Use augmented reality (AR) to pin a scene to a table or desk for easy exploration.
Use case
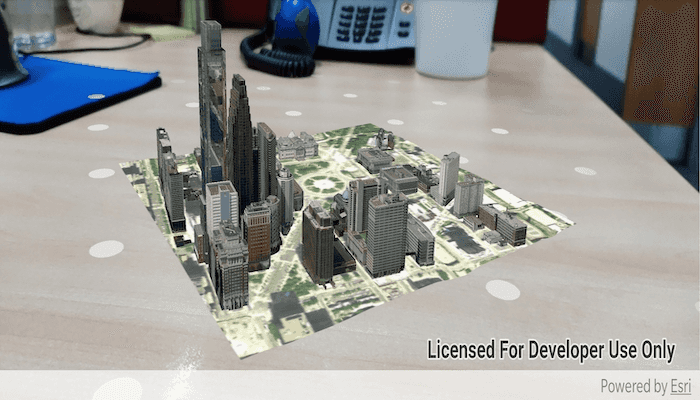
Tabletop scenes allow you to use your device to interact with scenes as if they are 3D-printed model models sitting on your desk. You could use this to virtually explore a proposed development without needing to create a physical model.
How to use the sample
You'll see a feed from the camera when you open the sample. Tap on any flat, horizontal surface (like a desk or table) to place the scene. With the scene placed, you can move the camera around the scene to explore. You can also pan the scene with a drag action.
NOTE: Google Play Services for AR must be installed to run this app.
How it works
- Create an
ArcGISARView. - Listen for a tap from the user, then use
mArView.setInitialTransformationMatrix(screenPoint)to set the initial transformation, which allows you to place the scene. This method uses ARCore's built-in plane detection. - Create and display the scene. To allow you to look at the content from below, set the base surface navigation constraint to
NONE. - To create a realistic tabletop scene experience, set the scene's base surface opacity to 0. This will ensure that only the target scene content is visible.
- For tabletop scenes, the
arView'soriginCameramust be set such that the altitude of the camera matches the altitude of the lowest point in the scene. Otherwise, scene content will float above or below the targeted anchor position identified by the user. For this sample, the origin camera's latitude and longitude are set to the center of the scene for best results. This will give the impression that the scene is centered on the location the user tapped. - Set the
translationFactoron the scene view such that the user can view the entire scene by moving the device around it. The translation factor defines how far the virtual camera moves when the physical camera moves.- A good formula for determining translation factor to use in a tabletop map experience is translationFactor = sceneWidth * tableTopWidth. The scene width is the width/length of the scene content you wish to display in meters. The tabletop width is the length of the area on the physical surface that you want the scene content to fill. To determine the scene's width, the sample examines all operational layers and uses the geometry engine to combine their extents and compute the overall width.
Relevant API
- ArcGISARView
- Surface.setOpacity(...)
Offline Data
- Download the data from ArcGIS Online.
- Open your command prompt and navigate to the folder where you extracted the contents of the data from step 1.
- Execute the following command:
adb push philadelphia.mspk /Android/data/com.esri.arcgisruntime.sample.displaysceneintabletopar/files/philadelphia.mspk
| Link | Local Location |
|---|---|
| Philadelphia Mobile Scene Package | /Android/data/com.esri.arcgisruntime.sample.displaysceneintabletopar/files/philadelphia.mspk |
About the data
This sample uses the Philadelphia Mobile Scene Package. It was chosen because it is a compact scene ideal for tabletop use. Note that tabletop mapping experiences work best with small, focused scenes. The small, focused area with basemap tiles defines a clear boundary for the scene.
Additional information
This sample requires a device that is compatible with ARCore 1.8 on Android.
Tabletop AR is one of three main patterns for working with geographic information in augmented reality. Augmented reality is made possible with the ArcGIS Runtime Toolkit. See Augmented reality in the guide for more information about augmented reality and adding it to your app.
Tags
augmented reality, drop, mixed reality, model, pin, place, table-top, tabletop
Sample Code
/*
* Copyright 2019 Esri
*
* Licensed under the Apache License, Version 2.0 (the "License");
* you may not use this file except in compliance with the License.
* You may obtain a copy of the License at
*
* http://www.apache.org/licenses/LICENSE-2.0
*
* Unless required by applicable law or agreed to in writing, software
* distributed under the License is distributed on an "AS IS" BASIS,
* WITHOUT WARRANTIES OR CONDITIONS OF ANY KIND, either express or implied.
* See the License for the specific language governing permissions and
* limitations under the License.
*/
package com.esri.arcgisruntime.sample.displaysceneintabletopar;
import java.util.List;
import android.os.Bundle;
import android.util.Log;
import android.view.MotionEvent;
import android.view.ScaleGestureDetector;
import android.widget.Toast;
import androidx.appcompat.app.AppCompatActivity;
import com.esri.arcgisruntime.concurrent.ListenableFuture;
import com.esri.arcgisruntime.geometry.Envelope;
import com.esri.arcgisruntime.geometry.GeodeticCurveType;
import com.esri.arcgisruntime.geometry.GeometryEngine;
import com.esri.arcgisruntime.geometry.LinearUnit;
import com.esri.arcgisruntime.geometry.LinearUnitId;
import com.esri.arcgisruntime.geometry.Point;
import com.esri.arcgisruntime.loadable.LoadStatus;
import com.esri.arcgisruntime.mapping.ArcGISScene;
import com.esri.arcgisruntime.mapping.MobileScenePackage;
import com.esri.arcgisruntime.mapping.NavigationConstraint;
import com.esri.arcgisruntime.mapping.view.Camera;
import com.esri.arcgisruntime.mapping.view.DefaultSceneViewOnTouchListener;
import com.esri.arcgisruntime.toolkit.ar.ArcGISArView;
import com.google.ar.core.HitResult;
import com.google.ar.core.Plane;
public class MainActivity extends AppCompatActivity {
private static final String TAG = MainActivity.class.getSimpleName();
private boolean mHasConfiguredScene = false;
private ArcGISArView mArView;
// objects that implement Loadable must be class fields to prevent being garbage collected before loading
private MobileScenePackage mMobileScenePackage;
@Override
protected void onCreate(Bundle savedInstanceState) {
super.onCreate(savedInstanceState);
setContentView(R.layout.activity_main);
setupArView();
}
/**
* Setup the Ar View to use ArCore and tracking. Also add a touch listener to the scene view which checks for single
* taps on a plane, as identified by ArCore. On tap, set the initial transformation matrix and load the scene.
*/
private void setupArView() {
mArView = findViewById(R.id.arView);
mArView.registerLifecycle(getLifecycle());
// show simple instructions to the user. Refer to the README for more details
Toast.makeText(this, R.string.camera_instruction_message, Toast.LENGTH_LONG).show();
mArView.getSceneView().setOnTouchListener(new DefaultSceneViewOnTouchListener(mArView.getSceneView()) {
@Override
public boolean onSingleTapConfirmed(MotionEvent motionEvent) {
// get the hit results for the tap
List<HitResult> hitResults = mArView.getArSceneView().getArFrame().hitTest(motionEvent);
// check if the tapped point is recognized as a plane by ArCore
if (!hitResults.isEmpty() && hitResults.get(0).getTrackable() instanceof Plane) {
// get a reference to the tapped plane
Plane plane = (Plane) hitResults.get(0).getTrackable();
Toast.makeText(MainActivity.this, "Plane detected with a width of: " + plane.getExtentX(), Toast.LENGTH_SHORT)
.show();
// get the tapped point as a graphics point
android.graphics.Point screenPoint = new android.graphics.Point(Math.round(motionEvent.getX()),
Math.round(motionEvent.getY()));
// if initial transformation set correctly
if (mArView.setInitialTransformationMatrix(screenPoint)) {
// the scene hasn't been configured
if (!mHasConfiguredScene) {
loadSceneFromPackage(plane);
} else if (mArView.getSceneView().getScene() != null) {
// use information from the scene to determine the origin camera and translation factor
updateTranslationFactorAndOriginCamera(mArView.getSceneView().getScene(), plane);
}
}
} else {
Toast.makeText(MainActivity.this, getString(R.string.not_plane_error), Toast.LENGTH_SHORT).show();
Log.e(TAG, getString(R.string.not_plane_error));
}
return super.onSingleTapConfirmed(motionEvent);
}
// disable pinch zooming
@Override public boolean onScale(ScaleGestureDetector scaleGestureDetector) {
return true;
}
});
}
/**
* Load the mobile scene package and get the first (and only) scene inside it. Set it to the ArView's SceneView and
* set the base surface to opaque and remove any navigation constraint, thus allowing the user to look at a scene
* from below. Then call updateTranslationFactorAndOriginCamera with the plane detected by ArCore.
*
* @param plane detected by ArCore based on a tap from the user. The loaded scene will be pinned on this plane.
*/
private void loadSceneFromPackage(Plane plane) {
// create a mobile scene package from a path a local .mspk
mMobileScenePackage = new MobileScenePackage(
getExternalFilesDir(null) + getString(R.string.philadelphia_mobile_scene_package_path));
// load the mobile scene package
mMobileScenePackage.loadAsync();
mMobileScenePackage.addDoneLoadingListener(() -> {
// if it loaded successfully and the mobile scene package contains a scene
if (mMobileScenePackage.getLoadStatus() == LoadStatus.LOADED && !mMobileScenePackage.getScenes()
.isEmpty()) {
// get a reference to the first scene in the mobile scene package, which is of a section of philadelphia
ArcGISScene philadelphiaScene = mMobileScenePackage.getScenes().get(0);
// set the clipping distance for the scene
mArView.setClippingDistance(400);
// add the scene to the AR view's scene view
mArView.getSceneView().setScene(philadelphiaScene);
// set the base surface to fully opaque
philadelphiaScene.getBaseSurface().setOpacity(0);
// let the camera move below ground
philadelphiaScene.getBaseSurface().setNavigationConstraint(NavigationConstraint.NONE);
mHasConfiguredScene = true;
// set translation factor and origin camera for scene placement in AR
updateTranslationFactorAndOriginCamera(philadelphiaScene, plane);
} else {
String error = "Failed to load mobile scene package: " + mMobileScenePackage.getLoadError()
.getMessage();
Toast.makeText(this, error, Toast.LENGTH_LONG).show();
Log.e(TAG, error);
}
});
}
/**
* Load the scene's first layer and calculate its geographical width. Use the scene's width and ArCore's assessment
* of the plane's width to set the AR view's translation transformation factor. Use the center of the scene, corrected
* for elevation, as the origin camera's look at point.
*
* @param scene to display
* @param plane detected by ArCore to which the scene should be pinned
*/
private void updateTranslationFactorAndOriginCamera(ArcGISScene scene, Plane plane) {
// load the scene's first layer
scene.getOperationalLayers().get(0).loadAsync();
scene.getOperationalLayers().get(0).addDoneLoadingListener(() -> {
// get the scene extent
Envelope layerExtent = scene.getOperationalLayers().get(0).getFullExtent();
// calculate the width of the layer content in meters
double width = GeometryEngine
.lengthGeodetic(layerExtent, new LinearUnit(LinearUnitId.METERS), GeodeticCurveType.GEODESIC);
// set the translation factor based on scene content width and desired physical size
mArView.setTranslationFactor(width / plane.getExtentX());
// find the center point of the scene content
Point centerPoint = layerExtent.getCenter();
// find the altitude of the surface at the center
ListenableFuture<Double> elevationFuture = mArView.getSceneView().getScene().getBaseSurface()
.getElevationAsync(centerPoint);
elevationFuture.addDoneListener(() -> {
try {
double elevation = elevationFuture.get();
// create a new origin camera looking at the bottom center of the scene
mArView.setOriginCamera(
new Camera(new Point(centerPoint.getX(), centerPoint.getY(), elevation), 0, 90, 0));
} catch (Exception e) {
Log.e(TAG, "Error getting elevation at point: " + e.getMessage());
}
});
});
}
@Override
protected void onPause() {
if (mArView != null) {
mArView.stopTracking();
}
super.onPause();
}
@Override
protected void onResume() {
super.onResume();
if (mArView != null) {
mArView.startTracking(ArcGISArView.ARLocationTrackingMode.IGNORE);
}
}
}