Learn how to create and display a scene with a basemap layer and an elevation layer. Set properties of the scene's camera to control the 3D perspective.
Like a map, a scene contains layers of geographic data. It contains a basemap layer and, optionally, one or more data layers. To provide a realistic view of the terrain, you can also add elevation layers to define the height of the surface across the scene. The 3D perspective of the scene is controlled by the scene's camera, which defines the position of the scene observer in 3D space.
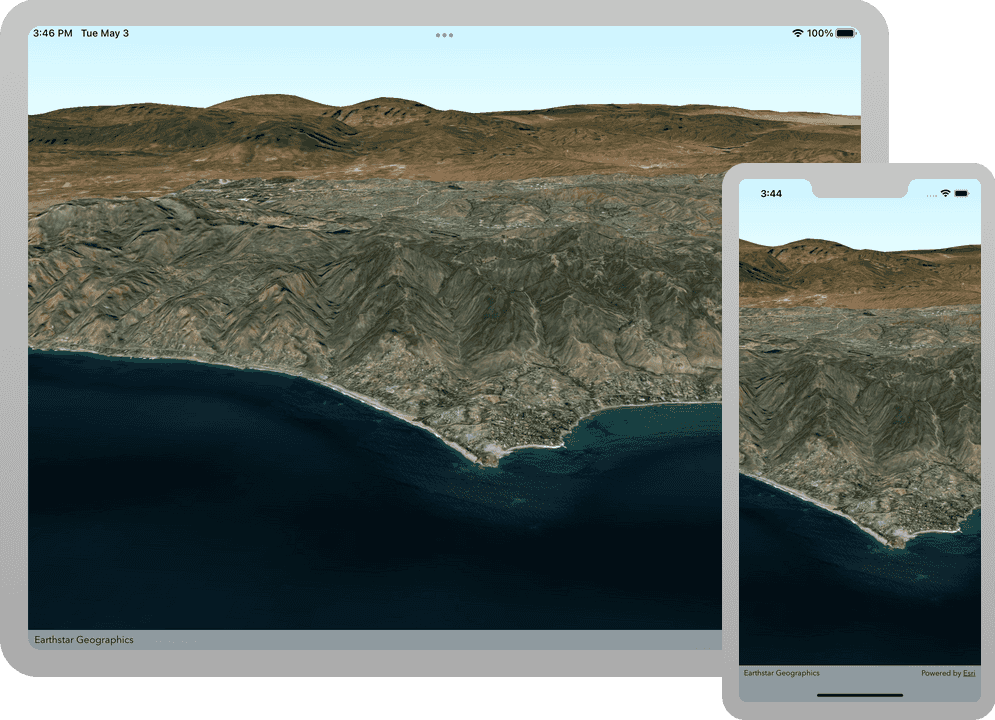
In this tutorial, you create and display a scene using the imagery basemap layer. The surface of the scene is defined with an elevation layer and the camera is positioned to display an area of the Santa Monica Mountains in the scene view.
The scene and code will be used as the starting point for other 3D tutorials.
Prerequisites
The following are required for this tutorial:
- An ArcGIS account to access your API keys. If you don't have an account, sign up for free.
- Your system meets the system requirements.
Steps
Create a new Xcode project
Use Xcode to create an iOS app and configure it to reference the API.
-
Open Xcode. In the menu bar, click File > New > Project.
- In the Choose a template for your new project window, select iOS then App.
- Click Next.
- In the Choose options for your new project window, set the following properties:
- Product Name:
<your app name> - Organization Identifier:
<your organization> - Interface: SwiftUI
- Language: Swift
- Product Name:
- Click Next.
- Choose a location to store your project. Click Create.
-
In the Project Navigator, click on the swift file named <your_app_name>App. In the Editor, right click on the struct name, <your_app_name>App. Select Refactor > Rename... and type
Main. Click the Rename button in the top right to confirm the new name of the file and struct. TheApp Mainfile and struct will be used by all following tutorials.App -
Add a reference to the API using Swift Package Manager.
Create a scene data model
Create a scene with a standard imagery basemap style. The scene will face the Santa Monica Mountains in California.
-
In Xcode, in the Project Navigator, click ContentView.swift.
-
In the editor, add an
importstatement to reference the API. -
Add a
@Stateproperty wrapper named scene of typeScenewith a default value. Create ascenewith anarcbasemap style and return it.GISImagery Standard ContentView.swiftUse dark colors for code blocks Add line. Add line. Add line. Add line. Add line. import SwiftUI import ArcGIS struct ContentView: View { @State private var scene: ArcGIS.Scene = { let scene = Scene(basemapStyle: .arcGISImageryStandard) return scene }() var body: some View { SceneView(scene: scene) } }Note that
Sceneis prefixed withArcGISin order to provide clarity from theScene protocol. -
In the Project Navigator, click MainApp.swift.
-
In the editor, distinguish
ScenefromArcGIS.Scene. Modify the body by adding theSwiftprefix toU I Scene.MainApp.swiftUse dark colors for code blocks Change line var body: some SwiftUI.Scene { WindowGroup { ContentView() .ignoresSafeArea() } }
Configure the scene
Scenes contain many properties that can be adjusted. Define a Surface on which layers are draped and center the scene on the Santa Monica Mountains.
-
In the Project Navigator, click ContentView.swift.
-
In the editor, create an
ArcGISTiledand add it to a newElevation Source Surface.An elevation source can define a surface with 3D terrain in a scene. Without an elevation source, the default globe surface is used to display the scene.
ContentView.swiftUse dark colors for code blocks Add line. Add line. Add line. Add line. Add line. Add line. Add line. Add line. Add line. Add line. Add line. Add line. Add line. struct ContentView: View { @State private var scene: ArcGIS.Scene = { let scene = Scene(basemapStyle: .arcGISImageryStandard) // Create an elevation source to show relief in the scene. let worldElevationServiceURL = URL(string: "https://elevation3d.arcgis.com/arcgis/rest/services/WorldElevation3D/Terrain3D/ImageServer")! let elevationSource = ArcGISTiledElevationSource(url: worldElevationServiceURL) // Create a Surface with the elevation data. let surface = Surface() surface.addElevationSource(elevationSource) // Add an exaggeration factor to increase the 3D effect of the elevation. surface.elevationExaggeration = 2.5 // Apply the surface to the scene. scene.baseSurface = surface return scene }() -
Set the initial viewpoint of the
sceneusing aPointand aCamera.The position from which you view the scene is defined by a
Camera. The following properties of the camera are used to define an observation point in the scene:- 3D location: Latitude, longitude, and altitude
- Heading: Azimuth of the camera's direction
- Pitch: Up and down angle
- Roll: Side-to-side angle
ContentView.swiftUse dark colors for code blocks Add line. Add line. Add line. Add line. Add line. Add line. Add line. Add line. Add line. struct ContentView: View { @State private var scene: ArcGIS.Scene = { let scene = Scene(basemapStyle: .arcGISImageryStandard) // Create an elevation source to show relief in the scene. let worldElevationServiceURL = URL(string: "https://elevation3d.arcgis.com/arcgis/rest/services/WorldElevation3D/Terrain3D/ImageServer")! let elevationSource = ArcGISTiledElevationSource(url: worldElevationServiceURL) // Create a Surface with the elevation data. let surface = Surface() surface.addElevationSource(elevationSource) // Add an exaggeration factor to increase the 3D effect of the elevation. surface.elevationExaggeration = 2.5 // Apply the surface to the scene. scene.baseSurface = surface // Create a point that defines the observer's (camera) initial location in the scene. // The point defines a longitude, latitude, and altitude of the initial camera location. let point = Point(x: -118.804, y: 34.027, z: 5330.0, spatialReference: .wgs84) // Create a Camera uing the point, the direction the camera should face (heading), and its pitch and roll (rotation and tilt). let camera = Camera(location: point, heading: 355.0, pitch: 72.0, roll: 0) // Set an initial viewpoint for the scene using the camera and observation point. scene.initialViewpoint = Viewpoint(boundingGeometry: point, camera: camera) return scene }()
Add a scene view to the UI
A scene view is a UI component that displays a scene and handles user interactions, including navigating with touch gestures. Add a scene view to the project UI and display the scene that is defined by the Model class.
-
To the body, add a
Sceneinitialized withView scene. This will create aScenewith the newly created scene.View ContentView.swiftUse dark colors for code blocks Add line. var body: some View { SceneView(scene: scene) }
Set your API key
An API key is required to enable access to services, web maps, and web scenes hosted in ArcGIS Online.
If you haven't already, go to your developer dashboard to get your API key. For these tutorials, use your default API key. It is scoped to include all of the services demonstrated in the tutorials.
-
In the Project Navigator, click MainApp.swift.
-
In the Editor, add an
importstatement to reference the API.MainApp.swiftUse dark colors for code blocks Add line. import SwiftUI import ArcGIS -
Implement an initializer in the
Mainstruct. Set theApp apiproperty on theKey ArcGISEnvironmentwith your API Key.MainApp.swiftUse dark colors for code blocks Add line. Add line. Add line. import SwiftUI import ArcGIS @main struct MainApp: App { init() { ArcGISEnvironment.apiKey = APIKey("<#your-API-key#>") } } -
Press Command + R to run the app.
If you are using the Xcode simulator your system must meet these minimum requirements: macOS Monterey 12.5, Xcode 15, iOS 17. If you are using a physical device, then refer to the system requirements.
You should see a scene with the imagery basemap layer centered on the Santa Monica Mountains in California. Drag, pinch, and rotate on the scene view to explore the scene.
What's next?
Learn how to use additional API features, ArcGIS location services, and ArcGIS tools in these tutorials: