Learn how to calculate the area that can be reached in a given driving time from a location.
A service area, also known as an isochrone, is a polygon that represents the area that can be reached when driving or walking on a street network. The area that can be reached is restricted by either time or distance. To calculate service areas, you can use the routing service. You provide a start location (facilities), one or more time or distance values, and a spatial reference. Once processed, the service returns the service areas that can be reached.
In this tutorial, you create and display five, ten, and fifteen minute drive time service areas when the map is clicked. You use data-driven styling to give each polygon a different shade of blue.
Prerequisites
You need an ArcGIS Developer or ArcGIS Online account to access the developer dashboard and create an API key.
Steps
Create a new pen
- To get started, either complete the Display a map tutorial or .
Set the API key
To access location services, you need an API key or OAuth 2.0 access token. To learn how to create and scope your key, visit the Create an API key tutorial.
-
Go to your dashboard to get an API key. The API key must be scoped to access the services used in this tutorial.
-
In CodePen, update
apito use your key.Key Use dark colors for code blocks const map = L.map("map", { minZoom: 2 }) map.setView([34.02, -118.805], 13); const apiKey = "YOUR_API_KEY"; const basemapEnum = "arcgis/streets"; L.esri.Vector.vectorBasemapLayer(basemapEnum, { apiKey: apiKey }).addTo(map);
Add references to ArcGIS REST JS
-
Reference the
routingandrequestpackages from ArcGIS REST JS.Use dark colors for code blocks <!-- Load Leaflet from CDN --> <link rel="stylesheet" href="https://unpkg.com/leaflet@1.9.4/dist/leaflet.css" crossorigin="" /> <script src="https://unpkg.com/leaflet@1.9.4/dist/leaflet.js" crossorigin=""></script> <!-- Load Esri Leaflet from CDN --> <script src="https://unpkg.com/esri-leaflet@3.0.12/dist/esri-leaflet.js"></script> <script src="https://unpkg.com/esri-leaflet-vector@4.2.3/dist/esri-leaflet-vector.js"></script> <!-- Load ArcGIS REST JS from CDN --> <script src="https://unpkg.com/@esri/arcgis-rest-request@4.0.0/dist/bundled/request.umd.js"></script> <script src="https://unpkg.com/@esri/arcgis-rest-routing@4.0.0/dist/bundled/routing.umd.js"></script>
Update the map
A navigation basemap layer is typically used in geocoding and routing applications. Update the basemap layer to use arcgis/navigation.
-
Update the basemap and the map initialization to center on location
[100.5231,13.7367], Bangkok.Use dark colors for code blocks const apiKey = "YOUR_API_KEY"; const basemapEnum = "arcgis/streets"; const map = L.map("map", { minZoom: 2 }); map.setView([13.7367, 100.5231], 13); // Bangkok L.esri.Vector.vectorBasemapLayer(basemapEnum, { apiKey: apiKey }).addTo(map);
Add layer groups
In this app, you display a marker for the starting point location and polygons for the service areas. Add a Layer to display the point and polygons on the map.
-
Add a
Layerfor theGroup clickedand another for thePoint service.Areas Use dark colors for code blocks L.esri.Vector.vectorBasemapLayer(basemapEnum, { apiKey: apiKey }).addTo(map); const clickedPoints = L.layerGroup().addTo(map); const serviceAreas = L.layerGroup().addTo(map);
Add a click handler
When you click on the map, you will update the location of the clicked and return a new service area.
-
Add a
clickevent handler. Inside, remove the data from the previous click withclear.Layers Use dark colors for code blocks const clickedPoints = L.layerGroup().addTo(map); const serviceAreas = L.layerGroup().addTo(map); map.on("click", (e) => { clickedPoints.clearLayers(); serviceAreas.clearLayers(); }); -
Display a
Markerat the clicked location.Use dark colors for code blocks map.on("click", (e) => { clickedPoints.clearLayers(); serviceAreas.clearLayers(); L.marker(e.latlng).addTo(clickedPoints); });
Get the service area
With the longitude and latitude of the click event, you can call the service function from ArcGIS REST JS to get the service area.
-
Create a new
Apito access the route service.K e y Manager Use dark colors for code blocks const clickedPoints = L.layerGroup().addTo(map); const serviceAreas = L.layerGroup().addTo(map); const authentication = arcgisRest.ApiKeyManager.fromKey(apiKey); map.on("click", (e) => { clickedPoints.clearLayers(); serviceAreas.clearLayers(); L.marker(e.latlng).addTo(clickedPoints); }); -
Call the
serviceoperation. Set theArea facilitiesparameter with the clicked coordinates to calculate the service area.The
facilitiesparameter lets you pass in multiple locations around which the service area is calculated. In this case, you are only passing one.By default, the three drive times that are requested are 5, 10 and 15 minutes. You can change these by passing the
defaultparameter.Breaks Use dark colors for code blocks const authentication = arcgisRest.ApiKeyManager.fromKey(apiKey); map.on("click", (e) => { clickedPoints.clearLayers(); serviceAreas.clearLayers(); L.marker(e.latlng).addTo(clickedPoints); arcgisRest .serviceArea({ endpoint: "https://route-api.arcgis.com/arcgis/rest/services/World/ServiceAreas/NAServer/ServiceArea_World/solveServiceArea", authentication, facilities: [[e.latlng.lng, e.latlng.lat]] }) }); -
Add an error handler. Inside, show a message and write the error to the console.
Use dark colors for code blocks arcgisRest .serviceArea({ endpoint: "https://route-api.arcgis.com/arcgis/rest/services/World/ServiceAreas/NAServer/ServiceArea_World/solveServiceArea", authentication, facilities: [[e.latlng.lng, e.latlng.lat]] }) .catch((error) => { console.error(error); alert("There was a problem using the route service. See the console for details."); });
Display the service area on the map
The response to the request contains the geographic information of the service areas that you can access and display on the map.
-
Add a response handler. Inside, add a
Geolayer that adds the features to theJSON servicelayer.Areas Use dark colors for code blocks arcgisRest .serviceArea({ endpoint: "https://route-api.arcgis.com/arcgis/rest/services/World/ServiceAreas/NAServer/ServiceArea_World/solveServiceArea", authentication, facilities: [[e.latlng.lng, e.latlng.lat]] }) .then((response) => { L.geoJSON(response.saPolygons.geoJson, { } ).addTo(serviceAreas); }) .catch((error) => { console.error(error); alert("There was a problem using the route service. See the console for details."); }); -
Style the different polygons using the
Fromproperty to distinguish the 5, 10, and 15 minute drive time polygons.Break Use dark colors for code blocks .then((response) => { L.geoJSON(response.saPolygons.geoJson, { style: (feature) => { const style = { fillOpacity: 0.5, weight: 1 }; if (feature.properties.FromBreak === 0) { style.color = "hsl(210, 80%, 40%)"; } else if (feature.properties.FromBreak === 5) { style.color = "hsl(210, 80%, 60%)"; } else { style.color = "hsl(210, 80%, 80%)"; } return style; } } ).addTo(serviceAreas); })
Run the app
In CodePen, run your code to display the map.
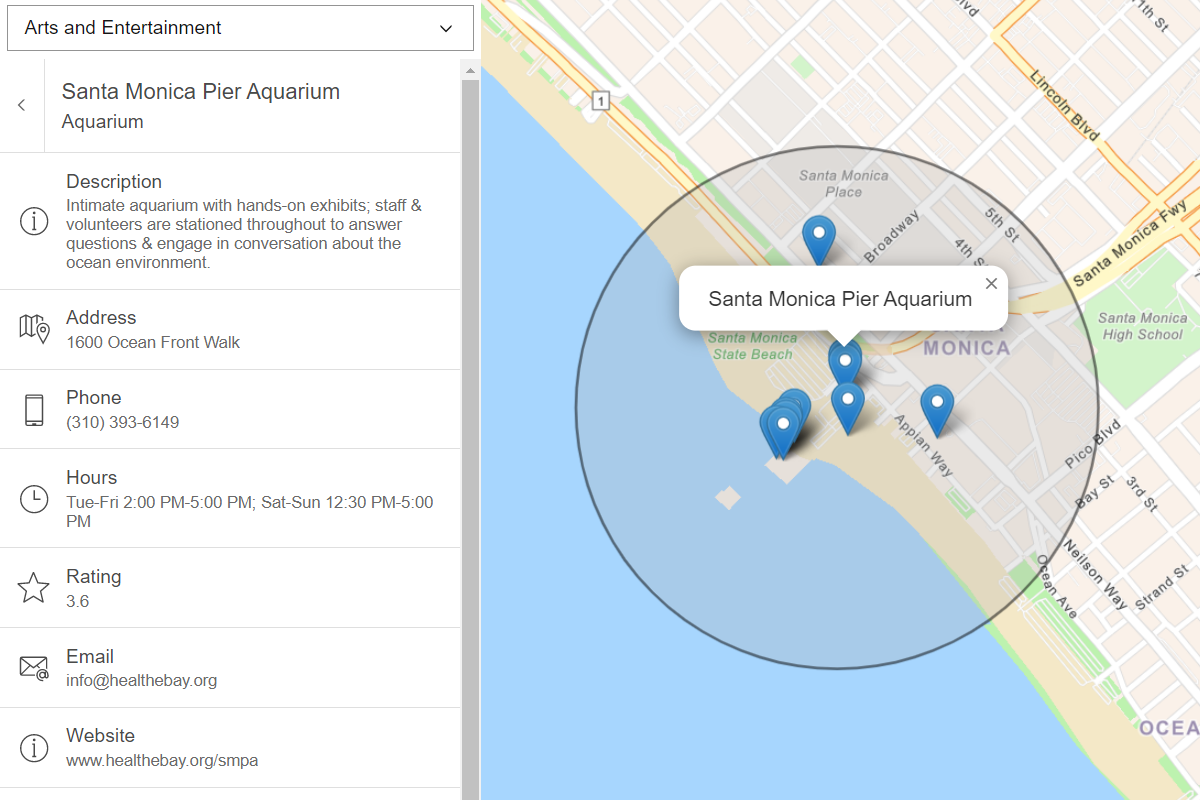
When you click on the map, three service areas are shown as concentric polygons around a marker. These indicate the areas that can be reached by driving for 5, 10 or 15 minutes.
What's next?
Learn how to use additional ArcGIS location services in these tutorials: