Learn how to authenticate a user to access a secure ArcGIS service with OAuth 2.0.
In this tutorial, you will build an app that uses named user login credentials to access a secure ArcGIS service using OAuth 2.0.
You can use different types of authentication to access ArcGIS location services. To implement OAuth 2.0, you can use your ArcGIS account to register an application and get a client ID, and then configure your app to redirect users to login with their credentials when the service or content is accessed. This is known as user authentication. If the app uses premium services that consume credits, the app user's account will be charged.
You will implement OAuth 2.0 so users can sign in to ArcGIS to access the ArcGIS World Traffic service.
Prerequisites
The following are required for this tutorial:
- Your system meets the system requirements.
- The ArcGIS Maps SDK for Qt, version 200.4.0 or later is installed.
- The Qt 6.5.1 software development framework is installed.
Steps
Download the ArcGIS Maps SDK for Qt Toolkit
The open-source ArcGIS Maps SDK for Qt Toolkit contains UI components and utilities to help simplify your Qt app development. For this OAuth tutorial app we will use the toolkit that provides the AuthenticationView class, which has a dialog that automatically displays the proper authentication view for any of the supported authentication types (OAuth, Token, HTTP Basic, HTTP Digest, SAML, PKI).
-
To configure the toolkit for use in this tutorial, you need to copy the ArcGIS Maps SDK for Qt Toolkit repository in GitHub onto your development machine.
-
You can do this by cloning the ArcGIS Maps SDK for Qt Toolkit repo (using the the URL: https://github.com/Esri/arcgis-maps-sdk-toolkit-qt.git) or downloading the .zip version of the repo and unzipping it to your preferred location on your development machine.
IMPORTANT: Make a particular note for the path to the toolkitcpp.pri file that is in the directory structure of the toolkit on your devlopement machine. You will need to reference the path to this file later in the tutorial (for example: C:/arcgis-maps-sdk-toolkit-qt/uitools/toolkitcpp.pri).
Configure OAuth 2.0 for your app
Use the ArcGIS Developer dashboard to create an application, generate a client ID, and define a redirect URL to access secure services.
- Sign in to your ArcGIS developer account. If you don't already have one, sign-up for free. You need to sign in so you can create an application and get a client ID for authentication.
- Click the OAuth 2.0 tab in the ribbon at the top.
- Click the New Application button in the upper-left of the page.
- In the Create New Application window, provide a Name and an optional Description for your application definition. Then click Create application. When the application is created,
Client ID,Client Secret, andTemporary Tokenvalues will also be generated. Take note of the Client ID; you will use this when implementing OAuth for your app. - Click the Add URI button at the bottom of the page to add a redirect URL.
- In the Add Allowed URI window, type
urn:and click Add URI.ietf: w g: oauth: 2.0:oob
The client ID uniquely identifies your app on the authenticating server. If the server cannot find an app with the provided client ID, it will not proceed with authentication.
The redirect URL is used to identify a response from the authenticating server when the system returns control back to your app after an OAuth 2.0 login. You can configure several redirect URLs in your application definition and can remove or edit them. It's important to make sure the redirect URL used in your app's code matches a redirect URL configured for the application.
A temporary token can be used to test access to secure resources without having to implement the full OAuth workflow.
The client secret is only needed in some OAuth workflows and will not be used in this tutorial.
IMPORTANT: Make a particular note for the Client ID string that is generated. You will need to use this string later in the tutorial (for example: XYZ123).
Open the project in Qt Creator
- To start this tutorial, complete the Display a map tutorial or download and unzip the solution.
- Open the display_a_map project in Qt Creator.
Configure the .pro file
Qt .pro files contains information required by qmake to build an application, a library, or a plugin.
-
To utilize
AuthenticationView, add the path to where thetoolkitcpp.prifile is located on your development system (for example:C:/arcgis-maps-sdk-toolkit-qt/uitools/toolkitcpp.pri). Also, Qt WebEngine Quick is a Qt module that can display an OAuth login webpage in your app. Add this module to your project. Then save and closedisplay_.a_ map.pro display_a_map.proUse dark colors for code blocks Add line. Add line. Add line. Add line. Add line. ARCGIS_RUNTIME_VERSION = 200.4.0 include($$PWD/arcgisruntime.pri) include(<path_to_toolkit_repo>/uitools/toolkitcpp.pri) # example: C:/arcgis-maps-sdk-toolkit-qt/uitools/toolkitcpp.pri qtHaveModule(webenginequick) { QT += webenginequick }
Implement OAuth login for this app
The OAuth login web page is implemented using the AuthenticationView class and the Qt WebEngine, which is part of the ArcGIS Toolkit.
-
In the project Sources folder, open main.cpp. Remove these
#includestatements. These Qt types are not needed for this tutorial.main.cppUse dark colors for code blocks Remove line Remove line Remove line #include "Display_a_map.h" #include "ArcGISRuntimeEnvironment.h" #include "MapQuickView.h" #include <QDir> #include <QGuiApplication> #include <QQmlApplicationEngine> -
Add
#includestatements forQ, andt W e b Engine Quick register.hfor the Toolkit.main.cppUse dark colors for code blocks Add line. Add line. #include "Display_a_map.h" #include "ArcGISRuntimeEnvironment.h" #include "MapQuickView.h" #include <QtWebEngineQuick> #include "Esri/ArcGISRuntime/Toolkit/register.h" -
Add code to initialize
Q.t W e b Engine Quick main.cppUse dark colors for code blocks Add line. using namespace Esri::ArcGISRuntime; int main(int argc, char *argv[]) { QGuiApplication app(argc, argv); QtWebEngineQuick::initialize(); -
Register the Toolkit. Then save and close main.cpp.
main.cppUse dark colors for code blocks Add line. Add line. // Register the Display_a_map (QQuickItem) for QML qmlRegisterType<Display_a_map>("Esri.Display_a_map", 1, 0, "Display_a_map"); // Initialize application view QQmlApplicationEngine engine; // Register the toolkit Esri::ArcGISRuntime::Toolkit::registerComponents(engine); -
Navigate to Resources > qml\qml.qrc > qml and open Display_a_mapForm.qml. Import the Toolkit. Be sure set the version to your installed ArcGIS Maps SDK for Qt version.
Display_a_mapForm.qmlUse dark colors for code blocks Add line. import QtQuick import QtQuick.Controls import Esri.Display_a_map import Esri.ArcGISRuntime.Toolkit -
Now that the toolkit is available, declare an
AuthenticationViewcomponent. Then save and close Display_a_mapForm.qml.AuthenticationViewis a Toolkit component that simplifies the authentication workflow by usingAuthenticationManagerto automatically display the correct login user interface for each security method (Token, OAuth, PKI, etc.). For more information, seeAuthenticationView.Display_a_mapForm.qmlUse dark colors for code blocks Add line. Add line. Add line. Add line. Add line. // Declare the C++ instance which creates the map etc. and supply the view Display_a_map { id: model mapView: view } // Declare an AuthenticationView to support login. AuthenticationView { id: authView anchors.fill: parent }
Add required class header files
Several additional classes are required to support the functionality your app needs. Specifically, for managing OAuth authentication, creating a credential, creating an image layer, and accessing the secured traffic layer portal item.
-
In the project Sources folder, open Display_a_map.cpp. Add
#includestatements for the required header files as shown.Display_a_map.cppUse dark colors for code blocks Add line. Add line. Add line. Add line. Add line. Add line. Add line. Add line. #include "Display_a_map.h" #include "Map.h" #include "MapTypes.h" #include "MapQuickView.h" #include "Point.h" #include "Viewpoint.h" #include "SpatialReference.h" #include <QFuture> // Tutorial add six includes #include "Credential.h" #include "OAuthClientInfo.h" #include "Portal.h" #include "PortalItem.h" #include "ArcGISMapImageLayer.h" #include "CoreTypes.h" #include "LayerListModel.h"
Create a credential and portal to access secured services
You can use an instance of the Portal class to access services hosted on ArcGIS Online or an ArcGIS Enterprise portal. In the constructor, you can either provide the portal URL or leave it out to use ArcGIS Online by default. You can also provide a Credential in the constructor to use when accessing secured resources.
-
In the
setupfunction, add the following code to createViewpoint Credential. Paste your Client ID (created earlier with the OAuth2 applications dashboard) to replace the "CLIENT_ID" placeholder. Also be sure thatOAuthModeis set toUser.Display_a_map.cppUse dark colors for code blocks Add line. Add line. void Display_a_map::setupViewpoint() { const Point center(-118.80543, 34.02700, SpatialReference::wgs84()); const Viewpoint viewpoint(center, 100000.0); m_mapView->setViewpointAsync(viewpoint); // Create a credential for this app and set the authentication mode. Credential* credential = new Credential(OAuthClientInfo("CLIENT_ID", OAuthMode::User), this); // Change the CLIENT_ID to your string, example "XYZ123" -
Create a
Portalthat will usecredentialto gain access to a secured ArcGIS service, the traffic layer resource.Display_a_map.cppUse dark colors for code blocks Add line. const Point center(-118.80543, 34.02700, SpatialReference::wgs84()); const Viewpoint viewpoint(center, 100000.0); m_mapView->setViewpointAsync(viewpoint); // Create a credential for this app and set the authentication mode. Credential* credential = new Credential(OAuthClientInfo("CLIENT_ID", OAuthMode::User), this); // Change the CLIENT_ID to your string, example "XYZ123" Portal* portal = new Portal(credential, this);
Add the secured traffic layer
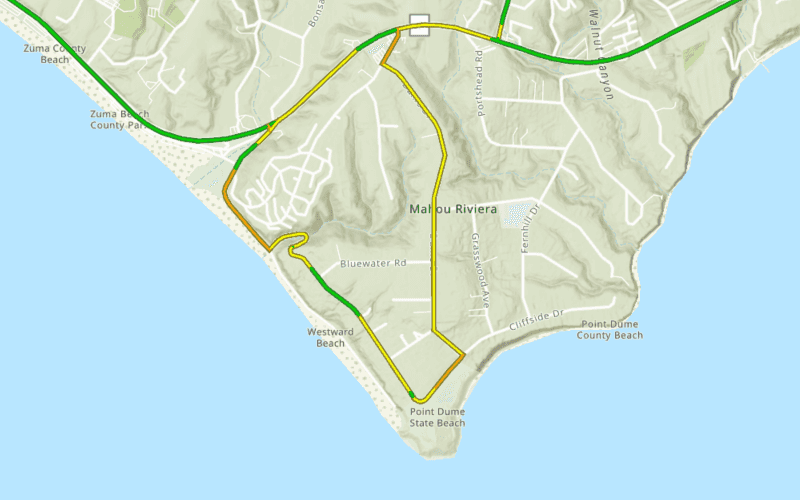
The ArcGIS World Traffic service, is a dynamic map service that presents historical and near real-time traffic information for different regions of the world. This service requires an ArcGIS Online organizational subscription. You will add a portal item referencing this service, and create a traffic layer from that.
ArcGIS World Traffic service data is updated every five minutes to provide traffic speed and traffic incident visualization and identification. Traffic speeds are displayed as a percentage of free-flow speeds, which is frequently the speed limit or how fast cars tend to travel when unencumbered by other vehicles. The streets are color coded as follows:
- Green (fast): 85 - 100% of free flow speeds
- Yellow (moderate): 65 - 85%
- Orange (slow); 45 - 65%
- Red (stop and go): 0 - 45%
-
Create a
PortalItemusing the traffic service's item ID. Then create anArcGISMapImageLayerto display the traffic service. Finally, append the traffic layer to the map's collection of data layers (operational layers).Display_a_map.cppUse dark colors for code blocks Add line. Add line. Add line. Add line. Add line. Add line. // Create a credential for this app and set the authentication mode. Credential* credential = new Credential(OAuthClientInfo("CLIENT_ID", OAuthMode::User), this); // Change the CLIENT_ID to your string, example "XYZ123" Portal* portal = new Portal(credential, this); // Create a layer to display the ArcGIS World Traffic service. // traffic layer https://www.arcgis.com/home/item.html?id=ff11eb5b930b4fabba15c47feb130de4 PortalItem* item = new PortalItem(portal, "ff11eb5b930b4fabba15c47feb130de4", this); ArcGISMapImageLayer* imageLayer = new ArcGISMapImageLayer(item, this); // Append the traffic layer to the map's data layer collection. m_map->operationalLayers()->append(imageLayer); -
Press Ctrl + R to run the app.
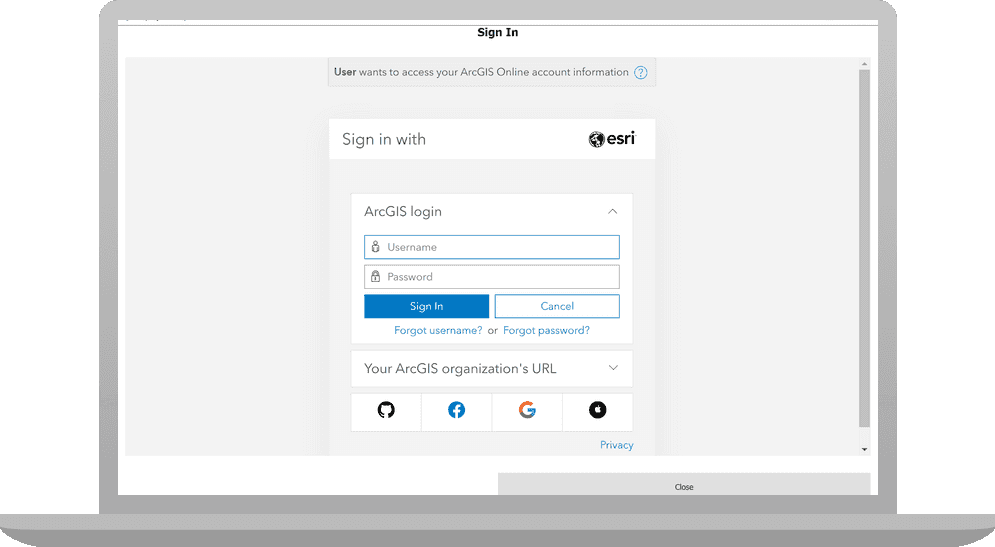
You should briefly see a map with the topographic basemap layer centered on the Santa Monica Mountains in California. The AuthenticationView will then prompt you with an OAuth login page to enter your ArcGIS Online username and password. After authenticating successfully with ArcGIS Online, the map will appear with the traffic layer also displayed.
Other tutorials
Some of the following also include instructions for QML.