Work with maps and geospatial data in Python using The ArcGIS API for Python.
Use simple and efficient tools powered by Web GIS, for sophisticated vector and raster analysis, geocoding, map making, routing and directions. Administer, organize and manage users, groups and information items in your GIS.
This library enables access to ready-to-use maps and curated geographic data from Esri and other authoritative sources, and works with your own data as well. It integrates well with the scientific Python ecosystem and includes rich support for Pandas and Jupyter notebook.
See below for options to install arcgis and its dependencies:
There are multiple ways in which you can experience the ArcGIS API for Python. The ArcGIS API for Python is distributed as a conda package named arcgis. Conda is a popular Python package and environment manager application that helps you install and update packages such as the ArcGIS API for Python and their dependencies.
Installation for ArcGIS Pro 3.0 and later
Python has a rich collection of packages that can be used in ArcGIS Pro. To simplify the use of Python packages, ArcGIS Pro includes a package management system called conda. Conda takes the guesswork and hassle out of installing and updating packages and their dependencies.
To further extend the versatility and utility of Python packages, multiple installations of Python can coexist on a single workstation, independent of one another. Each of these installations is referred to as a Python environment. Each Python environment can have its own set of packages, allowing you to switch between sets of Python functionality without uninstalling and reinstalling packages each time.
By default, ArcGIS Pro has a single conda environment, arcgispro-py3, which includes all Python libraries used by ArcGIS Pro as well as several others, such as scipy and pandas.
Note: The most recent ArcGIS Pro 3.1 ships with the ArcGIS API for Python 2.1.0 installed.
Installation using Python Package Manager
Starting from version 2.5, ArcGIS Pro releases ship with conda and the arcgis package pre-installed. The functionality of conda is integrated into ArcGIS Pro through the Python Package Manager. The Python Package Manager removes many of the hurdles faced when writing Python code. It supports installing open-source and third-party libraries that are associated with an individual project, rather than the base Python installation. This simplifies the process of successfully sharing complex Python tools across multiple computers.
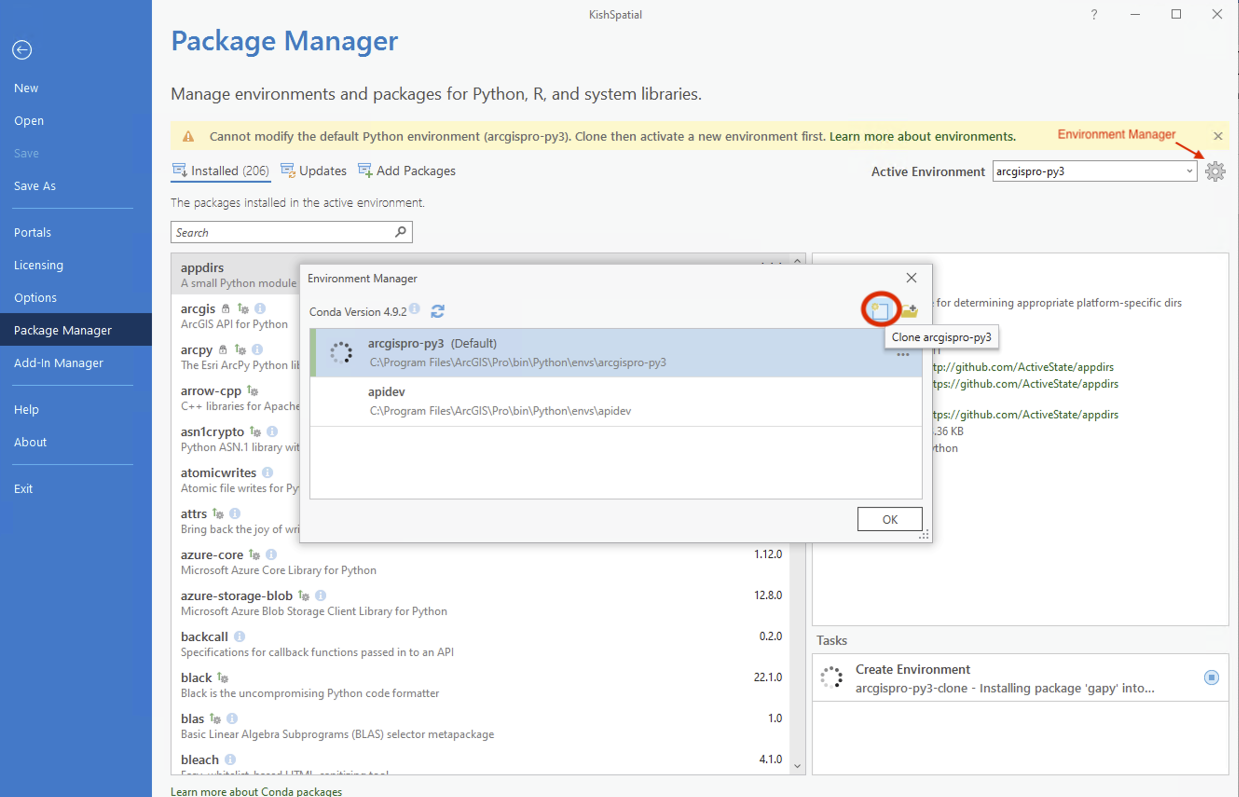
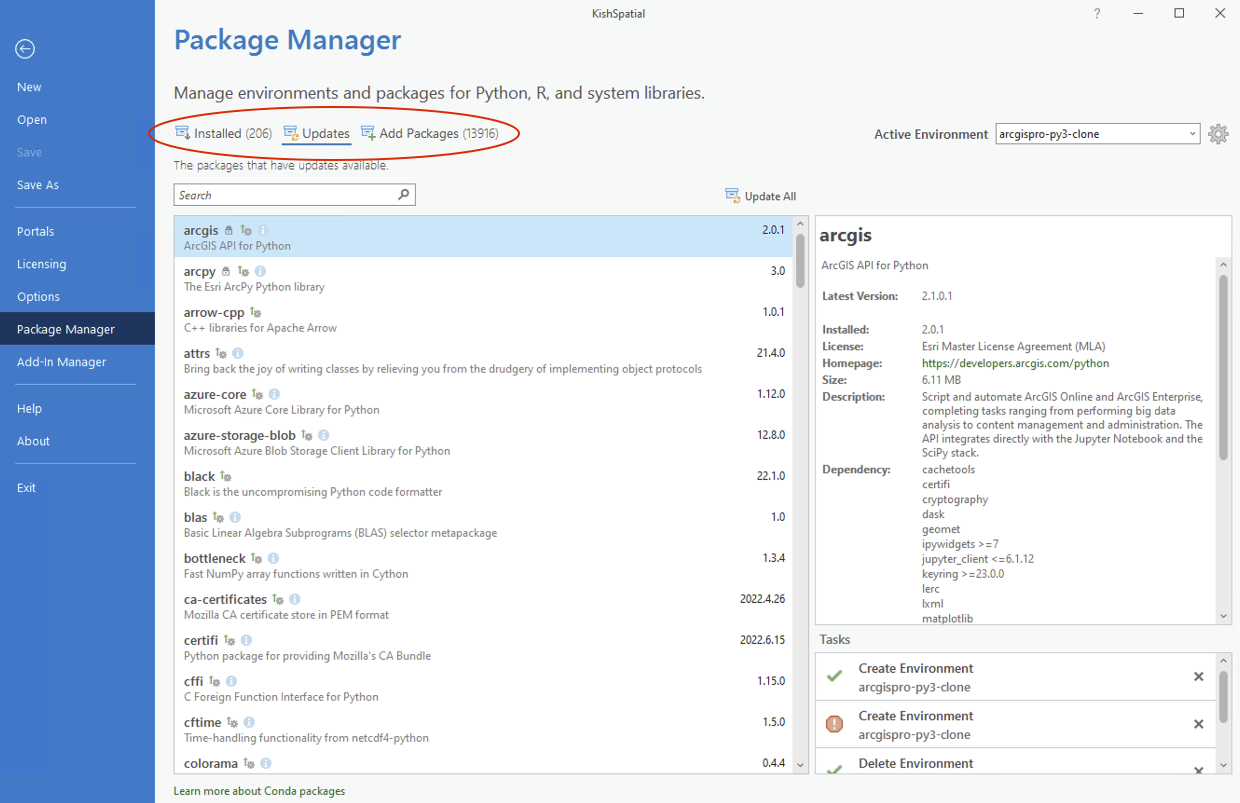
ArcGIS Pro 2.5 and later provide the Python Package Manager GUI to download and install any conda package. Access it through the ArcGIS Pro backstage area:
- Open ArcGIS Pro with a new blank Project
- Select the Project tab to access the Pro backstage (see screen shot below)
- Select the Package Manager menu option
- You will see a list of packages installed in the default arcgispro-py3 environment. In order to add more packages, you can do the following:
- click on the Environment Manager button, then click Clone arcgispro-py3
-
Modify the path and name if you choose, and click
OK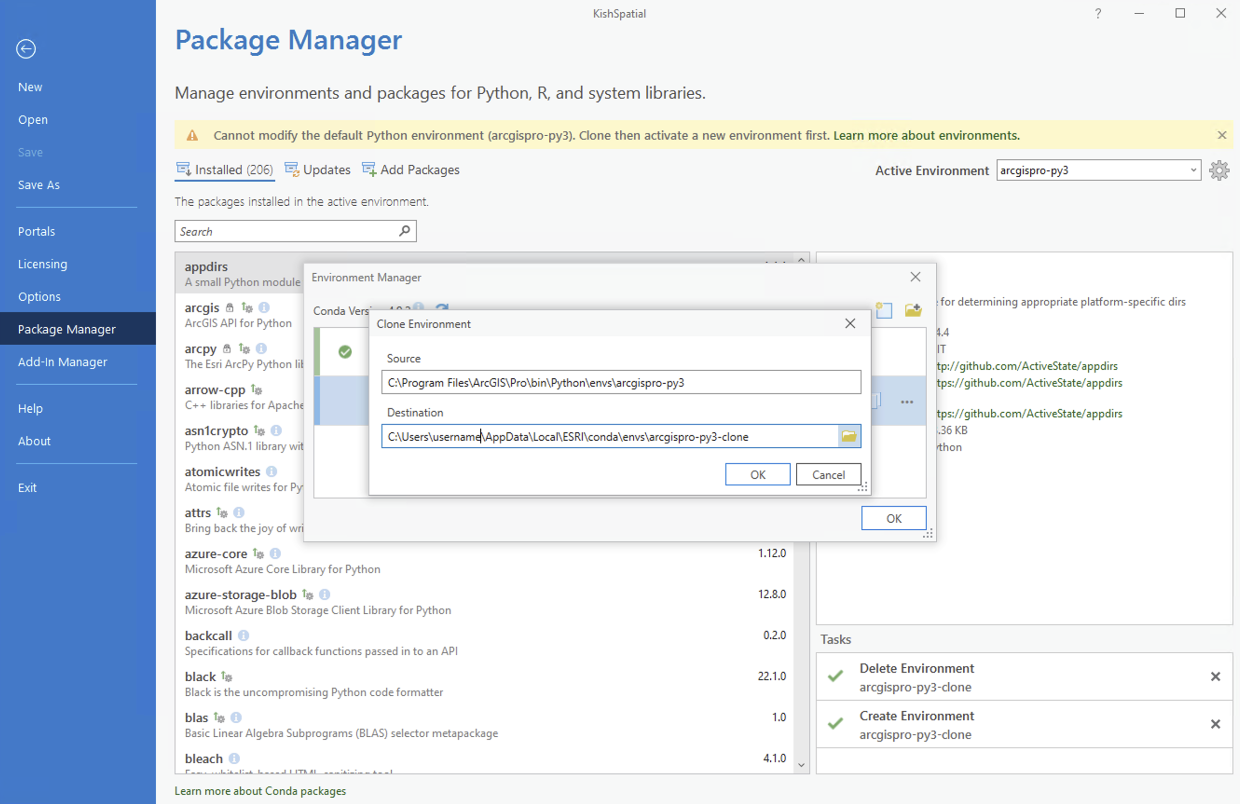
-
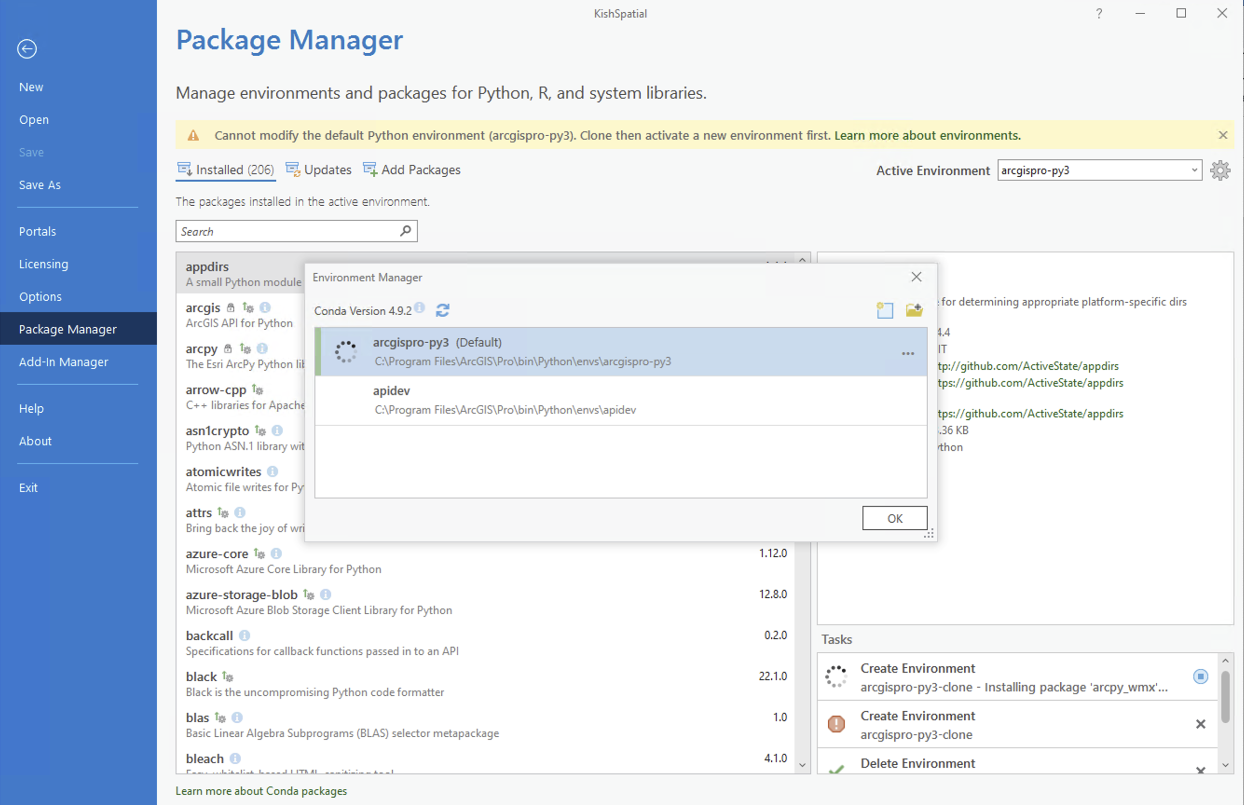
Allow environment creation to complete. Proceeding before this completes could result in an incomplete environment that may not perform properly.
-
Select the new enviroment, right-click and select
Activate, and clickOKwhen complete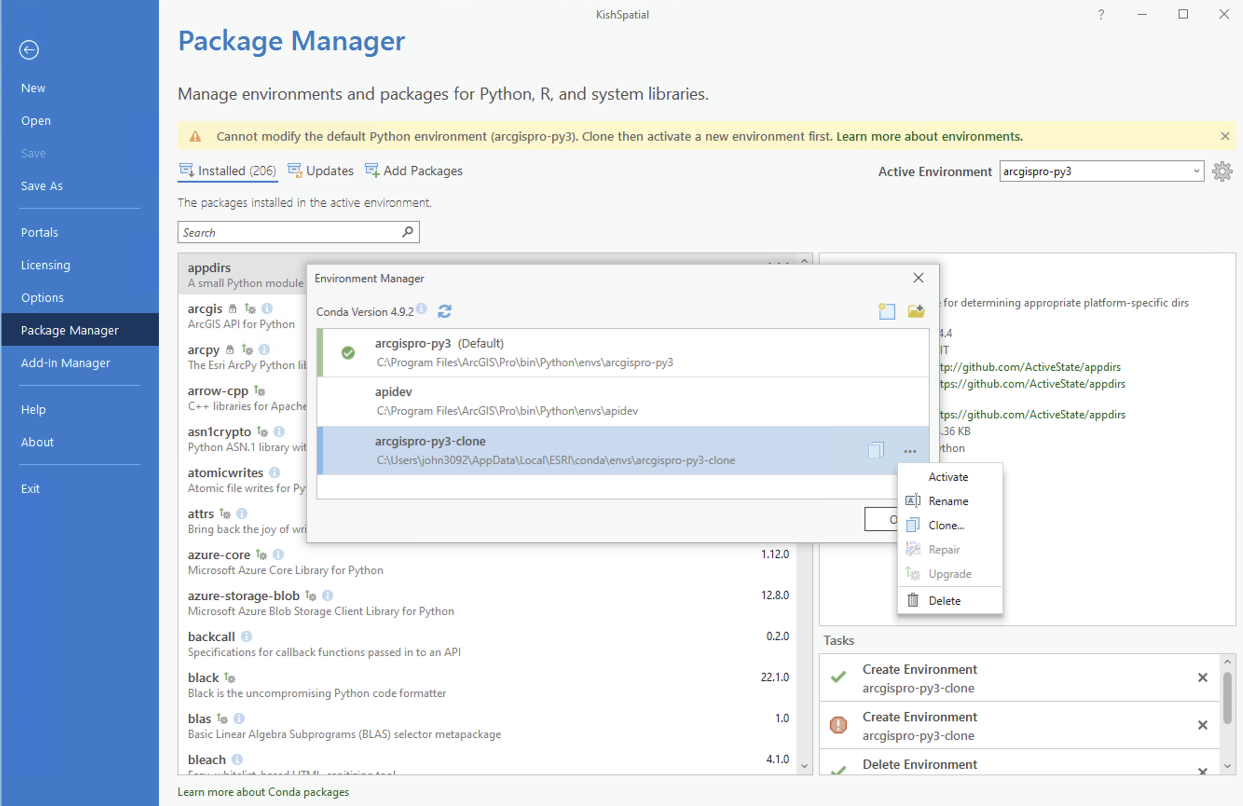
- The environment is now the active environment.
You can now review the Installed packages, as wells as use the Updates and Add Packages options to modify this cloned environment to meet your needs.
Installation using Python Command Prompt
ArcGIS Pro provides the Python Command Prompt to download and install any conda package.
- Navigate to Start Menu > All Programs > ArcGIS > Python Command Prompt
Note: By default, the Python Command Prompt opens in the ArcGIS Pro default
arcgispro-py3environment directory, usuallyC:\Program Files\ArcGIS\Pro\bin\Python\envs\arcgispro-py3\, with this default conda environment active. You cannot modify the packages in this environment. In order to add more packages, you need to create a clone of the default arcgispro-py3 environment. Follow the steps in the create environment technical article to clone an environment. You can then change the default environment that future ArcGIS Pro and Python Command Prompt sessions use to this cloned environment using the command:proswap <new enviroment name>. See Access conda from a command prompt for additional information.
-
Enter the following at the prompt. Entering no release number installs the current release of the ArcGIS API for Python:
conda install -c esri arcgis=<release_number>

Upgrade package
Note: The default arcgispro-py3 environment cannot be modified. Clone the default environment in order to create environments where packages can be updated.
-
The Python Package Manager cannot be used to update the
arcgispackage. Use the Python Command Prompt as described below:- Navigate to Start > ArcGIS > Python Command Prompt
- Activate the environment containing the arcgis package to upgrade. Enter the following at the prompt for an environment named arcggispro-py3-clone:
activate arcgispro-py3-clone
- Upgrade the arcgis package to the current release by installing from the esri channel with no release number. Enter the following at the prompt:
conda install -c esri arcgis

Note: Install a specific release of
arcgisusing a release number:conda install -c esri arcgis=<release_number>
Installation using Anaconda for Python Distribution
conda
Open a terminal application, navigate to the directory you want to work in, and activate the conda environment you want to use with the ArcGIS API for Python. Install the API with the following command:
conda install -c esri arcgis
Note: You can also use the
-n <environment_name>flag to install the package into an environment of your choosing.
For more detials, read here.
Pipenv
Pipenv is the official packaging tool for managing environments and installing packages from the Python Package Index (PyPI). To install the ArcGIS API for Python from PyPI in a new environment, create a new folder named your-folder. Then, open a terminal, and run cd /path/to/your-folder to change directories into your-folder. Next, enter the following command to simultaneously create a new environment and install the API in it:
pipenv install arcgis
Install with minimum dependencies
Both conda install -c esri arcgis and pip install arcgis will install all of the dependencies outlined in the system requirements section. However, the API can function in a 'stripped down' state with only a few dependencies. This allows developers to deploy the API with minimal footprint in space constrained environments. For this to work, you need to manually manage the dependencies in your environment based on the applications you need to solve and if you don't want to use every feature of the API. As of v2.1.0 of the Python API, the minimum dependencies needed include:
ujsonsixrequests- This library has its own dependencies that must be included
requests-toolbeltrequests-kerberosrequests-oauthlibrequests-gssapirequests_ntlm2- This library has its own dependencies that must be included
To install the API with no dependencies, simply add the --no-deps flag to any install command:
conda install -c esri arcgis --no-depspip install arcgis --no-deps
The above set of dependencies should allow you to establish a connection with your web GIS and perform a number of administrative and other tasks which involve processing on your GIS rather than in your Python kernel. Depending on your OS, this set up with minimal dependencies should take up about 50 mb in space. As your needs expand, you can then manually choose which dependencies to add to your Python environment. For instance, you can install pandas if you require to work with spatially enabled DataFrames and jupyter, if you need the notebook IDE.
Install as a Docker image
Docker is a popular containerization technology. Docker containers bundle software in a complete file system with everything that is needed to run it. Docker containers run the same regardless of your operating system. To learn more about docker, refer to the official documentation.
The ArcGIS API for Python is shipped as a Docker image which you can download and power up whenever you want to use the API. These images when spun up into containers, run in an isolated environment without making any changes to your local file system.
Follow the steps below to get Docker on your computer and run the API:
-
Download docker and install it on your computer.
-
Once installed, run the following command in terminal to pull Docker image
docker pull ghcr.io/esri/arcgis-python-api-notebook -
Then spin the image into a container using the following command in terminal. Replace the
<localport>with an available port number, for instance8889.docker run -it -p <localport>:8888 ghcr.io/esri/arcgis-python-api-notebook
- When the container starts, it will provide a 127.0.0.1 URL (with a one time token) to open your local Notebook instance. Copy the URL and paste it in your browser's address bar to use the notebooks.
Install in Google Colaboratory
Google Colab is a Google-hosted Jupyter notebook service that allows a user to access their notebooks from anywhere by storing them in Google Drive. It requires no setup beyond creating a Google account, and provides free computing resources, including cloud-based GPUs. To learn more, refer to the FAQ or tutorial. Colab is a very convenient platform for ArcGIS administration and management, as it allows a user to run scripts from wherever they have access to a Google account.
Google Colab runs in a cloud virtual machine that uses Ubuntu, meaning that it can process bash commands in addition to Python logic. Any command with a ! in front of it will be treated as if it were entered on the command line. This means that the ArcGIS API for Python can be installed with pip.
Follow the steps below to install:
-
If you have not already done so, register an account with Google and open a new Colab notebook.
-
Add a cell and run
!pip install arcgis.- Note: if your account has already been working on a notebook (even a separate one), it may prompt you to restart your runtime in order for this to work. This well reset your environment variables without altering any of your code, allowing you to re-run these commands and install successfully.
-
You can confirm the installation by running
!pip list. The list should include arcgis along with all of the proper dependencies found in a normal arcgis install. -
Run
import arcgisto confirm that it works properly.
Currently, Google Colab is not readily compatible with the ArcGIS mapping widget, but may work with some functions that return iFrames, such as the WebExperience.preview() method. To enable these widgets (or any 3rd-party widget) in Colab, run from google.colab import output followed by output.enable_custom_widget_manager().
Note: At the time of writing this, this installation process works for the default version of Python that comes with Colab, 3.10.12. This means that only ArcGIS 2.2.0 and higher can be installed, as prior versions are not compatible with Python 3.10+. Downgrading the Python version in Colab is possible, but may interfere with other dependencies needed to run ArcGIS.
Install Offline
1. While in a connected environment, download the appropriate software you'll need:
-
the latest version of the full Anaconda for Python 3x for your OS
-
the appropriate version of the API for Python package for your OS from Esri's channel on anaconda.org
- The file names appear in this pattern:
platform/arcgis-x.x.x-pyZZyyyyyyy-y.tar.bz2. Find your file by substituting: - your operating system platform for
platform - the API release number for
x.x.x - your Python version for
ZZ. - The
yyyyyyy_yrefers to a hash number created for each conda package uploaded to the channel
For instance, if you are installing the Python API 1.6.2 on Windows 64-bit for Python 3.7, download the
win-64/arcgis-1.6.2-py37h42bb103_633.tar.bz2package. - The file names appear in this pattern:
2. Configure Anaconda for use in the disconnected enviroment:
-
Install Anaconda from your install location. Once installed, you can use the Anaconda Navigator GUI application or the Anaconda Prompt command line console to operate the software. The procedure below outlines using the Anaconda Prompt and the
condautility on Windows:First, open Anaconda Prompt. All subsequent commands are run inside this prompt:
Start > Anaconda3 (64-bit) > Anaconda Prompt-
Configure Anaconda for offline use. See
Conda Configurationfor full details:conda config --set offline True -
Create a new environment, including
pythonandsixpackages:conda create -n <my_env_name> python six -
Activate the environment:
conda activate <my_env_name> -
Install the API for Python package, having downloaded the
bz2file that matches the appropriate platform, Python version and API release you are using:conda install /path_to_package_download_folder/platform/arcgis-x.x.x-pyZZyyyyyyy-y.tar.bz2The
condautility will pull all thearcgispackage dependencies from the installed set of Anaconda libraries instead of searching the internet.
-
3. Verify the install:
-
At this point, all modules, classes and functions are available in the API for use in your Python scripts or Jupyter notebooks except the
Map Widget. You can verify your install by making a connection to your GIS and printing properties:gis = GIS("url_to_your_gis", "username", "password") print(f"Connected to {gis.properties.portalHostname} as {gis.users.me.username}") -
The
map widgetis only supported withinJupyterapplications. Follow these additional steps to use the map widget in a disconnected environment:-
install the
jupyterlabpackage for visualizing with maps in either Jupyter Notebook or Jupyter Lab:conda install jupyterlab -
enable the map widget by running these 2 commands in succession:
jupyter nbextension enable --py --sys-prefix widgetsnbextensionjupyter nbextension enable --py --sys-prefix arcgis
-
proceed to Test your install with the Jupyter Notebook to verify the proper installation of the
map widget.NOTE: You may need to configure the map widget to use the Javascript API shipped with the portal you're connecting to in the disconnected environment. If
gis.map()does not return a map, run the following code to configure the map widget with the Javascript API shipped with the portal:MapView.set_js_cdn("https://your-portal-host/jsapi4/")
-
NOTE: The Web GIS must have a
Geocoderconfigured as a Utility Service to display a map. Seeherefor details if your portal does not have one.
Install for older versions
You can click here to install arcgis for older versions.
Install deep learning dependencies
If you already have an environment with the arcgis package installed, you can further install its deep learning dependencies to take advantage of the arcgis.learn module. Some of the deep learning samples available here can be referenced to understand the workflow.
Note: To use the deep learning capabilities in ArcGIS Pro 2.9 / ArcGIS API for Python 1.9.0 onwards, the minimum required version of the Nvidia GPU driver is 456.38.
Using the Deep Learning Frameworks Installer
To work with the deep learning tools in ArcGIS Pro 2.6 and later, you need to install supported deep learning frameworks packages.
Deep Learning Libraries Installer for ArcGIS is now available at https://github.com/Esri/deep-learning-frameworks. This installer includes a broad collection of components, such as PyTorch, TensorFlow, Fast.ai and scikit-learn, for performing deep learning and machine learning tasks. Note that this will install the deep learning frameworks into your currently active Pro Python environment; if you wish to install in an environment aside from the default arcgispro-py3 environment, switch to that environment before running the MSI using either ArcGIS Pro's Python manager UI or on the command line with proswap. Any subsequent clones of that environment will also include this full collection of packages.
For instructions on how to install deep learning frameworks manually or over ArcGIS Image Server, click here.
Install using Python Command Prompt or Anaconda
For ArcGIS Pro users:
Deep learning frameworks can be used to install all the required dependencies in ArcGIS Pro's default python environment using an MSI installer.
Alternatively,
for a cloned environment of ArcGIS Pro's default environment, deep-learning-essentials metapackage can be used to install the required dependencies which can be done using the following command, in the Python Command Prompt (included with ArcGIS Pro):
conda install deep-learning-essentials
For Anaconda users (Windows & Linux platforms):
arcgis_learn metapackage can be used for both windows and linux installations of Anaconda in a new environment.
The following command will update Anaconda to the latest version.
conda update conda
After that, metapackage can be installed using the command below:
conda install -c esri arcgis_learn=2.1.0 python=3.9
Note: Python version 3.7 and 3.8 are also supported with this command.
Test your install with jupyter notebook
To verify your arcgis installation, run the following commands in jupyter notebook:
NOTE: See Jupyter Browser Compatibility for information on browser support for running the Jupyter Notebook.
from arcgis.gis import GIS
my_gis = GIS()
m = my_gis.map()
m
To verify deep learning environment, run the following commands:
import fastai
import torch
import arcgis
Run this command to check if cuda device is picked up for training a model on GPU.
torch.cuda.is_available()
torch.zeros((3, 224, 224)).cuda()
Note: If you face an error pointing to some issue with driver, you need to update driver.
This overview describes how to use ArcGIS API for Python to write Python code, incorporating capabilities such as mapping, query, analysis, geocoding, routing, portal administration, and more. Browse the sample notebooks to get started. You may choose to experience these sample notebooks in a live environment as they are available as ArcGIS Notebooks.
These are temporary environments which are erased after you close the browser tab. If you would like to save your changes, download your notebooks from the
Filemenu of the Jupyter notebook IDE.