Prerequisites
- Please refer to the prerequisites section in our guide for more information. This sample demonstrates how to export training data and model inference using ArcGIS Pro. Alternatively, they can be done using ArcGIS Image Server as well.
- If you have already exported training samples using ArcGIS Pro, you can jump straight to the training section. The saved model can also be imported into ArcGIS Pro directly.
Introduction
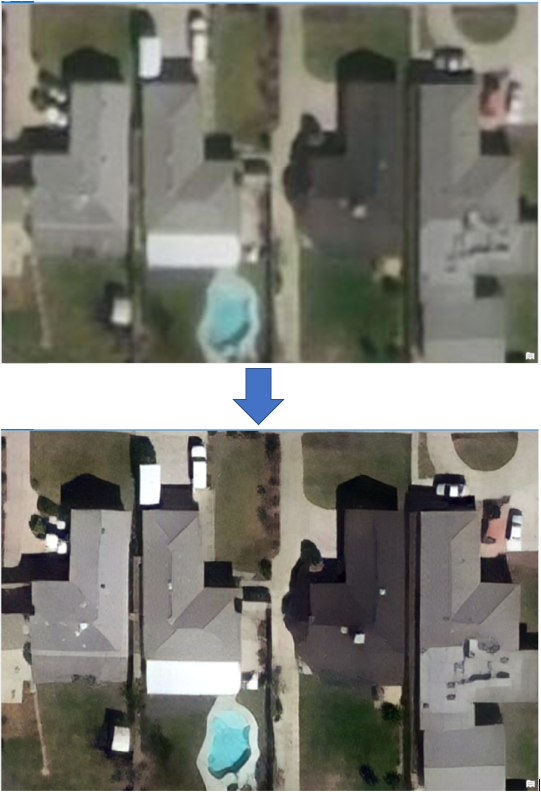
High resolution imagery is desirable for both visualization and image interpretation. However, high resolution imagery is expensive to procure. This sample notebook demonstrates how the SuperResolution model in arcgis.learn module can be used to increase image resolution. This model uses deep learning to add texture and detail to low resolution satellite imagery and turn it into higher resolution imagery.
We first start with high resolution aerial imagery to train the model. The data preparation step first downsamples the higher resolution imagery to create lower resolution, blurred imagery. The SuperResolution model uses this training data and learns how to upsample the lower resolution imagery and produce realistic high resolution images that closely resemble the higher quality images that we started with. We then use the trained SuperResolution model to produce simulated high resolution aerial imagery from relatively lower resolution satellite imagery.
Export Training Data
We will be using ArcGIS Pro to find the area where high resolution imagery. To simplify our job, we have already created polygon representing the extent of high resolution imagery. We can add the polygon from here.
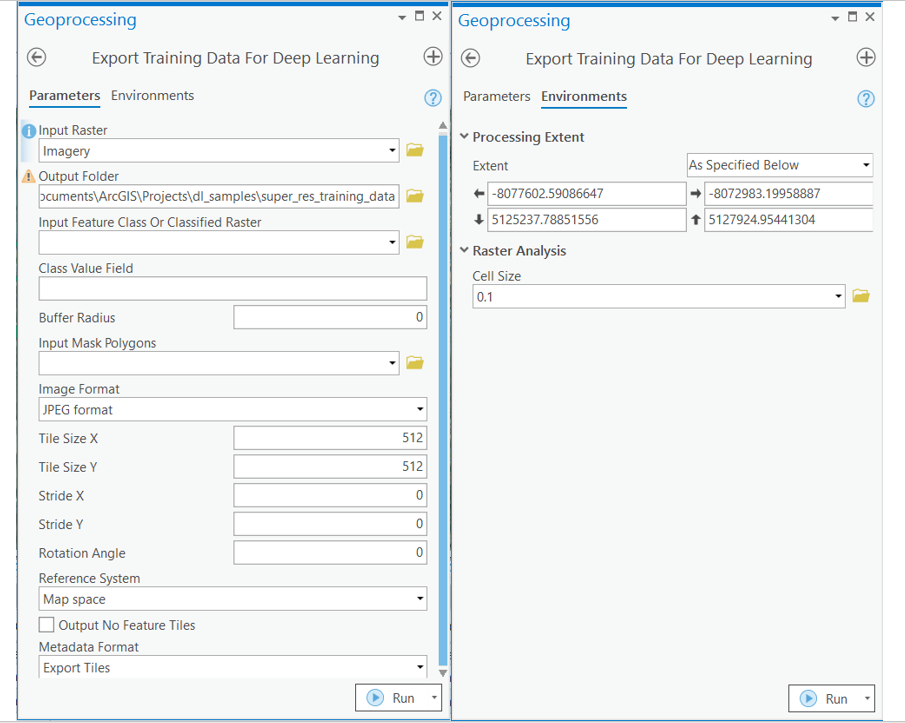
Training data can be exported by using the Export Training Data For Deep Learning tool available in ArcGIS Pro as well as ArcGIS Image Server.
- Input Raster: Imagery
- Image Format: JPEG Format
- Tile Size X & Tile Size Y: 512
- Meta Data Format: Export Tiles
- In 'Environments' tab set an optimum 'Cell Size' (0.1 in our case).
- Set the extent same as the polygon layer which we have added.
arcpy.ia.ExportTrainingDataForDeepLearning("Imagery", r"C:\sample\Data\Hi_res_superres_data", "JPEG", 512, 512, 0, 0, "Export Tiles", 0, "ecode", 75, None, 0)
After filling all details and running the Export Training Data For Deep Learning tool, a code like above will be generated and executed. That will create all the necessary files needed for the next step in the 'Output Folder', and we will now call it our training data.
Model Training
We will train our model using arcgis.learn module within ArcGIS API for Python. arcgis.learn contains tools and deep learning capabilities required for this study. A detailed documentation to install and setup the environment is available here.
Necessary Imports
import os
from pathlib import Path

from arcgis.gis import GIS
from arcgis.learn import SuperResolution, prepare_data
We will now use the prepare_data() function to apply various types of transformations and augmentations on the training data. These augmentations enable us to train a better model with limited data and also prevent the model from overfitting.
prepare_data(): Takes 4 parameters:
path: Path of folder containing training data.batch_size: No. of images your model will train on each step inside an epoch, it directly depends on the memory of your graphic card, size of the images you are training on and the type of model which you are working with. For this sample a batch size of 8 worked for us on a GPU with 8GB memory.dataset_type: To infer the supported dataset type, in our case 'superres'.downsample_factor: Factor to degrade the quality of image by resizing and adding compression artifacts in order to create labels.
Note:The quality of degraded image should be similar to the image on which we are going to do inferencing.
This function returns a data object which can be fed into a model for training.
gis = GIS('home')training_data = gis.content.get('abc0812aa82c4fe681662e5ba495b6b8')
training_data
filepath = training_data.download(file_name=training_data.name)import zipfile
with zipfile.ZipFile(filepath, 'r') as zip_ref:
zip_ref.extractall(Path(filepath).parent)data_path = Path(os.path.join(os.path.splitext(filepath)[0]))data = prepare_data(data_path,
batch_size=8,
downsample_factor=8)Visualize training data
To make sense of training data we will use the show_batch() method in arcgis.learn. show_batch() randomly picks few samples from the training data and visualizes them.
data.show_batch()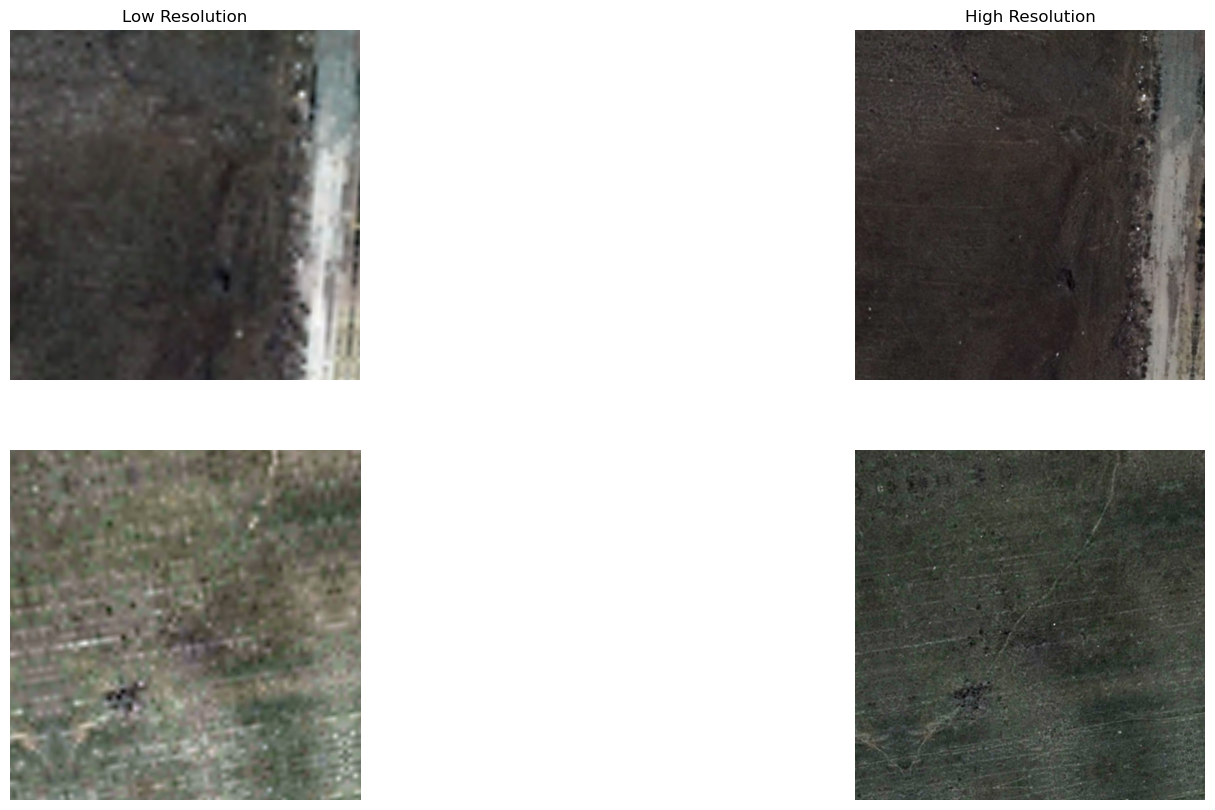
The imagery chips above show images which we have been downsampled in prepare_data and corresponding high resolution images with them.
data.show_batch() shows a batch of images from our training data. We can visualize the the low resolution training data generated using prepare_data function on left along with the original data on the right. You can degrade the image quality more by increasing downsample_factor in prepare_data.
arcgis.learn provides the SuperResolution model for increasing image resolution, which is based on a pretrained convnet, like ResNet that acts as the 'backbone'.
superres_model = SuperResolution(data)We will use the lr_find() method to find an optimum learning rate. It is important to set a learning rate at which we can train a model with good accuracy and speed.
superres_model.lr_find()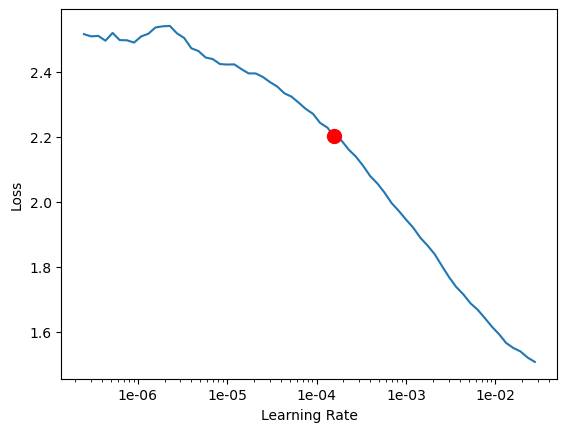
0.0001584893192461114
Train a model
We will now train the SuperResolution model using the suggested learning rate from the previous step. We can specify how many epochs we want to train for. Let's train the model for 10 epochs.
superres_model.fit(10, lr=0.0001584893192461114)| epoch | train_loss | valid_loss | pixel_loss | time |
|---|---|---|---|---|
| 0 | 2.226213 | 1.619254 | 0.441071 | 00:31 |
| 1 | 1.926456 | 1.222885 | 0.244132 | 00:29 |
| 2 | 1.604717 | 0.754641 | 0.160098 | 00:28 |
| 3 | 1.354619 | 0.630350 | 0.142651 | 00:28 |
| 4 | 1.163730 | 0.584501 | 0.145803 | 00:27 |
| 5 | 1.027998 | 0.560589 | 0.140496 | 00:28 |
| 6 | 0.923117 | 0.528723 | 0.126351 | 00:28 |
| 7 | 0.848579 | 0.518948 | 0.119298 | 00:29 |
| 8 | 0.791139 | 0.516928 | 0.119201 | 00:28 |
| 9 | 0.746877 | 0.514478 | 0.119008 | 00:28 |
After the training is complete, we can view the plot with training and validation losses.
superres_model.learn.recorder.plot_losses()
Visualize results on validation set
This method displays the chips from the validation dataset with downsampled chips (left), predicted chips (middle) and ground truth (right). This visual analysis helps in assessing the qualitative results of the trained model.
superres_model.show_results()
Save the model
Let's save the model by giving it a name and calling the save() method, so that we can load it later whenever required. By default, the model gets saved in training/data/models directory, however a custom path can optionally be provided to save model at desired location.
superres_model.save("superres_model")Deploy the Model
Model inference on ArcGIS Pro
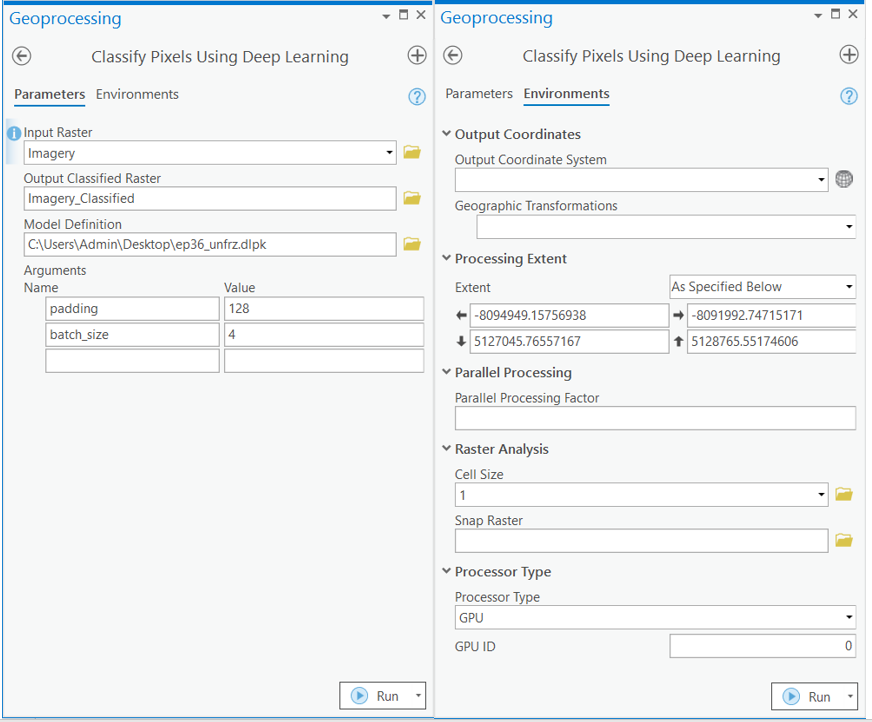
We will use saved model to improve the image quality using Classify Pixels Using Deep Learning tool available in both ArcGIS Pro and ArcGIS Image Server. For this sample we will deploy the model in Redlands,CA region where low resolution imagery is available.
- Input Raster: Imagery
- Output Classified Raster: Superres_Inferencing_arcgis
- Model Definition: model.emd
- padding: The 'Input Raster' is tiled and the deep learning model runs on each individual tile separately before producing the final result. This may lead to unwanted artifacts along the edges of each tile as the model has little context to detect objects accurately. Padding as the name suggests allows us to supply some extra information along the tile edges, this helps the model to predict better.
- Cell size: The model is very susceptible to the cell size. The cell size should be same as high resolution imagery we used to train the model which is 0.1 in our case.
Classify Pixels Using Deep Learning returns a raster layer. We have published the output from this sample here as a hosted raster layer.
Conclusion
In this notebook, we demonstrated how to use SuperResolution model using ArcGIS API for Python in order to obtain high-resolution image from a low-resolution satellite imagery.
References
[1] J. Johnson, A. Alahi, and L. Fei-Fei, “Perceptual losses for realtime style transfer and super-resolution”, 2016; arXiv:1603.08155.
[2] Fast.ai lesson 7.