- 🔬 Data Science
- 🥠 Deep Learning and pixel-based classification
Prerequisites
- Please refer to the prerequisites section in our guide for more information. This sample demonstrates how to do export training data and model inference using ArcGIS Image Server. Alternatively, they can be done using ArcGIS Pro as well.
- If you have already exported training samples using ArcGIS Pro, you can jump straight to the training section. The saved model can also be imported into ArcGIS Pro directly.
Introduction
Land cover classification has been one of the most common tasks in remote sensing as it is the foundation for many global and environmental applications. Traditionally, people have been using algorithms like maximum likelihood classifier, SVM, random forest, and object-based classification. The recent success of AI brings new opportunity to this field. This notebook showcases an end-to-end to land cover classification workflow using ArcGIS API for Python. The workflow consists of three major steps: (1) extract training data, (2) train a deep learning image segmentation model, (3) deploy the model for inference and create maps. To better illustrate this process, we will use World Imagery and high-resolution labeled data provided by the Chesapeake Conservancy land cover project.

Figure 1. A subset of of the labeled data for Kent county, Delaware
Export training data for deep learning
Import ArcGIS API for Python and get connected to your GIS
import os
from pathlib import Path

from arcgis import GIS
from arcgis.learn import UnetClassifier, prepare_data
from arcgis.raster import Raster
gis = GIS(profile="your_online_profile")
ent_gis = GIS(profile="your_enterprise_profile")Prepare data that will be used for training data export
To export training data, we need a labeled imagery layer that contains the class label for each location, and a raster input that contains all the original pixels and band information. In this land cover classification case, we will be using a subset of the one-meter resolution Kent county, Delaware, dataset as the labeled imagery layer and World Imagery: Color Infrared as the raster input.
label_layer = Raster("https://pythonapi.playground.esri.com/ra/rest/services/KENT_10001_us8bit_cmap/ImageServer",
                     gis=ent_gis,
                     engine="image_server")
Now let's retrieve the World Imagery layer.
world_imagery_layer = Raster("https://pythonapi.playground.esri.com/ra/rest/services/Imagery_AOI_NewYork/ImageServer",
                             gis=ent_gis,
                             engine="image_server")
m = ent_gis.map("Kent county, Delaware")
m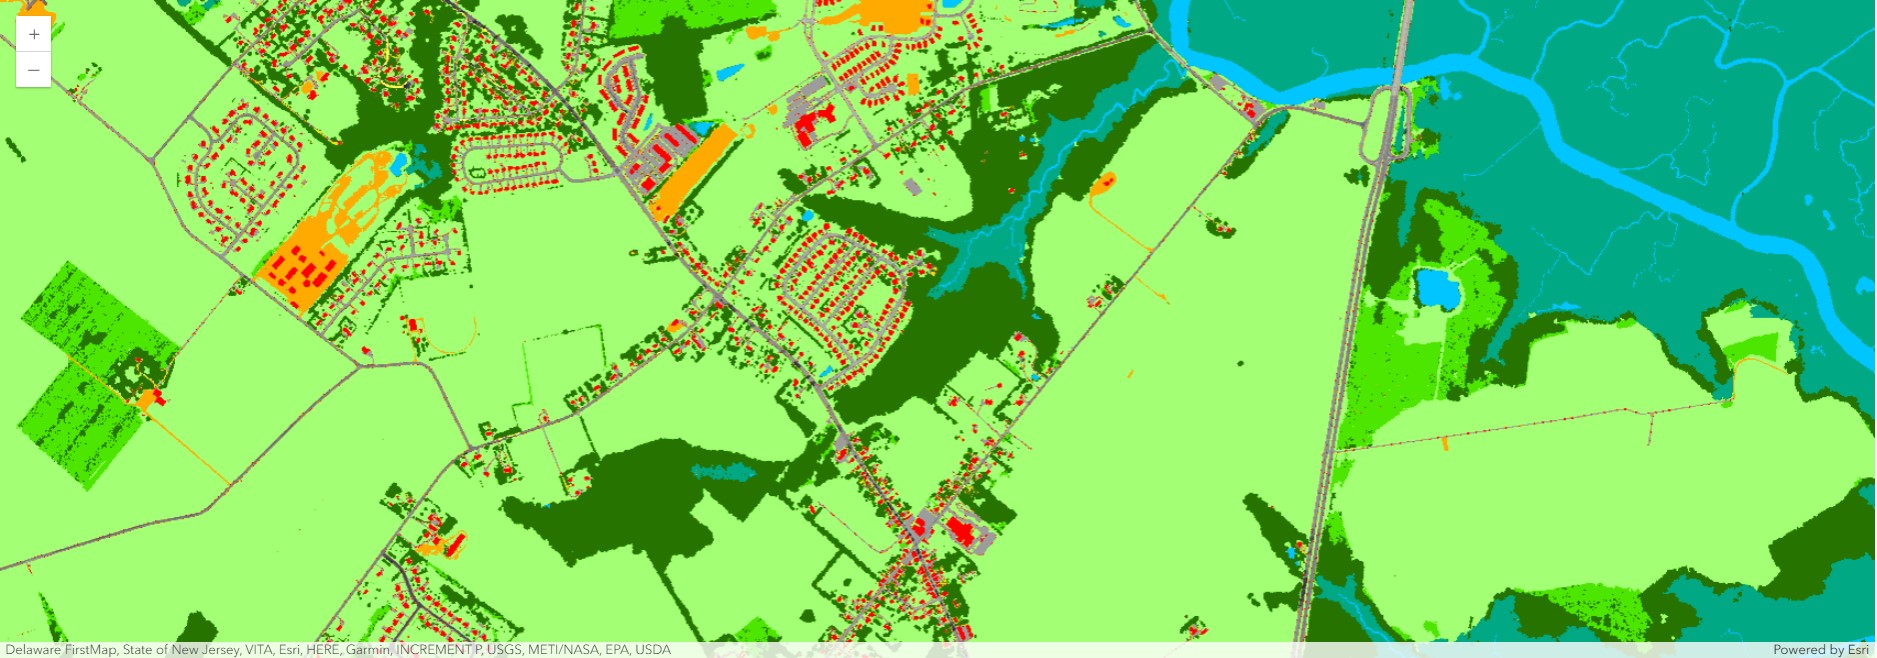
m.zoom = 15m.content.add(world_imagery_layer)m.content.add(label_layer)Specify a folder name in raster store that will be used to store our training data
Make sure a raster store is ready on your raster analytics image server. This is where where the output subimages, also called chips, labels and metadata files are going to be stored.
from arcgis.raster import analyticsds = analytics.get_datastores(gis=ent_gis)
ds< DatastoreManager for https://pythonapi.playground.esri.com/ra/admin >
ds.search(types="rasterStore")[<Datastore title:"/rasterStores/RasterDataStore" type:"rasterStore">]
rasterstore = ds.get("/rasterStores/RasterDataStore")
rasterstore
<Datastore title:"/rasterStores/RasterDataStore" type:"rasterStore">
from datetime import datetime
samplefolder = "landcover_sample_world_imagery"+str(datetime.now().microsecond)
samplefolder
'landcover_sample_world_imagery468062'
output_folder = rasterstore.datapath + "/" + samplefolder
output_folder
'/rasterStores/RasterDataStore/landcover_sample_world_imagery468062'
Export training data using arcgis.learn
With the feature class and raster layer, we are now ready to export training data using the export_training_data() method in arcgis.learn module. In addtion to feature class, raster layer, and output folder, we also need to speficy a few other parameters such as tile_size (size of the image chips), strid_size (distance to move each time when creating the next image chip), chip_format (TIFF, PNG, or JPEG), metadata format (how we are going to store those training labels). More detail can be found here.
Depending on the size of your data, tile and stride size, and computing resources, this opertation can take 15mins~2hrs in our experiment. Also, do not re-run it if you already run it once unless you would like to update the setting.
import arcgis
from arcgis import learn
arcgis.env.verbose = True
ext = {'spatialReference': {'latestWkid': 3857, 'wkid': 102100},
'xmin': -8449640.51886852,
'ymin': 4685349.83980574,
'xmax': -8352052.53352172,
'ymax': 4782795.56861414}export = learn.export_training_data(input_raster=world_imagery_layer,
output_location=output_folder,
input_class_data=label_layer,
chip_format="TIFF",
tile_size={"x":400,"y":400},
stride_size={"x":0,"y":0},
metadata_format="Classified_Tiles",
context={"startIndex": 0, "exportAllTiles": False, "cellSize": 2, "extent":ext},
gis = ent_gis)Submitted. Executing... Start Time: Wednesday, July 27, 2022 1:17:09 PM Exporting... ExportTrainingDataforDeepLearning GP Job: j30092d83b19440ca8fb698c37f591613 finished successfully.
Now let's get into the raster store and look at what has been generated and exported.
from arcgis.raster.analytics import list_datastore_content

samples = list_datastore_content(output_folder + "/images", filter = "*tif")
# print out the first five chips/subimages
samples[output_folder + "/images"][0:5]
Submitted. Executing... Start Time: Wednesday, July 27, 2022 1:22:35 PM Succeeded at Wednesday, July 27, 2022 1:22:35 PM (Elapsed Time: 0.22 seconds) ListDatastoreContent GP Job: jd871c47bc2404f12ba081866271a7810 finished successfully.
['/rasterStores/RasterDataStore/landcover_sample_world_imagery468062/images/000000000.tif',
 '/rasterStores/RasterDataStore/landcover_sample_world_imagery468062/images/000000001.tif',
 '/rasterStores/RasterDataStore/landcover_sample_world_imagery468062/images/000000002.tif',
 '/rasterStores/RasterDataStore/landcover_sample_world_imagery468062/images/000000003.tif',
 '/rasterStores/RasterDataStore/landcover_sample_world_imagery468062/images/000000004.tif']
labels = list_datastore_content(output_folder + "/labels", filter = "*tif")
# print out the labels images for the first five chips
labels[output_folder + "/labels"][0:5]
Start Time: Wednesday, July 27, 2022 1:23:43 PM Succeeded at Wednesday, July 27, 2022 1:23:44 PM (Elapsed Time: 0.18 seconds) ListDatastoreContent GP Job: j4941b3230ad247c5b62177d924cb1e55 finished successfully.
['/rasterStores/RasterDataStore/landcover_sample_world_imagery468062/labels/000000000.tif',
 '/rasterStores/RasterDataStore/landcover_sample_world_imagery468062/labels/000000001.tif',
 '/rasterStores/RasterDataStore/landcover_sample_world_imagery468062/labels/000000002.tif',
 '/rasterStores/RasterDataStore/landcover_sample_world_imagery468062/labels/000000003.tif',
 '/rasterStores/RasterDataStore/landcover_sample_world_imagery468062/labels/000000004.tif']
Model training
If you've already done part 1, you should already have the training chips. Please change the path to your own export training data folder that contains "images" and "labels" folder.
training_data = gis.content.get('e2d37d87c4f548b4b89b259b8373a904')
training_data
filepath = training_data.download(file_name=training_data.name)import zipfile
with zipfile.ZipFile(filepath, 'r') as zip_ref:
zip_ref.extractall(Path(filepath).parent)data_path = Path(os.path.join(os.path.splitext(filepath)[0]))data = prepare_data(data_path, batch_size=16)Visualize training data
To get a sense of what the training data looks like, arcgis.learn.show_batch() method randomly picks a few training chips and visualize them.
data.show_batch()
Load model architecture
We will be using U-net, one of the well-recogonized image segmentation algorithm, for our land cover classification. U-Net is designed like an auto-encoder. It has an encoding path (“contracting”) paired with a decoding path (“expanding”) which gives it the “U” shape. However, in contrast to the autoencoder, U-Net predicts a pixelwise segmentation map of the input image rather than classifying the input image as a whole. For each pixel in the original image, it asks the question: “To which class does this pixel belong?”. U-Net passes the feature maps from each level of the contracting path over to the analogous level in the expanding path. These are similar to residual connections in a ResNet type model, and allow the classifier to consider features at various scales and complexities to make its decision.

Figure 2. Architecture of a Unet model [1]
model = UnetClassifier(data)Train a model through learning rate tuning and transfer learning
Learning rate is one of the most important hyperparameters in model training. Here we explore a range of learning rate to guide us to choose the best one.
lr = model.lr_find()
Based on the learning rate plot above, we can see that the loss going down dramatically at 1e-4. Therefore, we set learning rate to be a range from 3e-5 to 1e-4, which means we will apply smaller rates to the first few layers and larger rates for the last few layers, and intermediate rates for middle layers, which is the idea of transfer learning. Let's start with 10 epochs for the sake of time.
model.fit(10, lr=lr)| epoch | train_loss | valid_loss | accuracy |
|---|---|---|---|
| 1 | 0.488864 | 0.431946 | 0.873322 |
| 2 | 0.436592 | 0.362094 | 0.892988 |
| 3 | 0.358467 | 0.335168 | 0.899636 |
| 4 | 0.364898 | 0.321729 | 0.901571 |
| 5 | 0.351462 | 0.294477 | 0.906844 |
| 6 | 0.323483 | 0.288438 | 0.907954 |
| 7 | 0.317848 | 0.274222 | 0.912660 |
| 8 | 0.291879 | 0.286264 | 0.912971 |
| 9 | 0.284547 | 0.262629 | 0.915441 |
| 10 | 0.288180 | 0.260001 | 0.915736 |
Visualize classification results in validation set
Now we have the model, let's look at how the model performs.
model.show_results()
As we can see, with only 10 epochs, we are already seeing reasonable results. Further improvment can be acheived through more sophisticated hyperparameter tuning. Let's save the model for further training or inference later. The model should be saved into a models folder in your folder. By default, it will be saved into your data_path that you specified in the very beginning of this notebook.
Deployment and inference
If you have finished trainiing the model in Part 2 of this notebook, you should have a model ready to be deployed. Using the model.save() function, you can save the model to the local disk. Additionally, if you pass publish=True, the model automatically gets published on the portal as a deep learning package.
model.save('stage-1-10', publish=True, gis=ent_gis)Locate model package
The model package file includes a few files:
- A model definition file with the extension .emd which includes information like model framework (e.g. tensorflow, pytorch). ArcGIS needs it to interpret your model.
- A model file in binary format that we have trained in Part 2.
classify_land_model_package = ent_gis.content.get('2e92f35da64e470ea326826fd6e463db')
classify_land_model_package
Now we are ready to install the mode. Installation of the deep learning model item will unpack the model definition file, model file and the inference function script, and copy them to "trusted" location under the Raster Analytic Image Server site's system directory.
from arcgis.learn import Model, list_modelsland_cover_model = Model(classify_land_model_package)land_cover_model.install(gis=ent_gis)Start Time: Friday, July 29, 2022 9:43:02 AM model Package is: 2e92f35da64e470ea326826fd6e463db Succeeded at Friday, July 29, 2022 9:43:02 AM (Elapsed Time: 0.06 seconds) InstallDeepLearningModel GP Job: jed1e4ea48a1545e8b6c660c756f77e69 finished successfully.
'[resources]models\\raster\\2e92f35da64e470ea326826fd6e463db\\unet_model_e300.emd'
Model inference
To test our model, let's get a new raster image by specifying a spatial extent.
from arcgis.learn import classify_pixels

ext = {'spatialReference': {'latestWkid': 3857, 'wkid': 102100},
       'xmin': -8404328.36942389,
       'ymin': 4742037.04240543,
       'xmax': -8403971.57042703,
       'ymax': 4742293.68138143}

context = {'cellSize': 2,
           'processorType':'GPU',
           'extent': ext,
           'batch_size': 9}
out_classify = classify_pixels(input_raster = ras_lyr, # make sure pass in the layer not url
model = land_cover_model,
model_arguments={"padding":100, "batch_size":16, "predict_background":True, "test_time_augmentation":True},
output_name = "land_cover_sample_inference_result"+str(datetime.now().microsecond),
context = context,
gis = ent_gis)
out_classify
Visualize land cover classification on map
from arcgis.raster.functions import colormap

result_map = ent_gis.map('Kent County, Delaware')
result_map.basemap.basemap = 'satellite'
# applying color map [value, red, green, blue]
land_cover_colormap=[[0, 0, 0, 0],
[1, 0, 197, 255],
[2, 0, 168, 132],
[3, 38, 115, 0],
[4, 76, 230, 0],
[5, 163, 255, 115],
[6, 255, 170, 0],
[7, 255, 0, 0],
[8, 156, 156, 156],
[9, 0, 0, 0],
[10, 115, 115, 0],
[11, 230, 230, 0],
[12, 255, 255, 115],
[13, 0, 0, 0],
[14, 0, 0, 0],
[15, 0, 0, 0]]result_map.content.add(colormap(out_classify.layers[0],
colormap = land_cover_colormap,
astype='u8'),
options={'opacity':0.2})
result_map
Conclusion
In this notebook, we have covered a lot of ground. In part 1, we discussed how to export training data for deep learning using ArcGIS python API and what the output looks like. In part 2, we demonstrated how to prepare the input data, train a pixel-based classification model, visualize the results, as well as apply the model to an unseen image. Then we covered how to install and publish this model and make it production-ready in part 3.
References
[1] Olaf Ronneberger, Philipp Fischer, Thomas Brox: U-Net: Convolutional Networks for Biomedical Image Segmentation, 2015; arXiv:1505.04597.