Learn how to use an ArcGIS portal item to access and display a feature layer in a map.
You can host a variety of geographic data and other resources using ArcGIS Online. These portal items can also define how the data is presented. A web map or web scene, for example, not only defines the layers for a map or scene, but also how layers are symbolized, the minimum and/or maximum scales at which they display, and several other properties. Likewise, a hosted feature layer contains the data for the layer and also defines the symbols and other display properties for how it is presented. When you add a map, scene, or layer from a portal item to your app, everything that has been saved with the item is applied in your app. Adding portal items to your app rather than creating them programmatically saves you from writing a lot of code, and can provide consistency across apps that use the same data.
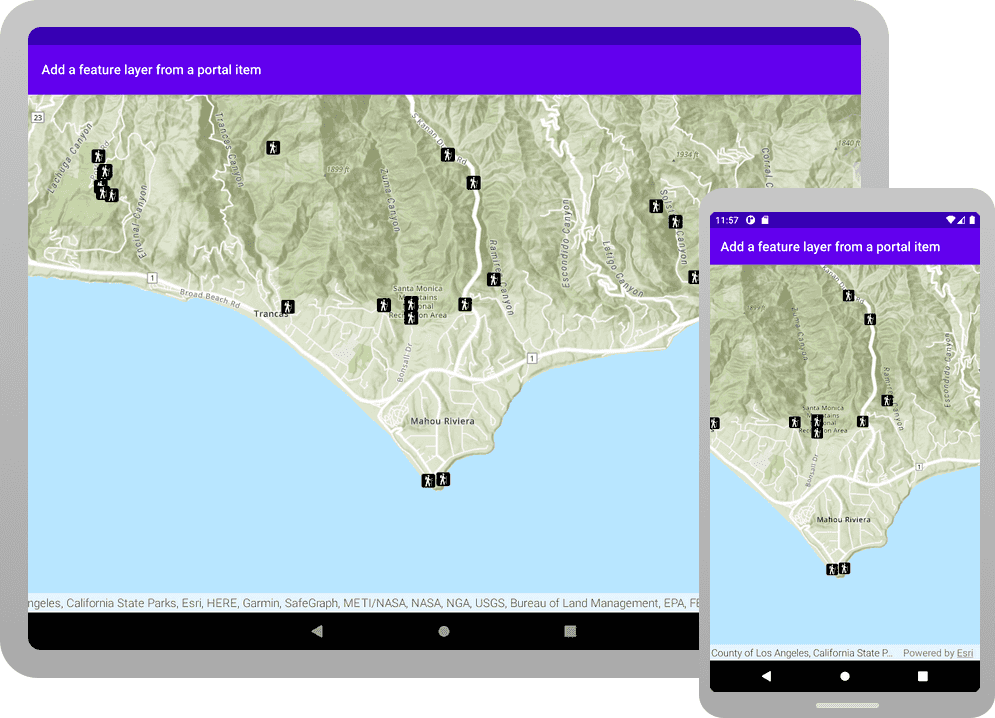
In this tutorial, you will add a hosted feature layer to display trailheads in the Santa Monica Mountains of Southern California. The hosted layer defines the trailhead locations (points) as well as the symbols used to display them.
Prerequisites
The following are required for this tutorial:
- An ArcGIS account to access API keys. If you don't have an account, sign up for free.
- A development and deployment environment that meets the system requirements.
- An IDE for Android development in Kotlin.
Steps
Open an Android Studio project with Gradle
-
To start this tutorial, complete the Display a map tutorial. Or download and unzip the Display a map solution in a new folder.
-
Modify the old project for use in this new tutorial. Expand More info for instructions.
-
On your file system, delete the .idea folder, if present, at the top level of your project.
-
In the Android tool window, open app > res > values > strings.xml.
In the
<string name="app_element, change the text content to Add a feature layer from a portal item.name"> strings.xmlUse dark colors for code blocks <resources> <string name="app_name">Add a feature layer from a portal item</string> </resources> -
In the Android tool window, open Gradle Scripts > settings.gradle.kts.
Change the value of
rootto "Add a feature layer from a portal item".Project.name settings.gradle.ktsUse dark colors for code blocks dependencyResolutionManagement { @Suppress("UnstableApiUsage") repositoriesMode.set(RepositoriesMode.FAIL_ON_PROJECT_REPOS) @Suppress("UnstableApiUsage") repositories { google() mavenCentral() maven { url = uri("https://esri.jfrog.io/artifactory/arcgis") } } } rootProject.name = "Add a feature layer from a portal item" include(":app") -
The UI theme composable in Display a map tutorial was
Display. Rename the theme composable throughout the tutorial by refactoringAMap Theme Display.AMap Theme In the Android tool window, open app > kotlin+java > com.exmple.app > ui.theme > Theme.kt.
Right-click the function name
Displayand select Refactor -> Rename. Replace the name withAMap Theme Add.AFeature Layer From APortal Item Theme Theme.ktUse dark colors for code blocks Copy @Composable fun DisplayAMapTheme( darkTheme: Boolean = isSystemInDarkTheme(), // Dynamic color is available on Android 12+ dynamicColor: Boolean = true, content: @Composable () -> Unit ) { val colorScheme = when { dynamicColor && Build.VERSION.SDK_INT >= Build.VERSION_CODES.S -> { val context = LocalContext.current if (darkTheme) dynamicDarkColorScheme(context) else dynamicLightColorScheme(context) } darkTheme -> DarkColorScheme else -> LightColorScheme } -
Click File > Sync Project with Gradle files. Android Studio will recognize your changes and create a new .idea folder.
-
-
Set your API key in MainActivity.kt.
An API Key enables access to services, web maps, and web scenes hosted in ArcGIS Online.
-
In Android Studio: in the Android tool window, open app > java > com.example.app > MainActivity.
-
In the
setfunction, find theA p i Key() ApiKey.create()call and paste your API key inside the quotes, replacing YOUR_API_KEY.MainActivity.ktUse dark colors for code blocks Copy private fun setApiKey() { ArcGISEnvironment.apiKey = ApiKey.create("YOUR_API_KEY") }
-
Add import statements
In the Android tool window, open app > kotlin+java > com.example.app > MainScreen.kt. Replace the import statements with the imports needed for this tutorial.
@file:OptIn(ExperimentalMaterial3Api::class)
package com.example.app.screens
import androidx.compose.foundation.layout.fillMaxSize
import androidx.compose.foundation.layout.padding
import androidx.compose.material3.ExperimentalMaterial3Api
import androidx.compose.material3.Scaffold
import androidx.compose.material3.Text
import androidx.compose.material3.TopAppBar
import androidx.compose.runtime.Composable
import androidx.compose.runtime.remember
import androidx.compose.ui.Modifier
import androidx.compose.ui.res.stringResource
import com.arcgismaps.mapping.ArcGISMap
import com.arcgismaps.mapping.BasemapStyle
import com.arcgismaps.mapping.PortalItem
import com.arcgismaps.mapping.Viewpoint
import com.arcgismaps.mapping.layers.FeatureLayer
import com.arcgismaps.portal.Portal
import com.arcgismaps.toolkit.geoviewcompose.MapView
import com.example.app.R
Add a feature layer to the map
You can reference an item (such as a web map or feature layer) hosted in a portal (such as ArcGIS Online) using its unique item ID. You will reference the Trailheads Styled feature layer stored in ArcGIS Online using its item ID: 2e4b3df6ba4b44969a3bc9827de746b3. You will then add that feature layer to your map's collection of data layers (operational layers).
-
In
Main, before the code that creates theScreen ArcGISMap, create a newPortalreferencing ArcGIS Online as theurlparameter andPortal.Connection.Anonymousfor theconnectionparameter.MainScreen.ktUse dark colors for code blocks fun createMap(): ArcGISMap { val portal = Portal( url = "https://www.arcgis.com", connection = Portal.Connection.Anonymous ) return ArcGISMap(BasemapStyle.ArcGISTopographic).apply{ initialViewpoint = Viewpoint( latitude = 34.0270, longitude = -118.8050, scale = 72000.0 ) } } -
Then, create a
PortalIteminstance, passingportaland the id of the portal item that the feature layer will use.MainScreen.ktUse dark colors for code blocks fun createMap(): ArcGISMap { val portal = Portal( url = "https://www.arcgis.com", connection = Portal.Connection.Anonymous ) val portalItem = PortalItem( portal = portal, itemId = "2e4b3df6ba4b44969a3bc9827de746b3" ) return ArcGISMap(BasemapStyle.ArcGISTopographic).apply{ initialViewpoint = Viewpoint( latitude = 34.0270, longitude = -118.8050, scale = 72000.0 ) } } -
Next, create a
FeatureLayerusingFeatureLayer.createWithItem(), to which you pass the portal item.MainScreen.ktUse dark colors for code blocks fun createMap(): ArcGISMap { val portal = Portal( url = "https://www.arcgis.com", connection = Portal.Connection.Anonymous ) val portalItem = PortalItem( portal = portal, itemId = "2e4b3df6ba4b44969a3bc9827de746b3" ) val featureLayer = FeatureLayer.createWithItem(portalItem) return ArcGISMap(BasemapStyle.ArcGISTopographic).apply{ initialViewpoint = Viewpoint( latitude = 34.0270, longitude = -118.8050, scale = 72000.0 ) } } -
In the
applyblock forArcGISMap, add the feature layer to the map.MainScreen.ktUse dark colors for code blocks fun createMap(): ArcGISMap { val portal = Portal( url = "https://www.arcgis.com", connection = Portal.Connection.Anonymous ) val portalItem = PortalItem( portal = portal, itemId = "2e4b3df6ba4b44969a3bc9827de746b3" ) val featureLayer = FeatureLayer.createWithItem(portalItem) return ArcGISMap(BasemapStyle.ArcGISTopographic).apply{ initialViewpoint = Viewpoint( latitude = 34.0270, longitude = -118.8050, scale = 72000.0 ) operationalLayers.add(featureLayer) } } -
Click Run > Run > app to run the app.
You should see a map of trail heads in the Santa Monica mountains. Double tap, Drag, pinch in, and pinch out on the map view to explore the map.
What's next?
Learn how to use additional API features, ArcGIS location services, and ArcGIS tools in these tutorials: