Augmented reality (AR) experiences can be implemented with two common patterns: tabletop and flyover.
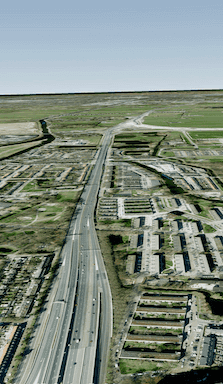
- Flyover – With flyover AR you can explore a scene using your device as a window into the virtual world. A typical flyover AR scenario starts with the scene’s virtual camera positioned over an area of interest. You can walk around and reorient the device to focus on specific content in the scene.
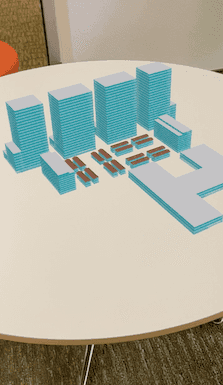
- Tabletop – Tabletop AR provides scene content anchored to a physical surface, as if it were a 3D-printed model. You can walk around the tabletop and view the scene from different angles.
| Flyover | Tabletop |
|---|---|
|
|
| On screen, flyover is visually indistinguishable from normal scene rendering. | In tabletop, scene content is anchored to a real-world surface. |
Support for augmented reality is provided through components available in the ArcGIS Maps SDK for Swift Toolkit.
Enable your app for AR
- To install the toolkit, see the Toolkit Installation Instructions.
- Configure privacy and permissions.
- Now you're ready to add flyover AR or add tabletop AR.
Configure privacy and permissions
Before you use augmented reality, you must make the following adjustments:
- Set the
Privacy - Camera Usage Descriptionproperty in the app's info.plist to request camera permissions. - If you’d like to restrict your app to installing only on devices that support ARKit (see Apple's System requirements for details), add
arkitto the required device capabilities section of info.plist:
<key>UIRequiredDeviceCapabilities</key>
<array>
<string>arkit</string>
</array>Once you have installed the toolkit and configured your app to meet privacy requirements, you can begin implementing your AR experience.
General AR guidelines
To create an optimal virtual experience, follow these guidelines:
- Provide user feedback for ARKit tracking issues. See Apple's Developer Guide for details.
- Set expectations about lighting before starting the experience. AR doesn't work well in low light.
- Don't allow users to view arbitrary content in AR. Use curated content that has been designed.
Understand Common AR Patterns
The ArcGIS Maps SDK for Swift offers two patterns for you to build augmented reality experiences:
- Flyover – Flyover AR is an experience that allows you to explore a scene using your device as a window into the virtual world. A typical flyover AR scenario will start with the scene’s virtual camera positioned over an area of interest. You can walk around and reorient the device to focus on specific content in the scene.
- Tabletop – A kind of AR scenario where scene content is anchored to a physical surface, as if it were a 3D-printed model. You can walk around the tabletop and view the scene from different angles.
Each experience is built using a combination of the features, toolkit, and some suggested user experiences, such as:
| AR pattern | Origin camera | Translation factor | Scene view | Base surface |
|---|---|---|---|---|
| Flyover AR | Above the tallest content in the scene | A large value to enable rapid traversal; 0 to restrict movement | Space effect: Stars Atmosphere: horizonOnly | Displayed |
| Tabletop AR | On the ground at the center or lowest point on the scene | Based on the size of the target content and the physical table | Space effect: Transparent Atmosphere: horizonOnly | Optional |
Add flyover AR to your app
Flyover AR displays a scene while using the movement of the physical device to move the scene view camera. For example, you can walk around while holding up your device as a window into the scene. Unlike other AR experiences, the camera feed is not displayed to the user, making flyover more similar to a traditional virtual reality (VR) experience.
Flyover is the simplest AR scenario to implement, as there is only a loose relationship between the physical world and the rendered virtual world. With flyover, you can imagine your device as a window into the virtual scene.
Implement flyover AR
-
Create the scene and add any content. This example uses the Yosemite Valley Hotspots web scene. Set the camera navigation to
unconstrained. In this mode the camera may pass above and below the elevation surface.Use dark colors for code blocks Copy @State private var scene: ArcGIS.Scene = { let scene = Scene( item: PortalItem( portal: .arcGISOnline(connection: .anonymous), id: PortalItem.ID("7558ee942b2547019f66885c44d4f0b1")! ) ) scene.baseSurface.navigationConstraint = .unconstrained return scene }() -
Flyoveris an ArcGIS Maps SDK for Swift Toolkit component. Create aScene View Flyoverusing the initial location, translation factor, and scene view.Scene View - The initial location is the scene view's camera position. Place it above the content you want the user to explore, ideally in the center.
- Set the translation factor to provide an appropriate speed for traversing the scene as the devices moves. The translation factor defines the relationship between physical device movement and virtual camera movement.
- The
Flyoverclosure builds aScene View Sceneto be overlayed on top of the augmented reality video feed. It contains aView Sceneparameter that allows the closure to access operations of theView Proxy Scene. In this example,View Seneis not used and thus, unlabeled asView Proxy _. - To create a more immersive experience, set the atmosphere effect on the
ScenetoView .realistic.
Use dark colors for code blocks Copy var body: some View { FlyoverSceneView( initialLocation: Point(x: 4.4777, y: 51.9244, z: 1_000, spatialReference: .wgs84), translationFactor: 1_000 ) { _ in SceneView(scene: scene) .atmosphereEffect(.realistic) } }
Add tabletop AR to your app
Tabletop AR allows you to use your device to interact with scenes as if they were 3D-printed models sitting on your desk. You could, for example, use tabletop AR to virtually explore a proposed development without needing to create a physical model.
Implement tabletop AR
Tabletop AR often allows users to place scene content on a physical surface of their choice, such as, the top of a desk. Once the content is placed, it stays anchored to the surface as the user moves around it.
-
Create the scene using an
ArcGISTiledand anElevation Source ArcGISScene. Set the scene's surface navigation constraint toLayer .stayand its opacity toAbove 0.For demonstration purposes, this code uses the Terrain3D REST service and the buildings layer because the pairing is particularly well-suited for tabletop display. You can construct your own scene using elevation and scene layer data or use any existing scene as long as a clippingDistance is defined for proper tabletop experience.
Use dark colors for code blocks Copy @State private var scene: ArcGIS.Scene = { // Creates a scene layer from buildings REST service. let buildingsURL = URL(string: "https://tiles.arcgis.com/tiles/P3ePLMYs2RVChkJx/arcgis/rest/services/DevA_BuildingShells/SceneServer")! let buildingsLayer = ArcGISSceneLayer(url: buildingsURL) // Creates an elevation source from Terrain3D REST service. let elevationServiceURL = URL(string: "https://elevation3d.arcgis.com/arcgis/rest/services/WorldElevation3D/Terrain3D/ImageServer")! let elevationSource = ArcGISTiledElevationSource(url: elevationServiceURL) let surface = Surface() surface.addElevationSource(elevationSource) let scene = Scene() scene.baseSurface = surface scene.addOperationalLayer(buildingsLayer) scene.baseSurface.navigationConstraint = .stayAbove scene.baseSurface.opacity = 0 return scene }() -
Create an anchor point. This is the location point of the ArcGIS scene that is anchored on the physical surface. This point could be a known value, a user-selected value, or a computed value. For simplicity, this example uses a known value.
Use dark colors for code blocks Copy private let anchorPoint = Point( x: -122.68350326165559, y: 45.53257485106716, spatialReference: .wgs84 ) -
Tableis an ArcGIS Maps SDK for Swift Toolkit component. Create aT o p Scene View Tableusing the anchor point, translation factor, clipping distance, and scene view; use the anchor point and scene created previously and calculate values for the remaining parameters.T o p Scene View - The translation factor defines how much the scene view translates as the device moves. A useful formula for determining this value is translation factor = virtual content width / desired physical content width. The virtual content width is the real-world size of the scene content and the desired physical content width is the physical table top width. The virtual content width is determined by the clipping distance in meters around the camera.
- The clipping distance is the distance in meters that the ArcGIS Scene data will be clipped to.
- The
Tabletopclosure builds aScene View Sceneto be overlayed on top of the augmented reality video feed. It contains aView Sceneparameter that allows the closure to access operations of theView Proxy Scene. In this example,View Seneis not used and thus, unlabeled asView Proxy _.
Use dark colors for code blocks Copy var body: some View { TableTopSceneView( anchorPoint: anchorPoint, translationFactor: 1_000, clippingDistance: 400 ) { _ in SceneView(scene: scene) } }