Learn how to authenticate a user to access a secure ArcGIS service with OAuth 2.0.
In this tutorial, you will build an app that uses named user login credentials to access a secure ArcGIS service using OAuth 2.0.
You can use different types of authentication to access ArcGIS location services. To implement OAuth 2.0, you can use your ArcGIS account to register an application and get a client ID, and then configure your app to redirect users to login with their credentials when the service or content is accessed. This is known as user authentication. If the app uses premium services that consume credits, the app user's account will be charged.
You will implement OAuth 2.0 so users can sign in to ArcGIS to access the ArcGIS World Traffic service.
Prerequisites
The following is required for this tutorial:
- Your system meets the system requirements.
Steps
Configure OAuth 2.0 for your app
Use the ArcGIS Developer dashboard to register your app, generate a client ID, and set a redirect URL to access the secure service.
-
Sign in to your ArcGIS developer account. If you don't already have one, sign-up for free. You need to sign in so you can create an application and get a client ID for authentication.
-
Click the OAuth 2.0 tab in the ribbon at the top.
-
Click the New Application button in the upper-left of the page.
-
In the Create New Application window, provide a Title and an optional Description for your app and click Create application. When the application is created, it will have a
Client ID, aClient Secret, and aTemporary Tokenproperty you can view. -
Click the Add URI button at the bottom of the page to add a redirect URL.
-
In the Add Allowed URI window, enter a redirect URI and click Add.
Use this redirect URL when creating the
OAuthwhen iOS returns control back to your app after OAuth 2.0 login. If you change this value, you must change it everywhere it is referenced.User Configuration You'll use the
Client IDand theredirect URLin your iOS app.The
client IDuniquely identifies your app on the authenticating server. If the server cannot find an app with the provided client ID, it will not proceed with authentication.The
redirect URLis used to identify a response from the authenticating server when the system returns control back to your app after an OAuth 2.0 login. You can configure several redirect URLs in your application definition and can remove or edit them. It's important to make sure the redirect URL used in your app's code matches a redirect URL configured for the application.A
temporary tokencan be used to test access to secure resources without having to implement the full OAuth workflow.The
client secretis only needed in some OAuth workflows and will not be used in this tutorial.
Open the Xcode project
-
To start the tutorial, complete the Display a map tutorial or download and unzip the solution.
-
Open the
.xcodeprojfile in Xcode.
Remove API keywords
An API Key is not required for this app because you are implementing authentication using OAuth 2.0.
-
Open MainApp.swift and remove the line that sets the API key.
MainApp.swiftUse dark colors for code blocks import SwiftUI import ArcGIS @main struct MainApp: App { init() { ArcGISEnvironment.apiKey = APIKey("<#your-API-key#>") } var body: some SwiftUI.Scene { WindowGroup { ContentView() .ignoresSafeArea() } } }
Add a layer to map
Add the World Traffic layer to the map and test run the app.
-
Open ContentView.swift and update the existing
mapvariable to add a traffic layer to the map's operational layers collection.The World Traffic layer is a premium service on ArcGIS Online that requires authentication to access.
ContentView.swiftUse dark colors for code blocks struct ContentView: View { @State private var map = { let map = Map(basemapStyle: .arcGISTopographic) map.initialViewpoint = Viewpoint(latitude: 34.02700, longitude: -118.80500, scale: 72_000) let trafficLayerURL = URL(string: "http://www.arcgis.com/home/item.html?id=bbdcd78953e5439985004023c8eda03d")! let trafficLayer = ArcGISMapImageLayer(url: trafficLayerURL) map.addOperationalLayer(trafficLayer) return map }() var body: some View { MapView(map: map) } } -
Press Command+R to run the app.
Note that the basemap and traffic layer do not load into the map because they both require authentication. Let's integrate OAuth authentication into the app.
Integrate OAuth 2.0 into your app
Create an ArcGISAuthenticationChallengeHandler that handles OAuth authentication every time an ArcGIS resource is accessed.
-
Create a final class named
Mof typey A r c GISChallenge Handler ArcGISAuthenticationChallengeHandlerand tag it as the@Main. Initialize the challenge handler with an array ofActor OAuthUserConfiguration.ContentView.swiftUse dark colors for code blocks import SwiftUI import ArcGIS struct ContentView: View { @State private var map = { let map = Map(basemapStyle: .arcGISTopographic) map.initialViewpoint = Viewpoint(latitude: 34.02700, longitude: -118.80500, scale: 72_000) let trafficLayerURL = URL(string: "http://www.arcgis.com/home/item.html?id=bbdcd78953e5439985004023c8eda03d")! let trafficLayer = ArcGISMapImageLayer(url: trafficLayerURL) map.addOperationalLayer(trafficLayer) return map }() var body: some View { MapView(map: map) } } // Creates an ArcGIS authentication challenge handler. @MainActor final class MyArcGISChallengeHandler: ObservableObject, ArcGISAuthenticationChallengeHandler { // The OAuth configurations that this challenge handler can work with. let oAuthUserConfigurations: [OAuthUserConfiguration] public init( oAuthUserConfigurations: [OAuthUserConfiguration] = [] ) { self.oAuthUserConfigurations = oAuthUserConfigurations } } -
Add a new function named
handleto handle the authentication challenge. This function attempts to create anA r c GISAuthentication Challenge(_ : ) OAuthUserCredentialusing the credentials provided by the firstOAuthUserConfigurationin the array. The credentials are stored in the in-memory credential store.ContentView.swiftUse dark colors for code blocks // Creates an ArcGIS authentication challenge handler. @MainActor final class MyArcGISChallengeHandler: ObservableObject, ArcGISAuthenticationChallengeHandler { // The OAuth configurations that this challenge handler can work with. let oAuthUserConfigurations: [OAuthUserConfiguration] public init( oAuthUserConfigurations: [OAuthUserConfiguration] = [] ) { self.oAuthUserConfigurations = oAuthUserConfigurations } // Handles the challenge to an ArcGIS secured resource that requires OAuth or ArcGIS Token authentication. func handleArcGISAuthenticationChallenge( _ challenge: ArcGISAuthenticationChallenge ) async throws -> ArcGISAuthenticationChallenge.Disposition { // If an OAuth user configuration is available for the challenge then create an `OAuthUserCredential`. if let configuration = oAuthUserConfigurations.first(where: { $0.canBeUsed(for: challenge.requestURL) }) { return .continueWithCredential( try await OAuthUserCredential.credential(for: configuration) ) } else { // If not, prompt the user for a username and password to create a `TokenCredential`. // ... return .continueWithCredential( try await TokenCredential.credential(for: challenge, username: "username", password: "password") ) } } } -
Create a
@Statevariable inObject ContentnamedView mthat creates an instance of they A r c GISChallenge Handler Mclass with the portal URL, client ID, and redirect URL. The client ID and redirect URL are values that you created in the previous step, Configure OAuth 2.0 for your app.y A r c GISChallenge Handler To construct the required
redirect, combine the redirect URL created in the application configuration, separated withURL ://.ContentView.swiftUse dark colors for code blocks struct ContentView: View { /// `clientID` is a unique identifier made for a public application created by the ArcGIS Maps SDK team. /// `redirectURL` is the redirect URL registered with the clientID. /// - Note: The clientID and redirectURL values here are examples. You must register your own app, generate a client ID, and set a redirect URL to access secure services in your deployed app. @StateObject private var myArcGISChallengeHandler = MyArcGISChallengeHandler( oAuthUserConfigurations: [ OAuthUserConfiguration( portalURL: URL(string: "https://www.arcgis.com")!, clientID: "lgAdHkYZYlwwfAhC", redirectURL: URL(string: "my-ags-app://auth")! ) ] ) @State private var map = { let map = Map(basemapStyle: .arcGISTopographic) map.initialViewpoint = Viewpoint(latitude: 34.02700, longitude: -118.80500, scale: 72_000) let trafficLayerURL = URL(string: "http://www.arcgis.com/home/item.html?id=bbdcd78953e5439985004023c8eda03d")! let trafficLayer = ArcGISMapImageLayer(url: trafficLayerURL) map.addOperationalLayer(trafficLayer) return map }() var body: some View { MapView(map: map) } } -
Lastly, add an
.onmodifier to the map view and assignAppear mto they A r c GISChallenge Handler ArcGISAuthenticationChallengeHandlerthat is provided by the app'sArcGISEnvironment.authenticationManager.ContentView.swiftUse dark colors for code blocks struct ContentView: View { /// `clientID` is a unique identifier made for a public application created by the ArcGIS Maps SDK team. /// `redirectURL` is the redirect URL registered with the clientID. /// - Note: The clientID and redirectURL values here are examples. You must register your own app, generate a client ID, and set a redirect URL to access secure services in your deployed app. @StateObject private var myArcGISChallengeHandler = MyArcGISChallengeHandler( oAuthUserConfigurations: [ OAuthUserConfiguration( portalURL: URL(string: "https://www.arcgis.com")!, clientID: "lgAdHkYZYlwwfAhC", redirectURL: URL(string: "my-ags-app://auth")! ) ] ) @State private var map = { let map = Map(basemapStyle: .arcGISTopographic) map.initialViewpoint = Viewpoint(latitude: 34.02700, longitude: -118.80500, scale: 72_000) let trafficLayerURL = URL(string: "http://www.arcgis.com/home/item.html?id=bbdcd78953e5439985004023c8eda03d")! let trafficLayer = ArcGISMapImageLayer(url: trafficLayerURL) map.addOperationalLayer(trafficLayer) return map }() var body: some View { MapView(map: map) .onAppear { ArcGISEnvironment.authenticationManager.arcGISAuthenticationChallengeHandler = myArcGISChallengeHandler } } } -
Press Command + R to run the app.
If you are using the Xcode simulator your system must meet these minimum requirements: macOS Monterey 12.5, Xcode 15, iOS 17. If you are using a physical device, then refer to the system requirements.
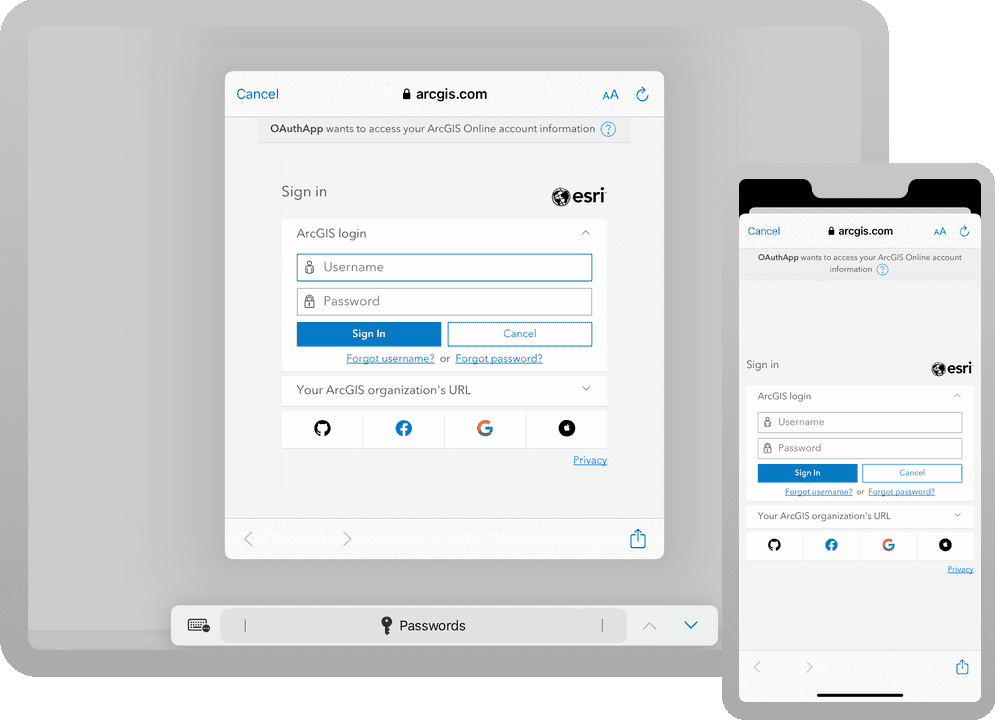
Upon app launch, you will be prompted to log in with your ArcGIS Developer credentials. Once you authenticate successfully with ArcGIS Online, the basemap and traffic layer will appear in the map.
What's next?
Learn how to use additional API features, ArcGIS location services, and ArcGIS tools in these tutorials: