 Hide Table of Contents
 Tutorials
About the API
Work with the API
Graphics and feature layers
Popups and Info Windows
Mobile
ArcGIS Server Services
References
What's New archive
Tutorials
About the API
Work with the API
Graphics and feature layers
Popups and Info Windows
Mobile
ArcGIS Server Services
References
What's New archive
ArcGIS 10 includes support for time-aware layers, which store information about the changing state of a dataset over time. Time-aware layers allow you to step through periods of time revealing patterns and trends in your data. For example, you can:
- Track hurricane paths and other meteorological events.
- Explore historic patterns in data through time, such as population or land use changes.
- Monitor changes in well production or status.
- Map the progression of a wildfire or flood.
- Visualize the spread of disease over time.
When time-aware layers are present in a Web API based application, the map is considered time-aware and the map's time extent is set. The time extent defines the time period for which layers' data is displayed in the map. Setting the map's time extent is similar to setting the spatial extent because once the time extent is set the map display updates automatically to conform to the change. Every time the map's time extent is changed all time-aware layers update to reflect the new extent.
There are several ways to work with time-aware layers in a Web API based application. The simplest is to use the TimeSlider widget because it handles the process of updating the map's time extent for you. Alternatively, you can use the Web APIs to build applications that perform temporal queries, filter layers using time definitions, and set the map's time extent.
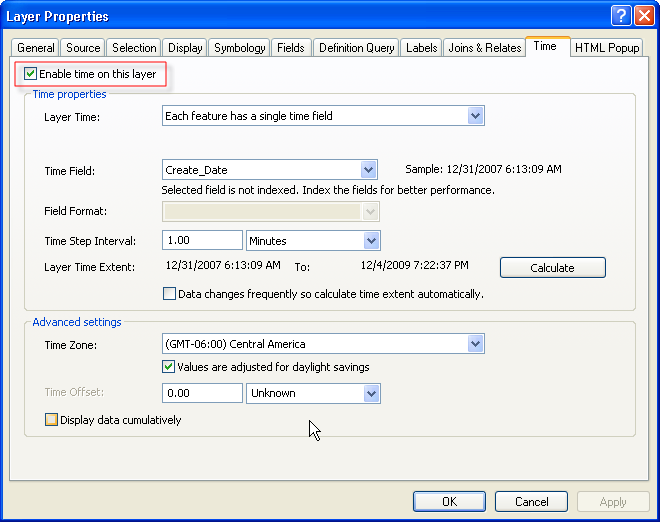
How do I make my layers time aware?
You can make your layers time-aware using the Layer Properties dialog in ArcMap(right-click on the layer in ArcMap and choose Properties to display the dialog).
Note: The Time Field must be of type date.
The time information is preserved and accessible through the map service when you publish your map to ArcGIS Server. After publishing, you can work with a time-aware map or feature service using the ArcGISDynamicMapServiceLayer or FeatureLayer classes to perform temporal queries and view changes in data over time.
In the Web APIs time-aware layers have a timeInfo property that provides access to the TimeInfo class. The TimeInfo class provides detailed information about the layer's time properties including the time range and time reference. The snippet below retrieves the time extent for a layer using the timeInfo property.
var layerTimeExtent = results[2].layer.timeInfo.timeExtent;
Creating JavaScript dates to use with time-aware layers
When working with time-aware layers you may need to create JavaScript dates to define a time extent or query a layer. When creating a new JavaScript date always specify UTC for the time zone. Coordinated Universal Time (UTC) is a time standard based on atomic time and is functionally equivalent to Greenwich Mean Time(GMT). If no time zone is specified then the REST API returns the date string without time zone information. If you use this date string in a temporal query the time zone defaults to the current local time. This can result in dates that are off by several hours.
require(["esri/TimeExtent", ... ], function(TimeExtent, ... ){
  var timeExtent = new TimeExtent();
  timeExtent.startTime = new Date("1/25/2010 6:30:00 UTC");
});
How do I work with time in the ArcGIS API for JavaScript?
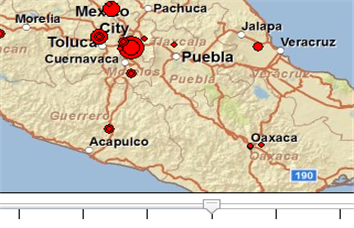
The ArcGIS API for JavaScript provides a TimeSlider widget that simplifies the process of visualizing temporal data. Using the time slider, you can filter the map to display cumulative data up to a point in time, a single point in time, or data that falls within a time range. The benefit of using the time slider is that it handles setting the map's time extent, which filters time-aware layers to only display data for the current time extent.
To set up the time slider, add a time-aware map or feature service to the map using the ArcGISDynamicMapService or FeatureLayer class. Next, associate the time slider with the map. Then define the time slice to visualize and the number of tics (or stops) the slider displays.
require(["esri/dijit/TimeSlider", ... ], function(TimeSlider, ... ){
  timeSlider = new TimeSlider({},dojo.byId("timeSliderDiv"));
  map.setTimeSlider(timeSlider);
  timeSlider.setThumbCount(1);
  var layerTimeExtent = results[0].layer.timeInfo.timeExtent;
  timeSlider.createTimeStopsByTimeInterval(layerTimeExtent,1,'esriTimeUnitsWeeks');
  timeSlider.startup();
});
Slider thumbs denote a location on the slider. Notice that in the code above the thumb count is set to one; this means that the map will display all features from the specified layers start time to the current thumb position. If you want to visualize features for an instant in time, set the thumb count to one and specify that singleThumbAsTimeInstant equals true.
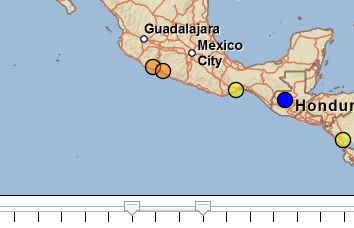
To visualize a time range set the thumb count to two.
Note: It is not recommended to use the time slider with feature layers in on demand mode because this can result in too many requests to the server. If you are not working with a large amount of data, you can use a feature layer in snapshot mode. If your dataset is large, consider using an ArcGISDynamicMapServiceLayer instead.
Filtering data using the map's setTimeExtent method
There are other ways besides the TimeSlider to visualize time-aware layers in your mapping applications. The map has a setTimeExtent method, which acts as a filter for layers that support time such as the ArcGISDynamicMapServiceLayer and FeatureLayer. Setting the map's time extent fires the onTimeExtentChanged event. Time-aware layers listen for this event and update to display content for the specified time extent. In this example, only data that meets the input time definition of January 15, 1989 appears.
require(["esri/TimeExtent", ... ], function(TimeExtent, ... ){
  var timeExtent = new TimeExtent();
  timeExtent.startTime = new Date("1/15/1989 UTC");
  map.setTimeExtent(timeExtent);
});
Filtering data using the layer's time definition
Feature layers support the ability to set a time definition, which limits the data that is loaded in the initial query. Setting a time definition on layer is similar to setting a definition expression, and restricts the data to only features that match the input time extent. When you set a time definition on a feature layer in snapshot or on demand mode, the features that match the time definition are retrieved once the layer is added to the map. If you modify the time definition after the layer is added, then the existing set of features is removed and a request is made to retrieve the new set of features. The current selection is always maintained and will not be removed if you set a new time definition.
var timeDef = new TimeExtent();
timeDef.startTime = new Date("09/25/2003 UTC");
timeDef.endTime = new Date("10/25/2005 UTC");
featureLayer.setTimeDefinition(timeDef);
Querying data using a time extent
You can perform temporal queries against time-aware layers using the timeExtent property on the Query object. For example, you might want to know all crimes that occurred during the night shift from 10 PM to 6 AM on a particular date.
var timeExtent = new TimeExtent();
timeExtent.startTime = new Date("1/17/2010 22:00:00");
timeExtent.endTime = new Date("1/18/2010 6:00:00");
var query = new Query();
query.timeExtent = timeExtent;
featureLayer.queryFeatures(query,function(featureSet){
  //do something with the results here
});
Related Samples
The ArcGIS JavaScript API has several samples that show how to work with time-aware layers.