Note: Sign in to access the data in this sample. username: viewer01 password: I68VGU^nMurF
Learn more about utility networks by referring to the Utility Network Guide.
This sample demonstrates how to utilize the UtilityNetworkTrace widget to run traces on a WebMap published with a utility network and trace configurations.
This widget runs traces on a utility network based on connectivity and traversibility.
Getting started
To use this widget, make sure to bring in a WebMap published with a utility network and sharedNamedTraceConfigurations. Read the Named trace configurations documentation to learn how to configure named trace configurations in ArcGIS Pro.
Note: Trace configurations are available starting at Enterprise 10.9.
// Initialize the WebMap and pass in the webmap idconst webmap = new WebMap({ portalItem: { // autocasts as new PortalItem() id: "471eb0bf37074b1fbb972b1da70fb310", // webmap id },});When initializing their webmap, the user will need to set the URL to the portal where the webmap is hosted. The default portal url is "https://www.arcgis.com". To do this, the esri/config class needs to be imported, and its portalUrl set. The following code snippet illustrates this workflow.
const [WebMap, MapView, UtilityNetworkAssociations, config] = await $arcgis.import([  "@arcgis/core/WebMap.js",  "@arcgis/core/views/MapView.js",  "@arcgis/core/widgets/UtilityNetworkAssociations.js",  "@arcgis/core/config.js"]);
// Set the hostname to the on-premise portalconfig.portalUrl = "https://myHostName.domainName.com/webadaptorName";
const webmap = new WebMap({  portalItem: { // autocasts as new PortalItem()    id: "471eb0bf37074b1fbb972b1da70fb310" // webmap id  }});...
Once a WebMap is loaded, the widget can be initialized and added to the view.
// Initialize the UtilityNetworkTrace widgetconst utilityNetworkTrace = new UtilityNetworkTrace({  view: view,});
// Add the widget to the viewview.ui.add(utilityNetworkTrace, "top-right");
How to run a trace
1. Sign in
The data in this example is secured, as most utility network data will be since the ArcGIS Utility Network user type extension is required. Therefore, the first step is to sign in to load the data.
In this sample sign in with the following credentials: username: viewer01 password: I68VGU^nMurF.
2. Set the trace type
The UtilityNetworkTrace widget can run one or more traces concurrently. These traces can be selected from the “Trace types” dropdown.
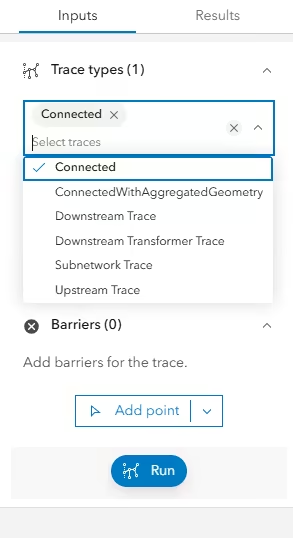
3. Add some flags (starting points and barriers)
The widget makes it easy to set trace flags using the user interface (UI). To add a starting location, select the add “Starting points” button to start drawing the first point. Click a feature on the map to add the starting point. Next, add one or more barriers to set the location where the trace will stop. This can be done by selecting the add “Barriers” button and clicking features on the map.
4. Run the trace
Finally, click the “Run” button to run the trace.