This section gives a short introduction to the Urban API Playground. It also provides a few exemplary queries and mutations, which can be copied and pasted directly in the Playground. The examples cover basic Urban operations.
Get started
Open the Playground by loading the Urban API endpoint in a web browser. You can also explore the Playground in the API Reference section, which embeds the same GraphQL endpoint in the ArcGIS for developers webpage.
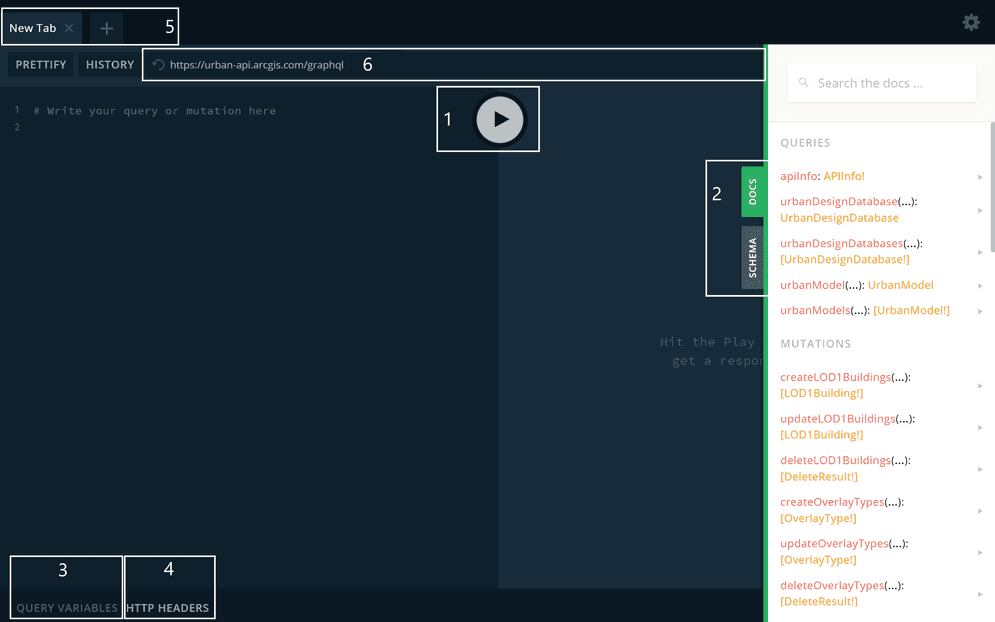
GraphQL Playground and its described elements.
1) Play button 2) Docs and Schema tabs 3) Query variables 4) HTTP Headers 5) Multiple tabs 6) URL bar
Press the Play button (1) to run an operation. The data returned by the operation, along with any errors, will be displayed in the pane next to the operation body. You can use two types of operations: a query or a mutation. A query is a read-only fetch operation, which requests data from a GraphQL service. A mutation is an operation that creates, modifies, or destroys data.
Note the Docs and Schema tabs (2) to the right. Open the Docs tab to see a complete set of queries and mutations along with their typed arguments and return values. You can drill-down into each part of the graph API by clicking on a given entry. Opening the Schema tab enables you to preview the whole GraphQL schema and download it as a file.
While writing operations, an autocomplete menu will list available fields. This can be triggered either by typing the first letters of a field's name or by pressing the auto-complete key shortcut which in most browsers is Ctrl+Space.
The IDE also supports advanced features such as using variables (3) and multiple tabs (5). Your queries and mutations will be automatically saved in local storage so you can visit the Playground later and use previous operations.
To use an authentication token with the IDE, add the access token to the request's authorization header. To do this, add the following content to the HTTP Headers tab (4): {"
When you open a new tab in the playground, the token in the header will be copied. Read more about user authentication in the Authentication section.
Examples of queries
The query examples work with a Hardeeville example city, set specifically for this chapter. The urban is "8d199b9a69664aac9b2c3a69573600a6".
Query the urban models
Use the urban query to list the id, title, and owner attributes of publicly accessible urban models.
Note, that up to 10 models are returned by the server due to the default limit. To return more models, change the limit argument.
query {
urbanModels {
id
title
owner
}
}Query plans and projects
Use the following query to view the Event, Global, and the Owner attributes of the plans and projects present in an urban model.
To select the urban model pass the appropriate urban as a query argument.
query {
urbanModel(urbanModelId: "8d199b9a69664aac9b2c3a69573600a6") {
urbanDatabase {
projects {
attributes {
EventName
GlobalID
OwnerName
}
}
plans {
attributes {
EventName
GlobalID
OwnerName
}
}
}
}
}Query projects using a geometry
Use the following query to filter the projects using a geometry. More specifically, get the Global and Event of the projects contained in a given polygon.
query {
urbanModel(urbanModelId: "8d199b9a69664aac9b2c3a69573600a6") {
urbanDatabase {
projects(
geometryFilter: {
relationship: Contains
polygon: {
rings: [
[
[-9025899.749800002, 3799667.6687999964]
[-9026098.991699995, 3799664.138700016]
[-9026105.205599999, 3800014.8562000096]
[-9025905.963599999, 3800018.3862000033]
[-9025899.749800002, 3799667.6687999964]
]
]
spatialReference: { wkid: 3857 }
}
}
) {
attributes {
GlobalID
EventName
}
}
}
}
}Examples of mutations
Set up your own Hardeeville example urban model to test the example mutations. Replace the id values provided in the examples with the id values of the model you created.
Create a new urban design database
Use create mutation to create a new urban design database feature service, which stores your future plan or a project.
Provide all the required attributes, which in this case are urban, type, and title. You can identify the required arguments in the Playground docs tab as the ones with an exclamation mark.
Additionally, you may want to save the new design database in the same ArcGIS Online folder as the urban model. To achieve this, add a folder attribute to the arguments.
mutation {
createUrbanDesignDatabase(
urbanModelId: "91a9f86012a64870a5a3a3fb9deb2XXX"
title: "Hotel (Urban Design Database)"
folderId: "95534b15e255459c98709a1555f9dXXX"
)
}Add a new project
Use the create mutation to add a new project to the just created design database.
Provide the required arguments End, Event, Owner, Start and geometry of the project.
What is more, you must specify the sub-fields, which will be returned by the server in response.
In the example below the only sub-field to be returned is the Global attribute of the just created project.
mutation {
createProjects(
urbanDatabaseId: "9c3ba6c054f945acabd1256bcbcf8XXX"
projects: [
{
attributes: { EndDate: 1514847600000, EventName: "New event", OwnerName: "urban_agnieszka_dev", StartDate: 1459943798196 }
geometry: {
rings: [
[
[-9025620.6397, 3800089.023199998]
[-9025647.4858, 3800060.340400003]
[-9025675.7504, 3800082.3681000024]
[-9025704.2087, 3800104.546599999]
[-9025677.0497, 3800132.425999999]
[-9025649.5113, 3800158.5407999977]
[-9025621.2685, 3800137.468000002]
[-9025593.723, 3800116.0534999967]
[-9025620.6397, 3800089.023199998]
]
]
spatialReference: { wkid: 3857 }
}
}
]
) {
attributes {
GlobalID
}
}
}Edit an existing project
Use the update mutation to edit the description of the just created project. Note, that this example uses variables,
which allows you to pass dynamic arguments in the query or mutation string. Provide a name for your mutation, for example, update, and declare the variables and their types.
Next, replace the static value in the mutation body with $variable.
mutation updateMyUrbanEvent($studyArea: PolygonInput!, $myDescription: String!) {
updateProjects(
urbanDatabaseId: "9c3ba6c054f945acabd1256bcbcf8XXX"
projects: [{ attributes: { GlobalID: "078D217A-1764-4AA2-9D23-6FCDA01F0XXX", Description: $myDescription }, geometry: $studyArea }]
) {
attributes {
GlobalID
CustomID
Description
}
geometry {
rings
}
}
}Finally, pass your input variables to the QUERY VARIABLES tab at the bottom of the Playground. The variables should be stored in a separate variables dictionary in the JSON format.
{
"studyArea": {
"rings": [
[
[-9025620.6397, 3800089.023199998],
[-9025647.4858, 3800060.340400003],
[-9025675.7504, 3800082.3681000024],
[-9025704.2087, 3800104.546599999],
[-9025677.0497, 3800132.425999999],
[-9025649.5113, 3800158.5407999977],
[-9025621.2685, 3800137.468000002],
[-9025593.723, 3800116.0534999967],
[-9025620.6397, 3800089.023199998]
]
],
"spatialReference": {
"wkid": 3857
}
},
"myDescription": "new updated description of the project"
}