Use the Programmatic Reticle Tool to edit and create geometries with programmatic operations to facilitate customized workflows such as those using buttons rather than tap interactions.
Use case
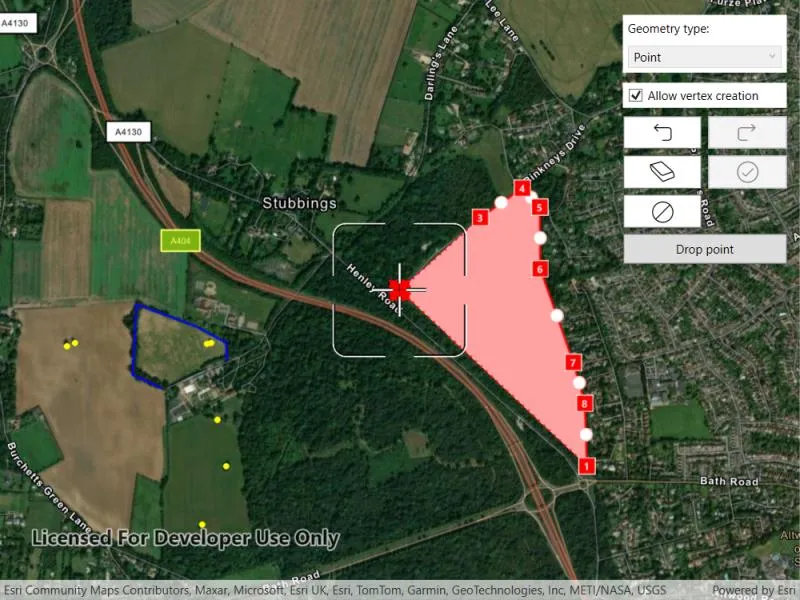
A field worker can use a button driven workflow to mark important features on a map. They can digitize features like sample or observation locations, fences, pipelines, and building footprints using point, multipoint, polyline, and polygon geometries. To create and edit geometries, workers can use a vertex-based reticle tool to specify vertex locations by panning the map to position the reticle over a feature of interest. Using a button driven workflow they can then place new vertices or pick up, move and drop existing vertices.
How to use the sample
To create a new geometry, select the geometry type you want to create (i.e. points, multipoints, polyline, or polygon) in the settings view. Press the button to start the geometry editor, pan the map to position the reticle then press the button to place a vertex. To edit an existing geometry, tap the geometry to be edited in the map and perform edits by positioning the reticle over a vertex and pressing the button to pick it up. The vertex can be moved by panning the map and dropped in a new position by pressing the button again.
Vertices can be selected and the viewpoint can be updated to their position by tapping them.
Vertex creation can be disabled using the switch in the settings view. When this switch is toggled off new vertex creation is prevented, existing vertices can be picked up and moved, but mid-vertices cannot be selected or picked up and will not grow when hovered. The feedback vertex and feedback lines under the reticle will also no longer be visible.
Use the buttons in the settings view to undo or redo changes made to the geometry and the cancel and done buttons to discard and save changes, respectively.
How it works
- Create a
GeometryEditorand set it to the MapView usingMyMapView.GeometryEditor. - Start the
GeometryEditorusingGeometryEditor.Start(GeometryType)to create a new geometry orGeometryEditor.Start(Geometry)to edit an existing geometry.- If using the Geometry Editor to edit an existing geometry, the geometry must be retrieved from the graphics overlay being used to visualize the geometry prior to calling the start method. To do this:
- Use
MapView.IdentifyGraphicsOverlayAsync(...)to identify graphics at the location of a tap. - Access the
MapView.IdentifyGraphicsOverlayAsync(...). - Find the desired graphic in the
results.FirstOrDefault()list. - Access the geometry associated with the
GraphicusingGraphic.Geometry- this will be used in theGeometryEditor.Start(Geometry)method.
- Use
- If using the Geometry Editor to edit an existing geometry, the geometry must be retrieved from the graphics overlay being used to visualize the geometry prior to calling the start method. To do this:
- Create a
ProgrammaticReticleTooland set theGeometryEditor.Tool. - Add event handlers to listen to
GeometryEditor.HoveredElementChangedandGeometryEditorPickedUpElementChanged.- These events can be used to determine the effect a button press will have and set the button text accordingly.
- Listen to tap events when the geometry editor is active to select and navigate to tapped vertices and mid-vertices.
- To retrieve the tapped element and update the viewpoint:
- Use
MapView.IdentifyGeometryEditorAsync(...)to identify geometry editor elements at the location of the tap. - Access the
MapView.IdentifyGeometryEditorAsync(...). - Find the desired element in the
results.Elements.FirstOrDefault()list. - Depending on whether or not the element is a
GeometryEditorVertexorGeometryEditorMidVertexuseGeometryEditor.SelectVertex(...)orGeometryEditor.SelectMidVertex(...)to select it. - Update the viewpoint using
MapView.SetViewpointAsync(...).
- Use
- To retrieve the tapped element and update the viewpoint:
- Enable and disable the vertex creation preview using
ProgrammaticReticleTool.VertexCreationPreviewEnabled.- To prevent mid-vertex growth when hovered use
ProgrammaticReticleTool.Style.GrowEffect.ApplyToMidVertices.
- To prevent mid-vertex growth when hovered use
- Check to see if undo and redo are possible during an editing session using
GeometryEditor.CanUndoandGeometryEditor.CanRedo. If it’s possible, useGeometryEditor.Undo()andGeometryEditor.Redo().- A picked up element can be returned to its previous position using
GeometryEditor.CancelCurrentAction(). This can be useful to undo a pick up without undoing any change to the geometry. Use theGeometryEditor.PickedUpElementproperty to check for a picked up element.
- A picked up element can be returned to its previous position using
- Check whether the currently selected
GeometryEditorElementcan be deleted (GeometryEditor.SelectedElement.CanDelete). If the element can be deleted, delete usingGeometryEditor.DeleteSelectedElement(). - Call
GeometryEditor.Stop()to finish the editing session and store theGraphic. TheGeometryEditordoes not automatically handle the visualization of a geometry output from an editing session. This must be done manually by propagating the geometry returned into aGraphicadded to aGraphicsOverlay.- To create a new
Graphicin theGraphicsOverlay:- Using
Graphic(Geometry), create a new Graphic with the geometry returned by theGeometryEditor.Stop()method. - Append the
Graphicto theGraphicsOverlay(i.e.GraphicsOverlay.Graphics.Add(Graphic)).
- Using
- To update the geometry underlying an existing
Graphicin theGraphicsOverlay:- Replace the existing
Graphic’sGeometryproperty with the geometry returned by theGeometryEditor.Stop()method.
- Replace the existing
- To create a new
Relevant API
- Geometry
- GeometryEditor
- Graphic
- GraphicsOverlay
- MapView
- ProgrammaticReticleTool
Additional information
The sample demonstrates a number of workflows which can be altered depending on desired app functionality:
-
picking up a hovered element combines selection and pick up, this can be separated into two steps to require selection before pick up.
-
tapping a vertex or mid-vertex selects it and updates the viewpoint to its position. This could be changed to not update the viewpoint or also pick up the element.
With the hovered and picked up element changed events and the programmatic APIs on the ProgrammaticReticleTool a broad range of editing experiences can be implemented.
Tags
draw, edit, freehand, geometry editor, programmatic, reticle, sketch, vertex
Sample code
// Copyright 2025 Esri.//// Licensed under the Apache License, Version 2.0 (the "License"); you may not use this file except in compliance with the License.// You may obtain a copy of the License at: http://www.apache.org/licenses/LICENSE-2.0//// Unless required by applicable law or agreed to in writing, software distributed under the License is distributed on an// "AS IS" BASIS, WITHOUT WARRANTIES OR CONDITIONS OF ANY KIND, either express or implied. See the License for the specific// language governing permissions and limitations under the License.
using Esri.ArcGISRuntime.Data;using Esri.ArcGISRuntime.Geometry;using Esri.ArcGISRuntime.Mapping;using Esri.ArcGISRuntime.Symbology;using Esri.ArcGISRuntime.UI;using Esri.ArcGISRuntime.UI.Controls;using Esri.ArcGISRuntime.UI.Editing;using System;using System.Collections.Generic;using System.Linq;using System.Windows;using Color = System.Drawing.Color;
namespace ArcGIS.WPF.Samples.EditGeometriesWithProgrammaticReticleTool{    [ArcGIS.Samples.Shared.Attributes.Sample(        name: "Edit geometries with programmatic reticle tool",        category: "Geometry",        description: "Use the Programmatic Reticle Tool to edit and create geometries with programmatic operations to facilitate customized workflows such as those using buttons rather than tap interactions.",        instructions: "To create a new geometry, select the geometry type you want to create (i.e. points, multipoints, polyline, or polygon) in the settings view. Press the button to start the geometry editor, pan the map to position the reticle then press the button to place a vertex. To edit an existing geometry, tap the geometry to be edited in the map and perform edits by positioning the reticle over a vertex and pressing the button to pick it up. The vertex can be moved by panning the map and dropped in a new position by pressing the button again.",        tags: new[] { "draw", "edit", "freehand", "geometry editor", "programmatic", "reticle", "sketch", "vertex" })]    public partial class EditGeometriesWithProgrammaticReticleTool    {        // Hold references to the geometry editor and programmatic reticle tool.        private GeometryEditor _geometryEditor = new GeometryEditor();        private ProgrammaticReticleTool _programmaticReticleTool = new ProgrammaticReticleTool();
        // Hold references to the graphics overlay and selected graphic.        private Graphic _selectedGraphic;        private GraphicsOverlay _graphicsOverlay;
        // Flag to indicate whether vertex creation is allowed.        private bool _allowVertexCreation = true;
        // Reticle state to determine the current action of the programmatic reticle tool.        private ReticleState _reticleState = ReticleState.Default;
        // Hold references to the symbols used for displaying  geometries.        private SimpleFillSymbol _polygonSymbol;        private SimpleLineSymbol _polylineSymbol;        private SimpleMarkerSymbol _pointSymbol, _multiPointSymbol;
        private string _pinkneysGreenJson = @"{""rings"":[[[-84843.262719916485,6713749.9329888355],[-85833.376589175183,6714679.7122141244],                    [-85406.822347959576,6715063.9827222107],[-85184.329997390232,6715219.6195847588],                    [-85092.653857582554,6715119.5391713539],[-85090.446872787768,6714792.7656492386],                    [-84915.369168906298,6714297.8798246197],[-84854.295522911285,6714080.907587287],                    [-84843.262719916485,6713749.9329888355]]],""spatialReference"":{""wkid"":102100,""latestWkid"":3857}}";
        private string _beechLodgeBoundaryJson = @"{""paths"":[[[-87090.652708065536,6714158.9244240439],[-87247.362370337316,6714232.880689906],                    [-87226.314032974493,6714605.4697726099],[-86910.499335316243,6714488.006312645],                    [-86750.82198052686,6714401.1768307304],[-86749.846825938366,6714305.8450344801]]],""spatialReference"":{""wkid"":102100,""latestWkid"":3857}}";
        private string _treeMarkersJson = @"{""points"":[[-86750.751150056443,6713749.4529355941],[-86879.381793060631,6713437.3335486846],                    [-87596.503104619667,6714381.7342108283],[-87553.257569537804,6714402.0910389507],                    [-86831.019903597829,6714398.4128562529],[-86854.105933315877,6714396.1957954112],                    [-86800.624094892439,6713992.3374453448]],""spatialReference"":{""wkid"":102100,""latestWkid"":3857}}";
        // Dictionary to map geometry type names to GeometryType enum values.        private readonly Dictionary<string, GeometryType> _geometryTypes = new Dictionary<string, GeometryType>()        {            { "Point", GeometryType.Point },            { "Multipoint", GeometryType.Multipoint },            { "Polygon", GeometryType.Polygon },            { "Polyline", GeometryType.Polyline },        };
        public EditGeometriesWithProgrammaticReticleTool()        {            InitializeComponent();            Initialize();        }
        private void Initialize()        {            MyMapView.Map = new Map()            {                Basemap = new Basemap(BasemapStyle.ArcGISImagery),                InitialViewpoint = new Viewpoint(51.523806, -0.775395, 2e4)            };
            // Create the geometry editor and add it to the map view.            _geometryEditor = new GeometryEditor();            MyMapView.GeometryEditor = _geometryEditor;
            // Create the programmatic reticle tool and set it as the geometry editor tool.            _programmaticReticleTool = new ProgrammaticReticleTool();            _geometryEditor.Tool = _programmaticReticleTool;
            // Add event handlers for geometry editor events.            MyMapView.GeometryEditor.HoveredElementChanged += GeometryEditor_HoveredElementChanged;            MyMapView.GeometryEditor.PickedUpElementChanged += GeometryEditor_PickedUpElementChanged;            MyMapView.GeometryEditor.PropertyChanged += GeometryEditor_PropertyChanged;
            // Enable vertex creation by default and set up the switch.            AllowVertexCreationCheckBox.IsChecked = true;            AllowVertexCreationCheckBox.Checked += AllowVertexCreationCheckBox_Checked;            AllowVertexCreationCheckBox.Unchecked += AllowVertexCreationCheckBox_Checked;
            // Create a graphics overlay and add it to the map view.            _graphicsOverlay = new GraphicsOverlay();            MyMapView.GraphicsOverlays.Add(_graphicsOverlay);
            // Set the geometry type picker and its default value.            GeometryTypePicker.ItemsSource = _geometryTypes;            GeometryTypePicker.SelectedIndex = 0;
            // Create the initial graphics for the sample.            CreateInitialGraphics();
            // Set the multifunction button text.            ResetFromEditingSession();        }
        private void SetButtonText()        {            // Update the multifunction button text based on the geometry editor state and hovered/picked up elements.            Dispatcher.Invoke(() =>            {                // Picked up elements can be dropped, so the button text indicates that a point can be dropped.                if (MyMapView.GeometryEditor.PickedUpElement != null)                {                    // If a vertex is picked up, the button text indicates that it can be dropped.                    MultifunctionButton.Content = "Drop point";                    MultifunctionButton.IsEnabled = true;                    _reticleState = ReticleState.PickedUp;                    return;                }
                // When vertex creation is allowed, the button text changes based on the hovered or picked up element. Vertices and mid-vertices can be picked up.                if (_allowVertexCreation)                {                    MultifunctionButton.IsEnabled = true;
                    if (MyMapView.GeometryEditor.PickedUpElement != null)                    {                        MultifunctionButton.Content = "Drop point";                        _reticleState = ReticleState.PickedUp;                    }                    else if (MyMapView.GeometryEditor.HoveredElement != null && (MyMapView.GeometryEditor.HoveredElement is GeometryEditorVertex || MyMapView.GeometryEditor.HoveredElement is GeometryEditorMidVertex))                    {                        MultifunctionButton.Content = "Pick up point";                        _reticleState = MyMapView.GeometryEditor.HoveredElement is GeometryEditorVertex ? ReticleState.HoveringVertex : ReticleState.HoveringMidVertex;                    }                    else                    {                        MultifunctionButton.Content = "Insert point";                        _reticleState = ReticleState.Default;                    }                }                // When vertex creation is not allowed, the button text changes based on the picked up element only. Only vertices can be picked up, mid-vertices cannot be picked up.                else                {                    // If no vertex is picked up, the button text indicates that a point can be picked up if the hovered element is a geometry editor vertex.                    MultifunctionButton.Content = "Pick up point";                    MultifunctionButton.IsEnabled = MyMapView.GeometryEditor.HoveredElement is GeometryEditorVertex;                    _reticleState = MyMapView.GeometryEditor.HoveredElement is GeometryEditorVertex ? ReticleState.HoveringVertex : ReticleState.HoveringMidVertex;                }            });        }
        private void SetUndoButtonEnabled()        {            // Enable the undo button if the geometry editor can undo or if an element is picked up.            UndoButton.IsEnabled = _geometryEditor.CanUndo || _geometryEditor.PickedUpElement != null;        }
        // Reset the UI after the editor stops.        private void ResetFromEditingSession()        {            // Reset the selected graphic.            if (_selectedGraphic != null)            {                _selectedGraphic.IsSelected = false;                _selectedGraphic.IsVisible = true;            }            _selectedGraphic = null;
            // Update the multifunction button text and enable it.            MultifunctionButton.Content = "Start geometry editor";            MultifunctionButton.IsEnabled = true;        }
        private void CreateInitialGraphics()        {            // Create symbols for displaying new geometries.            _pointSymbol = new SimpleMarkerSymbol(SimpleMarkerSymbolStyle.Square, Color.OrangeRed, 10);            _multiPointSymbol = new SimpleMarkerSymbol(SimpleMarkerSymbolStyle.Circle, Color.Yellow, 5);            _polylineSymbol = new SimpleLineSymbol(SimpleLineSymbolStyle.Solid, Color.Blue, 2);            var polygonLineSymbol = new SimpleLineSymbol(SimpleLineSymbolStyle.Dash, Color.Black, 1);            _polygonSymbol = new SimpleFillSymbol(SimpleFillSymbolStyle.Solid, Color.FromArgb(70, 255, 0, 0), polygonLineSymbol);
            // Create geometries from Json formatted strings.            var pinkneysGreen = (Polygon)Geometry.FromJson(_pinkneysGreenJson);            var beechLodgeBoundary = (Polyline)Geometry.FromJson(_beechLodgeBoundaryJson);            var treeMarkers = (Multipoint)Geometry.FromJson(_treeMarkersJson);
            // Add new example graphics from the geometries and symbols to the graphics overlay.            _graphicsOverlay.Graphics.Add(new Graphic(pinkneysGreen) { Symbol = _polygonSymbol });            _graphicsOverlay.Graphics.Add(new Graphic(beechLodgeBoundary) { Symbol = _polylineSymbol });            _graphicsOverlay.Graphics.Add(new Graphic(treeMarkers) { Symbol = _multiPointSymbol });        }
        // Return the graphic style based on geometry type.        private Symbol GetSymbol(GeometryType geometryType)        {            switch (geometryType)            {                case GeometryType.Point:                    return _pointSymbol;
                case GeometryType.Multipoint:                    return _multiPointSymbol;
                case GeometryType.Polyline:                    return _polylineSymbol;
                case GeometryType.Polygon:                    return _polygonSymbol;            }            return null;        }
        #region Event handlers        private void GeometryEditor_PickedUpElementChanged(object sender, PickedUpElementChangedEventArgs e)        {            // Update the button text based on the picked up element.            SetButtonText();
            // Update the undo button state based on the geometry editor state.            SetUndoButtonEnabled();        }
        private void GeometryEditor_HoveredElementChanged(object sender, HoveredElementChangedEventArgs e)        {            // Update the button text based on the hovered element.            SetButtonText();        }
        private void GeometryEditor_PropertyChanged(object sender, System.ComponentModel.PropertyChangedEventArgs e)        {            if (e.PropertyName == "CanUndo")            {                SetUndoButtonEnabled();            }        }
        private void MultifunctionButton_Click(object sender, RoutedEventArgs e)        {            // If the geometry editor is not started, start it with the selected geometry type.            if (!_geometryEditor.IsStarted)            {                _geometryEditor.Start(((KeyValuePair<string, GeometryType>)GeometryTypePicker.SelectedItem).Value);
                // Set the button text to indicate that the editor is active.                SetButtonText();                return;            }
            if (_allowVertexCreation)            {                // When vertex creation is allowed vertices and mid-vertices can be picked up, new vertices can be inserted.                switch (_reticleState)                {                    case ReticleState.Default:                    case ReticleState.PickedUp:                        _programmaticReticleTool.PlaceElementAtReticle();                        break;                    case ReticleState.HoveringVertex:                    case ReticleState.HoveringMidVertex:                        _programmaticReticleTool.SelectElementAtReticle();                        _programmaticReticleTool.PickUpSelectedElement();                        break;                }            }            else            {                // When vertex creation is not allowed functionality is limited to picking up and moving existing vertices, mid-vertices cannot be picked up.                switch (_reticleState)                {                    case ReticleState.PickedUp:                        _programmaticReticleTool.PlaceElementAtReticle();                        break;                    case ReticleState.HoveringVertex:                        _programmaticReticleTool.SelectElementAtReticle();                        _programmaticReticleTool.PickUpSelectedElement();                        break;                    default:                        // In edit mode, only picked up vertices can be placed and only vertices can be picked up.                        break;                }            }        }
        private async void MyMapView_GeoViewTapped(object sender, GeoViewInputEventArgs e)        {            try            {                // If the geometry editor is started, identify the geometry editor result at the tapped position.                if (_geometryEditor.IsStarted)                {                    // Identify the geometry editor result at the tapped position.                    IdentifyGeometryEditorResult result = await MyMapView.IdentifyGeometryEditorAsync(e.Position, 10);
                    if (result != null && result.Elements.Count > 0)                    {                        // Get the first element from the result.                        GeometryEditorElement element = result.Elements.FirstOrDefault();
                        // If the element is a vertex or mid-vertex, set the viewpoint to its position and select it.                        if (element is GeometryEditorVertex vertex)                        {                            await MyMapView.SetViewpointAsync(new Viewpoint(new MapPoint(vertex.Point.X, vertex.Point.Y, vertex.Point.SpatialReference)), TimeSpan.FromSeconds(0.3));                            _geometryEditor.SelectVertex(vertex.PartIndex, vertex.VertexIndex);                        }                        else if (element is GeometryEditorMidVertex midVertex && _allowVertexCreation)                        {                            await MyMapView.SetViewpointAsync(new Viewpoint(new MapPoint(midVertex.Point.X, midVertex.Point.Y, midVertex.Point.SpatialReference)), TimeSpan.FromSeconds(0.3));                            _geometryEditor.SelectMidVertex(midVertex.PartIndex, midVertex.SegmentIndex);                        }                    }
                    return;                }
                // Identify graphics in the graphics overlay using the tapped position.                IReadOnlyList<IdentifyGraphicsOverlayResult> results = await MyMapView.IdentifyGraphicsOverlaysAsync(e.Position, 10, false);
                // Try to get the first graphic from the first result.                _selectedGraphic = results.FirstOrDefault()?.Graphics?.FirstOrDefault();            }            catch (Exception ex)            {                // Report exceptions.                MessageBox.Show("Error editing: " + ex.Message, ex.GetType().Name, MessageBoxButton.OK, MessageBoxImage.Error);
                ResetFromEditingSession();                return;            }
            // Return since no graphic was selected.            if (_selectedGraphic == null) return;
            _selectedGraphic.IsSelected = true;
            // Hide the selected graphic and start an editing session with a copy of it.            _geometryEditor.Start(_selectedGraphic.Geometry);
            // Set the button text to indicate that the editor is active.            SetButtonText();
            // If vertex creation is allowed, set the viewpoint to the center of the selected graphic's geometry.            // Otherwise, set the viewpoint to the end point of the first part of the geometry.            if (_allowVertexCreation)            {                await MyMapView.SetViewpointAsync(new Viewpoint(_selectedGraphic.Geometry.Extent.GetCenter(), MyMapView.GetCurrentViewpoint(ViewpointType.CenterAndScale).TargetScale), TimeSpan.FromSeconds(0.3));            }            else            {                switch (_selectedGraphic.Geometry)                {                    case Polygon polygon:                        await MyMapView.SetViewpointAsync(new Viewpoint(polygon.Parts[0].EndPoint, MyMapView.GetCurrentViewpoint(ViewpointType.CenterAndScale).TargetScale), TimeSpan.FromSeconds(0.3));                        break;                    case Polyline polyline:                        await MyMapView.SetViewpointAsync(new Viewpoint(polyline.Parts[0].EndPoint, MyMapView.GetCurrentViewpoint(ViewpointType.CenterAndScale).TargetScale), TimeSpan.FromSeconds(0.3));                        break;                    case Multipoint multiPoint:                        await MyMapView.SetViewpointAsync(new Viewpoint(multiPoint.Points.Last(), MyMapView.GetCurrentViewpoint(ViewpointType.CenterAndScale).TargetScale), TimeSpan.FromSeconds(0.3));                        break;                    case MapPoint point:                        await MyMapView.SetViewpointAsync(new Viewpoint(point, MyMapView.GetCurrentViewpoint(ViewpointType.CenterAndScale).TargetScale), TimeSpan.FromSeconds(0.3));                        break;                }            }
            // Hide the selected graphic while editing.            _selectedGraphic.IsVisible = false;        }
        private void SaveButton_Click(object sender, RoutedEventArgs e)        {            // Stop the geometry editor and get the resulting geometry.            Geometry geometry = _geometryEditor.Stop();
            if (geometry != null)            {                if (_selectedGraphic != null)                {                    // Update the geometry of the graphic being edited and make it visible again.                    _selectedGraphic.Geometry = geometry;                }                else                {                    // Create a new graphic based on the geometry and add it to the graphics overlay.                    _graphicsOverlay.Graphics.Add(new Graphic(geometry, GetSymbol(geometry.GeometryType)));                }            }
            ResetFromEditingSession();        }
        // Stop the geometry editor without saving the geometry stored within.        private void DiscardButton_Click(object sender, RoutedEventArgs e)        {            // Stop the geometry editor and discard the geometry.            _geometryEditor.Stop();            ResetFromEditingSession();        }
        // Undo the last change made to the geometry while editing is active.        private void UndoButton_Click(object sender, RoutedEventArgs e)        {            if (_geometryEditor.PickedUpElement != null)            {                _geometryEditor.CancelCurrentAction();            }            else            {                _geometryEditor.Undo();            }        }
        // Redo the last change made to the geometry while editing is active.        private void RedoButton_Click(object sender, RoutedEventArgs e)        {            _geometryEditor.Redo();        }
        private void AllowVertexCreationCheckBox_Checked(object sender, RoutedEventArgs e)        {            // Update the programmatic reticle tool and geometry editor settings based on the switch state.            _programmaticReticleTool.VertexCreationPreviewEnabled = _programmaticReticleTool.Style.GrowEffect.ApplyToMidVertices = _allowVertexCreation = AllowVertexCreationCheckBox.IsChecked == true;
            // If the geometry editor is started, update the button text to reflect the new state.            if (_geometryEditor.IsStarted)            {                SetButtonText();            }        }
        // Delete the currently selected element of the geometry editor.        private void DeleteSelectedButton_Click(object sender, RoutedEventArgs e)        {            _geometryEditor.DeleteSelectedElement();        }        #endregion    }
public enum ReticleState { Default, PickedUp, HoveringVertex, HoveringMidVertex, }}<UserControl x:Class="ArcGIS.WPF.Samples.EditGeometriesWithProgrammaticReticleTool.EditGeometriesWithProgrammaticReticleTool" xmlns="http://schemas.microsoft.com/winfx/2006/xaml/presentation" xmlns:x="http://schemas.microsoft.com/winfx/2006/xaml" xmlns:converters="clr-namespace:ArcGIS.WPF.Viewer.Converters" xmlns:esri="http://schemas.esri.com/arcgis/runtime/2013">
<UserControl.Resources> <Style x:Key="IconStyle" TargetType="Button"> <Style.Setters> <Setter Property="FontFamily" Value="{StaticResource CalciteUIIconsMediumFontFamily}" /> <Setter Property="FontSize" Value="24" /> <Setter Property="Background" Value="White" /> <Setter Property="HorizontalAlignment" Value="Stretch" /> <Setter Property="Padding" Value="3" /> <Setter Property="Margin" Value="3" /> </Style.Setters> <Style.Triggers> <Trigger Property="IsEnabled" Value="False"> <Setter Property="Opacity" Value="0.8" /> </Trigger> </Style.Triggers> </Style> <converters:BoolNegationConverter x:Key="BoolNegationConverter" /> </UserControl.Resources>
<Grid> <esri:MapView x:Name="MyMapView" GeoViewTapped="MyMapView_GeoViewTapped" /> <Grid Margin="10" HorizontalAlignment="Right" VerticalAlignment="Top"> <Grid.RowDefinitions> <RowDefinition Height="auto" /> <RowDefinition Height="auto" /> <RowDefinition Height="auto" /> <RowDefinition Height="auto" /> <RowDefinition Height="auto" /> <RowDefinition Height="auto" /> </Grid.RowDefinitions> <Grid.ColumnDefinitions> <ColumnDefinition Width="85" /> <ColumnDefinition Width="85" /> </Grid.ColumnDefinitions> <Border Grid.Row="0" Grid.ColumnSpan="2" Margin="3,5" Background="White"> <StackPanel> <Label Content="Geometry type:" /> <ComboBox x:Name="GeometryTypePicker" Grid.Row="1" Grid.ColumnSpan="2" Margin="5" DisplayMemberPath="Key" IsEnabled="{Binding GeometryEditor.IsStarted, ElementName=MyMapView, Converter={StaticResource BoolNegationConverter}}" ToolTipService.ToolTip="Geometry types" /> </StackPanel> </Border> <Border Grid.Row="1" Grid.ColumnSpan="2" Margin="3,5" Background="White"> <CheckBox x:Name="AllowVertexCreationCheckBox" Margin="5" Checked="AllowVertexCreationCheckBox_Checked" Content="Allow vertex creation" Unchecked="AllowVertexCreationCheckBox_Checked" /> </Border> <Button x:Name="UndoButton" Grid.Row="2" Click="UndoButton_Click" IsEnabled="False" Style="{StaticResource IconStyle}" ToolTipService.ToolTip="Undo" Content="{StaticResource CalciteUIIcons_Glyph_Undo}" /> <Button Grid.Row="2" Grid.Column="1" Click="RedoButton_Click" IsEnabled="{Binding GeometryEditor.CanRedo, ElementName=MyMapView}" Style="{StaticResource IconStyle}" ToolTipService.ToolTip="Redo" Content="{StaticResource CalciteUIIcons_Glyph_Redo}" /> <Button Grid.Row="3" Click="DeleteSelectedButton_Click" IsEnabled="{Binding GeometryEditor.SelectedElement.CanDelete, ElementName=MyMapView, FallbackValue=False}" Style="{StaticResource IconStyle}" ToolTipService.ToolTip="Delete selected" Content="{StaticResource CalciteUIIcons_Glyph_Erase}" /> <Button x:Name="SaveButton" Grid.Row="3" Grid.Column="1" Click="SaveButton_Click" IsEnabled="{Binding GeometryEditor.CanUndo, ElementName=MyMapView}" Style="{StaticResource IconStyle}" ToolTipService.ToolTip="Save edits" Content="{StaticResource CalciteUIIcons_Glyph_CheckCircle}" /> <Button Grid.Row="4" Click="DiscardButton_Click" IsEnabled="{Binding GeometryEditor.IsStarted, ElementName=MyMapView}" Style="{StaticResource IconStyle}" ToolTipService.ToolTip="Discard edits" Content="{StaticResource CalciteUIIcons_Glyph_CircleDisallowed}" /> <Button x:Name="MultifunctionButton" Grid.Row="5" Grid.ColumnSpan="2" Height="30" Margin="3" Padding="3" Click="MultifunctionButton_Click" /> </Grid> </Grid></UserControl>