In this tutorial, you will create a custom data feed that uses the Yelp Fusion API to fetch data from Yelp. Click here to access the source code for the provider.
Create a Custom Data App
Complete the following steps to create a custom data app named yelp-data-app.
-
On your development machine, open a command prompt and navigate to a directory where you want your project to be saved.
-
Create the app by running the command:
cdf createapp yelp-data-app.
-
Verify your app runs by running the command:
npm start.
-
Once you verify that the app is running, stop it by running the command:
ctrl + c.
Create a Custom Data Provider
-
After you've created a custom data app, open a command prompt in the app directory and run the
cdf createprovider yelp-data-providercommand. This will create a yelp-data-provider directory that includes a project template with boilerplate code.
Install required packages
-
In the command prompt, navigate to the providers/yelp-data-provider directory, and run the
npm install yelp-fusioncommand to install a wrapper client for making requests to the Yelp Fusion API.
Provide Your Yelp Fusion API Key
-
In the providers/yelp-data-provider/src directory, create a file called yelp-provider-config.json. Enter your Yelp Fusion API Key for the
yelp.apifield in the yelp-provider-config.json file. The file should look like the following.Key Use dark colors for code blocks Copy { "yelp": { "apiKey": "<generated API key here>" } }
Code provider logic
-
Write custom data provider code within the Model function in the model.js file. The Model function encapsulates the logic required to access data from Yelp and format it as GeoJSON. Replace the contents of the model.js file with the following code.
Use dark colors for code blocks Copy const config = require(".yelp-provider-config.json"); const parseGeoJSON = require("./parseGeoJSON"); const yelp = require("yelp-fusion"); const yelpClient = yelp.client(config.yelp.apiKey); function Model() {} Model.prototype.getData = function(req, callback) { yelpClient .search({ categories: "restaurants", location: "Redlands" }) .then(response => { geojson = parseGeoJSON(response.jsonBody); geojson.metadata = { name: [category, "_in_", city].join("") }; callback(null, geojson); }) .catch(e => { callback(e); }); }; module.exports = Model; -
Create a new file called parseGeoJSON.js in the src directory to house an export function to parse a Yelp API response as GeoJSON. Add the following code to the file.
Use dark colors for code blocks Copy module.exports = body => { return { type: "FeatureCollection", features: body.businesses.map(business => { return { type: "Feature", properties: { name: business.name, category: business.categories[0].title }, geometry: { type: "Point", coordinates: [business.coordinates.longitude, business.coordinates.latitude] } }; }) }; };
Parameterize the Provider
The custom data provider makes use of two service parameters, category and city, which can be used to make the provider logic more generic. In this tutorial, you will use the category and city parameters to specify the Yelp category to filter by and the location for returning Yelp results.
-
Add the following code to the top of the
getfunction in the model.js file.Data Use dark colors for code blocks Copy const category = req.params.category; const city = req.params.city; -
Next, modify the object passed as an argument to the
yelpfunction as follows.Client.search Use dark colors for code blocks Copy yelpClient .search({ categories: category, location: city }) .then(/* ... */) .catch(/* ... */); -
At this point, the contents of the model.js should look like the following.
Use dark colors for code blocks Copy const config = require(".yelp-provider-config.json"); const parseGeoJSON = require("./parseGeoJSON"); const yelp = require("yelp-fusion"); const yelpClient = yelp.client(config.yelp.apiKey); function Model() {} Model.prototype.getData = function(req, callback) { const category = req.params.category; const city = req.params.city; yelpClient .search({ categories: category, location: city }) .then(response => { geojson = parseGeoJSON(response.jsonBody); geojson.metadata = { name: [category, "_in_", city].join("") }; callback(null, geojson); }) .catch(e => { callback(e); }); }; module.exports = Model; -
In the providers/yelp-data-provider/cdconfig.json file, add the following to the
servicearray:Parameters cdconfig.jsonUse dark colors for code blocks Copy 1 2 3 4 5 6 7 8 9 10 11{ "name": "yelp-data-provider", "arcgisVersion": "12.0.0", "parentServiceType": "FeatureServer", "customdataRuntimeVersion": "1", "type": "provider", "editingEnabled": false, "properties": { "serviceParameters": [ { "key": "category",
Customize Symbols and Labels
To optionally override the default symbology and add customized feature labels, add the metadata properties renderer and labeling to the geojson.metadata as shown below.
// code snippet
geojson.metadata = {
name: [category, "_in_", city].join(""),
labelingInfo: [
{
"symbol": {
"kerning": true,
"color": [214, 75, 75, 255],
"yoffset": 0,
"xoffset": 0,
"haloColor": [211, 211, 211, 255],
"rotated": false,
"type": "esriTS",
"horizontalAlignment": "center",
"haloSize": 1,
"angle": 0,
"text": "",
"verticalAlignment": "baseline",
"font": {
"size": 12.75,
"family": "Arial"
}
},
"maxScale": 0,
"repeatLabel": true,
"where": "category = 'Cocktail Bars'",
"minScale": 0,
"labelExpressionInfo": {
"expression": "$feature[\"category\"]"
},
"labelExpression": "[category]",
"labelPlacement": "esriServerPolygonPlacementAlwaysHorizontal"
}
],
renderer: {
"type": "simple",
"symbol": {
"type": "esriSMS",
"style": "esriSMSCircle",
"color": [255, 0, 0, 255],
"size": 10,
"angle": 0,
"xoffset": 0,
"yoffset": 0,
"outline": {
"color": [0, 0, 0, 255],
"width": 1
}
},
"label": "",
"description": "",
"rotationType": "geographic",
"rotationExpression": "[Rotation] * 2"
}
};
// code snippetNow that you've created a Yelp data provider, you're ready to test and deploy it to ArcGIS Server.
Test the Custom Data Provider
-
Open a command prompt and navigate to the yelp-data-app directory.
-
Run the
npm startcommand to start the app.
-
Send a GET request to http://localhost:8080/yelp-data-provider/rest/services/FeatureServer/0/query with the header
x-esri-service-paramsand the a value of{"category". Verify that the custom data provider is returning restaurants in Redlands.:"restaurants","city" :" Redlands"}
Generate a Custom Data Package File
To deploy the Yelp data provider to ArcGIS Server, you must first package it into a custom data package file (.cdpk).
-
Stop the custom data app if it's running.
-
Open a command prompt and navigate to the yelp-data-app directory.
-
Run the
cdf export yelp-data-providercommand. This will create a file named yelp-data-provider.cdpk in the yelp-data-app directory.
Deploy the Custom Data Feed Package to ArcGIS Server
Once you have a .cdpk file, use it to register the Yelp data provider with ArcGIS Server. Instructions for registering the Yelp data provider through ArcGIS Server Administrator are detailed below, but with ArcGIS Enterprise version 11.3 and higher, you may complete this process with ArcGIS Server Manager or with the CDF CLI tool.
-
In a web browser, navigate to the ArcGIS Server Administrator Directory and sign in as an administrator.
-
Click uploads > upload.


-
On the Upload Item page, click Choose File and select the yelp-data-provider.cdpk file. Optionally, provide a description in the Description text box.

-
Click Upload. Once the file is uploaded, you will be directed to a page with the following header: Uploaded item - <item_id>. Copy the item id.

-
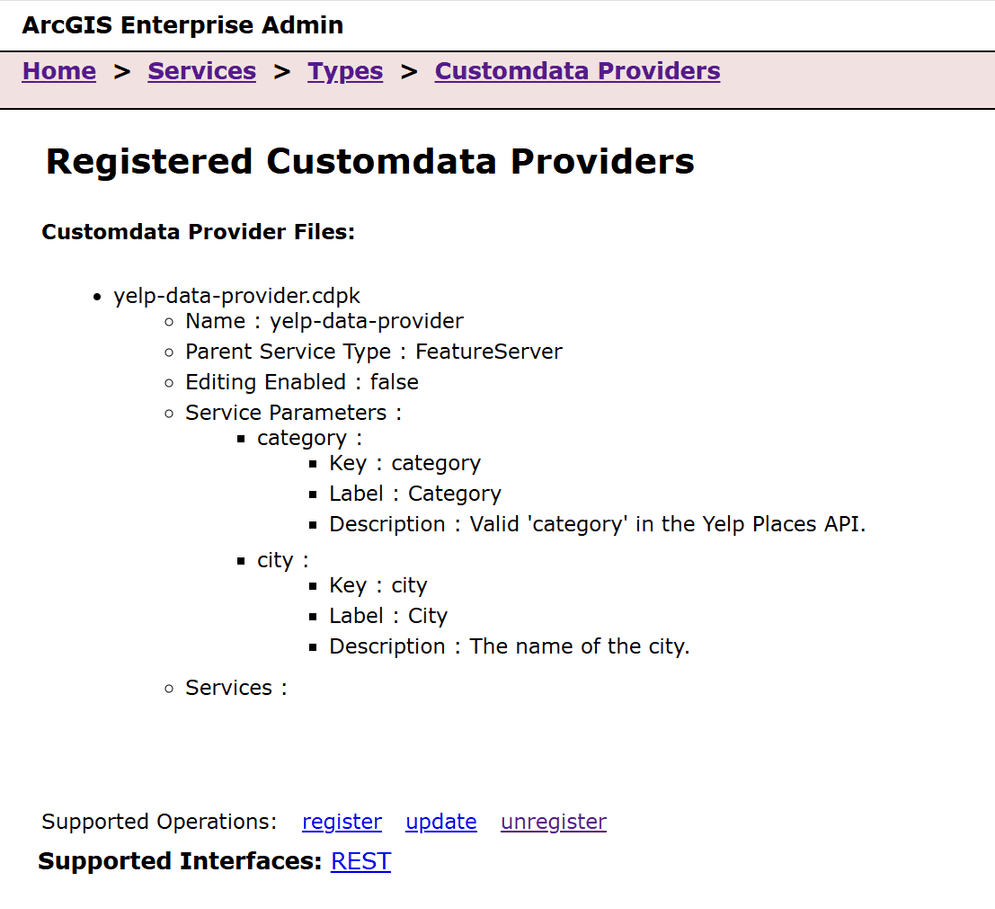
Browse back to the root of the Administrator Directory and then click services > types > customdataproviders.
-
On the Registered Customdata Providers page, click register and paste the item id into the Id of uploaded item field.


-
Click Register. When done you will seen something similar to the following.
Create a Feature Service
After you've registered the Yelp data provider with ArcGIS Server, you can create a read-only feature service that references the provider and serves data to ArcGIS clients.
-
Browse back to the root of the Administrator Directory and click services > createService.

-
On the Create Service page, copy and paste the following JSON into the Service (in JSON format) text box.
service JSONUse dark colors for code blocks Copy 1 2 3 4 5 6 7 8 9 10 11{ "serviceName": "yelpRedlands", "jsonProperties": { "customDataProviderInfo": { "forwardUserIdentity": false, "dataProviderName": "yelp-data-provider", "serviceParameters": { "city": "redlands", "category": "restaurants" } } -
Set the
categoryparameter to a Yelp category of your choice. For a list of business categories, see the Yelp Fusion API documentation. -
Set the
cityparameter to a location string. The location string can be a valid postal code or city name. -
Click Create.
Consume the Feature Service
To access the Yelp feature service that you created in the previous section, use the appropriate URL (e.g., https://<domain_or_machine_name>/<webadaptor_name>/rest/services/yelpRedlands/FeatureServer). You can use this URL to consume data from Yelp in ArcGIS clients like ArcGIS Pro, ArcGIS Online, and ArcGIS Enterprise.
You've successfully created a Yelp custom data feed that uses the Yelp Fusion API to fetch data from Yelp.