In this tutorial, you will create a custom data provider that allows for creating, reading, updating, and deleting point feature data hosted in a MongoDB instance. The source code used in this tutorial can be accessed here.
How the Provider Works
This sample provider will read and write to a MongoDB instance that is populated with documents in the format below.
{
"_id": "1150d48a-4283-409f-95dc-d97487b8ad84",
"fireId": "AK6448214467319840607",
"fireName": "GLACIER CREEK",
"fireType": "Wildfire",
"acres": 1897,
"location": {
"type": "Point",
"coordinates": [
-144.67327160022626,
64.48231108796996
]
},
"alternateID": 212345
}Notice in the document above the attribute alternate. ArcGIS does not currently support strings as ObjectIDs, so the _id field generated by MongoDB cannot be used. If you inspect the sample code, there is a function that hashes the _id and saves the hashed integer as the alternate in the document. This alternate is used as the ObjectID. See the API Reference for details on designating a feature attribute as the ObjectID with the id metadata property.
Create a Custom Data App
Complete the following steps to create a custom data app named mongodb-app.
-
On your development machine, open a command prompt and navigate to a directory where you want your project to be saved.
-
Create the app by running the command:
cdf createapp mongodb-app.
-
Verify your app runs by running the command:
npm start.
-
Once you verify that the app is running, stop it by running the command:
ctrl + c.
Create a Custom Data Provider
-
After you've created a custom data app, open a command prompt in the app directory and run the
cdf createprovider editable-mongodb-pointscommand. This will create an editable-mongodb-points directory that includes a project template with boilerplate code.
Install required packages
- In the command prompt, navigate to the providers/editable-mongodb-points
directory, and run the command
npm install mongodbto install the needed modules.
Configure the Provider
- In the providers/editable-mongodb-points/cdconfig.json file, add the following object to the
servicearray:Parameters Use dark colors for code blocks Copy { "key": "dataBaseName", "label": "Database Name", "description": "Name of the MongoDB database." }, { "key": "collectionName", "label": "Collection Name", "description": "Name of the MongoDB collection." } - Also in the providers/editable-mongodb-points/cdconfig.json, set the
editingproperty toEnabled true. - Create a file in the providers/editable-mongodb-points/src directory called mongodb-provider-config.json and add the following JSON:
Adjust your connection string as needed.
Use dark colors for code blocks Copy { "editable_mongodb_points": { "connectString": "mongodb://127.0.0.1:27017", "definedCollectionsOnly": true, "databases": { "editable-sample-fires": { "fires": { "geometryField": "location", "idField": "alternateID", "cacheTtl": 0, "crs": 4326, "maxRecordCount": 2000 } } } } }
Implement the Provider Code
Click here to acces the source code and dataset for this tutorial.
Implement the model.js file
Replace the contents of the default providers/editable-mongodb-points/src/model.js with the provided sample code. Due to the size of the files in the src directory, they are not shown in their entirety on this page, but important aspects of the code are highlighted in this tutorial.
The edit method receives that path parameters to specify which database and collection to connect to, coordinates the helper functions, and returns the response.
// *code snippet*
async editData(req, editData) {
// assign database and collection name from path parameters
const databaseName = req.params.dataBaseName;
const collectionName = req.params.collectionName;
const database = this.#client.db(databaseName);
const collection = database.collection(collectionName);
let applyEditsResponse = {}; // initialize the response object
// call the necessary functions to handled the edits
applyEditsResponse = await performEdits(collection, editData);
return applyEditsResponse;
}
// *code snippet*The get method is a simple, full-fetch data loading implementation that retrieves all the data from the table. The geoJSON metadata contains the id property that points to the attribute that is used at the ObjectID, a templates array with the object that defines what the editing widget will look like, and the fields array that specifies the properties of each attribute.
The empty object for the value of prototype.attributes in the templates metadata specifies that all attributes will be shown in the editing widget.
// *code snippet*
return {...geojson, metadata: {
idField: 'alternateID',
name: 'Fires',
templates: [
{
"name": "Edit MongoDB Fires",
"description": "Template for editing fire data features",
"drawingTool": "esriFeatureEditToolPoint",
"prototype": {
"attributes": {}
}
}
],
// *code snippet*All feature attributes must be listed in the fields array with correct type and marked editable if desired. Notice that the alternate is larger than a standard integer, and therefore specified as a big.
// *code snippet*
fields: [
{
"name": "_id",
"type": "string",
"alias": "mongoID",
"length": 128,
"editable": false
},
{
"name": "alternateID",
"type": "bigInteger",
"alias": "alternateID",
"editable": false
},
{
"name": "fireId",
"type": "string",
"alias": "fireId",
"length": 128,
"editable": true
},
{
"name": "fireName",
"type": "string",
"alias": "fireName",
"length": 128,
"editable": true
},
{
"name": "fireType",
"type": "string",
"alias": "fireType",
"length": 128,
"editable": true
},
{
"name": "acres",
"type": "string",
"alias": "acres",
"length": 128,
"editable": true
}
]
// *code snippet*In the Model class, create the get method as shown below:
async getMetadata() {
return {
idField: 'alternateID',
inputCrs: 4326
}
}Implement the editing code
Copy the contents of perform-edits.js to providers/editable-mongodb-points/src/. Ensure that this file is required in model.js as const { perform.
All critical editing operations for inserting, updating, and deleting features are carried out in perform-edits.js. The perform function handles the required edits from beginning to end and returns the formatted response needed to conform to the apply specification.
async function performEdits(collection, editsBody) {
let applyEditsResponse = {
addResults: [],
updateResults: [],
deleteResults: []
};
if (editsBody.adds) {
const insertResult = await insertMongoDocs(collection, editsBody.adds);
// add our own idField (altnerateId) and verify the documents
const verifiedDocuments = await updateIdFieldAndVerify(collection, insertResult, editsBody.adds);
// append the 'addResults' array to the final response object
applyEditsResponse.addResults = verifiedDocuments;
}
// handle the updates portion if it exists
if (editsBody.updates) {
const updateResult = await updateMongoDocs(collection, editsBody.updates);
// append the 'updateResults' array to the final response object
applyEditsResponse.updateResults = updateResult;
}
// handle the deletes portion if it exists
if (editsBody.deletes) {
const deleteResult = await deleteMongoDocs(collection, editsBody.deletes);
// append the 'deleteResults' to the final response object
applyEditsResponse.deleteResults = deleteResult;
}
return applyEditsResponse;
}Test the Provider
After implementing all the steps above, the providers/editable-mongodb-points/ directory should have the following structure:
- node_modules/
- src/
| mongodb-provider-config.json
| perform-edits.js
| controllers.js
| index.js
| model.js
| routes.js
| cdconfig.json
| package-lock.json
| package.json-
Navigate to the mongodb-app directory in a command prompt, and run the
npm start -- --log-level=debugcommand to start the custom data app and view provider routes. Theapplyroutes should be logged in the console.Edits 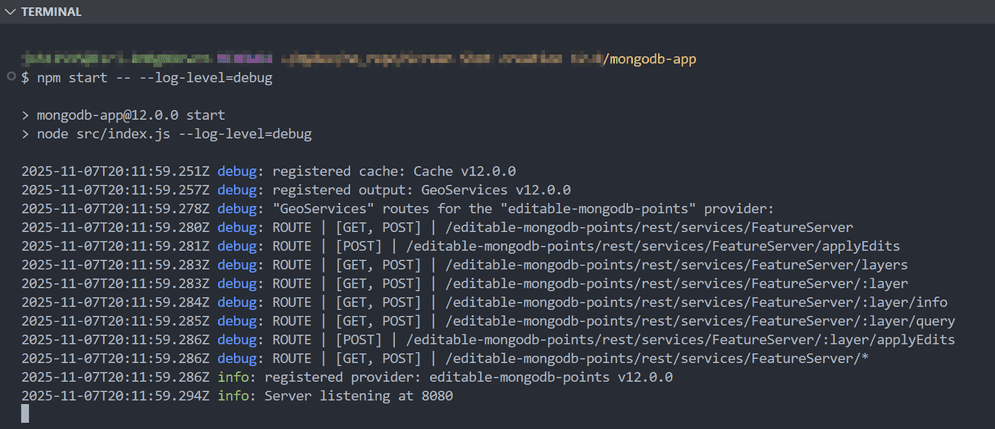
-
Send a GET request to http://localhost:8080/editable-mongodb-points/rest/services/FeatureServer/0/query, with the header
x-esri-service-paramsand the a value of{"database. Verify that the MongoDB provider is returning data points.Name" :"editable-sample-fires","collection Name" :"fires"} -
Send a POST request to http://localhost:8080/editable-mongodb-points/rest/services/FeatureServer/applyEdits, with the header
x-esri-service-paramsand the a value of{"database. In the request body, ensure that theName" :"editable-sample-fires","collection Name" :"fires"} editsproperty is a properly formatted array that adheres to the ArcGIS REST specification forapplylike the one below. Verify that the MongoDB provider returns a proper response.Edits Use dark colors for code blocks Copy [ { "id": "1", "adds": [ { "geometry": { "spatialReference": { "latestWkid": 3857, "wkid": 102100 }, "x": -8423358.204607472, "y": 5686549.449319279 }, "attributes": { "fireId": "Test_Fire_ID", "fireName": "Test_Fire_Name", "fireType": "Test_Fire_Type", "acres": "12345" } } ], "updates": null, "deletes": null } ]
Build and Deploy the Custom Data Provider Package File
- Stop the custom data app if it is running.
- Open a command prompt and navigate to the custom data app directory.
- Run the
cdf export editable-mongodb-pointscommand. - In a web browser, navigate to the ArcGIS Server Administrator Directory and sign in as an administrator.
- Click uploads > upload.
- On the Upload Item page, click Choose File and select the editable-mongodb-points.cdpk file. Optionally, provide a description in the Description text box.
- Click Upload. Once the file is uploaded, you will be directed to a page with the following header: Uploaded item - <item_id> . Copy the item id.
- Browse back to the root of the Administrator Directory and then click services > types > customdataproviders.
- On the Registered Customdata Providers page, click register and paste the item id into the Id of uploaded item field.
- Click Register.
Create Feature Service
-
Browse back to the root of the Administrator Directory and click services > createService.
-
On the Create Service page, copy and paste the following JSON into the Service (in JSON format) text box.
Use dark colors for code blocks Copy { "serviceName": "mongoEditPoints", "type": "FeatureServer", "description": "", "capabilities": "Query", "provider": "CUSTOMDATA", "clusterName": "default", "minInstancesPerNode": 0, "maxInstancesPerNode": 0, "instancesPerContainer": 1, "maxWaitTime": 60, "maxStartupTime": 300, "maxIdleTime": 1800, "maxUsageTime": 600, "loadBalancing": "ROUND_ROBIN", "isolationLevel": "HIGH", "configuredState": "STARTED", "recycleInterval": 24, "recycleStartTime": "00:00", "keepAliveInterval": 1800, "private": false, "isDefault": false, "maxUploadFileSize": 0, "allowedUploadFileTypes": "", "properties": { "disableCaching": "true" }, "jsonProperties": { "customDataProviderInfo": { "forwardUserIdentity": false, "serviceParameters": { "databaseName": "editable-sample-fires", "collectionName": "fires" }, "dataProviderName": "editable-mongodb-points", } }, "extensions": [], "frameworkProperties": {}, "datasets": [] } -
Click Create.
-
In ArcGIS Server Administrator Directory, navigate to Home > services > mongoEditPoints > edit
-
Change the value of
capabilitiestoQuery,, and click the Save Edits button.Editing

Keep in mind that the provider code we used above assumes a database named
editable-sample-fires and a collection named fires. If you used different names
in your MongoDB instance, update the value of database and collection accordingly.
Consume Feature Service
To access the MongoDB feature service that you created in the previous section, use the appropriate URL (e.g., https://<domain_or_machine_name>/<webadaptor_name>/rest/services/mongoEditPoints/FeatureServer). You can use this URL to consume data from MongoDB in ArcGIS clients like ArcGIS Pro, ArcGIS Online, and ArcGIS Enterprise.
To explore the editing capabilities of the provider in this walkthrough in a graphical user interface, add this feature service to a map in ArcGIS Map Viewer.
-
Click the editing widget and select a point on the map.
-
Notice that the attributes
fire,Id fire,Name fire, andType acresare all editable.mongowas not specified as editable in ourID geojson.medata.fieldsarray. -
Edit one of these attributes and click Update to change the value in the MongoDB collection.

To explore the apply REST API calls in more detail, navigate the ArcGIS REST Services Directory and navigate to apply at: https://<domain_or_machine_name>/<webadaptor_name>/rest/services/mongoEditPoints/FeatureServer/applyEdits
-
Enter the following in the Edits: texbox:
Use dark colors for code blocks Copy [ { "id": 0, "adds": [ { "geometry": { "spatialReference": { "latestWkid": 3857, "wkid": 102100 }, "x": -12633717.653726798, "y": 7084687.088394526 }, "attributes": { "_id": null, "fireId": "C3PO", "fireName": "Golden Fire", "fireType": "Wild", "acres": "4682" } } ], "updates": null, "deletes": null, "attachments": null, "assetMaps": null } ] -
Click Apply Edits to create the new feature.

You've successfully created a MongoDB custom data feed that can both read from and write to a MongoDB collection.