Learn how to access the spatial analysis service using user authentication.
Prerequisites
An ArcGIS Location Platform, ArcGIS Online, or ArcGIS Enterprise account.
Steps
Get the starter app
-
Go to the Sign in with user authentication (server) tutorial and download the solution.
-
Unzip the folder and open it in a text editor of your choice.
-
Navigate to the
user-auth-basicfolder. -
Install the required ArcGIS REST JS packages as defined in
package.json.Use dark colors for code blocks Copy npm install
Set up authentication
Create a new OAuth credential to register the application.
- Go to the Create OAuth credentials for user authentication tutorial to create an OAuth credential. Set the redirect URL to
https, for example:// <YOUR _SERVER >[ :YOUR _POR T]/authenticate https.://localhost :3000/authenticate - Copy the Client ID and Redirect URL from your OAuth credentials item and paste them to a safe location. It will be used in the next step.
Set developer credentials
- Open the
config.jsonfile and paste your developer credentials, replacing the placeholders with your actual values.config.jsonUse dark colors for code blocks Copy { "clientId": "YOUR_CLIENT_ID", "redirectUri": "YOUR_REDIRECT_URI", "portal": "https://www.arcgis.com/sharing/rest" }
Make a job request
-
Import
JobandJOBfrom_STATUSES arcgis-rest-requestand the portal helper functions from@esri/arcgis-rest-portal.Use dark colors for code blocks Copy import express from "express"; import fs from "fs"; import path from "path"; import { Job, JOB_STATUSES, ArcGISIdentityManager } from "@esri/arcgis-rest-request"; import { getSelf } from "@esri/arcgis-rest-portal"; -
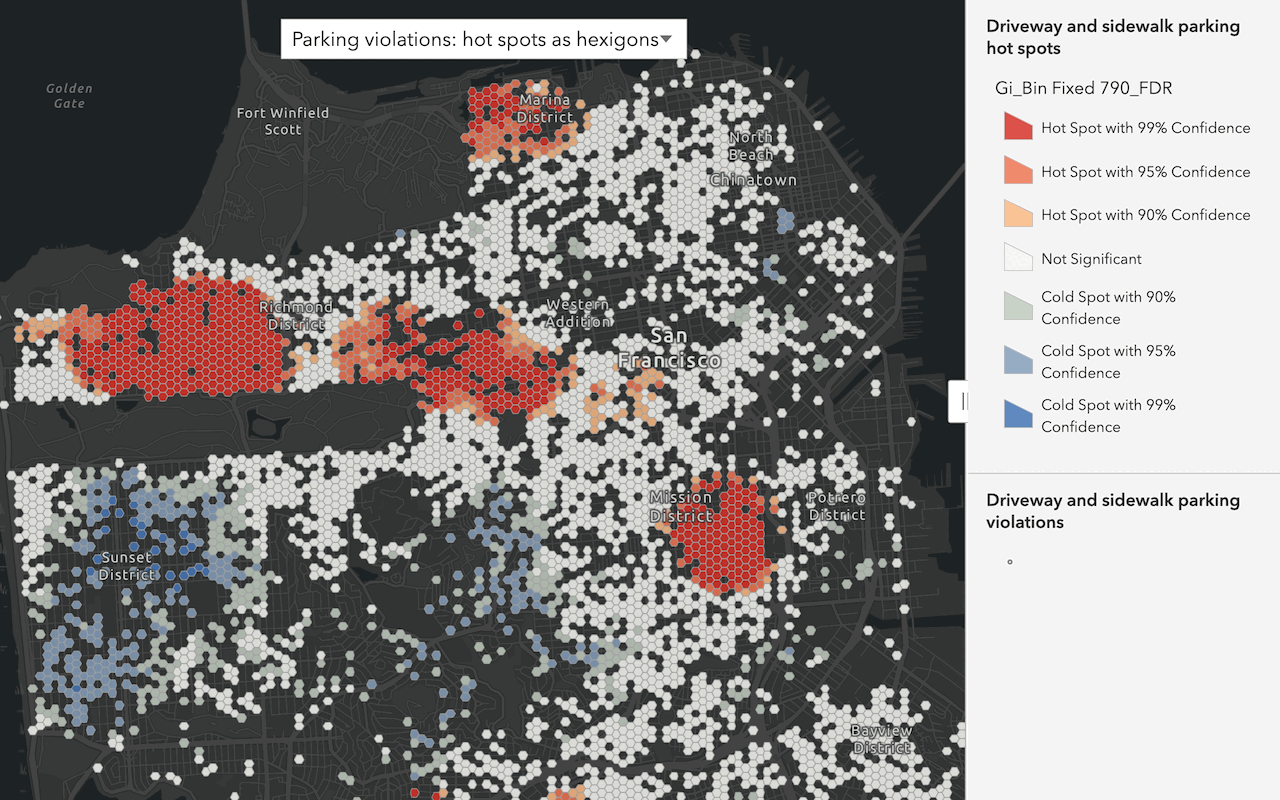
Create a function to run the hot spot analysis. This function submits a job to the spatial analysis service, using your organization’s analysis URL and authenticating with a session.
Use dark colors for code blocks async function runHotSpotAnalysis(session) { const portalSelf = await getSelf({ authentication: session }); const analysisUrl = portalSelf.helperServices.analysis.url; const params = { analysisLayer: { url: "https://services3.arcgis.com/GVgbJbqm8hXASVYi/arcgis/rest/services/sf_traffic_parking_violations_sa_osapi/FeatureServer/0" }, shapeType: "Hexagon", outputName: { serviceProperties: { name: `RestJS_find_hot_spots_${Date.now()}` } } }; const jobReq = await Job.submitJob({ url: `${analysisUrl}/FindHotSpots/submitJob`, params, authentication: session }); jobReq.on(JOB_STATUSES.Status, (info) => { console.log("Job Status:", info.status); }); const jobResults = await jobReq.getAllResults(); return jobResults; } -
Call the function after authentication. Exchange the authorization code for a session, then run the hot spot analysis.
Use dark colors for code blocks Copy ArcGISIdentityManager.exchangeAuthorizationCode(credentials, req.query.code) .then((session) => { res.status(200).send( "Session successfully acquired. Check your server console to see job status and analysis results as the job completes." ); return runHotSpotAnalysis(session); }) .then((jobResults) => { console.log("Hot spot analysis results: ", JSON.stringify(jobResults, null, 2)); }) .catch((err) => { console.error("Error:", err); res.status(500).send(err.message); }); -
Save the file, then run it from the terminal.
Use dark colors for code blocks Copy node index.js -
Open the URL shown in your terminal (e.g., https://localhost:3000/authorize) and sign in with your ArcGIS account. After signing in, the hot spot analysis job will start automatically. You can monitor its progress in your console. Once the job completes, the console will display the analysis metadata, including the URL of the resulting feature layer.
The analysis metadata should look like this:
{
"hotSpotsResultLayer": {
"paramName": "hotSpotsResultLayer",
"dataType": "GPString",
"value": {
"url": "FEATURE_SERVICE_URL",
"itemId": "ITEM_ID"
}
},
"processInfo": {
"paramName": "processInfo",
"dataType": "GPString",
"value": [
"{\"messageCode\": \"SS_00002\", \"message\": \"The following report outlines the workflow used to optimize your Find Hot Spots result:\", \"params\": {}, \"style\": \"<b></b><br/>\"}",
"{\"message\": \"Initial Data Assessment\", \"messageCode\": \"SS_84428\", \"params\": {}, \"style\": \"<u><b></b></u><br/>\"}",
What's next?
Learn how to perform additional spatial analyses in these tutorials:
Find and extract data
Find data with attribute and spatial queries using find analysis operations.
Combine data
Overlay, join, and dissolve features using combine analysis operations.
Summarize data
Aggregate and summarize features using summarize analysis operations.
Discover patterns in data
Find patterns and trends in data using spatial analysis operations.