
What is Survey123 Connect?
ArcGIS Survey123 Connect is a desktop application for creating, publishing, and managing surveys using the XLSForm standard. It provides powerful capabilities for building complex forms with sophisticated logic, calculations, and validation, making it ideal for data collection needs.
Connect gives you full control over survey structure and logic through Microsoft Excel spreadsheets, enabling you to create highly customized surveys.
You use the Survey123 Connect to:
- Create surveys using XLSForm with Microsoft Excel
- Analyze, convert, translate, and update surveys with Python-powered tools
- Automate workflows and integrate with ArcGIS API for Python
- Programmatically interact with surveys and data
When to use Connect vs web designer
Survey123 Connect is designed for users who need highly customized survey capabilities beyond what the web-based Survey123 web designer provides. For a detailed comparison of both authoring tools, see Types of Survey123 authoring tools.
Prerequisites
Before using Survey123 Connect, ensure you have:
- ArcGIS Account: ArcGIS Online or ArcGIS Enterprise account with publishing privileges
- System Requirements: Windows 10/11, macOS 10.14+, or Linux
- Microsoft Excel: For creating and editing XLSForm spreadsheets
- XLSForm Knowledge: Basic understanding of XLSForm structure and syntax
- Network Access: Internet connection for publishing and data synchronization
Installation and setup
Download and install
- Download Survey123 Connect from the Survey123 resources page
- Run the installer and follow the installation wizard
- Launch Survey123 Connect from your desktop or start menu
- Sign in with your ArcGIS Online or ArcGIS Enterprise credentials
First-time setup
- Configure your workspace by selecting a folder for your survey projects
- Set default settings for survey publishing and data collection
- Test your connection to ArcGIS by creating a simple survey
- Verify permissions ensure you have publishing privileges
How to create surveys with Connect
To create surveys with Survey123 Connect, you use the desktop application to design complex forms using XLSForm spreadsheets in Microsoft Excel. Connect provides powerful capabilities for building sophisticated surveys with custom logic, calculations, and validation that go beyond what's possible with the web-based designer.
The general steps are:
- Download and install Connect: Get the desktop application from the Survey123 resources page
- Create a new survey: Start from a template or blank form and configure basic settings
- Design with XLSForm: Use Microsoft Excel to create and configure survey structure and logic
- Preview and test: Test your survey logic and calculations before publishing
- Publish to ArcGIS: Deploy the survey to ArcGIS Online or Enterprise for data collection
Connect interface and workflow
Survey123 Connect provides a desktop interface for creating surveys using the XLSForm standard. You work with Microsoft Excel spreadsheets to define survey structure, logic, and appearance.
Key interface components:
- Survey management: Create, edit, and manage survey projects
- XLSForm editor: Microsoft Excel integration for survey design
- Preview functionality: Test surveys before publishing
- Publishing tools: Deploy surveys to ArcGIS with custom options
- Python integration: Built-in tools for automation and scripting
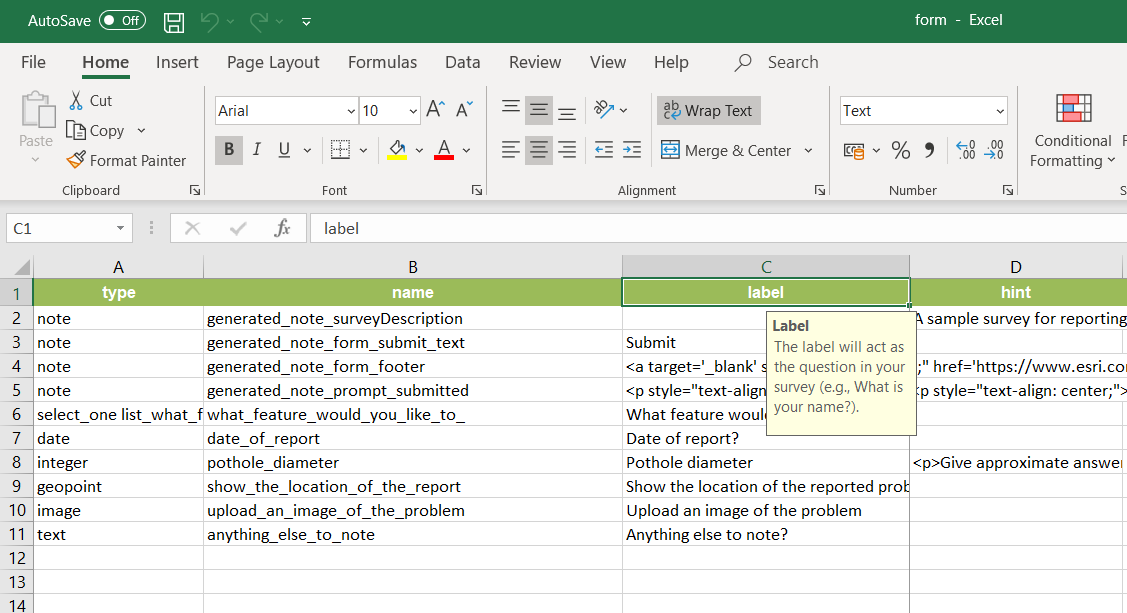
XLSForm structure and parameters
When creating surveys with Connect, you work with XLSForm spreadsheets that define survey structure and behavior:
Core XLSForm columns:
type: Question type (text, select_one, integer, date, etc.)name: Unique field identifier for the questionlabel: Question text displayed to usersrelevant: Conditional logic for showing/hiding questionsconstraint: Validation rules and data constraintscalculation: Computed fields and automatic calculations
Advanced XLSForm features:
repeat: Create repeating groups of questionsgroup: Organize questions into logical sectionsappearance: Customize question display and behaviorchoice: Dynamic choice lists based on conditions_filter media: Add images, audio, and video to questions
Connect installation and setup
To get started with Survey123 Connect, download and install the desktop application:
https://doc.arcgis.com/en/survey123/desktop/get-started/download-survey123.htmXLSForm configuration options
When creating surveys with Connect, you can configure various XLSForm parameters:
Question types:
text: Single-line and multi-line text inputselect: Single choice from a list_one select: Multiple choices from a list_multiple integer: Whole number input with validationdecimal: Decimal number inputdate: Date picker with format optionsgeopoint: GPS coordinate capture
Logic and validation:
relevant: Conditional logic expressionsconstraint: Data validation rulescalculation: Computed field expressionsrequired: Make fields mandatory
Advanced features:
group: Question grouping and organization (usefield-listappearance for multiple pages)appearance: Custom display options includingfield-listfor page breaksrepeat: Repeating question groupsmedia: Image, audio, and video support
Best practices
Follow these essential best practices to create effective surveys and avoid common pitfalls. Focus on planning your survey structure, testing thoroughly, and maintaining data quality throughout your workflow.
- Plan before building: Design your survey structure and logic before creating the XLSForm
- Test extensively: Preview and test all logic, calculations, and validation before publishing
- Use clear naming: Choose descriptive field names that are easy to reference in calculations
- Validate data: Implement proper constraints and validation to ensure data quality
- Stay current: Use the latest version of Survey123 Connect for the most up-to-date features and bug fixes
Code examples
Below are code examples showing how to use XLSForm syntax to create survey features:
Basic question types
The example below shows how to create a survey with basic question types.
| type | name | label | required |
|---|---|---|---|
| text | name | What is your name? | yes |
| select_one | gender | Gender | no |
| integer | age | Age | no |
| date | birthdate | Date of birth | no |
Conditional logic
The example below shows how to show a question only if a previous answer is "Yes":
| type | name | label | relevant |
|---|---|---|---|
| select_one yes_no | consent | Do you consent? | |
| text | details | Please provide details | ${consent} = 'yes' |
Data validation
The example below shows how to force a field to accept only numbers less than or equal to another field:
| type | name | label | constraint | constraint_message |
|---|---|---|---|---|
| integer | max_val | Enter max value | ||
| integer | your_val | Enter your value | . <= ${max | Value must be ≤ max value |
Calculations and auto-population
The example below shows how to auto-calculate a field based on previous answers:
| type | name | label | calculation |
|---|---|---|---|
| integer | a | Enter value A | |
| integer | b | Enter value B | |
| calculate | sum_ab | Sum of A and B | ${a} + ${b} |
Custom validation
The example below shows how to enforce a valid URL format using regular expressions:
| type | name | label | constraint | constraint_message |
|---|---|---|---|---|
| text | website | Enter website | regex(., '^https? | Must be a valid URL |
Appearance Customization
The example below shows how to set a question to appear as a multiline text box:
| type | name | label | appearance |
|---|---|---|---|
| text | comments | Comments | multiline |
Multiple-page surveys
The example below shows how to create a multiple-page survey using groups with field-list appearance:
| type | name | label | appearance |
|---|---|---|---|
| begin group | page1 | Personal Information | field-list |
| text | name | What is your name? | |
| integer | age | What is your age? | |
| end group | |||
| begin group | page2 | Contact Information | field-list |
| text | What is your email? | ||
| text | phone | What is your phone? | |
| end group |
Signature capture
The example below shows how to embed a signature field directly in the form:
| type | name | label | appearance |
|---|---|---|---|
| image | signature | Digital Signature | signature |
Tutorials
Create a smarter, responsive survey
Learn how to create intelligent surveys with conditional logic, hidden fields, and dynamic visibility using ArcGIS Survey123 and XLSForm.
Low-code/no-code
Create a simple survey
Learn how to use ArcGIS Survey123 to create a simple survey.
Low-code/no-code
Analyze survey results
Learn how to use ArcGIS Survey123 to analyze survey results.
Low-code/no-code

Create a survey and dashboard for park maintenance
Learn how to integrate ArcGIS Survey123 with ArcGIS Dashboards to create a reporting solution.
Low-code/no-code