Learn how to use ArcGIS Survey123 to create and share a simple survey.
ArcGIS Survey123 provides a user-friendly interface to create and manage surveys. You can use it to collect data in the field, either online or offline.
In this tutorial, you'll create a customer feedback survey for a local business using ArcGIS Survey123 web designer. You'll add different question types, configure settings, and share the survey for data collection.
Prerequisites
Steps
Create a new survey
- Go to ArcGIS Survey123 and sign in to your organization
- Click Create New Survey and select Web Designer
- In the New Survey window, click Blank Survey
- Enter the following details:
- Name: "Customer Feedback Survey"
- Tags: "feedback, customer, satisfaction, business"
- Summary: "Survey to collect customer feedback and satisfaction ratings"
- Click Create
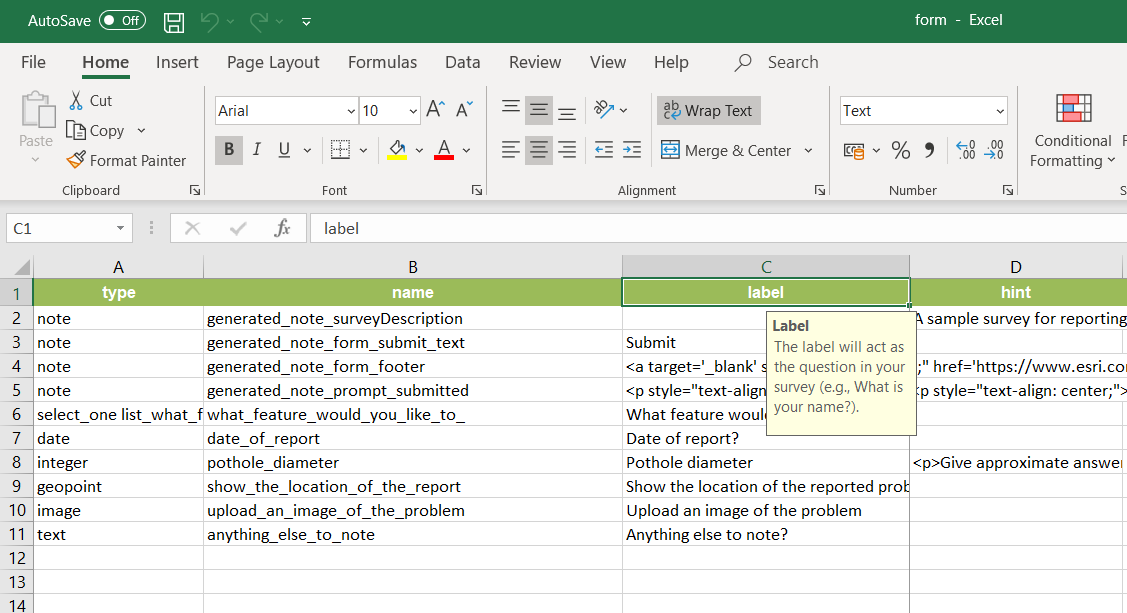
Add survey questions
-
Add a Singleline Text question:
- Question: "Customer Name"
- Hint text: "Enter your full name"
- Make this field required
-
Add an Email question:
- Question: "Email Address"
- Hint text: "Enter your email for follow-up"
- Make this field required
-
Add a Select from list question:
- Question: "Service Used"
- Options:
- Product Purchase
- Customer Support
- Consultation
- Other
- Make this field required
-
Add a Likert scale question:
- Question: "Overall Satisfaction"
- Scale: 1-5
- Labels:
- 1: "Very Dissatisfied"
- 2: "Dissatisfied"
- 3: "Neutral"
- 4: "Satisfied"
- 5: "Very Satisfied"
- Make this field required
-
Add a Multiline Text question:
- Question: "Additional Comments"
- Hint text: "Please share any additional feedback or suggestions"
- Make this field optional
-
Add a Date question:
- Question: "Visit Date"
- Set default to "current date"
- Make this field required
Configure survey settings
- Click the Settings gear icon
- Under Form Settings:
- Enable "Show progress bar"
- Set "Submit data" to "Always"
- Enable "Allow multiple submissions"
- Click Save
Customize the appearance
- Go to the Appearance panel
- Configure the following:
- Theme: Select "Modern" or "Classic"
- Primary Color: Choose a color that matches your brand
- Background: Select a subtle background pattern or solid color
- Logo: Upload your business logo (optional)
Publish the survey
- Click Publish in the top right corner
- Review the survey summary and click Publish to confirm
- Wait for the publishing process to complete
Share the survey
- In the sharing dialog, click Share
- Choose sharing options:
- Share with your organization: For internal use
- Share with everyone: For public access
- Share with specific groups: For targeted distribution
- Copy the survey URL for distribution
- Generate a QR code for easy mobile access
Test the survey
- Open your survey in a new browser tab using the shared URL
- Complete a test submission:
- Enter a test name
- Add a test email address
- Select a service type
- Rate satisfaction level
- Add test comments
- Confirm the visit date
- Submit the survey
- Verify that:
- The submission is successful
- You receive a confirmation message
- The data appears in your survey results
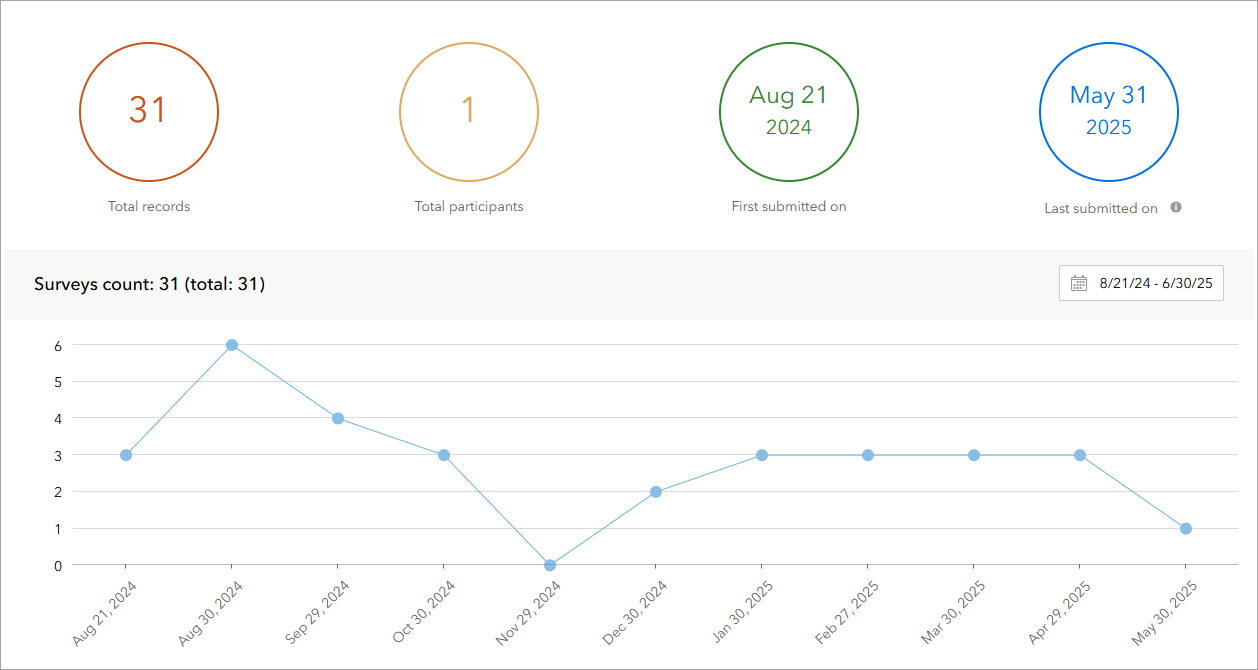
View and analyze results
- Return to the Survey123 website
- Click on your survey to open it
- Go to the Data tab to view submissions
- Use the Analysis tools to:
- View response summaries
- Export data to Excel or CSV
- Create charts and visualizations
Best Practices
Survey Design
When designing your survey, keep questions clear and concise. Use appropriate question types for the data you need to collect—single choice for mutually exclusive options, multiple choice for select-all-that-apply scenarios, and text fields for open-ended responses. Always include a mix of required and optional questions to balance data completeness with user experience.
Consider the logical flow of your questions, starting with basic information and progressing to more detailed feedback. Use consistent formatting and clear labels to maintain professional appearance. Include progress indicators for longer surveys to keep respondents engaged.
Question Configuration
Configure validation rules appropriately for each question type. Use required fields sparingly and only for essential information. Set up helpful hint text that guides users without being overly prescriptive. For choice questions, ensure all options are mutually exclusive and collectively exhaustive.
When using scales (like Likert scales), provide clear labels for each option to ensure consistent interpretation. Consider the cultural context of your audience when designing scales and response options.
Data Management
Plan your data collection strategy before publishing. Decide whether to allow anonymous responses or require user authentication. Consider implementing feature layer views if you need to filter sensitive data or provide different access levels.
Set up appropriate sharing permissions based on your data privacy requirements. Use descriptive field aliases that will make data analysis easier later. Consider the frequency of data collection when planning your survey lifecycle.
User Experience
Test your survey thoroughly before sharing it publicly. Ensure it works correctly on both desktop and mobile devices. Keep the survey length reasonable to maintain completion rates.
Provide clear instructions and context for respondents. Use consistent branding and professional appearance to build trust. Consider offering incentives or explaining the value of participation to increase response rates.
Tutorials
Analyze survey results
Learn how to use ArcGIS Survey123 to analyze survey results.
Low-code/no-code
Create a smarter, responsive survey
Learn how to create intelligent surveys with conditional logic, hidden fields, and dynamic visibility using ArcGIS Survey123 and XLSForm.
Low-code/no-code

Create a survey and dashboard for park maintenance
Learn how to integrate ArcGIS Survey123 with ArcGIS Dashboards to create a reporting solution.
Low-code/no-code