Learn how to create intelligent, responsive surveys using ArcGIS Survey123 with advanced XLSForm techniques.
ArcGIS Survey123 provides powerful XLSForm capabilities that let you create intelligent surveys with conditional logic, calculated fields, and dynamic visibility. These features enable you to build responsive forms that adapt to user input, collect metadata automatically, and provide a better user experience.
In this tutorial, you'll learn how to implement hidden fields, conditional visibility, and advanced logic to create smarter, more efficient surveys.
Prerequisites
- An ArcGIS Online or ArcGIS Enterprise account with publishing privileges
- Basic understanding of XLSForm structure and syntax
- Familiarity with Survey123 Connect or web designer
- Access to a spreadsheet application (Excel, Google Sheets, etc.)
Steps
1. Understand field visibility concepts
Before implementing advanced logic, understand the three main approaches to controlling field visibility:
- Permanently Hidden Fields: Fields that are never visible to users but store calculated values
- Conditional Visibility: Fields that show/hide based on user responses
- Dynamic Logic: Complex expressions that control multiple aspects of form behavior
2. Create permanently hidden fields
Hidden fields are useful for storing metadata, calculated values, or system information that users shouldn't see or edit.
- Add the field to your XLSForm survey sheet
- Set the appearance column to
hidden - Use the calculation column to define the value
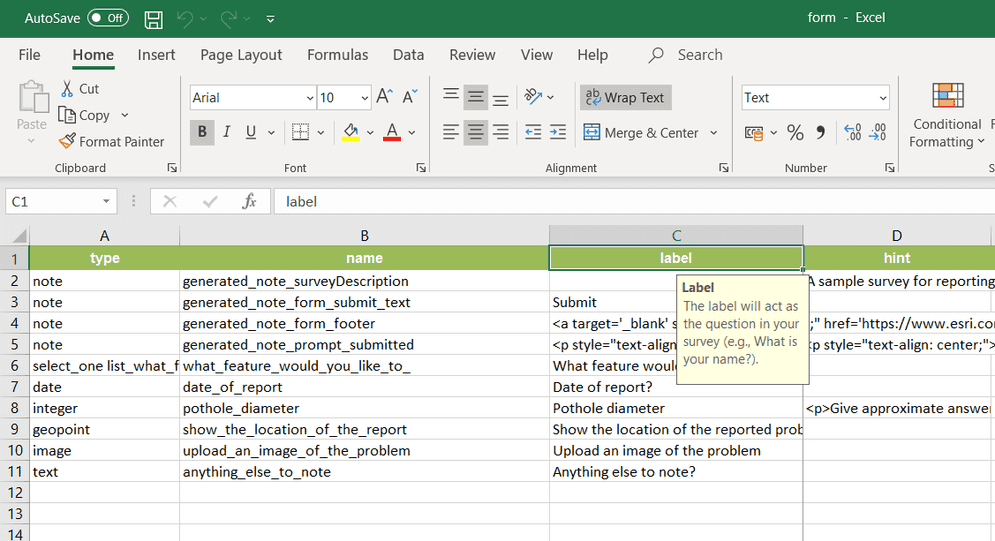
Example XLSForm structure:
type,name,label,calculation,appearance
geopoint,location,Location,,
text,user_email,User Email,${username},hidden
decimal,horiz_acc,Horizontal Accuracy,${location_accuracy},hiddenUse cases for hidden fields:
- Device metadata (accuracy, timestamp, user ID)
- Calculated values (distances, areas, derived metrics)
- System information (form version, submission ID)
- Integration data (external system IDs, workflow tokens)
3. Implement conditional visibility with relevant
The relevant column controls both visibility and data storage. Fields with relevant expressions that evaluate to false are hidden and their data is not stored.
- Add a
relevantcolumn to your XLSForm - Write logical expressions that evaluate to
trueorfalse - Test your logic with sample data
Example: Age-based conditional logic
type,name,label,relevant
select_one yes_no,is_adult,Are you 18+?,
text,guardian,Guardian Name,${is_adult} = 'no'4. Use body for UI-only visibility
The body column controls UI visibility without affecting data storage. Hidden fields still store their values.
- Add a
bodycolumn to your XLSForm::esri :visible - Write expressions that return
true(show) orfalse(hide) - Consider when you want data stored vs. when you want it hidden
Example: UI-only visibility
type,name,label,body::esri:visible
select_one yes_no,wants_details,Want more details?,
text,details,Provide details,${wants_details} = 'yes'When to use body:
- You want to hide fields but still collect the data
- Fields have default values that should be stored
- You're implementing progressive disclosure
- Fields are used for calculations but not user input
5. Compare visibility approaches
Understand the key differences between visibility methods:
| Feature | relevant | body | hidden appearance |
|---|---|---|---|
| Controls data storage | Yes | No | No |
| UI visibility | Yes | Yes | Always hidden |
| Use case | Conditional logic | UI-only visibility | Metadata/calculations |
| Performance impact | Low | Low | None |
Choose the right approach:
- Use
relevantfor conditional data collection - Use
bodyfor UI-only hiding::esri :visible - Use
hiddenappearance for system fields
6. Implement advanced conditional logic
Combine multiple conditions and create complex visibility rules.
- Use logical operators (
and,or,not) - Reference multiple fields in expressions
- Create nested conditional structures
Example: Complex conditional logic
type,name,label,relevant
select_one yes_no,has_vehicle,Do you own a vehicle?,
select_one vehicle_type,vehicle_type,Vehicle type,${has_vehicle} = 'yes'
text,vehicle_model,Vehicle model,${has_vehicle} = 'yes' and ${vehicle_type} = 'car'
text,motorcycle_cc,Engine size (cc),${has_vehicle} = 'yes' and ${vehicle_type} = 'motorcycle'7. Debug and test your logic
Ensure your conditional logic works correctly across all scenarios.
-
Add temporary debug fields
- Create note fields to display calculated values
- Use text fields to show expression results
- Add timestamps for troubleshooting
-
Test with various inputs
- Try all possible answer combinations
- Test edge cases and boundary conditions
- Verify data storage behavior
-
Validate expressions
- Check syntax in XLSForm validator
- Test expressions in Survey123 Connect
- Verify results in web designer preview
8. Optimize performance and maintainability
Create efficient, maintainable conditional logic.
-
Group related fields
- Apply the same
relevantexpression to multiple fields - Use groups to organize conditional sections
- Minimize duplicate expressions
- Apply the same
-
Use clear naming conventions
- Choose descriptive field names
- Use consistent naming patterns
- Document complex logic with comments
-
Structure your XLSForm logically
- Group related questions together
- Use consistent formatting
- Include helpful comments
9. Implement integration features
Use hidden fields and conditional logic for seamless integration with other systems.
-
Auto-fill hidden fields via URL parameters
- Pass values through app links
- Use URL parameters for context
- Implement workflow integration
-
Capture system metadata
- Store device information
- Record user context
- Track form interactions
-
Enable external system integration
- Store external IDs
- Capture workflow tokens
- Implement API integration
Integration examples:
type,name,label,calculation,appearance
text,workflow_id,Workflow ID,${workflow_token},hidden
text,user_context,User Context,${user_role},hidden
decimal,form_version,Form Version,1.2,hidden10. Test your smart survey
Thoroughly test all conditional logic and hidden field functionality.
-
Test all conditional paths
- Verify each branch of your logic
- Test edge cases and error conditions
- Validate data storage behavior
-
Check integration features
- Test URL parameter passing
- Verify hidden field calculations
- Validate external system integration
-
Validate user experience
- Ensure logical flow through the form
- Test on different devices and browsers
- Verify accessibility compliance
Testing checklist:
- All conditional logic works correctly
- Hidden fields store expected values
- URL parameters are processed properly
- Form performance is acceptable
- Data exports include all fields
- Integration features function as expected
Tutorials
Create a simple survey
Learn how to use ArcGIS Survey123 to create a simple survey.
Low-code/no-code
Analyze survey results
Learn how to use ArcGIS Survey123 to analyze survey results.
Low-code/no-code

Create a survey and dashboard for park maintenance
Learn how to integrate ArcGIS Survey123 with ArcGIS Dashboards to create a reporting solution.
Low-code/no-code