This sample creates a custom tile layer that blends the ArcGIS World Hillshade and National Geographic World Map services with the multiply operation. This creates a more detailed terrain representation than the default National Geographic basemap.
You can toggle the blended layer on and off using the Layer List component. The BlendLayer is toggled on by default.
| National Geographic Default | Custom Blend Layer (ArcGIS Hillshade + National Geographic) |
|---|---|
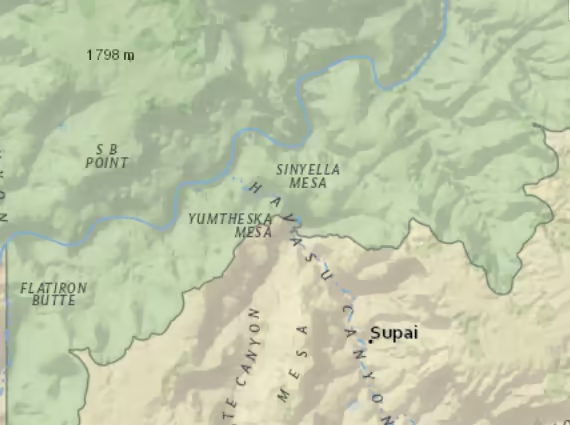 | 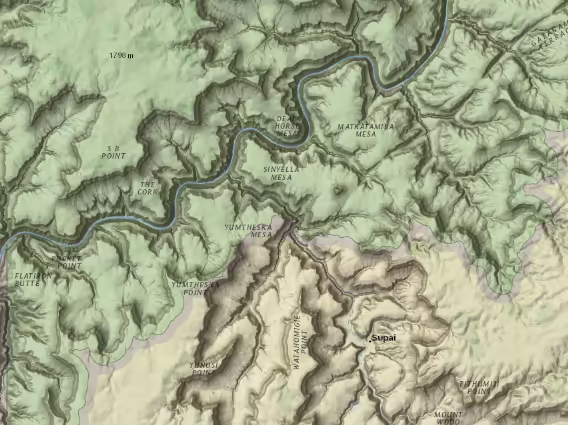 |
To create a custom tile layer, you must call createSubclass() on BaseTileLayer. BaseTileLayer is a class designed specifically for creating custom tile layers, such as the BlendLayer created in this sample. When creating a BlendLayer we define a property called multiplyLayers, which is an array of tile layers that will be blended together.
const BlendLayer = BaseTileLayer.createSubclass({ // multiplyLayers stores the tile layers used to create the blended layer. properties: { multiplyLayers: null, },});The tile layers are added to the multiplyLayers array. If a custom tile layer requires loadable resources, then you must load them in the layer using the load() method. This ensures that all loadable resources required for the layer to function are loaded prior to the custom layer resolving and becoming loaded.
const BlendLayer = BaseTileLayer.createSubclass({  properties: {    multiplyLayers: null,  },
  // Load each tile layer before the BlendLayer resolves.  load() {    this.multiplyLayers.forEach((layer) => {      this.addResolvingPromise(layer.load());    }, this);  },});
Once the layer is loaded with its required resources, we must override the fetchTile() method of the BlendLayer. Within this method, call fetchTile() on each tile layer returned in the multiplyLayers property. Once each tile layer returns the tile(s) visible in the view, we apply multiply operation to the tiles so that the BlendLayer will show the blended image.
// Fetch the tiles visible in the view from each layer.async fetchTile(level, row, col, options) {  const tilePromises = this.multiplyLayers.map((layer) => {    return layer.fetchTile(level, row, col, options);  });
  const results = await promiseUtils.eachAlways(tilePromises);
  // Re-throw an abort error because eachAlways catches rejected tile requests.  if (options?.signal?.aborted) {    throw promiseUtils.createAbortError();  }
  // Draw the fetched tiles to a canvas and blend them together.  const width = this.tileInfo.size[0];  const height = this.tileInfo.size[0];  const canvas = document.createElement("canvas");  const context = canvas.getContext("2d");
  canvas.width = width;  canvas.height = height;
  // multiply blends the top layer with the corresponding pixels in the layer below.  context.globalCompositeOperation = "multiply";  results.forEach((result) => {    const image = result.value;    context.drawImage(image, 0, 0, width, height);  });
  return canvas;}
The custom layer is added to a map and assigned to the map component. The Layer List component in the map displays the National Geographic layer and the blended custom layer.
const natGeoLayer = new TileLayer({  url: "https://services.arcgisonline.com/arcgis/rest/services/NatGeo_World_Map/MapServer",});
const hillShadeLayer = new TileLayer({  url: "https://services.arcgisonline.com/arcgis/rest/services/Elevation/World_Hillshade/MapServer",});
const blendLayer = new BlendLayer({  multiplyLayers: [hillShadeLayer, natGeoLayer],  title: "Blended NatGeo World Map",  copyright: "Blended National Geographic Layer",});
viewElement.map = new Map({  layers: [natGeoLayer, blendLayer],});