Learn how to use an ArcGIS portal item to access and display a feature layer

You can host a variety of geographic data and other resources using ArcGIS Online
In this tutorial, you will add a hosted feature layer to display trailheads in the Santa Monica Mountains of Southern California. The hosted layer defines the trailhead locations (points) as well as the symbols used to display them.
Prerequisites
Before starting this tutorial:
-
You need an ArcGIS Location Platform or ArcGIS Online account.
-
Confirm that your system meets the minimum system requirements.
-
An IDE for Java.
Steps
Open a Java project with Gradle
-
To start this tutorial, complete the Display a map tutorial, or download and unzip the Display a map solution into a new folder.
-
Open the build.gradle file as a project in IntelliJ IDEA.
-
If you downloaded the solution, get an access token and set the API key.
An API key
An API key is a long-lived access token created using API key credentials. They are valid for up to one year and are typically embedded directly into client applications. gives your app access to secure resourcesA secure resource is any item or service in an ArcGIS that requires an ArcGIS account and authentication to access. Examples include ArcGIS Location Services, and items and data services in an ArcGIS portal. used in this tutorial.-
Go to the Create an API key tutorial to obtain a new API key access token
An access token is an authorization string that provides access to secure ArcGIS content, data, and services. Its capabilities are determined by the privileges it supports. It is obtained by implementing API key authentication, User authentication, or App authentication. using your ArcGIS Location PlatformAn ArcGIS Location Platform account, formerly known as an ArcGIS Developer account, is an identity associated with an ArcGIS Location Platform subscription. or ArcGIS OnlineAn ArcGIS Online account, also known as an ArcGIS Organization account, is an identity associated with an ArcGIS Online subscription. It can be used to access ArcGIS tools and develop applications with ArcGIS location services for an organization. account. Ensure that the following privilegePrivileges are a set of permissions assigned to ArcGIS accounts, developer credentials, and applications that grant access to secure resources and functionality in ArcGIS. is enabled: Location services > Basemaps > Basemap styles service. Copy the access token as it will be used in the next step. -
In IntelliJ IDEA’s Project tool window, open src/main/java/com.example.app and double-click App.
-
In the
start()method, set the API key property on theArcGISRuntimeEnvironmentwith your access tokenAn access token is an authorization string that provides access to secure ArcGIS content, data, and services. Its capabilities are determined by the privileges it supports. It is obtained by implementing API key authentication, User authentication, or App authentication. . Replace YOUR_ACCESS_TOKEN with your copied access token. Be sure to surround your access token with double quotes as it is a string.App.javaArcGISRuntimeEnvironment.setApiKey("YOUR_ACCESS_TOKEN");
-
Prepare files before coding the app
Modify the files from the Display a map tutorial so they can be used in this tutorial: you will add imports, change the application title, and modify the view point’s scale. You will then add required JavaFX controls to the build configuration.
-
In IntellJ IDEA, locate the Project tool window, open src/main/java/com.example.app, and double-click App. Add the following imports, replacing those from the Display a map tutorial.
-
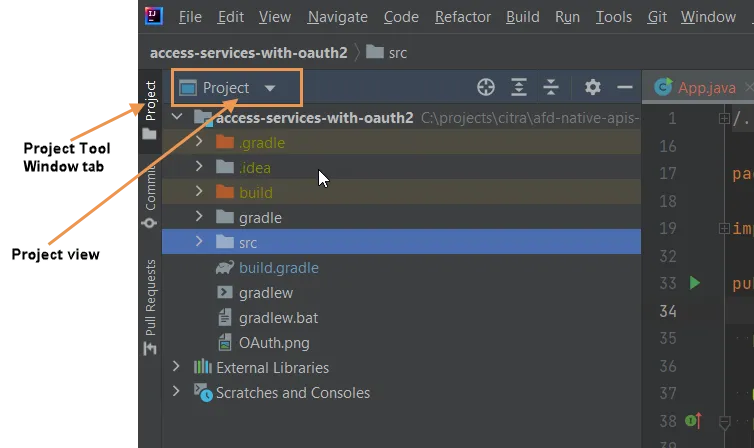
In the main menu of IntelliJ IDEA, click View > Tool Windows > Project. The Project Tool window displays, with a vertical tab on the left that says Project.
-
Inside the Project tool window, your view name should also be Project. If the view name is something else (such as Packages or Project Files), click on the leftmost control in the title bar of the Project tool window, and select Project from the drop-down list.
 App.javapackage com.example.app;import com.esri.arcgisruntime.ArcGISRuntimeEnvironment;import com.esri.arcgisruntime.layers.FeatureLayer;import com.esri.arcgisruntime.loadable.LoadStatus;import com.esri.arcgisruntime.mapping.ArcGISMap;import com.esri.arcgisruntime.mapping.BasemapStyle;import com.esri.arcgisruntime.mapping.Viewpoint;import com.esri.arcgisruntime.mapping.view.MapView;import com.esri.arcgisruntime.portal.Portal;import com.esri.arcgisruntime.portal.PortalItem;import javafx.application.Application;import javafx.scene.control.Alert;import javafx.scene.layout.StackPane;import javafx.scene.Scene;import javafx.stage.Stage;public class App extends Application {
 -
-
In the
start()life-cycle method, change the title that will appear on the application window toAdd a feature layer from a portal item.App.java@Overridepublic void start(Stage stage) {// set the title and size of the stage and show itstage.setTitle("Add a feature layer from a portal item");stage.setWidth(800);stage.setHeight(700);stage.show();
Display the ArcGIS portal item
You can reference an item2e4b3df6ba4b44969a3bc9827de746b3. You will then add that feature layer to your map’s collection of data layers (operational layers).
-
In the
start()method, directly beforemapView = new MapView();, create aPortalItemthat references the portal itemAn item, also known as a content item, is a resource stored in a portal such as a web map, hosted layer, style, script tool, file, or notebook. that the feature layer will use. To do this, provide the item IDAn item ID is a unique identifier representing a single item stored, managed, and accessed in a portal, such as a web map, hosted layer, or file. and aPortal.App.java56 collapsed lines// Copyright 2020 Esri// Licensed under the Apache License, Version 2.0 (the "License");// you may not use this file except in compliance with the License.// You may obtain a copy of the License at//// http://www.apache.org/licenses/LICENSE-2.0//// Unless required by applicable law or agreed to in writing, software// distributed under the License is distributed on an "AS IS" BASIS,// WITHOUT WARRANTIES OR CONDITIONS OF ANY KIND, either express or implied.// See the License for the specific language governing permissions and// limitations under the License.package com.example.app;import com.esri.arcgisruntime.ArcGISRuntimeEnvironment;import com.esri.arcgisruntime.layers.FeatureLayer;import com.esri.arcgisruntime.loadable.LoadStatus;import com.esri.arcgisruntime.mapping.ArcGISMap;import com.esri.arcgisruntime.mapping.BasemapStyle;import com.esri.arcgisruntime.mapping.Viewpoint;import com.esri.arcgisruntime.mapping.view.MapView;import com.esri.arcgisruntime.portal.Portal;import com.esri.arcgisruntime.portal.PortalItem;import javafx.application.Application;import javafx.scene.control.Alert;import javafx.scene.layout.StackPane;import javafx.scene.Scene;import javafx.stage.Stage;public class App extends Application {private MapView mapView;public static void main(String[] args) {Application.launch(args);}@Overridepublic void start(Stage stage) {// set the title and size of the stage and show itstage.setTitle("Add a feature layer from a portal item");stage.setWidth(800);stage.setHeight(700);stage.show();// create a JavaFX scene with a stack pane as the root node, and add it to the sceneStackPane stackPane = new StackPane();Scene scene = new Scene(stackPane);stage.setScene(scene);ArcGISRuntimeEnvironment.setApiKey("YOUR_ACCESS_TOKEN");// create a map view to display the map and add it to the stack paneString portalItemId = "2e4b3df6ba4b44969a3bc9827de746b3";Portal portal = new Portal("https://www.arcgis.com");PortalItem portalItem = new PortalItem(portal, portalItemId);mapView = new MapView();stackPane.getChildren().add(mapView);22 collapsed linesArcGISMap map = new ArcGISMap(BasemapStyle.ARCGIS_TOPOGRAPHIC);map.getOperationalLayers().add(layer);// set the map on the map viewmapView.setMap(map);mapView.setViewpoint(new Viewpoint(34.02700, -118.80543, 144447.638572));}/*** Stops and releases all resources used in application.*/@Overridepublic void stop() {if (mapView != null) {mapView.dispose();}}} -
Create a
FeatureLayerpassing thePortalItemand a layer ID of 0. Using aPortalItemto create aFeatureLayercauses the portal item to be loaded asynchronously.A layer ID is required because a portal item may have more than one layer. For instance, when a feature service has 3 layers, such as trailheads (points), trails (polylines) and trail areas (polygons), the corresponding portal item would contain all three layers.
App.java56 collapsed lines// Copyright 2020 Esri// Licensed under the Apache License, Version 2.0 (the "License");// you may not use this file except in compliance with the License.// You may obtain a copy of the License at//// http://www.apache.org/licenses/LICENSE-2.0//// Unless required by applicable law or agreed to in writing, software// distributed under the License is distributed on an "AS IS" BASIS,// WITHOUT WARRANTIES OR CONDITIONS OF ANY KIND, either express or implied.// See the License for the specific language governing permissions and// limitations under the License.package com.example.app;import com.esri.arcgisruntime.ArcGISRuntimeEnvironment;import com.esri.arcgisruntime.layers.FeatureLayer;import com.esri.arcgisruntime.loadable.LoadStatus;import com.esri.arcgisruntime.mapping.ArcGISMap;import com.esri.arcgisruntime.mapping.BasemapStyle;import com.esri.arcgisruntime.mapping.Viewpoint;import com.esri.arcgisruntime.mapping.view.MapView;import com.esri.arcgisruntime.portal.Portal;import com.esri.arcgisruntime.portal.PortalItem;import javafx.application.Application;import javafx.scene.control.Alert;import javafx.scene.layout.StackPane;import javafx.scene.Scene;import javafx.stage.Stage;public class App extends Application {private MapView mapView;public static void main(String[] args) {Application.launch(args);}@Overridepublic void start(Stage stage) {// set the title and size of the stage and show itstage.setTitle("Add a feature layer from a portal item");stage.setWidth(800);stage.setHeight(700);stage.show();// create a JavaFX scene with a stack pane as the root node, and add it to the sceneStackPane stackPane = new StackPane();Scene scene = new Scene(stackPane);stage.setScene(scene);ArcGISRuntimeEnvironment.setApiKey("YOUR_ACCESS_TOKEN");// create a map view to display the map and add it to the stack paneString portalItemId = "2e4b3df6ba4b44969a3bc9827de746b3";Portal portal = new Portal("https://www.arcgis.com");PortalItem portalItem = new PortalItem(portal, portalItemId);long layerId = 0;FeatureLayer layer = new FeatureLayer(portalItem, layerId);mapView = new MapView();stackPane.getChildren().add(mapView);22 collapsed linesArcGISMap map = new ArcGISMap(BasemapStyle.ARCGIS_TOPOGRAPHIC);map.getOperationalLayers().add(layer);// set the map on the map viewmapView.setMap(map);mapView.setViewpoint(new Viewpoint(34.02700, -118.80543, 144447.638572));}/*** Stops and releases all resources used in application.*/@Overridepublic void stop() {if (mapView != null) {mapView.dispose();}}} -
Add a done loading listener to the portal item. In the lambda, check if the portal item is not loaded and, in that case, display an alert.
App.java67 collapsed lines// Copyright 2020 Esri// Licensed under the Apache License, Version 2.0 (the "License");// you may not use this file except in compliance with the License.// You may obtain a copy of the License at//// http://www.apache.org/licenses/LICENSE-2.0//// Unless required by applicable law or agreed to in writing, software// distributed under the License is distributed on an "AS IS" BASIS,// WITHOUT WARRANTIES OR CONDITIONS OF ANY KIND, either express or implied.// See the License for the specific language governing permissions and// limitations under the License.package com.example.app;import com.esri.arcgisruntime.ArcGISRuntimeEnvironment;import com.esri.arcgisruntime.layers.FeatureLayer;import com.esri.arcgisruntime.loadable.LoadStatus;import com.esri.arcgisruntime.mapping.ArcGISMap;import com.esri.arcgisruntime.mapping.BasemapStyle;import com.esri.arcgisruntime.mapping.Viewpoint;import com.esri.arcgisruntime.mapping.view.MapView;import com.esri.arcgisruntime.portal.Portal;import com.esri.arcgisruntime.portal.PortalItem;import javafx.application.Application;import javafx.scene.control.Alert;import javafx.scene.layout.StackPane;import javafx.scene.Scene;import javafx.stage.Stage;public class App extends Application {private MapView mapView;public static void main(String[] args) {Application.launch(args);}@Overridepublic void start(Stage stage) {// set the title and size of the stage and show itstage.setTitle("Add a feature layer from a portal item");stage.setWidth(800);stage.setHeight(700);stage.show();// create a JavaFX scene with a stack pane as the root node, and add it to the sceneStackPane stackPane = new StackPane();Scene scene = new Scene(stackPane);stage.setScene(scene);ArcGISRuntimeEnvironment.setApiKey("YOUR_ACCESS_TOKEN");// create a map view to display the map and add it to the stack paneString portalItemId = "2e4b3df6ba4b44969a3bc9827de746b3";Portal portal = new Portal("https://www.arcgis.com");PortalItem portalItem = new PortalItem(portal, portalItemId);long layerId = 0;FeatureLayer layer = new FeatureLayer(portalItem, layerId);mapView = new MapView();stackPane.getChildren().add(mapView);ArcGISMap map = new ArcGISMap(BasemapStyle.ARCGIS_TOPOGRAPHIC);map.getOperationalLayers().add(layer);// set the map on the map viewmapView.setMap(map);mapView.setViewpoint(new Viewpoint(34.02700, -118.80543, 144447.638572));portalItem.addDoneLoadingListener(() -> {if (portalItem.getLoadStatus() != LoadStatus.LOADED) {new Alert(Alert.AlertType.ERROR, "Portal item not loaded. " + portalItem.getLoadError().getCause().getMessage()).show();}});}12 collapsed lines/*** Stops and releases all resources used in application.*/@Overridepublic void stop() {if (mapView != null) {mapView.dispose();}}}
Run the app. Ensure to run the app as a Gradle task and not as an application in your IDE. In the Gradle tool window, under Tasks > application, double-click run.
You should see a map of trail heads in the Santa Monica mountains. Click, drag, and scroll the mouse wheel on the map view to explore the map.
What’s next?
Learn how to use additional API features, ArcGIS location services, and ArcGIS tools in these tutorials: