Learn how to create and display a map
A map contains layers
In this tutorial, you create and display a map
The map and code will be used as the starting point for other 2D tutorials.
Prerequisites
Before starting this tutorial:
-
You need an ArcGIS Location Platform or ArcGIS Online account.
-
Your system meets the system requirements.
-
You need an IDE for Flutter - we recommend VS Code.
Set up authentication
To access the secure ArcGIS location services
You can implement API key authentication or user authentication in this tutorial. Compare the differences below:
API key authentication
- Users are not required to sign in.
- Requires creating an API key credential
API key credentials are an item that contains the parameters used to create and manage long-lived access tokens for API key authentication. They are a type of developer credential. with the correct privileges. - API keys
An API key is a long-lived access token created using API key credentials. They are valid for up to one year and are typically embedded directly into client applications. are long-lived access tokens. - Service usage is billed to the API key owner/developer.
- Simplest authentication method to implement.
- Recommended approach for new ArcGIS developers.
Learn more in API key authentication.
User authentication
- Users are required to sign in with an ArcGIS account
An ArcGIS account is an identity with a user type and set of privileges that can access specific ArcGIS products, tools, APIs, services, and resources. The main account types that can be used for development are an ArcGIS Location Platform account, ArcGIS Online account, and ArcGIS Enterprise account. ArcGIS Location Platform and ArcGIS Online accounts are also associated with a subscription. . - User accounts must have privilege
Privileges are a set of permissions assigned to ArcGIS accounts, developer credentials, and applications that grant access to secure resources and functionality in ArcGIS. to access the ArcGIS servicesA service, also known as an ArcGIS service, is software that supports an ArcGIS REST API and provides geospatial functionality or data. A service can be hosted by Esri or in ArcGIS Enterprise. used in application. - Requires creating OAuth credentials
OAuth credentials are an item that contains parameters required to implement user authentication or app authentication, including a .client_id,client_secret, and redirect URIs. They are a type of developer credential. - Application uses a redirect URL and client ID.
- Service usage is billed to the organization of the user signed into the application.
Learn more in User authentication.
To complete this tutorial, click on the tab in the switcher below for your authentication type of choice, either API key authentication or User authentication.
Create a new API key access token
-
Complete the Create an API key tutorial and create an API key with the following privilege(s)
Privileges are a set of permissions assigned to ArcGIS accounts, developer credentials, and applications that grant access to secure resources and functionality in ArcGIS. :- Privileges
- Location services > Basemaps
- Privileges
-
Copy and paste the API key access token into a safe location. It will be used in a later step.
Develop or download
You have two options for completing this tutorial:
Option 1: Develop the code
Create a new Flutter app
-
Open VS Code, then select Open... in the welcome tab. Choose your preferred project location.
-
Go to View > Terminal.
-
In the terminal window, use the following command to create a new Flutter app called display_a_map. Set your required target platform(s) and an org name, com.example.app.
Use dark colors for code blocks Copy flutter create -e display_a_map --platforms ios,android --org com.example.app
Refactor the template code
When working with the ArcGIS Maps SDK for Flutter, it is very common to require updates to application state, such as making updates to the UI in response to data changes. You will implement a stateful widget so your app is ready for this.
It is possible to display a map using a stateless widget implementation, see the Display map sample.
-
In VS Code, open lib/main.dart.
-
Inside
main(), instantiateMaterialwithinApp runand set the named argument,App() home, to an instance ofMain.App main.dartUse dark colors for code blocks void main() { runApp( const MaterialApp(home: MainApp()), ); } -
Refactor the template
Mainclass definition to extendApp Stateful. Hover your mouse over theWidget Statelesskeyword, right-click, select Refactor..., and chose Convert to StatefulWidget to refactor your code.Widget main.dartUse dark colors for code blocks class MainApp extends StatefulWidget { const MainApp({super.key}); @override State<MainApp> createState() => _MainAppState(); } class _MainAppState extends State<MainApp> { @override Widget build(BuildContext context) { return const MaterialApp( home: Scaffold(body: Center(child: Text('Hello World!'))), ); } } -
Remove the
Materialwidget that is returned within the build method of classApp _Main. This code was generated by the Flutter create template and will be replaced with code to return a widget that contains a map in a later step.App State main.dartUse dark colors for code blocks class _MainAppState extends State<MainApp> { @override Widget build(BuildContext context) { return const MaterialApp( home: Scaffold(body: Center(child: Text('Hello World!'))), ); } }
Add ArcGIS Maps SDK for Flutter
Add a dependency to the arcgis package.
-
In VS Code's terminal, change the directory to your new project:
Use dark colors for code blocks Copy cd display_a_map -
Run:
Use dark colors for code blocks Copy dart pub add arcgis_maps -
Run:
Use dark colors for code blocks Copy flutter pub upgrade -
Lastly, run:
Use dark colors for code blocks Copy dart run arcgis_maps install -
Return to main.dart.
-
Import the
arcgispackage._maps main.dartUse dark colors for code blocks import 'package:arcgis_maps/arcgis_maps.dart';
Make platform specific configuration changes
To develop for Android, iOS, or both, the Flutter tooling sets default values for a number of configuration versions. These are pre-configured in a new project when it is created. The updates specified below are changes that are required to these defaults in order to compile an application using the current version of the ArcGIS Maps SDK for Flutter package. For additional details see our System Requirements page.
-
Update the Android minimum SDK requirement by editing
android/app/build.gradle.ktsfile in your project:build.gradle.ktsUse dark colors for code blocks // ... defaultConfig { // TODO: Specify your own unique Application ID (https://developer.android.com/studio/build/application-id.html). applicationId = "com.example.app.display_a_map" // You can update the following values to match your application needs. // For more information, see: https://flutter.dev/to/review-gradle-config. minSdk = 28 targetSdk = flutter.targetSdkVersion versionCode = flutter.versionCode versionName = flutter.versionName } // ... -
Add a permission to
android/app/src/main/to access online resources:Android Manifest.xml AndroidManifest.xmlUse dark colors for code blocks <manifest xmlns:android="http://schemas.android.com/apk/res/android"> <uses-permission android:name="android.permission.INTERNET" /> <application android:label="display_a_map" android:name="${applicationName}" android:icon="@mipmap/ic_launcher"> <!-- ... -->
Set developer credentials
To allow your app users to access ArcGIS location services
Pass your API key access token to the ArcGISEnvironment.
-
Return to main.dart.
-
In the
main()function, set theArcGISEnvironment.apiKeyvalue to your access tokenAn access token is an authorization string that provides access to secure ArcGIS content, data, and services. Its capabilities are determined by the privileges it supports. It is obtained by implementing API key authentication, User authentication, or App authentication. .main.dartUse dark colors for code blocks void main () { ArcGISEnvironment.apiKey = 'YOUR_ACCESS_TOKEN'; runApp( const MaterialApp(home: MainApp()) ); }
Best Practice: The access token is stored directly in the code as a convenience for this tutorial. Do not store credentials directly in source code in a production environment.
Add a map
Create a map
-
Define a final class member variable inside
_Mainclass,App State _map, and initialize it withView Controller ArcGISMapViewControllerby calling thecreateController()onArcGISMapView.The ArcGIS map view controller is a user interface control that displays two-dimensional (2D) geographic content defined by an
ArcGISMap.main.dartUse dark colors for code blocks class _MainAppState extends State<MainApp> { final _mapViewController = ArcGISMapView.createController(); @override Widget build(BuildContext context) { } } -
Add widgets to the widget tree within the
build()consisting ofScaffold,Column,Expanded, andArcGISMapView. Set the map view's named argument,controllerProvider, to the class member variable_mapand theView Controller onMapViewReadyargument to a new method with the same name as the argument. You will define the new method next.The
Scaffoldwidget provides a basic material design visual layout structure, while theColumnwidget displays its children in a vertical array. TheArcGISMapViewwidget can only be used within a widget that has a bounded size. Using it with unbounded size will cause the application to throw an exception. For example, to use anArcGISwithin aMap View Columnwidget, which would give it unbounded size, would produce such an exception. Instead, you could wrap theArcGISin anMap View Expandedwidget to provide it proper bounds as illustrated in this step of the tutorial.main.dartUse dark colors for code blocks class _MainAppState extends State<MainApp> { final _mapViewController = ArcGISMapView.createController(); @override Widget build(BuildContext context) { return Scaffold( body: Column( children: [ Expanded( child: ArcGISMapView( controllerProvider: () => _mapViewController, onMapViewReady: onMapViewReady, ), ), ], ), ); } } -
Define a new method within
_Main,App State on, that does not return anything.Map View Ready() main.dartUse dark colors for code blocks void onMapViewReady() { } -
Define a final variable,
map, in the new method and initialize it to anArcGISMapusing the ArcGIS topographic basemap style.main.dartUse dark colors for code blocks void onMapViewReady() { final map = ArcGISMap.withBasemapStyle(BasemapStyle.arcGISTopographic); } -
Set the ArcGIS map view controller's
arcGISMapproperty to themap. In addition, callsetViewpoint()to zoom to the Santa Monica Mountains in California.Scale is an integral part of creating a viewpoint. It determines how closely you view your map. Scale is a ratio between measurements on a map view and measurements in the real-world. Use this conversion tool to see how scale works relative to zoom level and learn more about their relationship.
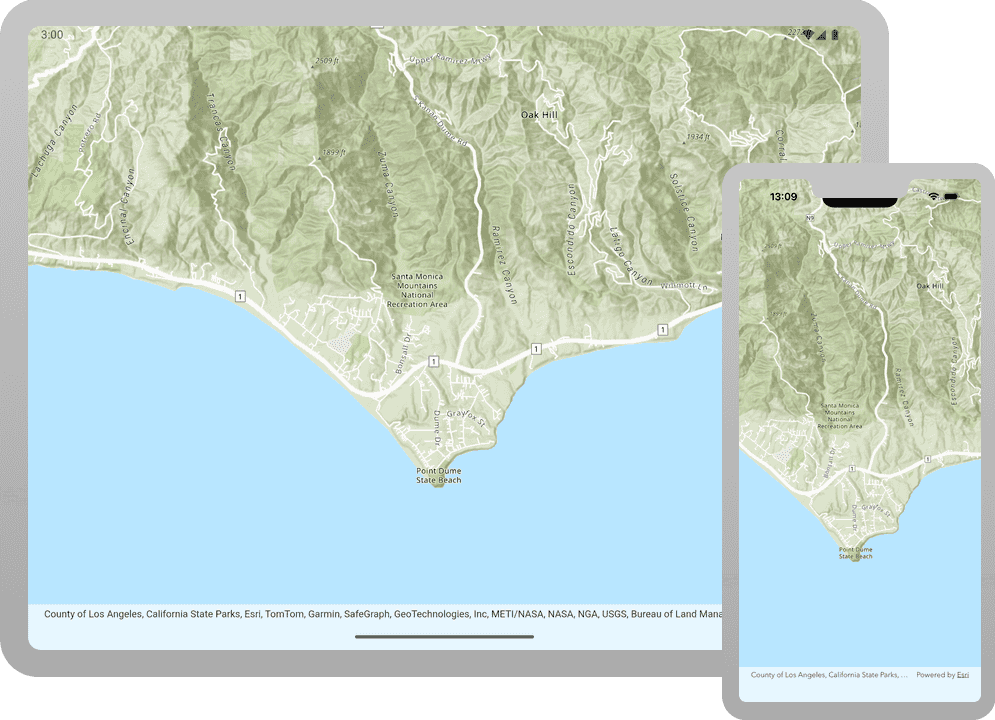
main.dartUse dark colors for code blocks void onMapViewReady() { final map = ArcGISMap.withBasemapStyle(BasemapStyle.arcGISTopographic); _mapViewController.arcGISMap = map; _mapViewController.setViewpoint( Viewpoint.withLatLongScale( latitude: 34.02700, longitude: -118.80500, scale: 72000, ), ); }
Run the app
-
Make sure you have an Android emulator, iOS simulator or physical device configured and running.
-
In VS Code, select Run > Run Without Debugging.
You will see a map
Alternatively, you can download the tutorial solution, as follows.
Option 2: Download the solution
-
Click the
Download solutionlink underSolutionand unzip the file to a location on your machine. -
Open the project in VS code.
Since the downloaded solution does not contain authentication code, you must add the authentication code and set the credentials that you created in the Set up authentication section.
Add authentication code and set developer credentials
To allow your app users to access ArcGIS location services
-
Open lib/main.dart.
-
In the
main()function, set theArcGISEnvironment.apiKeyvalue to your access tokenAn access token is an authorization string that provides access to secure ArcGIS content, data, and services. Its capabilities are determined by the privileges it supports. It is obtained by implementing API key authentication, User authentication, or App authentication. .main.dartUse dark colors for code blocks void main () { ArcGISEnvironment.apiKey = 'YOUR_ACCESS_TOKEN'; runApp( const MaterialApp(home: MainApp()) ); }
Best Practice: The access token is stored directly in the code as a convenience for this tutorial. Do not store credentials directly in source code in a production environment.
Run the application
Follow these steps to run the application.
-
In VS Code's terminal, run:
Use dark colors for code blocks Copy flutter pub upgrade -
Run:
Use dark colors for code blocks Copy dart run arcgis_maps install -
Make sure you have an Android emulator, iOS simulator or physical device configured and running.
-
In VS Code, select Run > Run Without Debugging.
You will see a map