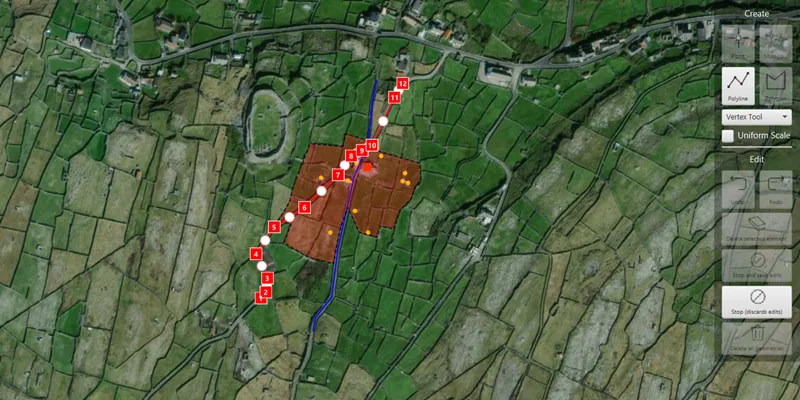
Use the Geometry Editor to create new point, multipoint, polyline, or polygon geometries or to edit existing geometries by interacting with a map view.
Use case
A field worker can mark features of interest on a map using an appropriate geometry. Features such as sample or observation locations, fences or pipelines, and building footprints can be digitized using point, multipoint, polyline, and polygon geometry types. Polyline and polygon geometries can be created and edited using a vertex-based creation and editing tool (i.e. vertex locations specified explicitly via tapping), or using a freehand tool.
How to use the sample
To create a new geometry, press the button appropriate for the geometry type you want to create (i.e. points, multipoints, polyline, or polygon) and interactively tap and drag on the map view to create the geometry.
To edit an existing geometry, tap the geometry to be edited in the map to select it and then edit the geometry by tapping and dragging elements of the geometry.
When the whole geometry is selected, you can use the control handles to scale and rotate the geometry.
If creating or editing polyline or polygon geometries, choose the desired creation/editing tool from the combo box.
Use the control panel to undo or redo changes made to the geometry, delete a selected element, save the geometry, stop the editing session and discard any edits, and remove all geometries from the map.
How it works
-
Create a
GeometryEditorand set it to the MapView usingmapView.setGeometryEditor(GeometryEditor). -
Start the
GeometryEditorusinggeometryEditor.start(GeometryType)to create a new geometry orgeometryEditor.start(Geometry)to edit an existing geometry.- If using the Geometry Editor to edit an existing geometry, the geometry must be retrieved from the graphics overlay being used to visualize the geometry prior to calling the start method. To do this:
- Use
MapView.identifyGraphicsOverlayAsync(...)to identify graphics at the location of a tap. - Access the
MapView.identifyGraphicsOverlayAsync(...)results usinglistenableFuture.get(). - Find the desired graphic in the
result.getGraphics()list. - Access the geometry associated with the
Graphicusinggraphic.getGeometry()- this will be used in thegeometryEditor.start(Geometry)method.
- Use
- If using the Geometry Editor to edit an existing geometry, the geometry must be retrieved from the graphics overlay being used to visualize the geometry prior to calling the start method. To do this:
-
Create
VertexTool,FreehandTool, orShapeToolobjects which define how the user interacts with the view to create or edit geometries, usinggeometryEditor.setTool(geometryEditorTool). -
Edit a tool’s
InteractionConfigurationto set theGeometryEditorScaleModeto allow either uniform or stretch scale mode. -
Check to see if undo and redo are possible during an editing session using
GeometryEditor.getCanUndo()andGeometryEditor.getCanRedo(). If it’s possible, useGeometryEditor.undo()andGeometryEditor.redo(). -
Check whether the currently selected
GeometryEditorElementcan be deleted (GeometryEditor.getSelectedElement().getCanDelete()). If the element can be deleted, delete usingGeometryEditor.deleteSelectedElement(). -
Call
GeometryEditor.stop()to finish the editing session. TheGeometryEditordoes not automatically handle the visualization of a geometry output from an editing session. This must be done manually by propagating the geometry returned byGeometryEditor.stop()into aGraphicand aGraphicsOverlay.- To create a new
Graphicin theGraphicsOverlay:- Using
Graphic(Geometry), create a new Graphic with the geometry returned by theGeometryEditor.stop()method. - Append the
Graphicto theGraphicsOverlay’sGraphicListModel(i.e.GraphicsOverlay.getGraphics().add(Graphic)).
- Using
- To update the geometry underlying an existing
Graphicin theGraphicsOverlay:- Replace the existing
Graphic’sGeometryproperty with the geometry returned by theGeometryEditor.stop()method usingGraphic.setGeometry(Geometry).
- Replace the existing
- To create a new
Relevant API
- Geometry
- GeometryEditor
- Graphic
- GraphicsOverlay
- MapView
Additional information
The sample opens with the ArcGIS Imagery basemap centered on the island of Inis Meáin (Aran Islands) in Ireland. Inis Meáin comprises a landscape of interlinked stone walls, roads, buildings, archaeological sites, and geological features, producing complex geometrical relationships.
Tags
draw, edit, freehand, geometry editor, sketch, vertex
Sample code
/* * Copyright 2023 Esri. * * Licensed under the Apache License, Version 2.0 (the "License"); you may not * use this file except in compliance with the License. You may obtain a copy of * the License at * * http://www.apache.org/licenses/LICENSE-2.0 * * Unless required by applicable law or agreed to in writing, software * distributed under the License is distributed on an "AS IS" BASIS, WITHOUT * WARRANTIES OR CONDITIONS OF ANY KIND, either express or implied. See the * License for the specific language governing permissions and limitations under * the License. */
package com.esri.samples.create_and_edit_geometries;
import com.esri.arcgisruntime.ArcGISRuntimeEnvironment;import com.esri.arcgisruntime.concurrent.ListenableFuture;import com.esri.arcgisruntime.geometry.Geometry;import com.esri.arcgisruntime.geometry.GeometryType;import com.esri.arcgisruntime.geometry.Multipoint;import com.esri.arcgisruntime.geometry.Point;import com.esri.arcgisruntime.geometry.Polygon;import com.esri.arcgisruntime.geometry.Polyline;import com.esri.arcgisruntime.mapping.ArcGISMap;import com.esri.arcgisruntime.mapping.BasemapStyle;import com.esri.arcgisruntime.mapping.Viewpoint;import com.esri.arcgisruntime.mapping.view.Graphic;import com.esri.arcgisruntime.mapping.view.GraphicsOverlay;import com.esri.arcgisruntime.mapping.view.IdentifyGraphicsOverlayResult;import com.esri.arcgisruntime.mapping.view.MapView;import com.esri.arcgisruntime.mapping.view.geometryeditor.FreehandTool;import com.esri.arcgisruntime.mapping.view.geometryeditor.GeometryEditor;import com.esri.arcgisruntime.mapping.view.geometryeditor.GeometryEditorTool;import com.esri.arcgisruntime.mapping.view.geometryeditor.ShapeTool;import com.esri.arcgisruntime.mapping.view.geometryeditor.ShapeToolType;import com.esri.arcgisruntime.mapping.view.geometryeditor.VertexTool;import com.esri.arcgisruntime.mapping.view.geometryeditor.GeometryEditorScaleMode;import com.esri.arcgisruntime.symbology.SimpleFillSymbol;import com.esri.arcgisruntime.symbology.SimpleLineSymbol;import com.esri.arcgisruntime.symbology.SimpleMarkerSymbol;
import javafx.beans.binding.Bindings;import javafx.fxml.FXML;import javafx.geometry.Point2D;import javafx.scene.control.Alert;import javafx.scene.control.Button;import javafx.scene.control.ComboBox;import javafx.scene.control.CheckBox;import javafx.scene.input.MouseButton;import javafx.scene.paint.Color;import javafx.util.StringConverter;
import java.nio.file.Files;import java.nio.file.Path;import java.util.List;
public class CreateAndEditGeometriesController {
  @FXML private MapView mapView;  @FXML private Button pointButton;  @FXML private Button multipointButton;  @FXML private Button polylineButton;  @FXML private Button polygonButton;  @FXML private CheckBox scaleModeUniformCheckBox;  @FXML private Button redoButton;  @FXML private Button undoButton;  @FXML private Button deleteSelectedElementButton;  @FXML private Button stopAndSaveButton;  @FXML private Button stopAndDiscardButton;  @FXML private Button deleteAllGeometriesButton;  @FXML private ComboBox<GeometryEditorTool> toolComboBox;
  private GeometryEditor geometryEditor;  private VertexTool vertexTool;  private FreehandTool freehandTool;  private ShapeTool arrowShapeTool;  private ShapeTool ellipseShapeTool;  private ShapeTool rectangleShapeTool;  private ShapeTool triangleShapeTool;  private GraphicsOverlay graphicsOverlay;  private Graphic selectedGraphic;  private SimpleFillSymbol fillSymbol;  private SimpleLineSymbol lineSymbol;  private SimpleMarkerSymbol pointSymbol;  private SimpleMarkerSymbol multipointSymbol;
  public void initialize() {
    // authentication with an API key or named user is required to access basemaps and other location services    String yourAPIKey = System.getProperty("apiKey");    ArcGISRuntimeEnvironment.setApiKey(yourAPIKey);
    // create a map with the standard imagery basemap style    ArcGISMap map = new ArcGISMap(BasemapStyle.ARCGIS_IMAGERY_STANDARD);
    // set the map to the map view    mapView.setMap(map);
    // set a viewpoint on the map view    mapView.setViewpoint(new Viewpoint(53.08230, -9.5920, 5000));
    // create a graphics overlay and add it to the map view    graphicsOverlay = new GraphicsOverlay();    mapView.getGraphicsOverlays().add(graphicsOverlay);
    // create a geometry editor and set it to the map view    geometryEditor = new GeometryEditor();    mapView.setGeometryEditor(geometryEditor);
    // create vertex, freehand, and shape tools for the geometry editor and add to combo box    vertexTool = new VertexTool();    freehandTool = new FreehandTool();    arrowShapeTool = ShapeTool.create(ShapeToolType.ARROW);    ellipseShapeTool = ShapeTool.create(ShapeToolType.ELLIPSE);    rectangleShapeTool = ShapeTool.create(ShapeToolType.RECTANGLE);    triangleShapeTool = ShapeTool.create(ShapeToolType.TRIANGLE);    toolComboBox.setConverter(new ComboBoxStringConverter());    toolComboBox.getItems().addAll(vertexTool, freehandTool, arrowShapeTool, ellipseShapeTool, rectangleShapeTool, triangleShapeTool);    // initially configure the geometry editor with the vertex tool    geometryEditor.setTool(vertexTool);    // bidirectionally bind the geometry editor tool to the tool selected in the combo box    toolComboBox.valueProperty().bindBidirectional(geometryEditor.toolProperty());
    // bind the tool's scale mode property to the 'selected' property of the checkbox    toolComboBox.getItems().forEach(tool -> {      if (tool instanceof VertexTool){        ((VertexTool) tool).getConfiguration().scaleModeProperty().bind(                Bindings.when(scaleModeUniformCheckBox.selectedProperty())                        .then(GeometryEditorScaleMode.UNIFORM)                        .otherwise(GeometryEditorScaleMode.STRETCH));      } else if (tool instanceof FreehandTool) {        ((FreehandTool) tool).getConfiguration().scaleModeProperty().bind(                Bindings.when(scaleModeUniformCheckBox.selectedProperty())                        .then(GeometryEditorScaleMode.UNIFORM)                        .otherwise(GeometryEditorScaleMode.STRETCH));      } else if (tool instanceof ShapeTool) {        ((ShapeTool) tool).getConfiguration().scaleModeProperty().bind(                Bindings.when(scaleModeUniformCheckBox.selectedProperty())                        .then(GeometryEditorScaleMode.UNIFORM)                        .otherwise(GeometryEditorScaleMode.STRETCH));      }    });
    // create symbols for displaying new geometries    // orange-red square for points    pointSymbol = new SimpleMarkerSymbol(SimpleMarkerSymbol.Style.SQUARE, Color.ORANGERED, 10);    // yellow circle for multipoints    multipointSymbol = new SimpleMarkerSymbol(SimpleMarkerSymbol.Style.CIRCLE, Color.YELLOW, 5);    // thin blue line for polylines    lineSymbol = new SimpleLineSymbol(SimpleLineSymbol.Style.SOLID, Color.BLUE, 2);    // black outline for polygons    SimpleLineSymbol polygonLineSymbol = new SimpleLineSymbol(SimpleLineSymbol.Style.DASH, Color.BLACK, 1);    // translucent red interior for polygons    fillSymbol = new SimpleFillSymbol(SimpleFillSymbol.Style.SOLID, Color.rgb(255, 0, 0, 0.3), polygonLineSymbol);
    // add some initial, example graphics to the graphics overlay    createInitialGraphics();
    // listen to changes in the geometry editor started property and update the UI    geometryEditor.startedProperty().addListener((observable, oldValue, newValue) -> {      if (newValue) {        // when the geometry editor is started (and so the geometry will not be null) bind the button state to the        // geometry type        pointButton.disableProperty().bind(Bindings.createBooleanBinding(() ->          geometryEditor.getGeometry().getGeometryType().equals(GeometryType.POINT)).not());        multipointButton.disableProperty().bind(Bindings.createBooleanBinding(() ->          geometryEditor.getGeometry().getGeometryType().equals(GeometryType.MULTIPOINT)).not());        polylineButton.disableProperty().bind(Bindings.createBooleanBinding(() ->          geometryEditor.getGeometry().getGeometryType().equals(GeometryType.POLYLINE)).not());        polygonButton.disableProperty().bind(Bindings.createBooleanBinding(() ->          geometryEditor.getGeometry().getGeometryType().equals(GeometryType.POLYGON)).not());        toolComboBox.disableProperty().bind(Bindings.or(          Bindings.createBooleanBinding(() -> geometryEditor.getGeometry().getGeometryType().equals(GeometryType.MULTIPOINT)),          Bindings.createBooleanBinding(() -> geometryEditor.getGeometry().getGeometryType().equals(GeometryType.POINT))        ));        // disable the scaling mode checkbox when the geometry editor is editing Point geometries        scaleModeUniformCheckBox.disableProperty().bind(Bindings.createBooleanBinding(() ->                geometryEditor.getGeometry().getGeometryType().equals(GeometryType.POINT)));      } else {        // when the geometry editor is not started (and so the geometry is null) enable all geometry buttons        pointButton.disableProperty().unbind();        pointButton.setDisable(false);        multipointButton.disableProperty().unbind();        multipointButton.setDisable(false);        polylineButton.disableProperty().unbind();        polylineButton.setDisable(false);        polygonButton.disableProperty().unbind();        polygonButton.setDisable(false);
        // disable combo box when geometry editor is not started        toolComboBox.disableProperty().unbind();        toolComboBox.setDisable(true);        // disable the scaling mode checkbox when geometry editor is not started        scaleModeUniformCheckBox.disableProperty().unbind();        scaleModeUniformCheckBox.setDisable(true);      }    });
    // bind the disable property of the undo and redo buttons to the geometry editor's can undo and can redo properties    undoButton.disableProperty().bind(geometryEditor.canUndoProperty().not());    redoButton.disableProperty().bind(geometryEditor.canRedoProperty().not());
    geometryEditor.selectedElementProperty().addListener(((observable, oldValue, newValue) -> {      if (newValue != null) {        // if an element is selected in the geometry editor        // bind the disable property of the delete selected element button to the selected element's can delete property        deleteSelectedElementButton.disableProperty().bind(geometryEditor.getSelectedElement().canDeleteProperty().not());      } else {        // if no element is selected in the geometry editor disable the delete selected element button        deleteSelectedElementButton.disableProperty().unbind();        deleteSelectedElementButton.setDisable(true);      }    }));
    // bind the disable property of the stop and save button to the geometry editor's started and can undo properties    stopAndSaveButton.disableProperty().bind(Bindings.or(      geometryEditor.startedProperty().not(), geometryEditor.canUndoProperty().not()));
    // bind the disable property of the stop and discard button to the geometry editor's started property    stopAndDiscardButton.disableProperty().bind(geometryEditor.startedProperty().not());
    // bind the disable property of the delete all geometries button to the geometry editor's started property    // and to whether there are any graphics in the graphics overlay    deleteAllGeometriesButton.disableProperty().bind(Bindings.when(geometryEditor.startedProperty()).then(true)      .otherwise(graphicsOverlay.getGraphics().isEmpty()));
    // configure identification and editing of existing graphics    mapView.setOnMouseClicked(e -> {      if (e.getButton() == MouseButton.PRIMARY && e.isStillSincePress()) {        graphicsOverlay.clearSelection();        var mapViewPoint = new Point2D(e.getX(), e.getY());
        // get graphics near the clicked location        ListenableFuture<IdentifyGraphicsOverlayResult> identifyGraphics =          mapView.identifyGraphicsOverlayAsync(graphicsOverlay, mapViewPoint, 10, false);
        identifyGraphics.addDoneListener(() -> {          try {            // only select graphic if user not already creating/editing a geometry            if (!geometryEditor.isStarted()) {              if (!identifyGraphics.get().getGraphics().isEmpty()) {
                // store the selected graphic so that it can be retained if edits are discarded                selectedGraphic = identifyGraphics.get().getGraphics().get(0);                selectedGraphic.setSelected(true);
                // Use vertex tool if selected geometry is a point or multipoint                if (selectedGraphic.getGeometry().getGeometryType().equals(GeometryType.POINT) ||                  selectedGraphic.getGeometry().getGeometryType().equals(GeometryType.MULTIPOINT)) {                  geometryEditor.setTool(vertexTool);                }
                // hide the selected graphic and start an editing session with a copy of it                geometryEditor.start(selectedGraphic.getGeometry());                selectedGraphic.setVisible(false);              } else {                selectedGraphic = null;              }            }          } catch (Exception ex) {            // on any error, display the stack trace            ex.printStackTrace();          }        });      }    });  }
  /**   * Creates example graphics to be loaded into the sample on startup.   */  private void createInitialGraphics() {    try {      // load example geometries from file      Point houseCoords = (Point) Geometry.fromJson(        Files.readString(Path.of(getClass().getResource("/create_and_edit_geometries/point_data.json").toURI())));
      Multipoint outbuildingCoord = (Multipoint) Geometry.fromJson(        Files.readString(Path.of(getClass().getResource("/create_and_edit_geometries/multipoint_data.json").toURI())));
      Polyline road1Coords = (Polyline) Geometry.fromJson(        Files.readString(Path.of(getClass().getResource("/create_and_edit_geometries/polyline_data_1.json").toURI())));
      Polyline road2Coords = (Polyline) Geometry.fromJson(        Files.readString(Path.of(getClass().getResource("/create_and_edit_geometries/polyline_data_2.json").toURI())));
      Polygon boundaryCoords = (Polygon) Geometry.fromJson(        Files.readString(Path.of(getClass().getResource("/create_and_edit_geometries/polygon_data.json").toURI())));
      // create graphics for example geometries      var pointGraphic = new Graphic(houseCoords);      var multipointGraphic = new Graphic(outbuildingCoord);      var polyline1Graphic = new Graphic(road1Coords);      var polyline2Graphic = new Graphic(road2Coords);      var polygonGraphic = new Graphic(boundaryCoords);
      // set style for example geometry graphics      pointGraphic.setSymbol(pointSymbol);      multipointGraphic.setSymbol(multipointSymbol);      polyline1Graphic.setSymbol(lineSymbol);      polyline2Graphic.setSymbol(lineSymbol);      polygonGraphic.setSymbol(fillSymbol);
      // add example geometry graphics to the graphics overlay      graphicsOverlay.getGraphics().addAll(List.of(pointGraphic, multipointGraphic, polyline1Graphic,        polyline2Graphic, polygonGraphic));    } catch (Exception e) {      new Alert(Alert.AlertType.ERROR, "Unable to load example geometries from file").show();    }
  }
  /**   * Starts the geometry editor with the point geometry type.   */  @FXML  private void handlePointButtonClicked() {    if (!geometryEditor.isStarted()) {      graphicsOverlay.clearSelection();      geometryEditor.setTool(vertexTool);      geometryEditor.start(GeometryType.POINT);    }  }
  /**   * Starts the geometry editor with the multipoint geometry type.   */  @FXML  private void handleMultipointButtonClicked() {    if (!geometryEditor.isStarted()) {      graphicsOverlay.clearSelection();      geometryEditor.setTool(vertexTool);      geometryEditor.start(GeometryType.MULTIPOINT);    }  }
  /**   * Starts the geometry editor with the polyline geometry type.   */  @FXML  private void handlePolylineButtonClicked() {    if (!geometryEditor.isStarted()) {      graphicsOverlay.clearSelection();      geometryEditor.start(GeometryType.POLYLINE);    }  }
  /**   * Starts the geometry editor with the polygon geometry type.   */  @FXML  private void handlePolygonButtonClicked() {    if (!geometryEditor.isStarted()) {      graphicsOverlay.clearSelection();      geometryEditor.start(GeometryType.POLYGON);    }  }
  /**   * Undo the last change made to the geometry while editing is active.   */  @FXML  private void handleUndoButtonClicked() {    geometryEditor.undo();  }
  /**   * Redo the last change made to the geometry while editing is active.   */  @FXML  private void handleRedoButtonClicked() {    geometryEditor.redo();  }
  /**   * Deletes the currently selected element of the geometry editor.   */  @FXML  private void handleDeleteSelectedElementButtonClicked() {    geometryEditor.deleteSelectedElement();  }
  /**   * Checks whether an existing graphic is being edited and either updates it,   * or creates a new graphic based on the geometry in the geometry editor.   */  @FXML  private void handleStopAndSaveButtonClicked() {    // handle saving depending on if the geometry being edited is new, or already exists and needs updating    if (selectedGraphic != null) {      updateSelectedGraphic();    } else {      createNewGraphic();    }  }
  /**   * Creates a new graphic based on the geometry type used by the geometry editor, and adds to the graphics overlay.   */  private void createNewGraphic() {    // get the geometry from the geometry editor and create a new graphic for it    var geometry = geometryEditor.stop();    var graphic = new Graphic(geometry);
    // set graphic style based on geometry type    switch (geometry.getGeometryType()) {      case POINT -> graphic.setSymbol(pointSymbol);      case MULTIPOINT -> graphic.setSymbol(multipointSymbol);      case POLYLINE -> graphic.setSymbol(lineSymbol);      case POLYGON -> graphic.setSymbol(fillSymbol);    }
    // add new graphic to the graphics overlay    graphicsOverlay.getGraphics().add(graphic);  }
  /**   * Updates and then resets the selected graphic.   */  private void updateSelectedGraphic() {    // update the geometry of the graphic being edited and make it visible again    selectedGraphic.setGeometry(geometryEditor.stop());    selectedGraphic.setVisible(true);    // reset the selected graphic    selectedGraphic.setSelected(false);    selectedGraphic = null;  }
  /**   * Stops the geometry editor without saving the geometry stored within.   */  @FXML  private void handleStopAndDiscardButtonClicked() {    // if editing a pre-existing graphic, make it visible again    if (selectedGraphic != null) {      selectedGraphic.setVisible(true);      selectedGraphic.setSelected(false);      selectedGraphic = null;      toolComboBox.disableProperty().unbind();      toolComboBox.setDisable(false);    }    geometryEditor.stop();  }
  /**   * Removes all graphics from the graphics overlay.   */  @FXML  private void handleDeleteAllGeometriesButtonClicked() {    graphicsOverlay.getGraphics().clear();  }
  /**   * Converts the GeometryEditorTool values to Strings to display in the ComboBox.   */  private static class ComboBoxStringConverter extends StringConverter<GeometryEditorTool> {
    @Override    public String toString(GeometryEditorTool geometryEditorTool) {      if (geometryEditorTool != null) {        if (geometryEditorTool instanceof VertexTool) return "Vertex Tool";        if (geometryEditorTool instanceof FreehandTool) return "Freehand Tool";        if (geometryEditorTool instanceof ShapeTool){          return switch (((ShapeTool) geometryEditorTool).getShapeType()) {            case ARROW -> "Arrow Shape Tool";            case ELLIPSE -> "Ellipse Shape Tool";            case RECTANGLE -> "Rectangle Shape Tool";            case TRIANGLE -> "Triangle Shape Tool";          };        }      }      return "";    }
    @Override    public GeometryEditorTool fromString(String string) {      return null;    }  }
  /**   * Disposes of application resources.   */  void terminate() {
    if (mapView != null) {      mapView.dispose();    }  }}
/* * Copyright 2023 Esri. * * Licensed under the Apache License, Version 2.0 (the "License"); you may not * use this file except in compliance with the License. You may obtain a copy of * the License at * * http://www.apache.org/licenses/LICENSE-2.0 * * Unless required by applicable law or agreed to in writing, software * distributed under the License is distributed on an "AS IS" BASIS, WITHOUT * WARRANTIES OR CONDITIONS OF ANY KIND, either express or implied. See the * License for the specific language governing permissions and limitations under * the License. */
package com.esri.samples.create_and_edit_geometries;
import javafx.application.Application;import javafx.fxml.FXMLLoader;import javafx.scene.Parent;import javafx.scene.Scene;import javafx.stage.Stage;
import java.io.IOException;
public class CreateAndEditGeometriesSample extends Application {
private static CreateAndEditGeometriesController controller;
@Override public void start(Stage stage) throws IOException {
// set up the scene FXMLLoader loader = new FXMLLoader(getClass().getResource("/create_and_edit_geometries/main.fxml")); Parent root = loader.load(); controller = loader.getController(); Scene scene = new Scene(root);
// set up the stage stage.setTitle("Create and Edit Geometries Sample"); stage.setWidth(1000); stage.setHeight(700); stage.setScene(scene); stage.show(); }
/** * Stops and releases all resources used in application. */ @Override public void stop() { controller.terminate(); }
/** * Opens and runs application. * * @param args arguments passed to this application */ public static void main(String[] args) { Application.launch(args); }
}