Use augmented reality (AR) to quickly explore a scene more naturally than you could with a touch or mouse interface.
Use case
You can use AR to drop into an area and visualize information, like a proposed development or a historical model of a city. You could use flyover AR to explore a city by walking through it virtually.
How to use the sample
When you open the sample, you'll be viewing the scene from above. You can walk around, using your device as a window into the scene. Try moving vertically to get closer to the ground.
How it works
- Create the
ArcGISARViewand add it to the view. - Listen for ARKit tracking state updates using
ArcGISARView.arSCNViewDelegateand provide guidance to the user as necessary. - Create the scene, add content, then display it.
- When the content you want to view loads, get its center point and use that to create the origin camera for the AR view. Note that the altitude should be set so that all scene content is visible. For a city, a good value might be a bit higher than the tallest building. The sample uses 600 meters in the absence of tall buildings in the sample data.
- Set the translation factor so that you can move through the scene easily. With a translation factor of 1000, you will move 1000 feet in the scene for every foot you move the physical device.
- Set the space effect to
starsand atmosphere effect torealisticto create an immersive experience.
Relevant API
- AGSSceneView
- ArcGISARView
About the data
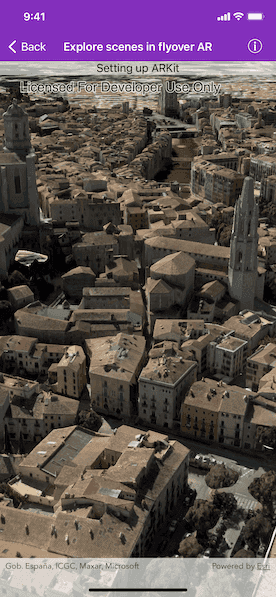
This sample uses an integrated mesh that depicts the city of Girona, Spain and is attributed to the Institut Cartogràfic i Geològic de Catalunya (ICGC). The data was produced from photogrammetrically correct imagery. Areas of white space within the integrated mesh are areas that had poor overlapping coverage from photos.
The world elevation service is used to show terrain while the integrated mesh layer loads.
Additional information
This sample requires a device that is compatible with ARKit 1.0 on iOS.
Flyover AR is one of three main patterns for working with geographic information in augmented reality. Augmented reality is made possible with the ArcGIS Runtime Toolkit. See Augmented reality in the guide for more information about augmented reality and adding it to your app.
Tags
augmented reality, bird's eye, birds-eye-view, fly over, flyover, mixed reality, translation factor
Sample Code
// Copyright 2019 Esri.
// Licensed under the Apache License, Version 2.0 (the "License");
// you may not use this file except in compliance with the License.
// You may obtain a copy of the License at
// http://www.apache.org/licenses/LICENSE-2.0
// Unless required by applicable law or agreed to in writing, software
// distributed under the License is distributed on an "AS IS" BASIS,
// WITHOUT WARRANTIES OR CONDITIONS OF ANY KIND, either express or implied.
// See the License for the specific language governing permissions and
// limitations under the License.
import UIKit
import ARKit
import ArcGISToolkit
import ArcGIS
class ExploreScenesInFlyoverAR: UIViewController {
@IBOutlet var arView: ArcGISARView!
@IBOutlet var arKitStatusLabel: UILabel!
override func viewDidLoad() {
super.viewDidLoad()
// Listen for tracking state changes
arView.arSCNViewDelegate = self
configureSceneForAR()
// add the source code button item to the right of navigation bar
(self.navigationItem.rightBarButtonItem as! SourceCodeBarButtonItem).filenames = ["ExploreScenesInFlyoverAR"]
}
override func viewDidAppear(_ animated: Bool) {
super.viewDidAppear(animated)
arView.startTracking(.ignore)
}
override func viewDidDisappear(_ animated: Bool) {
super.viewDidDisappear(animated)
arView.stopTracking()
}
private func configureSceneForAR() {
// Create scene with imagery basemap
let scene = AGSScene(basemapStyle: .arcGISImagery)
// Create an integrated mesh layer
let meshLayer = AGSIntegratedMeshLayer(url: URL(string: "https://tiles.arcgis.com/tiles/z2tnIkrLQ2BRzr6P/arcgis/rest/services/Girona_Spain/SceneServer")!)
// Add the mesh layer to our scene
scene.operationalLayers.add(meshLayer)
// Display the scene
arView.sceneView.scene = scene
// Wait for the layer to load, then set the AR camera
meshLayer.load { [weak self] error in
guard let self = self else { return }
if let error = error {
self.presentAlert(error: error)
} else {
let location = AGSPoint(x: 2.8262, y: 41.9857, z: 200.0, spatialReference: .wgs84())
let camera = AGSCamera(location: location, heading: 190, pitch: 90, roll: 0)
self.arView.originCamera = camera
}
}
// Set the translation factor to enable rapid movement through the scene
arView.translationFactor = 1000
// Turn the space and atmosphere effects on for an immersive experience
arView.sceneView.spaceEffect = .stars
arView.sceneView.atmosphereEffect = .realistic
}
}
// MARK: - tracking status display
extension ExploreScenesInFlyoverAR: ARSCNViewDelegate {
public func session(_ session: ARSession, cameraDidChangeTrackingState camera: ARCamera) {
switch camera.trackingState {
case .normal:
arKitStatusLabel.isHidden = true
case .notAvailable:
arKitStatusLabel.text = "ARKit location not available"
arKitStatusLabel.isHidden = false
case .limited(let reason):
arKitStatusLabel.isHidden = false
switch reason {
case .excessiveMotion:
arKitStatusLabel.text = "Try moving your phone more slowly"
arKitStatusLabel.isHidden = false
case .initializing:
arKitStatusLabel.text = "Keep moving your phone"
arKitStatusLabel.isHidden = false
case .insufficientFeatures:
arKitStatusLabel.text = "Try turning on more lights and moving around"
arKitStatusLabel.isHidden = false
case .relocalizing:
// this won't happen as this sample doesn't use relocalization
break
@unknown default:
break
}
}
}
}