Learn how to apply renderers
Applications can display feature layer data with different styles to enhance the visualization. The type of Renderer you choose depends on your application. A SimpleRenderer applies the same symbol to all features, a UniqueValueRenderer applies a different symbol to each unique attribute value, and a ClassBreaksRenderer applies a symbol to a range of numeric values. Renderers are responsible for accessing the data and applying the appropriate symbol to each feature when the layer draws. You can also use a LabelDefinition to show attribute information for features. Visit the Styles and data visualization documentation to learn more about styling layers.
You can also author, style and save web maps, web scenes, and layers as portal items and then add them to the map in your application. Visit the following tutorials to learn more about adding portal items.
In this tutorial, you will apply different renderers
Prerequisites
Before starting this tutorial:
-
You need an ArcGIS Location Platform or ArcGIS Online account.
-
Ensure your development environment meets the system requirements.
Optionally, you may want to install the ArcGIS Maps SDK for .NET to get access to project templates in Visual Studio (Windows only) and offline copies of the NuGet packages.
Develop or download
You have two options for completing this tutorial:
Option 1: Develop the code
To start the tutorial, complete the Display a map tutorial. This creates a map to display the Santa Monica Mountains in California using the topographic basemap from the ArcGIS Basemap Styles service
Open a Visual Studio solution
- Open the Visual Studio solution you created by completing the Display a map tutorial.
- Continue with the following instructions to apply renderers and label definitions to a feature layer based on attribute values.
Update the tutorial name used in the project (optional)
The Visual Studio solution, project, and the namespace for all classes currently use the name DisplayAMap. Follow the steps below if you prefer the name to reflect the current tutorial. These steps are not required, your code will still work if you keep the original name.
The tutorial instructions and code use the name StyleAFeatureLayer for the solution, project, and namespace. You can choose any name you like, but it should be the same for each of these.
-
Update the name for the solution and the project.
- In Visual Studio, in the Solution Explorer, right-click the solution name and choose Rename. Provide the new name for your solution.
- In the Solution Explorer, right-click the project name and choose Rename. Provide the new name for your project.
-
Rename the namespace used by classes in the project.
- In the Solution Explorer, expand the project node.
- Double-click MapViewModel.cs in the Solution Explorer to open the file.
- In the
MapViewModelclass, double-click the namespace name (DisplayAMap) to select it, and then right-click and choose Rename…. - Provide the new name for the namespace.
- Click Apply in the Rename: DisplayAMap window that appears in the upper-right of the code window. This will rename the namespace throughout your project.
-
Build the project.
- Choose Build > Build solution (or press <F6>).
Create a function to add a feature layer
A feature layer can be added from a feature servicex,y coordinates and a spatial reference.
You will define variables to store feature service URLs used by the app’s layers and then create a helper method to add a layer to the map’s collection of operational layers
-
In the Visual Studio > Solution Explorer, double-click MapViewModel.cs to open the file.
The project uses the Model-View-ViewModel (MVVM) design pattern to separate the application logic (view model) from the user interface (view).
MapViewModel.cscontains the view model class for the application, calledMapViewModel. See the Microsoft documentation for more information about the Model-View-ViewModel pattern. -
Add additional required
usingstatements near the top of the .cs file. Using statements make your code more concise by allowing you to use classes from these namespaces without having to fully qualify them.MapViewModel.csusing System;using System.Collections.Generic;using System.Text;using Esri.ArcGISRuntime.Geometry;using Esri.ArcGISRuntime.Mapping;using System.ComponentModel;using System.Runtime.CompilerServices;using Esri.ArcGISRuntime.Data;using Esri.ArcGISRuntime.Mapping.Labeling;using Esri.ArcGISRuntime.Symbology;using System.Diagnostics;using System.Drawing; -
Create four static
URIs: three for accessing feature layers, and a fourth for accessing a static image for use in a picture marker symbol. You will use these resources in future steps.MapViewModel.csclass MapViewModel : INotifyPropertyChanged{// Application constants used to connect to data and resources.static Uri parksAndOpenSpaces = new Uri("https://services3.arcgis.com/GVgbJbqm8hXASVYi/arcgis/rest/services/Parks_and_Open_Space/FeatureServer/0");static Uri trails = new Uri("https://services3.arcgis.com/GVgbJbqm8hXASVYi/arcgis/rest/services/Trails/FeatureServer/0");static Uri trailheads = new Uri("https://services3.arcgis.com/GVgbJbqm8hXASVYi/arcgis/rest/services/Trailheads/FeatureServer/0");static Uri trailheadImage = new Uri("https://static.arcgis.com/images/Symbols/NPS/npsPictograph_0231b.png"); -
Add a new method named
AddFeatureLayer()that takes a feature service URI as an argument, creates a feature layer from it, and adds the layer to the map.MapViewModel.csprivate Map? _map;public Map? Map{get { return _map; }set{_map = value;OnPropertyChanged();}}private FeatureLayer AddFeatureLayer(Uri featureServiceUri){// Create a service feature table from a Uri.ServiceFeatureTable serviceFeatureTable = new ServiceFeatureTable(featureServiceUri);// Create a feature layer from the service feature table.FeatureLayer featureLayer = new FeatureLayer(serviceFeatureTable);// Add the feature layer to the maps operational layers collection.Map?.OperationalLayers.Add(featureLayer);// Return the feature layer.return featureLayer;}
Add a layer with a unique value renderer
Create a method to apply a different symbol for each type of park area to the Parks and Open Spaces feature layer.
-
Add a new method named
AddOpenSpaceLayer()just after the newly addedAddFeatureLayer()method.UniqueValueassigns a symbol to a value or values. A unique value renderer uses a collection of unique values to assign the appropriate symbol for each feature it renderers.For this example, the renderer uses a feature’s
TYPEattribute value to apply the correct symbol.MapViewModel.csprivate void AddOpenSpaceLayer(){// Create a parks and open spaces feature layer and add it to the map view.FeatureLayer featureLayer = AddFeatureLayer(parksAndOpenSpaces);// Create fill symbols.SimpleFillSymbol purpleFillSymbol = new SimpleFillSymbol(SimpleFillSymbolStyle.Solid, Color.Purple, null);SimpleFillSymbol greenFillSymbol = new SimpleFillSymbol(SimpleFillSymbolStyle.Solid, Color.Green, null);SimpleFillSymbol blueFillSymbol = new SimpleFillSymbol(SimpleFillSymbolStyle.Solid, Color.Blue, null);SimpleFillSymbol redFillSymbol = new SimpleFillSymbol(SimpleFillSymbolStyle.Solid, Color.Red, null);// Create a unique value for natural areas, regional open spaces, local parks, and regional recreation parks.UniqueValue naturalAreas = new UniqueValue("Natural Areas", "Natural Areas", purpleFillSymbol, "Natural Areas");UniqueValue regionalOpenSpace = new UniqueValue("Regional Open Space", "Regional Open Space", greenFillSymbol, "Regional Open Space");UniqueValue localPark = new UniqueValue("Local Park", "Local Park", blueFillSymbol, "Local Park");UniqueValue regionalRecreationPark = new UniqueValue("Regional Recreation Park", "Regional Recreation Park", redFillSymbol, "Regional Recreation Park");// Create a unique value renderer to display these values.UniqueValueRenderer openSpacesUniqueValueRenderer = new UniqueValueRenderer(new List<string>() {"TYPE"},new List<UniqueValue>() {naturalAreas, regionalOpenSpace, localPark, regionalRecreationPark},"Open Spaces",null);// Assign the unique value renderer to the open spaces layer.featureLayer.Renderer = openSpacesUniqueValueRenderer;// Set the layer opacity to semi-transparent.featureLayer.Opacity = 0.2;} -
Update
SetupMap()to call the newAddOpenSpaceLayer()method.MapViewModel.csprivate void SetupMap(){// Create a new map with a 'topographic vector' basemap.Map map = new Map(BasemapStyle.ArcGISTopographic);// Set the initial viewpoint around the Santa Monica Mountains in California.var mapCenterPoint = new MapPoint(-118.805, 34.027, SpatialReferences.Wgs84);map.InitialViewpoint = new Viewpoint(mapCenterPoint, 100000);// Set the view model's Map property with the map.Map = map;AddOpenSpaceLayer();} -
Click Debug > Start Debugging (or press <F5> on the keyboard) to run the app. If your app uses user authentication, enter your ArcGIS Online credentials when prompted.
When the app opens, Parks and Open Spaces feature layer is added to the map. The map displays the different types of parks and open spaces with four unique symbols.
Add a layer with a class breaks renderer
Create a method to apply a different symbol for each of the five ranges of elevation gain to the Trails feature layer.
-
Add a new method named
AddTrailsLayer()just after theAddOpenSpaceLayer()method you created above.A
ClassBreakassigns a symbol to a range of values.For this example, the renderer uses each feature’s
ELEV_GAINattribute value to classify it into a defined range (class break) and apply the corresponding symbol.MapViewModel.csprivate void AddTrailsLayer(){// Create a trails feature layer and add it to the map view.FeatureLayer featureLayer = AddFeatureLayer(trails);// Create simple line symbols.SimpleLineSymbol firstClassSymbol = new SimpleLineSymbol(SimpleLineSymbolStyle.Solid, Color.Purple, 3.0);SimpleLineSymbol secondClassSymbol = new SimpleLineSymbol(SimpleLineSymbolStyle.Solid, Color.Purple, 4.0);SimpleLineSymbol thirdClassSymbol = new SimpleLineSymbol(SimpleLineSymbolStyle.Solid, Color.Purple, 5.0);SimpleLineSymbol fourthClassSymbol = new SimpleLineSymbol(SimpleLineSymbolStyle.Solid, Color.Purple, 6.0);SimpleLineSymbol fifthClassSymbol = new SimpleLineSymbol(SimpleLineSymbolStyle.Solid, Color.Purple, 7.0);// Create five class breaks.ClassBreak firstClassBreak = new ClassBreak("Under 500", "0 - 500", 0.0, 500.0, firstClassSymbol);ClassBreak secondClassBreak = new ClassBreak("501 to 1000", "501 - 1000", 501.0, 1000.0, secondClassSymbol);ClassBreak thirdClassBreak = new ClassBreak("1001 to 1500", "1001 - 1500", 1001.0, 1500.0, thirdClassSymbol);ClassBreak fourthClassBreak = new ClassBreak("1501 to 2000", "1501 - 2000", 1501.0, 2000.0, fourthClassSymbol);ClassBreak fifthClassBreak = new ClassBreak("2001 to 2300", "2001 to 2300", 2001.0, 2300.0, fifthClassSymbol);List<ClassBreak> elevationBreaks = new List<ClassBreak>() { firstClassBreak, secondClassBreak, thirdClassBreak, fourthClassBreak, fifthClassBreak };// Create and assign a class breaks renderer to the feature layer.ClassBreaksRenderer elevationClassBreaksRenderer = new ClassBreaksRenderer("ELEV_GAIN", elevationBreaks);featureLayer.Renderer = elevationClassBreaksRenderer;// Set the layer opacity to semi-transparent.featureLayer.Opacity = 0.75;} -
Update
SetupMap()to call the newAddTrailsLayer()method.MapViewModel.csprivate void SetupMap(){// Create a new map with a 'topographic vector' basemap.Map map = new Map(BasemapStyle.ArcGISTopographic);// Set the initial viewpoint around the Santa Monica Mountains in California.var mapCenterPoint = new MapPoint(-118.805, 34.027, SpatialReferences.Wgs84);map.InitialViewpoint = new Viewpoint(mapCenterPoint, 100000);// Set the view model's Map property with the map.Map = map;AddOpenSpaceLayer();AddTrailsLayer();} -
Click Debug > Start Debugging (or press <F5> on the keyboard) to run the app. If your app uses user authentication, enter your ArcGIS Online credentials when prompted.
When the app opens, the Trails feature layer is added to the map. The map displays trails with different symbols depending on trail elevation.
Add layers with definition expressions
You can use a definition expression to define a subset of features to display. Features that do not meet the expression criteria are not displayed by the layer. In the following steps, you will create two methods that use a definition expression to apply a symbol to a subset of features in the Trails feature layer.
FeatureLayer.DefinitionExpression uses a SQL expression to limit the features available for query and display. Your code will create two layers that each display a different subset of trails based on the value for the USE_BIKE field. Trails that allow bikes will be symbolized with a blue symbol ("USE_BIKE = 'Yes'") and those that don’t will be red ("USE_BIKE = 'No'"). Another way to symbolize these features would be to create a UniqueValueRenderer that applies a different symbol for these values.
-
Add a method named
AddBikeOnlyTrailsLayer()with a definition expression to filter for trails that permit bikes. Add this method just after the newly addedAddTrailsLayer()method.MapViewModel.csprivate void AddBikeOnlyTrailsLayer(){// Create a trails feature layer and add it to the map view.FeatureLayer featureLayer = AddFeatureLayer(trails);// Write a definition expression to filter for trails that permit the use of bikes.featureLayer.DefinitionExpression = "USE_BIKE = 'Yes'";// Create and assign a simple renderer to the feature layer.SimpleLineSymbol bikeTrailSymbol = new SimpleLineSymbol(SimpleLineSymbolStyle.Dot, Color.Blue, 2.0);SimpleRenderer bikeTrailRenderer = new SimpleRenderer(bikeTrailSymbol);featureLayer.Renderer = bikeTrailRenderer;} -
Add another method named
AddNoBikeTrailsLayer()with a definition expression to filter for trails that don’t allow bikes. Add this method just after theAddBikeOnlyTrailsLayer()method.MapViewModel.csprivate void AddNoBikeTrailsLayer(){// Create a trails feature layer and add it to the map view.FeatureLayer featureLayer = AddFeatureLayer(trails);// Write a definition expression to filter for trails that don't permit the use of bikes.featureLayer.DefinitionExpression = "USE_BIKE = 'No'";// Create and assign a simple renderer to the feature layer.SimpleLineSymbol noBikeTrailSymbol = new SimpleLineSymbol(SimpleLineSymbolStyle.Dot, Color.Red, 2.0);SimpleRenderer noBikeTrailRenderer = new SimpleRenderer(noBikeTrailSymbol);featureLayer.Renderer = noBikeTrailRenderer;} -
Update
SetupMap()to call the newAddBikeOnlyTrailsLayer()andAddNoBikeTrailsLayer()methods.MapViewModel.csprivate void SetupMap(){// Create a new map with a 'topographic vector' basemap.Map map = new Map(BasemapStyle.ArcGISTopographic);// Set the initial viewpoint around the Santa Monica Mountains in California.var mapCenterPoint = new MapPoint(-118.805, 34.027, SpatialReferences.Wgs84);map.InitialViewpoint = new Viewpoint(mapCenterPoint, 100000);// Set the view model's Map property with the map.Map = map;AddOpenSpaceLayer();AddTrailsLayer();AddNoBikeTrailsLayer();AddBikeOnlyTrailsLayer();} -
Click Debug > Start Debugging (or press <F5> on the keyboard) to run the app. If your app uses user authentication, enter your ArcGIS Online credentials when prompted.
When the app opens, two Trails feature layers are added to the map. One shows where bikes are permitted and the other where they are prohibited.
Symbolize a layer with a picture symbol and label features with an attribute
Create a method to style trailheads with hiker images and labels for the Trailheads feature layer.
Feature layers
For feature layers, graphics overlays, and map image sublayers, labeling is implemented using a collection of LabelDefinition objects to define what labels look like (font, size, color, angle, and so on), the scale at which they display, the text they contain, how they handle overlaps, and so on.
If you want to label everything in your layer or overlay to look identical, you can define a single label definition. If you want to use different label formatting for different attribute values, you can add as many label definitions as you need to define distinct sets of geoelements
-
Create a helper method named
MakeLabelDefinition()to define a label definition based on the feature layer attribute that’s passed in. The function will also define the label placement and text symbol. Add this method just after theAddNoBikeTrailsLayer()method you created earlier.MapViewModel.csprivate LabelDefinition MakeLabelDefinition(string labelAttribute){// Create a new text symbol.TextSymbol labelTextSymbol = new TextSymbol{Color = Color.White,Size = 12.0,HaloColor = Color.Red,HaloWidth = 1.0,FontFamily = "Arial",FontStyle = FontStyle.Italic,FontWeight = FontWeight.Normal};// Create a new Arcade label expression based on the field name.ArcadeLabelExpression labelExpression = new ArcadeLabelExpression("$feature." + labelAttribute);// Create and return the label definition.return new LabelDefinition(labelExpression, labelTextSymbol );} -
Add a method named
AddTrailheadsLayer(). Add this method just after the newMakeLabelDefinition()method.Use a
PictureMarkerSymbolto draw a trailhead hiker image. Use theLabelDefinitionto label each trailhead by its name.MapViewModel.csprivate void AddTrailheadsLayer(){// Create a trailheads feature layer and add it to the map view.FeatureLayer featureLayer = AddFeatureLayer(trailheads);// Create a new picture marker symbol that uses the trailhead image.PictureMarkerSymbol pictureMarkerSymbol = new PictureMarkerSymbol(trailheadImage);pictureMarkerSymbol.Height = 18.0;pictureMarkerSymbol.Width = 18.0;// Create a new simple renderer based on the picture marker symbol.SimpleRenderer simpleRenderer = new SimpleRenderer(pictureMarkerSymbol);// Set the feature layer's renderer and enable labels.featureLayer.Renderer = simpleRenderer;featureLayer.LabelsEnabled = true;// Create the label definition and pass the "TRL_NAME" attribute to label features by trail name.LabelDefinition trailHeadsDefinition = MakeLabelDefinition("TRL_NAME");// Add the label definition to the layer's label definition collection.featureLayer.LabelDefinitions.Add(trailHeadsDefinition);} -
Update
SetupMap()to call the newAddTrailheadsLayer()method.MapViewModel.cs213 collapsed lines// Copyright 2022 Esri// Licensed under the Apache License, Version 2.0 (the "License");// you may not use this file except in compliance with the License.// You may obtain a copy of the License at//// https://www.apache.org/licenses/LICENSE-2.0//// Unless required by applicable law or agreed to in writing, software// distributed under the License is distributed on an "AS IS" BASIS,// WITHOUT WARRANTIES OR CONDITIONS OF ANY KIND, either express or implied.// See the License for the specific language governing permissions and// limitations under the License.using System;using System.Collections.Generic;using System.Text;using Esri.ArcGISRuntime.Geometry;using Esri.ArcGISRuntime.Mapping;using System.ComponentModel;using System.Runtime.CompilerServices;using Esri.ArcGISRuntime.Data;using Esri.ArcGISRuntime.Mapping.Labeling;using Esri.ArcGISRuntime.Symbology;using System.Diagnostics;using System.Drawing;namespace StyleAFeatureLayer{class MapViewModel : INotifyPropertyChanged{// Application constants used to connect to data and resources.static Uri parksAndOpenSpaces = new Uri("https://services3.arcgis.com/GVgbJbqm8hXASVYi/arcgis/rest/services/Parks_and_Open_Space/FeatureServer/0");static Uri trails = new Uri("https://services3.arcgis.com/GVgbJbqm8hXASVYi/arcgis/rest/services/Trails/FeatureServer/0");static Uri trailheads = new Uri("https://services3.arcgis.com/GVgbJbqm8hXASVYi/arcgis/rest/services/Trailheads/FeatureServer/0");static Uri trailheadImage = new Uri("https://static.arcgis.com/images/Symbols/NPS/npsPictograph_0231b.png");public MapViewModel(){SetupMap();}public event PropertyChangedEventHandler? PropertyChanged;protected void OnPropertyChanged([CallerMemberName] string propertyName = ""){PropertyChanged?.Invoke(this, new PropertyChangedEventArgs(propertyName));}private Map? _map;public Map? Map{get { return _map; }set{_map = value;OnPropertyChanged();}}private FeatureLayer AddFeatureLayer(Uri featureServiceUri){// Create a service feature table from a Uri.ServiceFeatureTable serviceFeatureTable = new ServiceFeatureTable(featureServiceUri);// Create a feature layer from the service feature table.FeatureLayer featureLayer = new FeatureLayer(serviceFeatureTable);// Add the feature layer to the maps operational layers collection.Map?.OperationalLayers.Add(featureLayer);// Return the feature layer.return featureLayer;}private void AddOpenSpaceLayer(){// Create a parks and open spaces feature layer and add it to the map view.FeatureLayer featureLayer = AddFeatureLayer(parksAndOpenSpaces);// Create fill symbols.SimpleFillSymbol purpleFillSymbol = new SimpleFillSymbol(SimpleFillSymbolStyle.Solid, Color.Purple, null);SimpleFillSymbol greenFillSymbol = new SimpleFillSymbol(SimpleFillSymbolStyle.Solid, Color.Green, null);SimpleFillSymbol blueFillSymbol = new SimpleFillSymbol(SimpleFillSymbolStyle.Solid, Color.Blue, null);SimpleFillSymbol redFillSymbol = new SimpleFillSymbol(SimpleFillSymbolStyle.Solid, Color.Red, null);// Create a unique value for natural areas, regional open spaces, local parks, and regional recreation parks.UniqueValue naturalAreas = new UniqueValue("Natural Areas", "Natural Areas", purpleFillSymbol, "Natural Areas");UniqueValue regionalOpenSpace = new UniqueValue("Regional Open Space", "Regional Open Space", greenFillSymbol, "Regional Open Space");UniqueValue localPark = new UniqueValue("Local Park", "Local Park", blueFillSymbol, "Local Park");UniqueValue regionalRecreationPark = new UniqueValue("Regional Recreation Park", "Regional Recreation Park", redFillSymbol, "Regional Recreation Park");// Create a unique value renderer to display these values.UniqueValueRenderer openSpacesUniqueValueRenderer = new UniqueValueRenderer(new List<string>() {"TYPE"},new List<UniqueValue>() {naturalAreas, regionalOpenSpace, localPark, regionalRecreationPark},"Open Spaces",null);// Assign the unique value renderer to the open spaces layer.featureLayer.Renderer = openSpacesUniqueValueRenderer;// Set the layer opacity to semi-transparent.featureLayer.Opacity = 0.2;}private void AddTrailsLayer(){// Create a trails feature layer and add it to the map view.FeatureLayer featureLayer = AddFeatureLayer(trails);// Create simple line symbols.SimpleLineSymbol firstClassSymbol = new SimpleLineSymbol(SimpleLineSymbolStyle.Solid, Color.Purple, 3.0);SimpleLineSymbol secondClassSymbol = new SimpleLineSymbol(SimpleLineSymbolStyle.Solid, Color.Purple, 4.0);SimpleLineSymbol thirdClassSymbol = new SimpleLineSymbol(SimpleLineSymbolStyle.Solid, Color.Purple, 5.0);SimpleLineSymbol fourthClassSymbol = new SimpleLineSymbol(SimpleLineSymbolStyle.Solid, Color.Purple, 6.0);SimpleLineSymbol fifthClassSymbol = new SimpleLineSymbol(SimpleLineSymbolStyle.Solid, Color.Purple, 7.0);// Create five class breaks.ClassBreak firstClassBreak = new ClassBreak("Under 500", "0 - 500", 0.0, 500.0, firstClassSymbol);ClassBreak secondClassBreak = new ClassBreak("501 to 1000", "501 - 1000", 501.0, 1000.0, secondClassSymbol);ClassBreak thirdClassBreak = new ClassBreak("1001 to 1500", "1001 - 1500", 1001.0, 1500.0, thirdClassSymbol);ClassBreak fourthClassBreak = new ClassBreak("1501 to 2000", "1501 - 2000", 1501.0, 2000.0, fourthClassSymbol);ClassBreak fifthClassBreak = new ClassBreak("2001 to 2300", "2001 to 2300", 2001.0, 2300.0, fifthClassSymbol);List<ClassBreak> elevationBreaks = new List<ClassBreak>() { firstClassBreak, secondClassBreak, thirdClassBreak, fourthClassBreak, fifthClassBreak };// Create and assign a class breaks renderer to the feature layer.ClassBreaksRenderer elevationClassBreaksRenderer = new ClassBreaksRenderer("ELEV_GAIN", elevationBreaks);featureLayer.Renderer = elevationClassBreaksRenderer;// Set the layer opacity to semi-transparent.featureLayer.Opacity = 0.75;}private void AddBikeOnlyTrailsLayer(){// Create a trails feature layer and add it to the map view.FeatureLayer featureLayer = AddFeatureLayer(trails);// Write a definition expression to filter for trails that permit the use of bikes.featureLayer.DefinitionExpression = "USE_BIKE = 'Yes'";// Create and assign a simple renderer to the feature layer.SimpleLineSymbol bikeTrailSymbol = new SimpleLineSymbol(SimpleLineSymbolStyle.Dot, Color.Blue, 2.0);SimpleRenderer bikeTrailRenderer = new SimpleRenderer(bikeTrailSymbol);featureLayer.Renderer = bikeTrailRenderer;}private void AddNoBikeTrailsLayer(){// Create a trails feature layer and add it to the map view.FeatureLayer featureLayer = AddFeatureLayer(trails);// Write a definition expression to filter for trails that don't permit the use of bikes.featureLayer.DefinitionExpression = "USE_BIKE = 'No'";// Create and assign a simple renderer to the feature layer.SimpleLineSymbol noBikeTrailSymbol = new SimpleLineSymbol(SimpleLineSymbolStyle.Dot, Color.Red, 2.0);SimpleRenderer noBikeTrailRenderer = new SimpleRenderer(noBikeTrailSymbol);featureLayer.Renderer = noBikeTrailRenderer;}private LabelDefinition MakeLabelDefinition(string labelAttribute){// Create a new text symbol.TextSymbol labelTextSymbol = new TextSymbol{Color = Color.White,Size = 12.0,HaloColor = Color.Red,HaloWidth = 1.0,FontFamily = "Arial",FontStyle = FontStyle.Italic,FontWeight = FontWeight.Normal};// Create a new Arcade label expression based on the field name.ArcadeLabelExpression labelExpression = new ArcadeLabelExpression("$feature." + labelAttribute);// Create and return the label definition.return new LabelDefinition(labelExpression, labelTextSymbol );}private void AddTrailheadsLayer(){// Create a trailheads feature layer and add it to the map view.FeatureLayer featureLayer = AddFeatureLayer(trailheads);// Create a new picture marker symbol that uses the trailhead image.PictureMarkerSymbol pictureMarkerSymbol = new PictureMarkerSymbol(trailheadImage);pictureMarkerSymbol.Height = 18.0;pictureMarkerSymbol.Width = 18.0;// Create a new simple renderer based on the picture marker symbol.SimpleRenderer simpleRenderer = new SimpleRenderer(pictureMarkerSymbol);// Set the feature layer's renderer and enable labels.featureLayer.Renderer = simpleRenderer;featureLayer.LabelsEnabled = true;// Create the label definition and pass the "TRL_NAME" attribute to label features by trail name.LabelDefinition trailHeadsDefinition = MakeLabelDefinition("TRL_NAME");// Add the label definition to the layer's label definition collection.featureLayer.LabelDefinitions.Add(trailHeadsDefinition);}private void SetupMap(){// Create a new map with a 'topographic vector' basemap.Map map = new Map(BasemapStyle.ArcGISTopographic);// Set the initial viewpoint around the Santa Monica Mountains in California.var mapCenterPoint = new MapPoint(-118.805, 34.027, SpatialReferences.Wgs84);map.InitialViewpoint = new Viewpoint(mapCenterPoint, 100000);// Set the view model's Map property with the map.Map = map;AddOpenSpaceLayer();AddTrailsLayer();AddNoBikeTrailsLayer();AddBikeOnlyTrailsLayer();AddTrailheadsLayer();}3 collapsed lines}}
Run the solution
Click Debug > Start Debugging (or press <F5> on the keyboard) to run the app. If your app uses user authentication, enter your ArcGIS Online credentials when prompted.
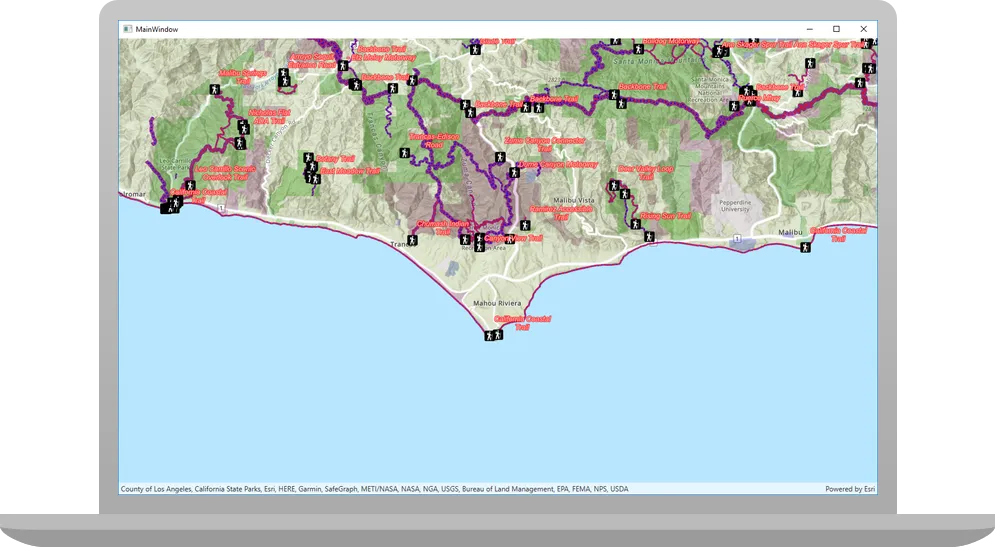
When the app opens, all the layers you’ve created and symbolized are displayed on the map.
- Parks and open spaces are displayed with four unique symbols
- Trails use different symbols (line widths) depending on trail elevation
- Trails are blue where bikes are permitted and red where they are prohibited
- Trailheads are displayed with a hiker icon and labels display each trail’s name
Alternatively, you can download the tutorial solution, as follows.
Option 2: Download the solution
-
Click the Download solution link in the right-hand panel of the page.
-
Unzip the file to a location on your machine.
-
Open the
.slnfile in Visual Studio.
Since the downloaded solution does not contain authentication credentials, you must first set up authentication to create credentials, and then add the developer credentials to the solution.
Set up authentication
To access the secure ArcGIS location services
You can implement API key authentication or user authentication in this tutorial. Compare the differences below:
API key authentication
- Users are not required to sign in.
- Requires creating an API key credential
API key credentials are an item that contains the parameters used to create and manage long-lived access tokens for API key authentication. They are a type of developer credential. with the correct privileges. - API keys
An API key is a long-lived access token created using API key credentials. They are valid for up to one year and are typically embedded directly into client applications. are long-lived access tokens. - Service usage is billed to the API key owner/developer.
- Simplest authentication method to implement.
- Recommended approach for new ArcGIS developers.
Learn more in API key authentication.
User authentication
- Users are required to sign in with an ArcGIS account
An ArcGIS account is an identity with a user type and set of privileges that can access specific ArcGIS products, tools, APIs, services, and resources. The main account types that can be used for development are an ArcGIS Location Platform account, ArcGIS Online account, and ArcGIS Enterprise account. ArcGIS Location Platform and ArcGIS Online accounts are also associated with a subscription. . - User accounts must have privilege
Privileges are a set of permissions assigned to ArcGIS accounts, developer credentials, and applications that grant access to secure resources and functionality in ArcGIS. to access the ArcGIS servicesA service, also known as an ArcGIS service, is software that supports an ArcGIS REST API and provides geospatial functionality or data. A service can be hosted by Esri or in ArcGIS Enterprise. used in application. - Requires creating OAuth credentials
OAuth credentials are an item that contains parameters required to implement user authentication or app authentication, including a .client_id,client_secret, and redirect URIs. They are a type of developer credential. - Application uses a redirect URL and client ID.
- Service usage is billed to the organization of the user signed into the application.
Learn more in User authentication.
To complete this tutorial, click on the tab in the switcher below for your authentication type of choice, either API key authentication or User authentication.
Create a new API key access token
-
Complete the Create an API key tutorial and create an API key with the following privilege(s)
Privileges are a set of permissions assigned to ArcGIS accounts, developer credentials, and applications that grant access to secure resources and functionality in ArcGIS. :- Privileges
- Location services > Basemaps
- Privileges
-
Copy and paste the API key access token into a safe location. It will be used in a later step.
Create new OAuth credentials to access the secure resources used in this tutorial.
-
Complete the Create OAuth credentials for user authentication tutorial to obtain a Client ID and Redirect URL.
A
Client IDuniquely identifies your app on the authenticating server. If the server cannot find an app with the provided Client ID, it will not proceed with authentication.The
Redirect URL(also referred to as a callback url) is used to identify a response from the authenticating server when the system returns control back to your app after an OAuth login. Since it does not necessarily represent a valid endpoint that a user could navigate to, the redirect URL can use a custom scheme, such asmy-app://auth. It is important to make sure the redirect URL used in your app’s code matches a redirect URL configured on the authenticating server. -
Copy and paste the Client ID and Redirect URL into a safe location. They will be used in a later step.
All users that access this application need account privileges
Set developer credentials in the solution
To allow your app users to access ArcGIS location services
-
In Visual Studio, in the Solution Explorer, click App.xaml.cs to open the file.
-
Set the
ArcGISEnvironment.ApiKeyproperty with your API key access token.App.xaml.csprotected override void OnStartup(StartupEventArgs e){base.OnStartup(e);// Set the access token for ArcGIS Maps SDK for .NET.Esri.ArcGISRuntime.ArcGISRuntimeEnvironment.ApiKey = "YOUR_ACCESS_TOKEN";// Call a function to set up the AuthenticationManager for OAuth.UserAuth.ArcGISLoginPrompt.RegisterOAuthConfig();} -
Remove the code that sets up user authentication.
App.xaml.csprotected override void OnStartup(StartupEventArgs e){base.OnStartup(e);// Set the access token for ArcGIS Maps SDK for .NET.Esri.ArcGISRuntime.ArcGISRuntimeEnvironment.ApiKey = "YOUR_ACCESS_TOKEN";// Call a function to set up the AuthenticationManager for OAuth.UserAuth.ArcGISLoginPrompt.RegisterOAuthConfig();}
Best Practice: The access token is stored directly in the code as a convenience for this tutorial. Do not store credentials directly in source code in a production environment.
-
From the Visual Studio Solution explorer window, open the
ArcGISLoginPrompt.csfile. -
Set your values for the client ID (
OAuthClientID) and the redirect URL (OAuthRedirectUrl). These are the user authentication settings you created in the Set up authentication step.ArcGISLoginPrompt.csinternal static class ArcGISLoginPrompt{private const string ArcGISOnlineUrl = "https://www.arcgis.com/sharing/rest";// Specify the Client ID and Redirect URL to use with OAuth authentication.// See the instructions here for creating OAuth app settings:// https://developers.arcgis.com/documentation/security-and-authentication/user-authentication/tutorials/create-oauth-credentials-user-auth/private const string AppClientId = "YOUR_CLIENT_ID";private const string OAuthRedirectUrl = "YOUR_REDIRECT_URL"; -
In Visual Studio, in the Solution Explorer, click App.xaml.cs to open the file.
-
Remove the line of code that sets an API key access token.
App.xaml.csprotected override void OnStartup(StartupEventArgs e){base.OnStartup(e);// Set the access token for ArcGIS Maps SDK for .NET.Esri.ArcGISRuntime.ArcGISRuntimeEnvironment.ApiKey = "YOUR_ACCESS_TOKEN";// Call a function to set up the AuthenticationManager for OAuth.UserAuth.ArcGISLoginPrompt.RegisterOAuthConfig();}
Best Practice: The OAuth credentials are stored directly in the code as a convenience for this tutorial. Do not store credentials directly in source code in a production environment.
Run the solution
Click Debug > Start Debugging (or press <F5> on the keyboard) to run the app. If your app uses user authentication, enter your ArcGIS Online credentials when prompted.
When the app opens, all the layers you’ve created and symbolized are displayed on the map.
- Parks and open spaces are displayed with four unique symbols
- Trails use different symbols (line widths) depending on trail elevation
- Trails are blue where bikes are permitted and red where they are prohibited
- Trailheads are displayed with a hiker icon and labels display each trail’s name
What’s next?
Learn how to use additional API features, ArcGIS location services, and ArcGIS tools in these tutorials: