Learn how to search for places of interest, such as hotels, cafes, and gas stations using the geocoding service
Geocoding
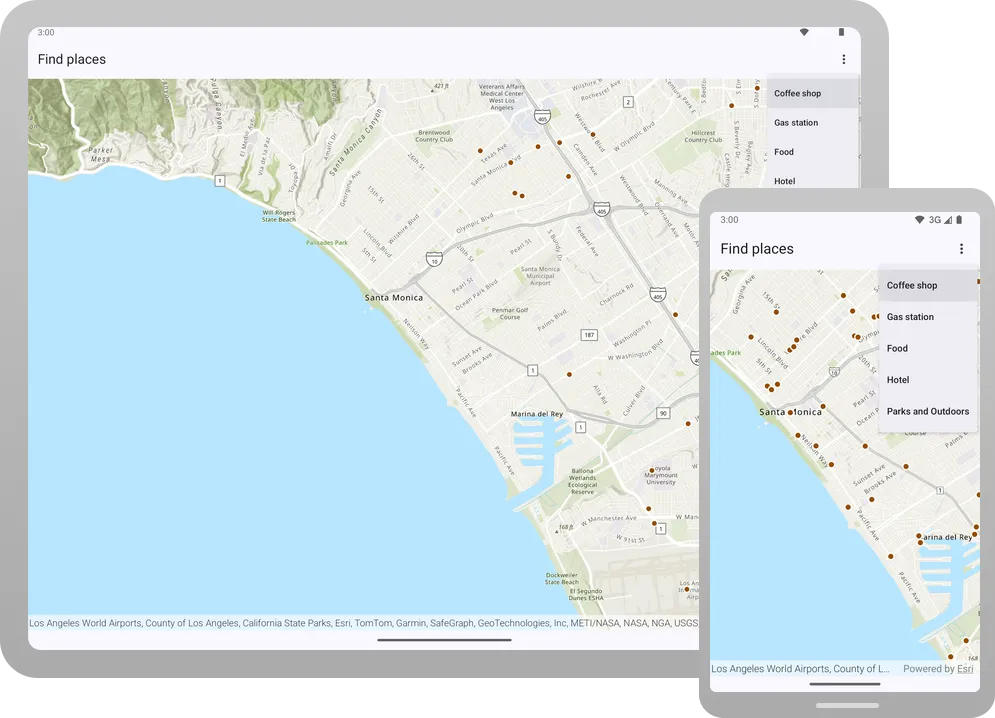
In this tutorial, you use a picklist in the user interface to select a category of places, for example, coffee shops or gas stations. You locate all the places that match this category by accessing a geocoding service. The places are displayed on the map so that you can click on them to get further information.
Prerequisites
Before starting this tutorial, you need the following:
-
An ArcGIS Location Platform or ArcGIS Online account.
-
A development and deployment environment that meets the system requirements.
-
An IDE for Android development in Kotlin.
Set up authentication
To access the secure ArcGIS location services
You can implement API key authentication or user authentication in this tutorial. Compare the differences below:
API key authentication
- Users are not required to sign in.
- Requires creating an API key credential
API key credentials are an item that contains the parameters used to create and manage long-lived access tokens for API key authentication. They are a type of developer credential. with the correct privileges. - API keys
An API key is a long-lived access token created using API key credentials. They are valid for up to one year and are typically embedded directly into client applications. are long-lived access tokens. - Service usage is billed to the API key owner/developer.
- Simplest authentication method to implement.
- Recommended approach for new ArcGIS developers.
Learn more in API key authentication.
User authentication
- Users are required to sign in with an ArcGIS account
An ArcGIS account is an identity with a user type and set of privileges that can access specific ArcGIS products, tools, APIs, services, and resources. The main account types that can be used for development are an ArcGIS Location Platform account, ArcGIS Online account, and ArcGIS Enterprise account. ArcGIS Location Platform and ArcGIS Online accounts are also associated with a subscription. . - User accounts must have privilege
Privileges are a set of permissions assigned to ArcGIS accounts, developer credentials, and applications that grant access to secure resources and functionality in ArcGIS. to access the ArcGIS servicesA service, also known as an ArcGIS service, is software that supports an ArcGIS REST API and provides geospatial functionality or data. A service can be hosted by Esri or in ArcGIS Enterprise. used in application. - Requires creating OAuth credentials
OAuth credentials are an item that contains parameters required to implement user authentication or app authentication, including a .client_id,client_secret, and redirect URIs. They are a type of developer credential. - Application uses a redirect URL and client ID.
- Service usage is billed to the organization of the user signed into the application.
Learn more in User authentication.
To complete this tutorial, click on the tab in the switcher below for your authentication type of choice, either API key authentication or User authentication.
Create a new API key access token
-
Complete the Create an API key tutorial and create an API key with the following privilege(s)
Privileges are a set of permissions assigned to ArcGIS accounts, developer credentials, and applications that grant access to secure resources and functionality in ArcGIS. :- Privileges
- Location services > Basemaps
- Location services > Geocoding
- Privileges
-
Copy and paste the API key access token into a safe location. It will be used in a later step.
Create new OAuth credentials to access the secure resources used in this tutorial.
-
Complete the Create OAuth credentials for user authentication tutorial to obtain a Client ID and Redirect URL.
A
Client IDuniquely identifies your app on the authenticating server. If the server cannot find an app with the provided Client ID, it will not proceed with authentication.The
Redirect URL(also referred to as a callback url) is used to identify a response from the authenticating server when the system returns control back to your app after an OAuth login. Since it does not necessarily represent a valid endpoint that a user could navigate to, the redirect URL can use a custom scheme, such asmy-app://auth. It is important to make sure the redirect URL used in your app’s code matches a redirect URL configured on the authenticating server. -
Copy and paste the Client ID and Redirect URL into a safe location. They will be used in a later step.
All users that access this application need account privileges
Develop or download
You have two options for completing this tutorial:
Option 1: Develop the code
Open an Android Studio project
-
Open the project you created by completing the Display a map tutorial.
-
Continue with the following instructions to search for places of interest, such as hotels, cafes, and gas stations using the ArcGIS Geocoding service
A geocoding service is a service that can search for addresses, place addresses, businesses, reverse geocode coordinates to addresses, provide suggestions for places, and perform bulk geocoding. It is hosted by Esri as the ArcGIS Geocoding service and can also be hosted in ArcGIS Enterprise. . -
Modify the old project for use in this new tutorial.
-
On your file system, delete the .idea folder, if present, at the top level of your project.
-
In the Android view, open app > res > values > strings.xml.
In the
<string name="app_name">element, change the text content to Find places.strings.xml<resources><string name="app_name">Find places</string></resources> -
In the Android view, open Gradle Scripts > settings.gradle.kts.
Change the value of
rootProject.nameto “Find places”.settings.gradle.kts14 collapsed linespluginManagement {repositories {google {content {includeGroupByRegex("com\\.android.*")includeGroupByRegex("com\\.google.*")includeGroupByRegex("androidx.*")}}mavenCentral()gradlePluginPortal()}}dependencyResolutionManagement {repositoriesMode.set(RepositoriesMode.FAIL_ON_PROJECT_REPOS)repositories {google()mavenCentral()maven { url = uri("https://esri.jfrog.io/artifactory/arcgis") }}}rootProject.name = "Find places"include(":app") -
Click File > Sync Project with Gradle files. Android Studio will recognize your changes and create a new .idea folder.
-
In
libs.versions.toml, add a [libraries] entry for the dependency. In the module-levelbuild.gradle.kts (app), add the dependency for the lifecycle view model.20 collapsed lines[versions]arcgisMapsKotlin = "300.0.0"# Version numbers added by Android Studio New Project Wizardagp = "8.12.1"kotlin = "2.2.10"coreKtx = "1.17.0"junit = "4.13.2"junitVersion = "1.3.0"espressoCore = "3.7.0"lifecycleRuntimeKtx = "2.9.2"activityCompose = "1.10.1"composeBom = "2025.08.00"# Other version numberscompileSdk = "36"minSdk = "28"targetSdk = "36"media3CommonKtx = "1.5.1"[libraries]arcgis-maps-kotlin = { group = "com.esri", name = "arcgis-maps-kotlin", version.ref = "arcgisMapsKotlin" }arcgis-maps-kotlin-toolkit-bom = { group = "com.esri", name = "arcgis-maps-kotlin-toolkit-bom", version.ref = "arcgisMapsKotlin" }arcgis-maps-kotlin-toolkit-geoview-compose = { group = "com.esri", name = "arcgis-maps-kotlin-toolkit-geoview-compose" }arcgis-maps-kotlin-toolkit-authentication = { group = "com.esri", name = "arcgis-maps-kotlin-toolkit-authentication" }androidx-core-ktx = { group = "androidx.core", name = "core-ktx", version.ref = "coreKtx" }junit = { group = "junit", name = "junit", version.ref = "junit" }androidx-junit = { group = "androidx.test.ext", name = "junit", version.ref = "junitVersion" }androidx-espresso-core = { group = "androidx.test.espresso", name = "espresso-core", version.ref = "espressoCore" }androidx-lifecycle-runtime-ktx = { group = "androidx.lifecycle", name = "lifecycle-runtime-ktx", version.ref = "lifecycleRuntimeKtx" }androidx-activity-compose = { group = "androidx.activity", name = "activity-compose", version.ref = "activityCompose" }androidx-lifecycle-viewmodel-compose = { group = "androidx.lifecycle", name = "lifecycle-viewmodel-compose", version.ref = "lifecycleRuntimeKtx" }16 collapsed linesandroidx-compose-bom = { group = "androidx.compose", name = "compose-bom", version.ref = "composeBom" }androidx-ui = { group = "androidx.compose.ui", name = "ui" }androidx-ui-graphics = { group = "androidx.compose.ui", name = "ui-graphics" }androidx-ui-tooling = { group = "androidx.compose.ui", name = "ui-tooling" }androidx-ui-tooling-preview = { group = "androidx.compose.ui", name = "ui-tooling-preview" }androidx-ui-test-manifest = { group = "androidx.compose.ui", name = "ui-test-manifest" }androidx-ui-test-junit4 = { group = "androidx.compose.ui", name = "ui-test-junit4" }androidx-material3 = { group = "androidx.compose.material3", name = "material3" }androidx-compose-material-icons-core = { group = "androidx.compose.material", name = "material-icons-core" }androidx-media3-common-ktx = { group = "androidx.media3", name = "media3-common-ktx", version.ref = "media3CommonKtx" }[plugins]android-application = { id = "com.android.application", version.ref = "agp" }kotlin-android = { id = "org.jetbrains.kotlin.android", version.ref = "kotlin" }kotlin-compose = { id = "org.jetbrains.kotlin.plugin.compose", version.ref = "kotlin" }47 collapsed linesplugins {alias(libs.plugins.android.application)alias(libs.plugins.kotlin.android)alias(libs.plugins.kotlin.compose)}android {namespace = "com.example.app"compileSdk = libs.versions.compileSdk.get().toInt()defaultConfig {applicationId = "com.example.app"minSdk = libs.versions.minSdk.get().toInt()targetSdk = libs.versions.targetSdk.get().toInt()versionCode = 1versionName = "1.0"testInstrumentationRunner = "androidx.test.runner.AndroidJUnitRunner"vectorDrawables {useSupportLibrary = true}}buildTypes {release {isMinifyEnabled = falseproguardFiles(getDefaultProguardFile("proguard-android-optimize.txt"), "proguard-rules.pro")}}compileOptions {sourceCompatibility = JavaVersion.VERSION_17targetCompatibility = JavaVersion.VERSION_17}kotlinOptions {jvmTarget = "17"}buildFeatures {compose = true}packaging {resources {excludes += "/META-INF/{AL2.0,LGPL2.1}"}}}dependencies {implementation(libs.androidx.core.ktx)implementation(libs.androidx.lifecycle.runtime.ktx)implementation(libs.androidx.activity.compose)implementation(platform(libs.androidx.compose.bom))implementation(libs.androidx.lifecycle.viewmodel.compose)implementation(libs.androidx.ui)implementation(libs.androidx.ui.graphics)19 collapsed linesimplementation(libs.androidx.ui.tooling.preview)implementation(libs.androidx.material3)implementation(libs.androidx.compose.material.icons.core)implementation(libs.androidx.media3.common.ktx)testImplementation(libs.junit)androidTestImplementation(libs.androidx.junit)androidTestImplementation(libs.androidx.espresso.core)androidTestImplementation(platform(libs.androidx.compose.bom))androidTestImplementation(libs.androidx.ui.test.junit4)debugImplementation(libs.androidx.ui.tooling)debugImplementation(libs.androidx.ui.test.manifest)// ArcGIS Maps for Kotlin - SDK dependencyimplementation(libs.arcgis.maps.kotlin)// Toolkit dependenciesimplementation(platform(libs.arcgis.maps.kotlin.toolkit.bom))implementation(libs.arcgis.maps.kotlin.toolkit.geoview.compose)implementation(libs.arcgis.maps.kotlin.toolkit.authentication)}
-
Set developer credentials
If you implemented API key authenticationLocatorTask. To create an API Key access token that has the Basemaps and Geocoding privileges, see the Set up authentication step and then follow the instructions below.
-
In the Android view of Android Studio, open app > kotlin+java > com.example.app > MainActivity.
-
In the
onCreate()lifecycle method of theMainActivityclass, set theArcGISEnvironment.apiKeyproperty by callingApiKey.create(). Pass in your API key access token as a string and don’t forget the double quotes. Do this before thesetContentblock.MainActivity.ktoverride fun onCreate(savedInstanceState: Bundle?) {super.onCreate(savedInstanceState)ArcGISEnvironment.apiKey = ApiKey.create("YOUR_ACCESS_TOKEN")
Best Practice: The access token is stored directly in the code as a convenience for this tutorial. Do not store credentials directly in source code in a production environment.
Use the Authenticator toolkit component to manage your OAuth credentialsclient_id, client_secret, and redirect URIs. They are a type of developer credential. ArcGISEnvironment.
-
Open the app > kotlin+java > com.example.app > MainActivity.kt file.
-
Set your
clientIDandredirectURLvalues.MainActivity.ktauthenticatorState.oAuthUserConfigurations = listOf(OAuthUserConfiguration(portalUrl = "https://www.arcgis.com",clientId = "YOUR_CLIENT_ID",redirectUrl = "YOUR_REDIRECT_URL"))
Best Practice: The OAuth credentials are stored directly in the code as a convenience for this tutorial. Do not store credentials directly in source code in a production environment.
Add import statements and some Compose variables
-
In the Android view, open app > kotlin+java > com.example.app > screens > MainScreen.kt. Replace the import statements with the imports needed for this tutorial.
MainScreen.kt@file:OptIn(ExperimentalMaterial3Api::class)package com.example.app.screensimport android.app.Applicationimport android.util.Logimport androidx.compose.foundation.layout.PaddingValuesimport androidx.compose.foundation.layout.fillMaxSizeimport androidx.compose.foundation.layout.heightimport androidx.compose.foundation.layout.paddingimport androidx.compose.foundation.layout.widthInimport androidx.compose.foundation.layout.wrapContentSizeimport androidx.compose.foundation.lazy.LazyColumnimport androidx.compose.material.icons.Iconsimport androidx.compose.material.icons.filled.MoreVertimport androidx.compose.material3.DropdownMenuimport androidx.compose.material3.DropdownMenuItemimport androidx.compose.material3.ExperimentalMaterial3Apiimport androidx.compose.material3.Iconimport androidx.compose.material3.IconButtonimport androidx.compose.material3.MaterialThemeimport androidx.compose.material3.Scaffoldimport androidx.compose.material3.Textimport androidx.compose.material3.TopAppBarimport androidx.compose.runtime.Composableimport androidx.compose.runtime.collectAsStateimport androidx.compose.runtime.getValueimport androidx.compose.runtime.mutableStateOfimport androidx.compose.runtime.rememberimport androidx.compose.runtime.setValueimport androidx.compose.ui.Modifierimport androidx.compose.ui.res.stringResourceimport androidx.compose.ui.text.font.FontStyleimport androidx.compose.ui.text.style.TextAlignimport androidx.compose.ui.unit.dpimport androidx.lifecycle.AndroidViewModelimport androidx.lifecycle.ViewModelimport androidx.lifecycle.viewModelScopeimport androidx.lifecycle.viewmodel.compose.viewModelimport com.arcgismaps.Colorimport com.arcgismaps.geometry.Envelopeimport com.arcgismaps.geometry.Pointimport com.arcgismaps.geometry.SpatialReferenceimport com.arcgismaps.mapping.ArcGISMapimport com.arcgismaps.mapping.BasemapStyleimport com.arcgismaps.mapping.GeoElementimport com.arcgismaps.mapping.Viewpointimport com.arcgismaps.mapping.symbology.SimpleLineSymbolimport com.arcgismaps.mapping.symbology.SimpleLineSymbolStyleimport com.arcgismaps.mapping.symbology.SimpleMarkerSymbolimport com.arcgismaps.mapping.symbology.SimpleMarkerSymbolStyleimport com.arcgismaps.mapping.view.Graphicimport com.arcgismaps.mapping.view.GraphicsOverlayimport com.arcgismaps.mapping.view.SingleTapConfirmedEventimport com.arcgismaps.tasks.geocode.GeocodeParametersimport com.arcgismaps.tasks.geocode.LocatorTaskimport com.arcgismaps.toolkit.geoviewcompose.MapViewimport com.arcgismaps.toolkit.geoviewcompose.MapViewProxyimport com.example.app.Rimport kotlinx.coroutines.Jobimport kotlinx.coroutines.flow.MutableStateFlowimport kotlinx.coroutines.flow.StateFlowimport kotlinx.coroutines.flow.asStateFlowimport kotlinx.coroutines.launch
Create a view model
Modern app architecture uses a map view model to hold the business logic and the mutable state of your app.
-
In Android Studio: in the Android view, open app > kotlin+java > com.example.app > screens > MainScreen.kt, create a map view model that extends
ViewModel.MainScreen.kt65 collapsed lines@file:OptIn(ExperimentalMaterial3Api::class)package com.example.app.screensimport android.app.Applicationimport android.util.Logimport androidx.compose.foundation.layout.PaddingValuesimport androidx.compose.foundation.layout.fillMaxSizeimport androidx.compose.foundation.layout.heightimport androidx.compose.foundation.layout.paddingimport androidx.compose.foundation.layout.widthInimport androidx.compose.foundation.layout.wrapContentSizeimport androidx.compose.foundation.lazy.LazyColumnimport androidx.compose.material.icons.Iconsimport androidx.compose.material.icons.filled.MoreVertimport androidx.compose.material3.DropdownMenuimport androidx.compose.material3.DropdownMenuItemimport androidx.compose.material3.ExperimentalMaterial3Apiimport androidx.compose.material3.Iconimport androidx.compose.material3.IconButtonimport androidx.compose.material3.MaterialThemeimport androidx.compose.material3.Scaffoldimport androidx.compose.material3.Textimport androidx.compose.material3.TopAppBarimport androidx.compose.runtime.Composableimport androidx.compose.runtime.collectAsStateimport androidx.compose.runtime.getValueimport androidx.compose.runtime.mutableStateOfimport androidx.compose.runtime.rememberimport androidx.compose.runtime.setValueimport androidx.compose.ui.Modifierimport androidx.compose.ui.res.stringResourceimport androidx.compose.ui.text.font.FontStyleimport androidx.compose.ui.text.style.TextAlignimport androidx.compose.ui.unit.dpimport androidx.lifecycle.AndroidViewModelimport androidx.lifecycle.ViewModelimport androidx.lifecycle.viewModelScopeimport androidx.lifecycle.viewmodel.compose.viewModelimport com.arcgismaps.Colorimport com.arcgismaps.geometry.Envelopeimport com.arcgismaps.geometry.Pointimport com.arcgismaps.geometry.SpatialReferenceimport com.arcgismaps.mapping.ArcGISMapimport com.arcgismaps.mapping.BasemapStyleimport com.arcgismaps.mapping.GeoElementimport com.arcgismaps.mapping.Viewpointimport com.arcgismaps.mapping.symbology.SimpleLineSymbolimport com.arcgismaps.mapping.symbology.SimpleLineSymbolStyleimport com.arcgismaps.mapping.symbology.SimpleMarkerSymbolimport com.arcgismaps.mapping.symbology.SimpleMarkerSymbolStyleimport com.arcgismaps.mapping.view.Graphicimport com.arcgismaps.mapping.view.GraphicsOverlayimport com.arcgismaps.mapping.view.SingleTapConfirmedEventimport com.arcgismaps.tasks.geocode.GeocodeParametersimport com.arcgismaps.tasks.geocode.LocatorTaskimport com.arcgismaps.toolkit.geoviewcompose.MapViewimport com.arcgismaps.toolkit.geoviewcompose.MapViewProxyimport com.example.app.Rimport kotlinx.coroutines.Jobimport kotlinx.coroutines.flow.MutableStateFlowimport kotlinx.coroutines.flow.StateFlowimport kotlinx.coroutines.flow.asStateFlowimport kotlinx.coroutines.launchclass MapViewModel() : ViewModel() {}5 collapsed lines@Composablefun MainScreen() {} -
In the
MainScreencomposable, delete the entire function body. Leave just the function declaration as shown below. Then delete the top-level code for creating a map that is part of the Display a map tutorial. In this tutorial, you will create the map within the view model.MainScreen.kt69 collapsed lines@file:OptIn(ExperimentalMaterial3Api::class)package com.example.app.screensimport android.app.Applicationimport android.util.Logimport androidx.compose.foundation.layout.PaddingValuesimport androidx.compose.foundation.layout.fillMaxSizeimport androidx.compose.foundation.layout.heightimport androidx.compose.foundation.layout.paddingimport androidx.compose.foundation.layout.widthInimport androidx.compose.foundation.layout.wrapContentSizeimport androidx.compose.foundation.lazy.LazyColumnimport androidx.compose.material.icons.Iconsimport androidx.compose.material.icons.filled.MoreVertimport androidx.compose.material3.DropdownMenuimport androidx.compose.material3.DropdownMenuItemimport androidx.compose.material3.ExperimentalMaterial3Apiimport androidx.compose.material3.Iconimport androidx.compose.material3.IconButtonimport androidx.compose.material3.MaterialThemeimport androidx.compose.material3.Scaffoldimport androidx.compose.material3.Textimport androidx.compose.material3.TopAppBarimport androidx.compose.runtime.Composableimport androidx.compose.runtime.collectAsStateimport androidx.compose.runtime.getValueimport androidx.compose.runtime.mutableStateOfimport androidx.compose.runtime.rememberimport androidx.compose.runtime.setValueimport androidx.compose.ui.Modifierimport androidx.compose.ui.res.stringResourceimport androidx.compose.ui.text.font.FontStyleimport androidx.compose.ui.text.style.TextAlignimport androidx.compose.ui.unit.dpimport androidx.lifecycle.AndroidViewModelimport androidx.lifecycle.ViewModelimport androidx.lifecycle.viewModelScopeimport androidx.lifecycle.viewmodel.compose.viewModelimport com.arcgismaps.Colorimport com.arcgismaps.geometry.Envelopeimport com.arcgismaps.geometry.Pointimport com.arcgismaps.geometry.SpatialReferenceimport com.arcgismaps.mapping.ArcGISMapimport com.arcgismaps.mapping.BasemapStyleimport com.arcgismaps.mapping.GeoElementimport com.arcgismaps.mapping.Viewpointimport com.arcgismaps.mapping.symbology.SimpleLineSymbolimport com.arcgismaps.mapping.symbology.SimpleLineSymbolStyleimport com.arcgismaps.mapping.symbology.SimpleMarkerSymbolimport com.arcgismaps.mapping.symbology.SimpleMarkerSymbolStyleimport com.arcgismaps.mapping.view.Graphicimport com.arcgismaps.mapping.view.GraphicsOverlayimport com.arcgismaps.mapping.view.SingleTapConfirmedEventimport com.arcgismaps.tasks.geocode.GeocodeParametersimport com.arcgismaps.tasks.geocode.LocatorTaskimport com.arcgismaps.toolkit.geoviewcompose.MapViewimport com.arcgismaps.toolkit.geoviewcompose.MapViewProxyimport com.example.app.Rimport kotlinx.coroutines.Jobimport kotlinx.coroutines.flow.MutableStateFlowimport kotlinx.coroutines.flow.StateFlowimport kotlinx.coroutines.flow.asStateFlowimport kotlinx.coroutines.launchclass MapViewModel() : ViewModel() {}@Composablefun MainScreen() {}MainScreen.kt40 collapsed lines@file:OptIn(ExperimentalMaterial3Api::class)package com.example.app.screensimport androidx.compose.foundation.layout.fillMaxSizeimport androidx.compose.foundation.layout.paddingimport androidx.compose.material3.ExperimentalMaterial3Apiimport androidx.compose.material3.Scaffoldimport androidx.compose.material3.Textimport androidx.compose.material3.TopAppBarimport androidx.compose.runtime.Composableimport androidx.compose.runtime.rememberimport androidx.compose.ui.Modifierimport androidx.compose.ui.res.stringResourceimport com.arcgismaps.mapping.ArcGISMapimport com.arcgismaps.mapping.BasemapStyleimport com.arcgismaps.mapping.Viewpointimport com.arcgismaps.toolkit.geoviewcompose.MapViewimport com.example.app.R@Composablefun MainScreen() {val map = remember {createMap()}Scaffold(topBar = { TopAppBar(title = { Text(text = stringResource(id = R.string.app_name)) }) }) {MapView(modifier = Modifier.fillMaxSize().padding(it),arcGISMap = map)}}fun createMap(): ArcGISMap {return ArcGISMap(BasemapStyle.ArcGISTopographic).apply {initialViewpoint = Viewpoint(latitude = 34.0270,longitude = -118.8050,scale = 72000.0)}} -
In the view model, create a map from a
BasemapStyleand center theArcGISMap.initialViewpointon downtown Santa Monica, CA. Then create aMapViewProxy, which is defined in the ArcGIS Maps SDK for Kotlin Toolkit.MapViewModel class67 collapsed lines@file:OptIn(ExperimentalMaterial3Api::class)package com.example.app.screensimport android.app.Applicationimport android.util.Logimport androidx.compose.foundation.layout.PaddingValuesimport androidx.compose.foundation.layout.fillMaxSizeimport androidx.compose.foundation.layout.heightimport androidx.compose.foundation.layout.paddingimport androidx.compose.foundation.layout.widthInimport androidx.compose.foundation.layout.wrapContentSizeimport androidx.compose.foundation.lazy.LazyColumnimport androidx.compose.material.icons.Iconsimport androidx.compose.material.icons.filled.MoreVertimport androidx.compose.material3.DropdownMenuimport androidx.compose.material3.DropdownMenuItemimport androidx.compose.material3.ExperimentalMaterial3Apiimport androidx.compose.material3.Iconimport androidx.compose.material3.IconButtonimport androidx.compose.material3.MaterialThemeimport androidx.compose.material3.Scaffoldimport androidx.compose.material3.Textimport androidx.compose.material3.TopAppBarimport androidx.compose.runtime.Composableimport androidx.compose.runtime.collectAsStateimport androidx.compose.runtime.getValueimport androidx.compose.runtime.mutableStateOfimport androidx.compose.runtime.rememberimport androidx.compose.runtime.setValueimport androidx.compose.ui.Modifierimport androidx.compose.ui.res.stringResourceimport androidx.compose.ui.text.font.FontStyleimport androidx.compose.ui.text.style.TextAlignimport androidx.compose.ui.unit.dpimport androidx.lifecycle.AndroidViewModelimport androidx.lifecycle.ViewModelimport androidx.lifecycle.viewModelScopeimport androidx.lifecycle.viewmodel.compose.viewModelimport com.arcgismaps.Colorimport com.arcgismaps.geometry.Envelopeimport com.arcgismaps.geometry.Pointimport com.arcgismaps.geometry.SpatialReferenceimport com.arcgismaps.mapping.ArcGISMapimport com.arcgismaps.mapping.BasemapStyleimport com.arcgismaps.mapping.GeoElementimport com.arcgismaps.mapping.Viewpointimport com.arcgismaps.mapping.symbology.SimpleLineSymbolimport com.arcgismaps.mapping.symbology.SimpleLineSymbolStyleimport com.arcgismaps.mapping.symbology.SimpleMarkerSymbolimport com.arcgismaps.mapping.symbology.SimpleMarkerSymbolStyleimport com.arcgismaps.mapping.view.Graphicimport com.arcgismaps.mapping.view.GraphicsOverlayimport com.arcgismaps.mapping.view.SingleTapConfirmedEventimport com.arcgismaps.tasks.geocode.GeocodeParametersimport com.arcgismaps.tasks.geocode.LocatorTaskimport com.arcgismaps.toolkit.geoviewcompose.MapViewimport com.arcgismaps.toolkit.geoviewcompose.MapViewProxyimport com.example.app.Rimport kotlinx.coroutines.Jobimport kotlinx.coroutines.flow.MutableStateFlowimport kotlinx.coroutines.flow.StateFlowimport kotlinx.coroutines.flow.asStateFlowimport kotlinx.coroutines.launchclass MapViewModel() : ViewModel() {// Create a map using the basemap style ArcGISTopographic.val map = ArcGISMap(BasemapStyle.ArcGISTopographic).apply {initialViewpoint = Viewpoint(center = Point(x = -118.477324,y = 33.999390,spatialReference = SpatialReference.wgs84()),scale = 72_000.0)}val mapViewProxy = MapViewProxy()7 collapsed lines}@Composablefun MainScreen() {} -
Create a
GraphicsOverlayto display graphicsA graphic is a visual element composed of a geometry, symbol, and attributes that is displayed on a map or scene. that represent places of the same category, such as coffee shops.A graphics overlay
A graphics overlay is a client-side, temporary container of graphics to display on a map view or scene view. is a container for graphicsA graphic is a visual element composed of a geometry, symbol, and attributes that is displayed on a map or scene. . It is used with a map viewA map view is a user interface that displays map layers and graphics in 2D. It controls the area (extent) of the map that is visible and supports user interactions such as pan and zoom. to display graphics on a mapA map is a collection of layers that are displayed in 2D. It is typically composed of a basemap layer and data layers. . You can add more than one graphics overlay to a map view. Graphics overlays are displayed on top of all the other layersA layer is a reference to a collection of geographic data that is used to access and display data. The data for layers are typically provided by the basemap layer service and data services. .Then create other map view model properties as follows:
- The current extent visible on the map view.
- The location on the map where the user taps to obtain further information about the place represented by a graphic.
- The selected geoelement
A geoelement refers to any geographic element in a map or map view that can be identified by its location to return attribute information. , which is the closest geoelement to the tap location. (A graphic is a type ofGeoElement.) - The current coroutine Job, so the job can be cancelled before launching a new coroutine.
MapViewModel class65 collapsed lines@file:OptIn(ExperimentalMaterial3Api::class)package com.example.app.screensimport android.app.Applicationimport android.util.Logimport androidx.compose.foundation.layout.PaddingValuesimport androidx.compose.foundation.layout.fillMaxSizeimport androidx.compose.foundation.layout.heightimport androidx.compose.foundation.layout.paddingimport androidx.compose.foundation.layout.widthInimport androidx.compose.foundation.layout.wrapContentSizeimport androidx.compose.foundation.lazy.LazyColumnimport androidx.compose.material.icons.Iconsimport androidx.compose.material.icons.filled.MoreVertimport androidx.compose.material3.DropdownMenuimport androidx.compose.material3.DropdownMenuItemimport androidx.compose.material3.ExperimentalMaterial3Apiimport androidx.compose.material3.Iconimport androidx.compose.material3.IconButtonimport androidx.compose.material3.MaterialThemeimport androidx.compose.material3.Scaffoldimport androidx.compose.material3.Textimport androidx.compose.material3.TopAppBarimport androidx.compose.runtime.Composableimport androidx.compose.runtime.collectAsStateimport androidx.compose.runtime.getValueimport androidx.compose.runtime.mutableStateOfimport androidx.compose.runtime.rememberimport androidx.compose.runtime.setValueimport androidx.compose.ui.Modifierimport androidx.compose.ui.res.stringResourceimport androidx.compose.ui.text.font.FontStyleimport androidx.compose.ui.text.style.TextAlignimport androidx.compose.ui.unit.dpimport androidx.lifecycle.AndroidViewModelimport androidx.lifecycle.ViewModelimport androidx.lifecycle.viewModelScopeimport androidx.lifecycle.viewmodel.compose.viewModelimport com.arcgismaps.Colorimport com.arcgismaps.geometry.Envelopeimport com.arcgismaps.geometry.Pointimport com.arcgismaps.geometry.SpatialReferenceimport com.arcgismaps.mapping.ArcGISMapimport com.arcgismaps.mapping.BasemapStyleimport com.arcgismaps.mapping.GeoElementimport com.arcgismaps.mapping.Viewpointimport com.arcgismaps.mapping.symbology.SimpleLineSymbolimport com.arcgismaps.mapping.symbology.SimpleLineSymbolStyleimport com.arcgismaps.mapping.symbology.SimpleMarkerSymbolimport com.arcgismaps.mapping.symbology.SimpleMarkerSymbolStyleimport com.arcgismaps.mapping.view.Graphicimport com.arcgismaps.mapping.view.GraphicsOverlayimport com.arcgismaps.mapping.view.SingleTapConfirmedEventimport com.arcgismaps.tasks.geocode.GeocodeParametersimport com.arcgismaps.tasks.geocode.LocatorTaskimport com.arcgismaps.toolkit.geoviewcompose.MapViewimport com.arcgismaps.toolkit.geoviewcompose.MapViewProxyimport com.example.app.Rimport kotlinx.coroutines.Jobimport kotlinx.coroutines.flow.MutableStateFlowimport kotlinx.coroutines.flow.StateFlowimport kotlinx.coroutines.flow.asStateFlowimport kotlinx.coroutines.launchclass MapViewModel() : ViewModel() {// Create a map using the basemap style ArcGISTopographic.val map = ArcGISMap(BasemapStyle.ArcGISTopographic).apply {initialViewpoint = Viewpoint(center = Point(x = -118.477324,y = 33.999390,spatialReference = SpatialReference.wgs84()),scale = 72_000.0)}val mapViewProxy = MapViewProxy()val graphicsOverlay = GraphicsOverlay()// The current extent visible in the map view.lateinit var geoViewExtent: Envelope// The location on the map that the user tapped to obtain further information. (A graphic is a type of GeoElement).private val _tapLocation = MutableStateFlow<Point?>(null)val tapLocation: StateFlow<Point?> = _tapLocation.asStateFlow()// The geoelement closest to the location that the user tapped.private val _selectedGeoElement = MutableStateFlow<GeoElement?>(null)val selectedGeoElement: StateFlow<GeoElement?> = _selectedGeoElement.asStateFlow()private var currentIdentifyJob: Job? = null}5 collapsed lines@Composablefun MainScreen() {}
Set up the LocatorTask
A locator task is used to search for places using a geocoding service. Results from this search contain the place location and additional information ( attributes
-
In the view model, create a
LocatorTaskproperty namedlocatorbased on the Geocoding service.A locator task is used to convert an address to a point
A point is a type of geometry containing a single set of (geocode) or vice-versa ( reverse geocodex,ycoordinates and a spatial reference.Reverse geocoding is the process of converting a point to its nearest address or place. ). An address includes any type of information that distinguishes a place. A locatorA locator is an ArcGIS dataset that stores address information and the rules for translating descriptions of places (such as street addresses or place names) into spatial data that can be displayed on a map. involves finding matching locations for a given address. Reverse-geocoding is the opposite and finds the closest address for a given point.MapViewModel class94 collapsed lines@file:OptIn(ExperimentalMaterial3Api::class)package com.example.app.screensimport android.app.Applicationimport android.util.Logimport androidx.compose.foundation.layout.PaddingValuesimport androidx.compose.foundation.layout.fillMaxSizeimport androidx.compose.foundation.layout.heightimport androidx.compose.foundation.layout.paddingimport androidx.compose.foundation.layout.widthInimport androidx.compose.foundation.layout.wrapContentSizeimport androidx.compose.foundation.lazy.LazyColumnimport androidx.compose.material.icons.Iconsimport androidx.compose.material.icons.filled.MoreVertimport androidx.compose.material3.DropdownMenuimport androidx.compose.material3.DropdownMenuItemimport androidx.compose.material3.ExperimentalMaterial3Apiimport androidx.compose.material3.Iconimport androidx.compose.material3.IconButtonimport androidx.compose.material3.MaterialThemeimport androidx.compose.material3.Scaffoldimport androidx.compose.material3.Textimport androidx.compose.material3.TopAppBarimport androidx.compose.runtime.Composableimport androidx.compose.runtime.collectAsStateimport androidx.compose.runtime.getValueimport androidx.compose.runtime.mutableStateOfimport androidx.compose.runtime.rememberimport androidx.compose.runtime.setValueimport androidx.compose.ui.Modifierimport androidx.compose.ui.res.stringResourceimport androidx.compose.ui.text.font.FontStyleimport androidx.compose.ui.text.style.TextAlignimport androidx.compose.ui.unit.dpimport androidx.lifecycle.AndroidViewModelimport androidx.lifecycle.ViewModelimport androidx.lifecycle.viewModelScopeimport androidx.lifecycle.viewmodel.compose.viewModelimport com.arcgismaps.Colorimport com.arcgismaps.geometry.Envelopeimport com.arcgismaps.geometry.Pointimport com.arcgismaps.geometry.SpatialReferenceimport com.arcgismaps.mapping.ArcGISMapimport com.arcgismaps.mapping.BasemapStyleimport com.arcgismaps.mapping.GeoElementimport com.arcgismaps.mapping.Viewpointimport com.arcgismaps.mapping.symbology.SimpleLineSymbolimport com.arcgismaps.mapping.symbology.SimpleLineSymbolStyleimport com.arcgismaps.mapping.symbology.SimpleMarkerSymbolimport com.arcgismaps.mapping.symbology.SimpleMarkerSymbolStyleimport com.arcgismaps.mapping.view.Graphicimport com.arcgismaps.mapping.view.GraphicsOverlayimport com.arcgismaps.mapping.view.SingleTapConfirmedEventimport com.arcgismaps.tasks.geocode.GeocodeParametersimport com.arcgismaps.tasks.geocode.LocatorTaskimport com.arcgismaps.toolkit.geoviewcompose.MapViewimport com.arcgismaps.toolkit.geoviewcompose.MapViewProxyimport com.example.app.Rimport kotlinx.coroutines.Jobimport kotlinx.coroutines.flow.MutableStateFlowimport kotlinx.coroutines.flow.StateFlowimport kotlinx.coroutines.flow.asStateFlowimport kotlinx.coroutines.launchclass MapViewModel() : ViewModel() {// Create a map using the basemap style ArcGISTopographic.val map = ArcGISMap(BasemapStyle.ArcGISTopographic).apply {initialViewpoint = Viewpoint(center = Point(x = -118.477324,y = 33.999390,spatialReference = SpatialReference.wgs84()),scale = 72_000.0)}val mapViewProxy = MapViewProxy()val graphicsOverlay = GraphicsOverlay()// The current extent visible in the map view.lateinit var geoViewExtent: Envelope// The location on the map that the user tapped to obtain further information. (A graphic is a type of GeoElement).private val _tapLocation = MutableStateFlow<Point?>(null)val tapLocation: StateFlow<Point?> = _tapLocation.asStateFlow()// The geoelement closest to the location that the user tapped.private val _selectedGeoElement = MutableStateFlow<GeoElement?>(null)val selectedGeoElement: StateFlow<GeoElement?> = _selectedGeoElement.asStateFlow()private var currentIdentifyJob: Job? = nullval locator = LocatorTask(uri = "https://geocode-api.arcgis.com/arcgis/rest/services/World/GeocodeServer")7 collapsed lines}@Composablefun MainScreen() {} -
To support the geocode operation, create an
enumnamedCategory. It should have two properties: aStringnamed “label” and aColornamed “color”. Each category is searched using itslabeland is distinguished on the map using its associatedcolor.This tutorial uses category filtering to provide accurate search results based on pre-determined place categories. Feel free to modify this list to your specific requirements.
MapViewModel classenum class Category(val label: String, val color: Color) {// CoffeeShop color is brown.CoffeeShop(label = "Coffee shop", color = Color.fromRgba(r =150, g = 75, b= 0, a = 255)),// GasStation color is orange.GasStation(label = "Gas station", color = Color.fromRgba(r = 255, g = 165, b = 0, a =255)),// Food color is purple.Food(label = "Food", color = Color.fromRgba(r = 160, g = 32, b = 240, a = 255)),// Hotel color is blue.Hotel(label = "Hotel", color = Color.fromRgba(r = 0, g = 0, b = 255, a = 255)),ParksOutdoors(label = "Parks and Outdoors", Color.green)} -
Create a suspend function called
findPlaces()to perform the geocodeGeocoding is the process of converting text for an address or place to a complete address with a location. search operation. The method takes a parameter of typeCategorythat you created in the previous step to indicate which category of places to search for.MapViewModel class108 collapsed lines@file:OptIn(ExperimentalMaterial3Api::class)package com.example.app.screensimport android.app.Applicationimport android.util.Logimport androidx.compose.foundation.layout.PaddingValuesimport androidx.compose.foundation.layout.fillMaxSizeimport androidx.compose.foundation.layout.heightimport androidx.compose.foundation.layout.paddingimport androidx.compose.foundation.layout.widthInimport androidx.compose.foundation.layout.wrapContentSizeimport androidx.compose.foundation.lazy.LazyColumnimport androidx.compose.material.icons.Iconsimport androidx.compose.material.icons.filled.MoreVertimport androidx.compose.material3.DropdownMenuimport androidx.compose.material3.DropdownMenuItemimport androidx.compose.material3.ExperimentalMaterial3Apiimport androidx.compose.material3.Iconimport androidx.compose.material3.IconButtonimport androidx.compose.material3.MaterialThemeimport androidx.compose.material3.Scaffoldimport androidx.compose.material3.Textimport androidx.compose.material3.TopAppBarimport androidx.compose.runtime.Composableimport androidx.compose.runtime.collectAsStateimport androidx.compose.runtime.getValueimport androidx.compose.runtime.mutableStateOfimport androidx.compose.runtime.rememberimport androidx.compose.runtime.setValueimport androidx.compose.ui.Modifierimport androidx.compose.ui.res.stringResourceimport androidx.compose.ui.text.font.FontStyleimport androidx.compose.ui.text.style.TextAlignimport androidx.compose.ui.unit.dpimport androidx.lifecycle.AndroidViewModelimport androidx.lifecycle.ViewModelimport androidx.lifecycle.viewModelScopeimport androidx.lifecycle.viewmodel.compose.viewModelimport com.arcgismaps.Colorimport com.arcgismaps.geometry.Envelopeimport com.arcgismaps.geometry.Pointimport com.arcgismaps.geometry.SpatialReferenceimport com.arcgismaps.mapping.ArcGISMapimport com.arcgismaps.mapping.BasemapStyleimport com.arcgismaps.mapping.GeoElementimport com.arcgismaps.mapping.Viewpointimport com.arcgismaps.mapping.symbology.SimpleLineSymbolimport com.arcgismaps.mapping.symbology.SimpleLineSymbolStyleimport com.arcgismaps.mapping.symbology.SimpleMarkerSymbolimport com.arcgismaps.mapping.symbology.SimpleMarkerSymbolStyleimport com.arcgismaps.mapping.view.Graphicimport com.arcgismaps.mapping.view.GraphicsOverlayimport com.arcgismaps.mapping.view.SingleTapConfirmedEventimport com.arcgismaps.tasks.geocode.GeocodeParametersimport com.arcgismaps.tasks.geocode.LocatorTaskimport com.arcgismaps.toolkit.geoviewcompose.MapViewimport com.arcgismaps.toolkit.geoviewcompose.MapViewProxyimport com.example.app.Rimport kotlinx.coroutines.Jobimport kotlinx.coroutines.flow.MutableStateFlowimport kotlinx.coroutines.flow.StateFlowimport kotlinx.coroutines.flow.asStateFlowimport kotlinx.coroutines.launchclass MapViewModel() : ViewModel() {// Create a map using the basemap style ArcGISTopographic.val map = ArcGISMap(BasemapStyle.ArcGISTopographic).apply {initialViewpoint = Viewpoint(center = Point(x = -118.477324,y = 33.999390,spatialReference = SpatialReference.wgs84()),scale = 72_000.0)}val mapViewProxy = MapViewProxy()val graphicsOverlay = GraphicsOverlay()// The current extent visible in the map view.lateinit var geoViewExtent: Envelope// The location on the map that the user tapped to obtain further information. (A graphic is a type of GeoElement).private val _tapLocation = MutableStateFlow<Point?>(null)val tapLocation: StateFlow<Point?> = _tapLocation.asStateFlow()// The geoelement closest to the location that the user tapped.private val _selectedGeoElement = MutableStateFlow<GeoElement?>(null)val selectedGeoElement: StateFlow<GeoElement?> = _selectedGeoElement.asStateFlow()private var currentIdentifyJob: Job? = nullval locator = LocatorTask(uri = "https://geocode-api.arcgis.com/arcgis/rest/services/World/GeocodeServer")enum class Category(val label: String, val color: Color) {// CoffeeShop color is brown.CoffeeShop(label = "Coffee shop", color = Color.fromRgba(r =150, g = 75, b= 0, a = 255)),// GasStation color is orange.GasStation(label = "Gas station", color = Color.fromRgba(r = 255, g = 165, b = 0, a =255)),// Food color is purple.Food(label = "Food", color = Color.fromRgba(r = 160, g = 32, b = 240, a = 255)),// Hotel color is blue.Hotel(label = "Hotel", color = Color.fromRgba(r = 0, g = 0, b = 255, a = 255)),ParksOutdoors(label = "Parks and Outdoors", Color.green)}suspend fun findPlaces(category: Category) {}7 collapsed lines}@Composablefun MainScreen() {} -
Clear the previous results by removing all graphics from the graphics overlay. Create and configure new
GeocodeParameters. Populate them with thesearchAreaparameter (the current map view extent) and the result attribute names.MapViewModel class108 collapsed lines@file:OptIn(ExperimentalMaterial3Api::class)package com.example.app.screensimport android.app.Applicationimport android.util.Logimport androidx.compose.foundation.layout.PaddingValuesimport androidx.compose.foundation.layout.fillMaxSizeimport androidx.compose.foundation.layout.heightimport androidx.compose.foundation.layout.paddingimport androidx.compose.foundation.layout.widthInimport androidx.compose.foundation.layout.wrapContentSizeimport androidx.compose.foundation.lazy.LazyColumnimport androidx.compose.material.icons.Iconsimport androidx.compose.material.icons.filled.MoreVertimport androidx.compose.material3.DropdownMenuimport androidx.compose.material3.DropdownMenuItemimport androidx.compose.material3.ExperimentalMaterial3Apiimport androidx.compose.material3.Iconimport androidx.compose.material3.IconButtonimport androidx.compose.material3.MaterialThemeimport androidx.compose.material3.Scaffoldimport androidx.compose.material3.Textimport androidx.compose.material3.TopAppBarimport androidx.compose.runtime.Composableimport androidx.compose.runtime.collectAsStateimport androidx.compose.runtime.getValueimport androidx.compose.runtime.mutableStateOfimport androidx.compose.runtime.rememberimport androidx.compose.runtime.setValueimport androidx.compose.ui.Modifierimport androidx.compose.ui.res.stringResourceimport androidx.compose.ui.text.font.FontStyleimport androidx.compose.ui.text.style.TextAlignimport androidx.compose.ui.unit.dpimport androidx.lifecycle.AndroidViewModelimport androidx.lifecycle.ViewModelimport androidx.lifecycle.viewModelScopeimport androidx.lifecycle.viewmodel.compose.viewModelimport com.arcgismaps.Colorimport com.arcgismaps.geometry.Envelopeimport com.arcgismaps.geometry.Pointimport com.arcgismaps.geometry.SpatialReferenceimport com.arcgismaps.mapping.ArcGISMapimport com.arcgismaps.mapping.BasemapStyleimport com.arcgismaps.mapping.GeoElementimport com.arcgismaps.mapping.Viewpointimport com.arcgismaps.mapping.symbology.SimpleLineSymbolimport com.arcgismaps.mapping.symbology.SimpleLineSymbolStyleimport com.arcgismaps.mapping.symbology.SimpleMarkerSymbolimport com.arcgismaps.mapping.symbology.SimpleMarkerSymbolStyleimport com.arcgismaps.mapping.view.Graphicimport com.arcgismaps.mapping.view.GraphicsOverlayimport com.arcgismaps.mapping.view.SingleTapConfirmedEventimport com.arcgismaps.tasks.geocode.GeocodeParametersimport com.arcgismaps.tasks.geocode.LocatorTaskimport com.arcgismaps.toolkit.geoviewcompose.MapViewimport com.arcgismaps.toolkit.geoviewcompose.MapViewProxyimport com.example.app.Rimport kotlinx.coroutines.Jobimport kotlinx.coroutines.flow.MutableStateFlowimport kotlinx.coroutines.flow.StateFlowimport kotlinx.coroutines.flow.asStateFlowimport kotlinx.coroutines.launchclass MapViewModel() : ViewModel() {// Create a map using the basemap style ArcGISTopographic.val map = ArcGISMap(BasemapStyle.ArcGISTopographic).apply {initialViewpoint = Viewpoint(center = Point(x = -118.477324,y = 33.999390,spatialReference = SpatialReference.wgs84()),scale = 72_000.0)}val mapViewProxy = MapViewProxy()val graphicsOverlay = GraphicsOverlay()// The current extent visible in the map view.lateinit var geoViewExtent: Envelope// The location on the map that the user tapped to obtain further information. (A graphic is a type of GeoElement).private val _tapLocation = MutableStateFlow<Point?>(null)val tapLocation: StateFlow<Point?> = _tapLocation.asStateFlow()// The geoelement closest to the location that the user tapped.private val _selectedGeoElement = MutableStateFlow<GeoElement?>(null)val selectedGeoElement: StateFlow<GeoElement?> = _selectedGeoElement.asStateFlow()private var currentIdentifyJob: Job? = nullval locator = LocatorTask(uri = "https://geocode-api.arcgis.com/arcgis/rest/services/World/GeocodeServer")enum class Category(val label: String, val color: Color) {// CoffeeShop color is brown.CoffeeShop(label = "Coffee shop", color = Color.fromRgba(r =150, g = 75, b= 0, a = 255)),// GasStation color is orange.GasStation(label = "Gas station", color = Color.fromRgba(r = 255, g = 165, b = 0, a =255)),// Food color is purple.Food(label = "Food", color = Color.fromRgba(r = 160, g = 32, b = 240, a = 255)),// Hotel color is blue.Hotel(label = "Hotel", color = Color.fromRgba(r = 0, g = 0, b = 255, a = 255)),ParksOutdoors(label = "Parks and Outdoors", Color.green)}suspend fun findPlaces(category: Category) {graphicsOverlay.graphics.clear()val geocodeParameters = GeocodeParameters().apply {searchArea = geoViewExtentresultAttributeNames.addAll(listOf("Place_addr", "PlaceName"))}}7 collapsed lines}@Composablefun MainScreen() {} -
Perform the search query using
geocode(). Pass in the category’slabeland the geocode parameters.MapViewModel class108 collapsed lines@file:OptIn(ExperimentalMaterial3Api::class)package com.example.app.screensimport android.app.Applicationimport android.util.Logimport androidx.compose.foundation.layout.PaddingValuesimport androidx.compose.foundation.layout.fillMaxSizeimport androidx.compose.foundation.layout.heightimport androidx.compose.foundation.layout.paddingimport androidx.compose.foundation.layout.widthInimport androidx.compose.foundation.layout.wrapContentSizeimport androidx.compose.foundation.lazy.LazyColumnimport androidx.compose.material.icons.Iconsimport androidx.compose.material.icons.filled.MoreVertimport androidx.compose.material3.DropdownMenuimport androidx.compose.material3.DropdownMenuItemimport androidx.compose.material3.ExperimentalMaterial3Apiimport androidx.compose.material3.Iconimport androidx.compose.material3.IconButtonimport androidx.compose.material3.MaterialThemeimport androidx.compose.material3.Scaffoldimport androidx.compose.material3.Textimport androidx.compose.material3.TopAppBarimport androidx.compose.runtime.Composableimport androidx.compose.runtime.collectAsStateimport androidx.compose.runtime.getValueimport androidx.compose.runtime.mutableStateOfimport androidx.compose.runtime.rememberimport androidx.compose.runtime.setValueimport androidx.compose.ui.Modifierimport androidx.compose.ui.res.stringResourceimport androidx.compose.ui.text.font.FontStyleimport androidx.compose.ui.text.style.TextAlignimport androidx.compose.ui.unit.dpimport androidx.lifecycle.AndroidViewModelimport androidx.lifecycle.ViewModelimport androidx.lifecycle.viewModelScopeimport androidx.lifecycle.viewmodel.compose.viewModelimport com.arcgismaps.Colorimport com.arcgismaps.geometry.Envelopeimport com.arcgismaps.geometry.Pointimport com.arcgismaps.geometry.SpatialReferenceimport com.arcgismaps.mapping.ArcGISMapimport com.arcgismaps.mapping.BasemapStyleimport com.arcgismaps.mapping.GeoElementimport com.arcgismaps.mapping.Viewpointimport com.arcgismaps.mapping.symbology.SimpleLineSymbolimport com.arcgismaps.mapping.symbology.SimpleLineSymbolStyleimport com.arcgismaps.mapping.symbology.SimpleMarkerSymbolimport com.arcgismaps.mapping.symbology.SimpleMarkerSymbolStyleimport com.arcgismaps.mapping.view.Graphicimport com.arcgismaps.mapping.view.GraphicsOverlayimport com.arcgismaps.mapping.view.SingleTapConfirmedEventimport com.arcgismaps.tasks.geocode.GeocodeParametersimport com.arcgismaps.tasks.geocode.LocatorTaskimport com.arcgismaps.toolkit.geoviewcompose.MapViewimport com.arcgismaps.toolkit.geoviewcompose.MapViewProxyimport com.example.app.Rimport kotlinx.coroutines.Jobimport kotlinx.coroutines.flow.MutableStateFlowimport kotlinx.coroutines.flow.StateFlowimport kotlinx.coroutines.flow.asStateFlowimport kotlinx.coroutines.launchclass MapViewModel() : ViewModel() {// Create a map using the basemap style ArcGISTopographic.val map = ArcGISMap(BasemapStyle.ArcGISTopographic).apply {initialViewpoint = Viewpoint(center = Point(x = -118.477324,y = 33.999390,spatialReference = SpatialReference.wgs84()),scale = 72_000.0)}val mapViewProxy = MapViewProxy()val graphicsOverlay = GraphicsOverlay()// The current extent visible in the map view.lateinit var geoViewExtent: Envelope// The location on the map that the user tapped to obtain further information. (A graphic is a type of GeoElement).private val _tapLocation = MutableStateFlow<Point?>(null)val tapLocation: StateFlow<Point?> = _tapLocation.asStateFlow()// The geoelement closest to the location that the user tapped.private val _selectedGeoElement = MutableStateFlow<GeoElement?>(null)val selectedGeoElement: StateFlow<GeoElement?> = _selectedGeoElement.asStateFlow()private var currentIdentifyJob: Job? = nullval locator = LocatorTask(uri = "https://geocode-api.arcgis.com/arcgis/rest/services/World/GeocodeServer")enum class Category(val label: String, val color: Color) {// CoffeeShop color is brown.CoffeeShop(label = "Coffee shop", color = Color.fromRgba(r =150, g = 75, b= 0, a = 255)),// GasStation color is orange.GasStation(label = "Gas station", color = Color.fromRgba(r = 255, g = 165, b = 0, a =255)),// Food color is purple.Food(label = "Food", color = Color.fromRgba(r = 160, g = 32, b = 240, a = 255)),// Hotel color is blue.Hotel(label = "Hotel", color = Color.fromRgba(r = 0, g = 0, b = 255, a = 255)),ParksOutdoors(label = "Parks and Outdoors", Color.green)}suspend fun findPlaces(category: Category) {graphicsOverlay.graphics.clear()val geocodeParameters = GeocodeParameters().apply {searchArea = geoViewExtentresultAttributeNames.addAll(listOf("Place_addr", "PlaceName"))}val geocodeResultsList = locator.geocode(searchText = category.label,parameters = geocodeParameters).getOrElse { error ->return logError(error)}}7 collapsed lines}@Composablefun MainScreen() {} -
Create graphics for each of the results and add them to the graphics overlay.
Populate the
graphicsOverlaywithSimpleMarkerSymbols representing each place returned in the search results. This is very similar to the Add a point, line, and polygon tutorial.MapViewModel class108 collapsed lines@file:OptIn(ExperimentalMaterial3Api::class)package com.example.app.screensimport android.app.Applicationimport android.util.Logimport androidx.compose.foundation.layout.PaddingValuesimport androidx.compose.foundation.layout.fillMaxSizeimport androidx.compose.foundation.layout.heightimport androidx.compose.foundation.layout.paddingimport androidx.compose.foundation.layout.widthInimport androidx.compose.foundation.layout.wrapContentSizeimport androidx.compose.foundation.lazy.LazyColumnimport androidx.compose.material.icons.Iconsimport androidx.compose.material.icons.filled.MoreVertimport androidx.compose.material3.DropdownMenuimport androidx.compose.material3.DropdownMenuItemimport androidx.compose.material3.ExperimentalMaterial3Apiimport androidx.compose.material3.Iconimport androidx.compose.material3.IconButtonimport androidx.compose.material3.MaterialThemeimport androidx.compose.material3.Scaffoldimport androidx.compose.material3.Textimport androidx.compose.material3.TopAppBarimport androidx.compose.runtime.Composableimport androidx.compose.runtime.collectAsStateimport androidx.compose.runtime.getValueimport androidx.compose.runtime.mutableStateOfimport androidx.compose.runtime.rememberimport androidx.compose.runtime.setValueimport androidx.compose.ui.Modifierimport androidx.compose.ui.res.stringResourceimport androidx.compose.ui.text.font.FontStyleimport androidx.compose.ui.text.style.TextAlignimport androidx.compose.ui.unit.dpimport androidx.lifecycle.AndroidViewModelimport androidx.lifecycle.ViewModelimport androidx.lifecycle.viewModelScopeimport androidx.lifecycle.viewmodel.compose.viewModelimport com.arcgismaps.Colorimport com.arcgismaps.geometry.Envelopeimport com.arcgismaps.geometry.Pointimport com.arcgismaps.geometry.SpatialReferenceimport com.arcgismaps.mapping.ArcGISMapimport com.arcgismaps.mapping.BasemapStyleimport com.arcgismaps.mapping.GeoElementimport com.arcgismaps.mapping.Viewpointimport com.arcgismaps.mapping.symbology.SimpleLineSymbolimport com.arcgismaps.mapping.symbology.SimpleLineSymbolStyleimport com.arcgismaps.mapping.symbology.SimpleMarkerSymbolimport com.arcgismaps.mapping.symbology.SimpleMarkerSymbolStyleimport com.arcgismaps.mapping.view.Graphicimport com.arcgismaps.mapping.view.GraphicsOverlayimport com.arcgismaps.mapping.view.SingleTapConfirmedEventimport com.arcgismaps.tasks.geocode.GeocodeParametersimport com.arcgismaps.tasks.geocode.LocatorTaskimport com.arcgismaps.toolkit.geoviewcompose.MapViewimport com.arcgismaps.toolkit.geoviewcompose.MapViewProxyimport com.example.app.Rimport kotlinx.coroutines.Jobimport kotlinx.coroutines.flow.MutableStateFlowimport kotlinx.coroutines.flow.StateFlowimport kotlinx.coroutines.flow.asStateFlowimport kotlinx.coroutines.launchclass MapViewModel() : ViewModel() {// Create a map using the basemap style ArcGISTopographic.val map = ArcGISMap(BasemapStyle.ArcGISTopographic).apply {initialViewpoint = Viewpoint(center = Point(x = -118.477324,y = 33.999390,spatialReference = SpatialReference.wgs84()),scale = 72_000.0)}val mapViewProxy = MapViewProxy()val graphicsOverlay = GraphicsOverlay()// The current extent visible in the map view.lateinit var geoViewExtent: Envelope// The location on the map that the user tapped to obtain further information. (A graphic is a type of GeoElement).private val _tapLocation = MutableStateFlow<Point?>(null)val tapLocation: StateFlow<Point?> = _tapLocation.asStateFlow()// The geoelement closest to the location that the user tapped.private val _selectedGeoElement = MutableStateFlow<GeoElement?>(null)val selectedGeoElement: StateFlow<GeoElement?> = _selectedGeoElement.asStateFlow()private var currentIdentifyJob: Job? = nullval locator = LocatorTask(uri = "https://geocode-api.arcgis.com/arcgis/rest/services/World/GeocodeServer")enum class Category(val label: String, val color: Color) {// CoffeeShop color is brown.CoffeeShop(label = "Coffee shop", color = Color.fromRgba(r =150, g = 75, b= 0, a = 255)),// GasStation color is orange.GasStation(label = "Gas station", color = Color.fromRgba(r = 255, g = 165, b = 0, a =255)),// Food color is purple.Food(label = "Food", color = Color.fromRgba(r = 160, g = 32, b = 240, a = 255)),// Hotel color is blue.Hotel(label = "Hotel", color = Color.fromRgba(r = 0, g = 0, b = 255, a = 255)),ParksOutdoors(label = "Parks and Outdoors", Color.green)}suspend fun findPlaces(category: Category) {graphicsOverlay.graphics.clear()val geocodeParameters = GeocodeParameters().apply {searchArea = geoViewExtentresultAttributeNames.addAll(listOf("Place_addr", "PlaceName"))}val geocodeResultsList = locator.geocode(searchText = category.label,parameters = geocodeParameters).getOrElse { error ->return logError(error)}if (geocodeResultsList.isNotEmpty()) {val placeSymbol = SimpleMarkerSymbol(style = SimpleMarkerSymbolStyle.Circle,color = category.color,size = 10f).apply {outline = SimpleLineSymbol(style = SimpleLineSymbolStyle.Solid,color = Color.white,width = 2f)}val graphics = geocodeResultsList.map { geocodeResult ->Graphic(geometry = geocodeResult.displayLocation,attributes = geocodeResult.attributes,symbol = placeSymbol)}graphicsOverlay.graphics.addAll(graphics)}}7 collapsed lines}@Composablefun MainScreen() {}
Identify the closest geoelement to the user’s tap location
An identify
-
Create a function called
identify()that takes aSingleTapConfirmedEvent. In the function, first cancel the current identify job. Then launch a new coroutine and callMapViewProxy.identify()to identify the closest graphic(s) at the tap location.MapViewModel class/*** Identifies the tapped screen coordinate in the provided [singleTapConfirmedEvent]. The* identified geoelement is set to [_selectedGeoElement].** @since 200.5.0*/fun identify(singleTapConfirmedEvent: SingleTapConfirmedEvent) {currentIdentifyJob?.cancel()currentIdentifyJob = viewModelScope.launch {val result = mapViewProxy.identify(graphicsOverlay = graphicsOverlay,screenCoordinate = singleTapConfirmedEvent.screenCoordinate,tolerance = 2.dp)result.onSuccess { identifyGraphicsOverlayResult ->_selectedGeoElement.value = identifyGraphicsOverlayResult.geoElements.firstOrNull()}.onFailure { error ->logError(error)}}}
Add functions to clear the selected geoelement and log errors
-
Add a function that clears the currently selected geoelement
A geoelement refers to any geographic element in a map or map view that can be identified by its location to return attribute information. . Then add a function to log errors.MapViewModel class170 collapsed lines@file:OptIn(ExperimentalMaterial3Api::class)package com.example.app.screensimport android.app.Applicationimport android.util.Logimport androidx.compose.foundation.layout.PaddingValuesimport androidx.compose.foundation.layout.fillMaxSizeimport androidx.compose.foundation.layout.heightimport androidx.compose.foundation.layout.paddingimport androidx.compose.foundation.layout.widthInimport androidx.compose.foundation.layout.wrapContentSizeimport androidx.compose.foundation.lazy.LazyColumnimport androidx.compose.material.icons.Iconsimport androidx.compose.material.icons.filled.MoreVertimport androidx.compose.material3.DropdownMenuimport androidx.compose.material3.DropdownMenuItemimport androidx.compose.material3.ExperimentalMaterial3Apiimport androidx.compose.material3.Iconimport androidx.compose.material3.IconButtonimport androidx.compose.material3.MaterialThemeimport androidx.compose.material3.Scaffoldimport androidx.compose.material3.Textimport androidx.compose.material3.TopAppBarimport androidx.compose.runtime.Composableimport androidx.compose.runtime.collectAsStateimport androidx.compose.runtime.getValueimport androidx.compose.runtime.mutableStateOfimport androidx.compose.runtime.rememberimport androidx.compose.runtime.setValueimport androidx.compose.ui.Modifierimport androidx.compose.ui.res.stringResourceimport androidx.compose.ui.text.font.FontStyleimport androidx.compose.ui.text.style.TextAlignimport androidx.compose.ui.unit.dpimport androidx.lifecycle.AndroidViewModelimport androidx.lifecycle.ViewModelimport androidx.lifecycle.viewModelScopeimport androidx.lifecycle.viewmodel.compose.viewModelimport com.arcgismaps.Colorimport com.arcgismaps.geometry.Envelopeimport com.arcgismaps.geometry.Pointimport com.arcgismaps.geometry.SpatialReferenceimport com.arcgismaps.mapping.ArcGISMapimport com.arcgismaps.mapping.BasemapStyleimport com.arcgismaps.mapping.GeoElementimport com.arcgismaps.mapping.Viewpointimport com.arcgismaps.mapping.symbology.SimpleLineSymbolimport com.arcgismaps.mapping.symbology.SimpleLineSymbolStyleimport com.arcgismaps.mapping.symbology.SimpleMarkerSymbolimport com.arcgismaps.mapping.symbology.SimpleMarkerSymbolStyleimport com.arcgismaps.mapping.view.Graphicimport com.arcgismaps.mapping.view.GraphicsOverlayimport com.arcgismaps.mapping.view.SingleTapConfirmedEventimport com.arcgismaps.tasks.geocode.GeocodeParametersimport com.arcgismaps.tasks.geocode.LocatorTaskimport com.arcgismaps.toolkit.geoviewcompose.MapViewimport com.arcgismaps.toolkit.geoviewcompose.MapViewProxyimport com.example.app.Rimport kotlinx.coroutines.Jobimport kotlinx.coroutines.flow.MutableStateFlowimport kotlinx.coroutines.flow.StateFlowimport kotlinx.coroutines.flow.asStateFlowimport kotlinx.coroutines.launchclass MapViewModel() : ViewModel() {// Create a map using the basemap style ArcGISTopographic.val map = ArcGISMap(BasemapStyle.ArcGISTopographic).apply {initialViewpoint = Viewpoint(center = Point(x = -118.477324,y = 33.999390,spatialReference = SpatialReference.wgs84()),scale = 72_000.0)}val mapViewProxy = MapViewProxy()val graphicsOverlay = GraphicsOverlay()// The current extent visible in the map view.lateinit var geoViewExtent: Envelope// The location on the map that the user tapped to obtain further information. (A graphic is a type of GeoElement).private val _tapLocation = MutableStateFlow<Point?>(null)val tapLocation: StateFlow<Point?> = _tapLocation.asStateFlow()// The geoelement closest to the location that the user tapped.private val _selectedGeoElement = MutableStateFlow<GeoElement?>(null)val selectedGeoElement: StateFlow<GeoElement?> = _selectedGeoElement.asStateFlow()private var currentIdentifyJob: Job? = nullval locator = LocatorTask(uri = "https://geocode-api.arcgis.com/arcgis/rest/services/World/GeocodeServer")enum class Category(val label: String, val color: Color) {// CoffeeShop color is brown.CoffeeShop(label = "Coffee shop", color = Color.fromRgba(r =150, g = 75, b= 0, a = 255)),// GasStation color is orange.GasStation(label = "Gas station", color = Color.fromRgba(r = 255, g = 165, b = 0, a =255)),// Food color is purple.Food(label = "Food", color = Color.fromRgba(r = 160, g = 32, b = 240, a = 255)),// Hotel color is blue.Hotel(label = "Hotel", color = Color.fromRgba(r = 0, g = 0, b = 255, a = 255)),ParksOutdoors(label = "Parks and Outdoors", Color.green)}suspend fun findPlaces(category: Category) {graphicsOverlay.graphics.clear()val geocodeParameters = GeocodeParameters().apply {searchArea = geoViewExtentresultAttributeNames.addAll(listOf("Place_addr", "PlaceName"))}val geocodeResultsList = locator.geocode(searchText = category.label,parameters = geocodeParameters).getOrElse { error ->return logError(error)}if (geocodeResultsList.isNotEmpty()) {val placeSymbol = SimpleMarkerSymbol(style = SimpleMarkerSymbolStyle.Circle,color = category.color,size = 10f).apply {outline = SimpleLineSymbol(style = SimpleLineSymbolStyle.Solid,color = Color.white,width = 2f)}val graphics = geocodeResultsList.map { geocodeResult ->Graphic(geometry = geocodeResult.displayLocation,attributes = geocodeResult.attributes,symbol = placeSymbol)}graphicsOverlay.graphics.addAll(graphics)}}/*** Identifies the tapped screen coordinate in the provided [singleTapConfirmedEvent]. The* identified geoelement is set to [_selectedGeoElement].** @since 200.5.0*/fun identify(singleTapConfirmedEvent: SingleTapConfirmedEvent) {currentIdentifyJob?.cancel()currentIdentifyJob = viewModelScope.launch {val result = mapViewProxy.identify(graphicsOverlay = graphicsOverlay,screenCoordinate = singleTapConfirmedEvent.screenCoordinate,tolerance = 2.dp)result.onSuccess { identifyGraphicsOverlayResult ->_selectedGeoElement.value = identifyGraphicsOverlayResult.geoElements.firstOrNull()}.onFailure { error ->logError(error)}}}fun clearSelectedGeoElement() {_selectedGeoElement.value = null}private fun logError(error: Throwable) {Log.e(this.javaClass.simpleName, error.message.toString(), error.cause)}7 collapsed lines}@Composablefun MainScreen() {}
Add a Scaffold with a top bar and a dropdown menu
The MainScreen composable needs some variables to hold state for a dropdown menu, a view model, and the currently selected geoelementScaffold composable to display a dropdown menu, the map view, and a callout.
-
In the
MainScreencomposable function add the following:- A mutable state boolean to hold whether a dropdown menu, which you’ll create in a later step, is expanded.
- An instance of your
MapViewModelclass, using the Jetpack ComposeviewModel()function. - A
selectedGeoElementvariable that collects themapViewModel.selectedGeoElement, which was defined as aStateFlow<GeoElement>.
MainScreen()180 collapsed lines@file:OptIn(ExperimentalMaterial3Api::class)package com.example.app.screensimport android.app.Applicationimport android.util.Logimport androidx.compose.foundation.layout.PaddingValuesimport androidx.compose.foundation.layout.fillMaxSizeimport androidx.compose.foundation.layout.heightimport androidx.compose.foundation.layout.paddingimport androidx.compose.foundation.layout.widthInimport androidx.compose.foundation.layout.wrapContentSizeimport androidx.compose.foundation.lazy.LazyColumnimport androidx.compose.material.icons.Iconsimport androidx.compose.material.icons.filled.MoreVertimport androidx.compose.material3.DropdownMenuimport androidx.compose.material3.DropdownMenuItemimport androidx.compose.material3.ExperimentalMaterial3Apiimport androidx.compose.material3.Iconimport androidx.compose.material3.IconButtonimport androidx.compose.material3.MaterialThemeimport androidx.compose.material3.Scaffoldimport androidx.compose.material3.Textimport androidx.compose.material3.TopAppBarimport androidx.compose.runtime.Composableimport androidx.compose.runtime.collectAsStateimport androidx.compose.runtime.getValueimport androidx.compose.runtime.mutableStateOfimport androidx.compose.runtime.rememberimport androidx.compose.runtime.setValueimport androidx.compose.ui.Modifierimport androidx.compose.ui.res.stringResourceimport androidx.compose.ui.text.font.FontStyleimport androidx.compose.ui.text.style.TextAlignimport androidx.compose.ui.unit.dpimport androidx.lifecycle.AndroidViewModelimport androidx.lifecycle.ViewModelimport androidx.lifecycle.viewModelScopeimport androidx.lifecycle.viewmodel.compose.viewModelimport com.arcgismaps.Colorimport com.arcgismaps.geometry.Envelopeimport com.arcgismaps.geometry.Pointimport com.arcgismaps.geometry.SpatialReferenceimport com.arcgismaps.mapping.ArcGISMapimport com.arcgismaps.mapping.BasemapStyleimport com.arcgismaps.mapping.GeoElementimport com.arcgismaps.mapping.Viewpointimport com.arcgismaps.mapping.symbology.SimpleLineSymbolimport com.arcgismaps.mapping.symbology.SimpleLineSymbolStyleimport com.arcgismaps.mapping.symbology.SimpleMarkerSymbolimport com.arcgismaps.mapping.symbology.SimpleMarkerSymbolStyleimport com.arcgismaps.mapping.view.Graphicimport com.arcgismaps.mapping.view.GraphicsOverlayimport com.arcgismaps.mapping.view.SingleTapConfirmedEventimport com.arcgismaps.tasks.geocode.GeocodeParametersimport com.arcgismaps.tasks.geocode.LocatorTaskimport com.arcgismaps.toolkit.geoviewcompose.MapViewimport com.arcgismaps.toolkit.geoviewcompose.MapViewProxyimport com.example.app.Rimport kotlinx.coroutines.Jobimport kotlinx.coroutines.flow.MutableStateFlowimport kotlinx.coroutines.flow.StateFlowimport kotlinx.coroutines.flow.asStateFlowimport kotlinx.coroutines.launchclass MapViewModel() : ViewModel() {// Create a map using the basemap style ArcGISTopographic.val map = ArcGISMap(BasemapStyle.ArcGISTopographic).apply {initialViewpoint = Viewpoint(center = Point(x = -118.477324,y = 33.999390,spatialReference = SpatialReference.wgs84()),scale = 72_000.0)}val mapViewProxy = MapViewProxy()val graphicsOverlay = GraphicsOverlay()// The current extent visible in the map view.lateinit var geoViewExtent: Envelope// The location on the map that the user tapped to obtain further information. (A graphic is a type of GeoElement).private val _tapLocation = MutableStateFlow<Point?>(null)val tapLocation: StateFlow<Point?> = _tapLocation.asStateFlow()// The geoelement closest to the location that the user tapped.private val _selectedGeoElement = MutableStateFlow<GeoElement?>(null)val selectedGeoElement: StateFlow<GeoElement?> = _selectedGeoElement.asStateFlow()private var currentIdentifyJob: Job? = nullval locator = LocatorTask(uri = "https://geocode-api.arcgis.com/arcgis/rest/services/World/GeocodeServer")enum class Category(val label: String, val color: Color) {// CoffeeShop color is brown.CoffeeShop(label = "Coffee shop", color = Color.fromRgba(r =150, g = 75, b= 0, a = 255)),// GasStation color is orange.GasStation(label = "Gas station", color = Color.fromRgba(r = 255, g = 165, b = 0, a =255)),// Food color is purple.Food(label = "Food", color = Color.fromRgba(r = 160, g = 32, b = 240, a = 255)),// Hotel color is blue.Hotel(label = "Hotel", color = Color.fromRgba(r = 0, g = 0, b = 255, a = 255)),ParksOutdoors(label = "Parks and Outdoors", Color.green)}suspend fun findPlaces(category: Category) {graphicsOverlay.graphics.clear()val geocodeParameters = GeocodeParameters().apply {searchArea = geoViewExtentresultAttributeNames.addAll(listOf("Place_addr", "PlaceName"))}val geocodeResultsList = locator.geocode(searchText = category.label,parameters = geocodeParameters).getOrElse { error ->return logError(error)}if (geocodeResultsList.isNotEmpty()) {val placeSymbol = SimpleMarkerSymbol(style = SimpleMarkerSymbolStyle.Circle,color = category.color,size = 10f).apply {outline = SimpleLineSymbol(style = SimpleLineSymbolStyle.Solid,color = Color.white,width = 2f)}val graphics = geocodeResultsList.map { geocodeResult ->Graphic(geometry = geocodeResult.displayLocation,attributes = geocodeResult.attributes,symbol = placeSymbol)}graphicsOverlay.graphics.addAll(graphics)}}/*** Identifies the tapped screen coordinate in the provided [singleTapConfirmedEvent]. The* identified geoelement is set to [_selectedGeoElement].** @since 200.5.0*/fun identify(singleTapConfirmedEvent: SingleTapConfirmedEvent) {currentIdentifyJob?.cancel()currentIdentifyJob = viewModelScope.launch {val result = mapViewProxy.identify(graphicsOverlay = graphicsOverlay,screenCoordinate = singleTapConfirmedEvent.screenCoordinate,tolerance = 2.dp)result.onSuccess { identifyGraphicsOverlayResult ->_selectedGeoElement.value = identifyGraphicsOverlayResult.geoElements.firstOrNull()}.onFailure { error ->logError(error)}}}fun clearSelectedGeoElement() {_selectedGeoElement.value = null}private fun logError(error: Throwable) {Log.e(this.javaClass.simpleName, error.message.toString(), error.cause)}}@Composablefun MainScreen() {var isDropdownExpanded by remember { mutableStateOf(false) }// Create a ViewModel to handle MapView interactions.val mapViewModel: MapViewModel = viewModel()val selectedGeoElement = mapViewModel.selectedGeoElement.collectAsState().value} -
Add a
Scaffoldthat has a top bar. Add an empty content lambda to theScaffold. That lambda is where you will addMapViewin a later step.MainScreen()180 collapsed lines@file:OptIn(ExperimentalMaterial3Api::class)package com.example.app.screensimport android.app.Applicationimport android.util.Logimport androidx.compose.foundation.layout.PaddingValuesimport androidx.compose.foundation.layout.fillMaxSizeimport androidx.compose.foundation.layout.heightimport androidx.compose.foundation.layout.paddingimport androidx.compose.foundation.layout.widthInimport androidx.compose.foundation.layout.wrapContentSizeimport androidx.compose.foundation.lazy.LazyColumnimport androidx.compose.material.icons.Iconsimport androidx.compose.material.icons.filled.MoreVertimport androidx.compose.material3.DropdownMenuimport androidx.compose.material3.DropdownMenuItemimport androidx.compose.material3.ExperimentalMaterial3Apiimport androidx.compose.material3.Iconimport androidx.compose.material3.IconButtonimport androidx.compose.material3.MaterialThemeimport androidx.compose.material3.Scaffoldimport androidx.compose.material3.Textimport androidx.compose.material3.TopAppBarimport androidx.compose.runtime.Composableimport androidx.compose.runtime.collectAsStateimport androidx.compose.runtime.getValueimport androidx.compose.runtime.mutableStateOfimport androidx.compose.runtime.rememberimport androidx.compose.runtime.setValueimport androidx.compose.ui.Modifierimport androidx.compose.ui.res.stringResourceimport androidx.compose.ui.text.font.FontStyleimport androidx.compose.ui.text.style.TextAlignimport androidx.compose.ui.unit.dpimport androidx.lifecycle.AndroidViewModelimport androidx.lifecycle.ViewModelimport androidx.lifecycle.viewModelScopeimport androidx.lifecycle.viewmodel.compose.viewModelimport com.arcgismaps.Colorimport com.arcgismaps.geometry.Envelopeimport com.arcgismaps.geometry.Pointimport com.arcgismaps.geometry.SpatialReferenceimport com.arcgismaps.mapping.ArcGISMapimport com.arcgismaps.mapping.BasemapStyleimport com.arcgismaps.mapping.GeoElementimport com.arcgismaps.mapping.Viewpointimport com.arcgismaps.mapping.symbology.SimpleLineSymbolimport com.arcgismaps.mapping.symbology.SimpleLineSymbolStyleimport com.arcgismaps.mapping.symbology.SimpleMarkerSymbolimport com.arcgismaps.mapping.symbology.SimpleMarkerSymbolStyleimport com.arcgismaps.mapping.view.Graphicimport com.arcgismaps.mapping.view.GraphicsOverlayimport com.arcgismaps.mapping.view.SingleTapConfirmedEventimport com.arcgismaps.tasks.geocode.GeocodeParametersimport com.arcgismaps.tasks.geocode.LocatorTaskimport com.arcgismaps.toolkit.geoviewcompose.MapViewimport com.arcgismaps.toolkit.geoviewcompose.MapViewProxyimport com.example.app.Rimport kotlinx.coroutines.Jobimport kotlinx.coroutines.flow.MutableStateFlowimport kotlinx.coroutines.flow.StateFlowimport kotlinx.coroutines.flow.asStateFlowimport kotlinx.coroutines.launchclass MapViewModel() : ViewModel() {// Create a map using the basemap style ArcGISTopographic.val map = ArcGISMap(BasemapStyle.ArcGISTopographic).apply {initialViewpoint = Viewpoint(center = Point(x = -118.477324,y = 33.999390,spatialReference = SpatialReference.wgs84()),scale = 72_000.0)}val mapViewProxy = MapViewProxy()val graphicsOverlay = GraphicsOverlay()// The current extent visible in the map view.lateinit var geoViewExtent: Envelope// The location on the map that the user tapped to obtain further information. (A graphic is a type of GeoElement).private val _tapLocation = MutableStateFlow<Point?>(null)val tapLocation: StateFlow<Point?> = _tapLocation.asStateFlow()// The geoelement closest to the location that the user tapped.private val _selectedGeoElement = MutableStateFlow<GeoElement?>(null)val selectedGeoElement: StateFlow<GeoElement?> = _selectedGeoElement.asStateFlow()private var currentIdentifyJob: Job? = nullval locator = LocatorTask(uri = "https://geocode-api.arcgis.com/arcgis/rest/services/World/GeocodeServer")enum class Category(val label: String, val color: Color) {// CoffeeShop color is brown.CoffeeShop(label = "Coffee shop", color = Color.fromRgba(r =150, g = 75, b= 0, a = 255)),// GasStation color is orange.GasStation(label = "Gas station", color = Color.fromRgba(r = 255, g = 165, b = 0, a =255)),// Food color is purple.Food(label = "Food", color = Color.fromRgba(r = 160, g = 32, b = 240, a = 255)),// Hotel color is blue.Hotel(label = "Hotel", color = Color.fromRgba(r = 0, g = 0, b = 255, a = 255)),ParksOutdoors(label = "Parks and Outdoors", Color.green)}suspend fun findPlaces(category: Category) {graphicsOverlay.graphics.clear()val geocodeParameters = GeocodeParameters().apply {searchArea = geoViewExtentresultAttributeNames.addAll(listOf("Place_addr", "PlaceName"))}val geocodeResultsList = locator.geocode(searchText = category.label,parameters = geocodeParameters).getOrElse { error ->return logError(error)}if (geocodeResultsList.isNotEmpty()) {val placeSymbol = SimpleMarkerSymbol(style = SimpleMarkerSymbolStyle.Circle,color = category.color,size = 10f).apply {outline = SimpleLineSymbol(style = SimpleLineSymbolStyle.Solid,color = Color.white,width = 2f)}val graphics = geocodeResultsList.map { geocodeResult ->Graphic(geometry = geocodeResult.displayLocation,attributes = geocodeResult.attributes,symbol = placeSymbol)}graphicsOverlay.graphics.addAll(graphics)}}/*** Identifies the tapped screen coordinate in the provided [singleTapConfirmedEvent]. The* identified geoelement is set to [_selectedGeoElement].** @since 200.5.0*/fun identify(singleTapConfirmedEvent: SingleTapConfirmedEvent) {currentIdentifyJob?.cancel()currentIdentifyJob = viewModelScope.launch {val result = mapViewProxy.identify(graphicsOverlay = graphicsOverlay,screenCoordinate = singleTapConfirmedEvent.screenCoordinate,tolerance = 2.dp)result.onSuccess { identifyGraphicsOverlayResult ->_selectedGeoElement.value = identifyGraphicsOverlayResult.geoElements.firstOrNull()}.onFailure { error ->logError(error)}}}fun clearSelectedGeoElement() {_selectedGeoElement.value = null}private fun logError(error: Throwable) {Log.e(this.javaClass.simpleName, error.message.toString(), error.cause)}}@Composablefun MainScreen() {var isDropdownExpanded by remember { mutableStateOf(false) }// Create a ViewModel to handle MapView interactions.val mapViewModel: MapViewModel = viewModel()val selectedGeoElement = mapViewModel.selectedGeoElement.collectAsState().valueScaffold(topBar = {TopAppBar(title = { Text(text = stringResource(id = R.string.app_name)) },) }) {}} -
Add an
actionslambda as a parameter to theTopAppBar. The lambda will first display a More options icon (the three vertical dots), which the user taps to display a dropdown menu of place categories.MainScreen()180 collapsed lines@file:OptIn(ExperimentalMaterial3Api::class)package com.example.app.screensimport android.app.Applicationimport android.util.Logimport androidx.compose.foundation.layout.PaddingValuesimport androidx.compose.foundation.layout.fillMaxSizeimport androidx.compose.foundation.layout.heightimport androidx.compose.foundation.layout.paddingimport androidx.compose.foundation.layout.widthInimport androidx.compose.foundation.layout.wrapContentSizeimport androidx.compose.foundation.lazy.LazyColumnimport androidx.compose.material.icons.Iconsimport androidx.compose.material.icons.filled.MoreVertimport androidx.compose.material3.DropdownMenuimport androidx.compose.material3.DropdownMenuItemimport androidx.compose.material3.ExperimentalMaterial3Apiimport androidx.compose.material3.Iconimport androidx.compose.material3.IconButtonimport androidx.compose.material3.MaterialThemeimport androidx.compose.material3.Scaffoldimport androidx.compose.material3.Textimport androidx.compose.material3.TopAppBarimport androidx.compose.runtime.Composableimport androidx.compose.runtime.collectAsStateimport androidx.compose.runtime.getValueimport androidx.compose.runtime.mutableStateOfimport androidx.compose.runtime.rememberimport androidx.compose.runtime.setValueimport androidx.compose.ui.Modifierimport androidx.compose.ui.res.stringResourceimport androidx.compose.ui.text.font.FontStyleimport androidx.compose.ui.text.style.TextAlignimport androidx.compose.ui.unit.dpimport androidx.lifecycle.AndroidViewModelimport androidx.lifecycle.ViewModelimport androidx.lifecycle.viewModelScopeimport androidx.lifecycle.viewmodel.compose.viewModelimport com.arcgismaps.Colorimport com.arcgismaps.geometry.Envelopeimport com.arcgismaps.geometry.Pointimport com.arcgismaps.geometry.SpatialReferenceimport com.arcgismaps.mapping.ArcGISMapimport com.arcgismaps.mapping.BasemapStyleimport com.arcgismaps.mapping.GeoElementimport com.arcgismaps.mapping.Viewpointimport com.arcgismaps.mapping.symbology.SimpleLineSymbolimport com.arcgismaps.mapping.symbology.SimpleLineSymbolStyleimport com.arcgismaps.mapping.symbology.SimpleMarkerSymbolimport com.arcgismaps.mapping.symbology.SimpleMarkerSymbolStyleimport com.arcgismaps.mapping.view.Graphicimport com.arcgismaps.mapping.view.GraphicsOverlayimport com.arcgismaps.mapping.view.SingleTapConfirmedEventimport com.arcgismaps.tasks.geocode.GeocodeParametersimport com.arcgismaps.tasks.geocode.LocatorTaskimport com.arcgismaps.toolkit.geoviewcompose.MapViewimport com.arcgismaps.toolkit.geoviewcompose.MapViewProxyimport com.example.app.Rimport kotlinx.coroutines.Jobimport kotlinx.coroutines.flow.MutableStateFlowimport kotlinx.coroutines.flow.StateFlowimport kotlinx.coroutines.flow.asStateFlowimport kotlinx.coroutines.launchclass MapViewModel() : ViewModel() {// Create a map using the basemap style ArcGISTopographic.val map = ArcGISMap(BasemapStyle.ArcGISTopographic).apply {initialViewpoint = Viewpoint(center = Point(x = -118.477324,y = 33.999390,spatialReference = SpatialReference.wgs84()),scale = 72_000.0)}val mapViewProxy = MapViewProxy()val graphicsOverlay = GraphicsOverlay()// The current extent visible in the map view.lateinit var geoViewExtent: Envelope// The location on the map that the user tapped to obtain further information. (A graphic is a type of GeoElement).private val _tapLocation = MutableStateFlow<Point?>(null)val tapLocation: StateFlow<Point?> = _tapLocation.asStateFlow()// The geoelement closest to the location that the user tapped.private val _selectedGeoElement = MutableStateFlow<GeoElement?>(null)val selectedGeoElement: StateFlow<GeoElement?> = _selectedGeoElement.asStateFlow()private var currentIdentifyJob: Job? = nullval locator = LocatorTask(uri = "https://geocode-api.arcgis.com/arcgis/rest/services/World/GeocodeServer")enum class Category(val label: String, val color: Color) {// CoffeeShop color is brown.CoffeeShop(label = "Coffee shop", color = Color.fromRgba(r =150, g = 75, b= 0, a = 255)),// GasStation color is orange.GasStation(label = "Gas station", color = Color.fromRgba(r = 255, g = 165, b = 0, a =255)),// Food color is purple.Food(label = "Food", color = Color.fromRgba(r = 160, g = 32, b = 240, a = 255)),// Hotel color is blue.Hotel(label = "Hotel", color = Color.fromRgba(r = 0, g = 0, b = 255, a = 255)),ParksOutdoors(label = "Parks and Outdoors", Color.green)}suspend fun findPlaces(category: Category) {graphicsOverlay.graphics.clear()val geocodeParameters = GeocodeParameters().apply {searchArea = geoViewExtentresultAttributeNames.addAll(listOf("Place_addr", "PlaceName"))}val geocodeResultsList = locator.geocode(searchText = category.label,parameters = geocodeParameters).getOrElse { error ->return logError(error)}if (geocodeResultsList.isNotEmpty()) {val placeSymbol = SimpleMarkerSymbol(style = SimpleMarkerSymbolStyle.Circle,color = category.color,size = 10f).apply {outline = SimpleLineSymbol(style = SimpleLineSymbolStyle.Solid,color = Color.white,width = 2f)}val graphics = geocodeResultsList.map { geocodeResult ->Graphic(geometry = geocodeResult.displayLocation,attributes = geocodeResult.attributes,symbol = placeSymbol)}graphicsOverlay.graphics.addAll(graphics)}}/*** Identifies the tapped screen coordinate in the provided [singleTapConfirmedEvent]. The* identified geoelement is set to [_selectedGeoElement].** @since 200.5.0*/fun identify(singleTapConfirmedEvent: SingleTapConfirmedEvent) {currentIdentifyJob?.cancel()currentIdentifyJob = viewModelScope.launch {val result = mapViewProxy.identify(graphicsOverlay = graphicsOverlay,screenCoordinate = singleTapConfirmedEvent.screenCoordinate,tolerance = 2.dp)result.onSuccess { identifyGraphicsOverlayResult ->_selectedGeoElement.value = identifyGraphicsOverlayResult.geoElements.firstOrNull()}.onFailure { error ->logError(error)}}}fun clearSelectedGeoElement() {_selectedGeoElement.value = null}private fun logError(error: Throwable) {Log.e(this.javaClass.simpleName, error.message.toString(), error.cause)}}@Composablefun MainScreen() {var isDropdownExpanded by remember { mutableStateOf(false) }// Create a ViewModel to handle MapView interactions.val mapViewModel: MapViewModel = viewModel()val selectedGeoElement = mapViewModel.selectedGeoElement.collectAsState().valueScaffold(topBar = {TopAppBar(title = { Text(text = stringResource(id = R.string.app_name)) },actions = {IconButton(onClick = { isDropdownExpanded = !isDropdownExpanded }) {Icon(imageVector = Icons.Default.MoreVert,contentDescription = "More options")}}) }) {}} -
The
actionslambda then defines aDropdownMenuthat has aDropdownMenuItemfor each of the categories you created in the map view model.MainScreen()180 collapsed lines@file:OptIn(ExperimentalMaterial3Api::class)package com.example.app.screensimport android.app.Applicationimport android.util.Logimport androidx.compose.foundation.layout.PaddingValuesimport androidx.compose.foundation.layout.fillMaxSizeimport androidx.compose.foundation.layout.heightimport androidx.compose.foundation.layout.paddingimport androidx.compose.foundation.layout.widthInimport androidx.compose.foundation.layout.wrapContentSizeimport androidx.compose.foundation.lazy.LazyColumnimport androidx.compose.material.icons.Iconsimport androidx.compose.material.icons.filled.MoreVertimport androidx.compose.material3.DropdownMenuimport androidx.compose.material3.DropdownMenuItemimport androidx.compose.material3.ExperimentalMaterial3Apiimport androidx.compose.material3.Iconimport androidx.compose.material3.IconButtonimport androidx.compose.material3.MaterialThemeimport androidx.compose.material3.Scaffoldimport androidx.compose.material3.Textimport androidx.compose.material3.TopAppBarimport androidx.compose.runtime.Composableimport androidx.compose.runtime.collectAsStateimport androidx.compose.runtime.getValueimport androidx.compose.runtime.mutableStateOfimport androidx.compose.runtime.rememberimport androidx.compose.runtime.setValueimport androidx.compose.ui.Modifierimport androidx.compose.ui.res.stringResourceimport androidx.compose.ui.text.font.FontStyleimport androidx.compose.ui.text.style.TextAlignimport androidx.compose.ui.unit.dpimport androidx.lifecycle.AndroidViewModelimport androidx.lifecycle.ViewModelimport androidx.lifecycle.viewModelScopeimport androidx.lifecycle.viewmodel.compose.viewModelimport com.arcgismaps.Colorimport com.arcgismaps.geometry.Envelopeimport com.arcgismaps.geometry.Pointimport com.arcgismaps.geometry.SpatialReferenceimport com.arcgismaps.mapping.ArcGISMapimport com.arcgismaps.mapping.BasemapStyleimport com.arcgismaps.mapping.GeoElementimport com.arcgismaps.mapping.Viewpointimport com.arcgismaps.mapping.symbology.SimpleLineSymbolimport com.arcgismaps.mapping.symbology.SimpleLineSymbolStyleimport com.arcgismaps.mapping.symbology.SimpleMarkerSymbolimport com.arcgismaps.mapping.symbology.SimpleMarkerSymbolStyleimport com.arcgismaps.mapping.view.Graphicimport com.arcgismaps.mapping.view.GraphicsOverlayimport com.arcgismaps.mapping.view.SingleTapConfirmedEventimport com.arcgismaps.tasks.geocode.GeocodeParametersimport com.arcgismaps.tasks.geocode.LocatorTaskimport com.arcgismaps.toolkit.geoviewcompose.MapViewimport com.arcgismaps.toolkit.geoviewcompose.MapViewProxyimport com.example.app.Rimport kotlinx.coroutines.Jobimport kotlinx.coroutines.flow.MutableStateFlowimport kotlinx.coroutines.flow.StateFlowimport kotlinx.coroutines.flow.asStateFlowimport kotlinx.coroutines.launchclass MapViewModel() : ViewModel() {// Create a map using the basemap style ArcGISTopographic.val map = ArcGISMap(BasemapStyle.ArcGISTopographic).apply {initialViewpoint = Viewpoint(center = Point(x = -118.477324,y = 33.999390,spatialReference = SpatialReference.wgs84()),scale = 72_000.0)}val mapViewProxy = MapViewProxy()val graphicsOverlay = GraphicsOverlay()// The current extent visible in the map view.lateinit var geoViewExtent: Envelope// The location on the map that the user tapped to obtain further information. (A graphic is a type of GeoElement).private val _tapLocation = MutableStateFlow<Point?>(null)val tapLocation: StateFlow<Point?> = _tapLocation.asStateFlow()// The geoelement closest to the location that the user tapped.private val _selectedGeoElement = MutableStateFlow<GeoElement?>(null)val selectedGeoElement: StateFlow<GeoElement?> = _selectedGeoElement.asStateFlow()private var currentIdentifyJob: Job? = nullval locator = LocatorTask(uri = "https://geocode-api.arcgis.com/arcgis/rest/services/World/GeocodeServer")enum class Category(val label: String, val color: Color) {// CoffeeShop color is brown.CoffeeShop(label = "Coffee shop", color = Color.fromRgba(r =150, g = 75, b= 0, a = 255)),// GasStation color is orange.GasStation(label = "Gas station", color = Color.fromRgba(r = 255, g = 165, b = 0, a =255)),// Food color is purple.Food(label = "Food", color = Color.fromRgba(r = 160, g = 32, b = 240, a = 255)),// Hotel color is blue.Hotel(label = "Hotel", color = Color.fromRgba(r = 0, g = 0, b = 255, a = 255)),ParksOutdoors(label = "Parks and Outdoors", Color.green)}suspend fun findPlaces(category: Category) {graphicsOverlay.graphics.clear()val geocodeParameters = GeocodeParameters().apply {searchArea = geoViewExtentresultAttributeNames.addAll(listOf("Place_addr", "PlaceName"))}val geocodeResultsList = locator.geocode(searchText = category.label,parameters = geocodeParameters).getOrElse { error ->return logError(error)}if (geocodeResultsList.isNotEmpty()) {val placeSymbol = SimpleMarkerSymbol(style = SimpleMarkerSymbolStyle.Circle,color = category.color,size = 10f).apply {outline = SimpleLineSymbol(style = SimpleLineSymbolStyle.Solid,color = Color.white,width = 2f)}val graphics = geocodeResultsList.map { geocodeResult ->Graphic(geometry = geocodeResult.displayLocation,attributes = geocodeResult.attributes,symbol = placeSymbol)}graphicsOverlay.graphics.addAll(graphics)}}/*** Identifies the tapped screen coordinate in the provided [singleTapConfirmedEvent]. The* identified geoelement is set to [_selectedGeoElement].** @since 200.5.0*/fun identify(singleTapConfirmedEvent: SingleTapConfirmedEvent) {currentIdentifyJob?.cancel()currentIdentifyJob = viewModelScope.launch {val result = mapViewProxy.identify(graphicsOverlay = graphicsOverlay,screenCoordinate = singleTapConfirmedEvent.screenCoordinate,tolerance = 2.dp)result.onSuccess { identifyGraphicsOverlayResult ->_selectedGeoElement.value = identifyGraphicsOverlayResult.geoElements.firstOrNull()}.onFailure { error ->logError(error)}}}fun clearSelectedGeoElement() {_selectedGeoElement.value = null}private fun logError(error: Throwable) {Log.e(this.javaClass.simpleName, error.message.toString(), error.cause)}}@Composablefun MainScreen() {var isDropdownExpanded by remember { mutableStateOf(false) }// Create a ViewModel to handle MapView interactions.val mapViewModel: MapViewModel = viewModel()val selectedGeoElement = mapViewModel.selectedGeoElement.collectAsState().valueScaffold(topBar = {TopAppBar(title = { Text(text = stringResource(id = R.string.app_name)) },actions = {IconButton(onClick = { isDropdownExpanded = !isDropdownExpanded }) {Icon(imageVector = Icons.Default.MoreVert,contentDescription = "More options")}DropdownMenu(expanded = isDropdownExpanded,onDismissRequest = { isDropdownExpanded = false }) {DropdownMenuItem(onClick = {mapViewModel.clearSelectedGeoElement()mapViewModel.viewModelScope.launch {mapViewModel.findPlaces(category = MapViewModel.Category.CoffeeShop)isDropdownExpanded = false}},text = { Text(MapViewModel.Category.CoffeeShop.label) })DropdownMenuItem(onClick = {mapViewModel.clearSelectedGeoElement()mapViewModel.viewModelScope.launch {mapViewModel.findPlaces(category = MapViewModel.Category.GasStation)isDropdownExpanded = false}},text = { Text(MapViewModel.Category.GasStation.label) })DropdownMenuItem(onClick = {mapViewModel.clearSelectedGeoElement()mapViewModel.viewModelScope.launch {mapViewModel.findPlaces(category = MapViewModel.Category.Food)isDropdownExpanded = false}},text = { Text(MapViewModel.Category.Food.label) })DropdownMenuItem(onClick = {mapViewModel.clearSelectedGeoElement()mapViewModel.viewModelScope.launch {mapViewModel.findPlaces(category = MapViewModel.Category.Hotel)isDropdownExpanded = false}},text = { Text(MapViewModel.Category.Hotel.label) })DropdownMenuItem(onClick = {mapViewModel.clearSelectedGeoElement()mapViewModel.viewModelScope.launch {mapViewModel.findPlaces(category = MapViewModel.Category.ParksOutdoors)isDropdownExpanded = false}},text = { Text(MapViewModel.Category.ParksOutdoors.label) })}}) }) {}}
Add MapView to display the map and interact with the map view model
Add the MapView composable and pass the parameters that do the following:
-
Display the current extent of the map when the extent (visible area) changes.
-
Define a
MapViewProxy -
Attach the graphics overlay to display the graphics that represent places matching the category selected in the dropdown menu.
-
Call the
identify()function when the user taps on the map. You created this function in the map view model.MapView()264 collapsed lines@file:OptIn(ExperimentalMaterial3Api::class)package com.example.app.screensimport android.app.Applicationimport android.util.Logimport androidx.compose.foundation.layout.PaddingValuesimport androidx.compose.foundation.layout.fillMaxSizeimport androidx.compose.foundation.layout.heightimport androidx.compose.foundation.layout.paddingimport androidx.compose.foundation.layout.widthInimport androidx.compose.foundation.layout.wrapContentSizeimport androidx.compose.foundation.lazy.LazyColumnimport androidx.compose.material.icons.Iconsimport androidx.compose.material.icons.filled.MoreVertimport androidx.compose.material3.DropdownMenuimport androidx.compose.material3.DropdownMenuItemimport androidx.compose.material3.ExperimentalMaterial3Apiimport androidx.compose.material3.Iconimport androidx.compose.material3.IconButtonimport androidx.compose.material3.MaterialThemeimport androidx.compose.material3.Scaffoldimport androidx.compose.material3.Textimport androidx.compose.material3.TopAppBarimport androidx.compose.runtime.Composableimport androidx.compose.runtime.collectAsStateimport androidx.compose.runtime.getValueimport androidx.compose.runtime.mutableStateOfimport androidx.compose.runtime.rememberimport androidx.compose.runtime.setValueimport androidx.compose.ui.Modifierimport androidx.compose.ui.res.stringResourceimport androidx.compose.ui.text.font.FontStyleimport androidx.compose.ui.text.style.TextAlignimport androidx.compose.ui.unit.dpimport androidx.lifecycle.AndroidViewModelimport androidx.lifecycle.ViewModelimport androidx.lifecycle.viewModelScopeimport androidx.lifecycle.viewmodel.compose.viewModelimport com.arcgismaps.Colorimport com.arcgismaps.geometry.Envelopeimport com.arcgismaps.geometry.Pointimport com.arcgismaps.geometry.SpatialReferenceimport com.arcgismaps.mapping.ArcGISMapimport com.arcgismaps.mapping.BasemapStyleimport com.arcgismaps.mapping.GeoElementimport com.arcgismaps.mapping.Viewpointimport com.arcgismaps.mapping.symbology.SimpleLineSymbolimport com.arcgismaps.mapping.symbology.SimpleLineSymbolStyleimport com.arcgismaps.mapping.symbology.SimpleMarkerSymbolimport com.arcgismaps.mapping.symbology.SimpleMarkerSymbolStyleimport com.arcgismaps.mapping.view.Graphicimport com.arcgismaps.mapping.view.GraphicsOverlayimport com.arcgismaps.mapping.view.SingleTapConfirmedEventimport com.arcgismaps.tasks.geocode.GeocodeParametersimport com.arcgismaps.tasks.geocode.LocatorTaskimport com.arcgismaps.toolkit.geoviewcompose.MapViewimport com.arcgismaps.toolkit.geoviewcompose.MapViewProxyimport com.example.app.Rimport kotlinx.coroutines.Jobimport kotlinx.coroutines.flow.MutableStateFlowimport kotlinx.coroutines.flow.StateFlowimport kotlinx.coroutines.flow.asStateFlowimport kotlinx.coroutines.launchclass MapViewModel() : ViewModel() {// Create a map using the basemap style ArcGISTopographic.val map = ArcGISMap(BasemapStyle.ArcGISTopographic).apply {initialViewpoint = Viewpoint(center = Point(x = -118.477324,y = 33.999390,spatialReference = SpatialReference.wgs84()),scale = 72_000.0)}val mapViewProxy = MapViewProxy()val graphicsOverlay = GraphicsOverlay()// The current extent visible in the map view.lateinit var geoViewExtent: Envelope// The location on the map that the user tapped to obtain further information. (A graphic is a type of GeoElement).private val _tapLocation = MutableStateFlow<Point?>(null)val tapLocation: StateFlow<Point?> = _tapLocation.asStateFlow()// The geoelement closest to the location that the user tapped.private val _selectedGeoElement = MutableStateFlow<GeoElement?>(null)val selectedGeoElement: StateFlow<GeoElement?> = _selectedGeoElement.asStateFlow()private var currentIdentifyJob: Job? = nullval locator = LocatorTask(uri = "https://geocode-api.arcgis.com/arcgis/rest/services/World/GeocodeServer")enum class Category(val label: String, val color: Color) {// CoffeeShop color is brown.CoffeeShop(label = "Coffee shop", color = Color.fromRgba(r =150, g = 75, b= 0, a = 255)),// GasStation color is orange.GasStation(label = "Gas station", color = Color.fromRgba(r = 255, g = 165, b = 0, a =255)),// Food color is purple.Food(label = "Food", color = Color.fromRgba(r = 160, g = 32, b = 240, a = 255)),// Hotel color is blue.Hotel(label = "Hotel", color = Color.fromRgba(r = 0, g = 0, b = 255, a = 255)),ParksOutdoors(label = "Parks and Outdoors", Color.green)}suspend fun findPlaces(category: Category) {graphicsOverlay.graphics.clear()val geocodeParameters = GeocodeParameters().apply {searchArea = geoViewExtentresultAttributeNames.addAll(listOf("Place_addr", "PlaceName"))}val geocodeResultsList = locator.geocode(searchText = category.label,parameters = geocodeParameters).getOrElse { error ->return logError(error)}if (geocodeResultsList.isNotEmpty()) {val placeSymbol = SimpleMarkerSymbol(style = SimpleMarkerSymbolStyle.Circle,color = category.color,size = 10f).apply {outline = SimpleLineSymbol(style = SimpleLineSymbolStyle.Solid,color = Color.white,width = 2f)}val graphics = geocodeResultsList.map { geocodeResult ->Graphic(geometry = geocodeResult.displayLocation,attributes = geocodeResult.attributes,symbol = placeSymbol)}graphicsOverlay.graphics.addAll(graphics)}}/*** Identifies the tapped screen coordinate in the provided [singleTapConfirmedEvent]. The* identified geoelement is set to [_selectedGeoElement].** @since 200.5.0*/fun identify(singleTapConfirmedEvent: SingleTapConfirmedEvent) {currentIdentifyJob?.cancel()currentIdentifyJob = viewModelScope.launch {val result = mapViewProxy.identify(graphicsOverlay = graphicsOverlay,screenCoordinate = singleTapConfirmedEvent.screenCoordinate,tolerance = 2.dp)result.onSuccess { identifyGraphicsOverlayResult ->_selectedGeoElement.value = identifyGraphicsOverlayResult.geoElements.firstOrNull()}.onFailure { error ->logError(error)}}}fun clearSelectedGeoElement() {_selectedGeoElement.value = null}private fun logError(error: Throwable) {Log.e(this.javaClass.simpleName, error.message.toString(), error.cause)}}@Composablefun MainScreen() {var isDropdownExpanded by remember { mutableStateOf(false) }// Create a ViewModel to handle MapView interactions.val mapViewModel: MapViewModel = viewModel()val selectedGeoElement = mapViewModel.selectedGeoElement.collectAsState().valueScaffold(topBar = {TopAppBar(title = { Text(text = stringResource(id = R.string.app_name)) },actions = {IconButton(onClick = { isDropdownExpanded = !isDropdownExpanded }) {Icon(imageVector = Icons.Default.MoreVert,contentDescription = "More options")}DropdownMenu(expanded = isDropdownExpanded,onDismissRequest = { isDropdownExpanded = false }) {DropdownMenuItem(onClick = {mapViewModel.clearSelectedGeoElement()mapViewModel.viewModelScope.launch {mapViewModel.findPlaces(category = MapViewModel.Category.CoffeeShop)isDropdownExpanded = false}},text = { Text(MapViewModel.Category.CoffeeShop.label) })DropdownMenuItem(onClick = {mapViewModel.clearSelectedGeoElement()mapViewModel.viewModelScope.launch {mapViewModel.findPlaces(category = MapViewModel.Category.GasStation)isDropdownExpanded = false}},text = { Text(MapViewModel.Category.GasStation.label) })DropdownMenuItem(onClick = {mapViewModel.clearSelectedGeoElement()mapViewModel.viewModelScope.launch {mapViewModel.findPlaces(category = MapViewModel.Category.Food)isDropdownExpanded = false}},text = { Text(MapViewModel.Category.Food.label) })DropdownMenuItem(onClick = {mapViewModel.clearSelectedGeoElement()mapViewModel.viewModelScope.launch {mapViewModel.findPlaces(category = MapViewModel.Category.Hotel)isDropdownExpanded = false}},text = { Text(MapViewModel.Category.Hotel.label) })DropdownMenuItem(onClick = {mapViewModel.clearSelectedGeoElement()mapViewModel.viewModelScope.launch {mapViewModel.findPlaces(category = MapViewModel.Category.ParksOutdoors)isDropdownExpanded = false}},text = { Text(MapViewModel.Category.ParksOutdoors.label) })}}) }) {MapView(modifier = Modifier.fillMaxSize().padding(it),arcGISMap = mapViewModel.map,onVisibleAreaChanged = { newVisibleArea ->mapViewModel.geoViewExtent = newVisibleArea.extent},mapViewProxy = mapViewModel.mapViewProxy,graphicsOverlays = listOf(mapViewModel.graphicsOverlay),onSingleTapConfirmed = { singleTapConfirmedEvent ->mapViewModel.identify(singleTapConfirmedEvent)},)4 collapsed lines}}
Define CalloutContent to display name and address for the found place
When a user taps on a graphic, a callout displays showing the name and address of the geoelement
-
Define a composable function named
CalloutContentthat displays the name of the place in larger font size and the address of the place in a smaller size.CalloutContent()284 collapsed lines@file:OptIn(ExperimentalMaterial3Api::class)package com.example.app.screensimport android.app.Applicationimport android.util.Logimport androidx.compose.foundation.layout.PaddingValuesimport androidx.compose.foundation.layout.fillMaxSizeimport androidx.compose.foundation.layout.heightimport androidx.compose.foundation.layout.paddingimport androidx.compose.foundation.layout.widthInimport androidx.compose.foundation.layout.wrapContentSizeimport androidx.compose.foundation.lazy.LazyColumnimport androidx.compose.material.icons.Iconsimport androidx.compose.material.icons.filled.MoreVertimport androidx.compose.material3.DropdownMenuimport androidx.compose.material3.DropdownMenuItemimport androidx.compose.material3.ExperimentalMaterial3Apiimport androidx.compose.material3.Iconimport androidx.compose.material3.IconButtonimport androidx.compose.material3.MaterialThemeimport androidx.compose.material3.Scaffoldimport androidx.compose.material3.Textimport androidx.compose.material3.TopAppBarimport androidx.compose.runtime.Composableimport androidx.compose.runtime.collectAsStateimport androidx.compose.runtime.getValueimport androidx.compose.runtime.mutableStateOfimport androidx.compose.runtime.rememberimport androidx.compose.runtime.setValueimport androidx.compose.ui.Modifierimport androidx.compose.ui.res.stringResourceimport androidx.compose.ui.text.font.FontStyleimport androidx.compose.ui.text.style.TextAlignimport androidx.compose.ui.unit.dpimport androidx.lifecycle.AndroidViewModelimport androidx.lifecycle.ViewModelimport androidx.lifecycle.viewModelScopeimport androidx.lifecycle.viewmodel.compose.viewModelimport com.arcgismaps.Colorimport com.arcgismaps.geometry.Envelopeimport com.arcgismaps.geometry.Pointimport com.arcgismaps.geometry.SpatialReferenceimport com.arcgismaps.mapping.ArcGISMapimport com.arcgismaps.mapping.BasemapStyleimport com.arcgismaps.mapping.GeoElementimport com.arcgismaps.mapping.Viewpointimport com.arcgismaps.mapping.symbology.SimpleLineSymbolimport com.arcgismaps.mapping.symbology.SimpleLineSymbolStyleimport com.arcgismaps.mapping.symbology.SimpleMarkerSymbolimport com.arcgismaps.mapping.symbology.SimpleMarkerSymbolStyleimport com.arcgismaps.mapping.view.Graphicimport com.arcgismaps.mapping.view.GraphicsOverlayimport com.arcgismaps.mapping.view.SingleTapConfirmedEventimport com.arcgismaps.tasks.geocode.GeocodeParametersimport com.arcgismaps.tasks.geocode.LocatorTaskimport com.arcgismaps.toolkit.geoviewcompose.MapViewimport com.arcgismaps.toolkit.geoviewcompose.MapViewProxyimport com.example.app.Rimport kotlinx.coroutines.Jobimport kotlinx.coroutines.flow.MutableStateFlowimport kotlinx.coroutines.flow.StateFlowimport kotlinx.coroutines.flow.asStateFlowimport kotlinx.coroutines.launchclass MapViewModel() : ViewModel() {// Create a map using the basemap style ArcGISTopographic.val map = ArcGISMap(BasemapStyle.ArcGISTopographic).apply {initialViewpoint = Viewpoint(center = Point(x = -118.477324,y = 33.999390,spatialReference = SpatialReference.wgs84()),scale = 72_000.0)}val mapViewProxy = MapViewProxy()val graphicsOverlay = GraphicsOverlay()// The current extent visible in the map view.lateinit var geoViewExtent: Envelope// The location on the map that the user tapped to obtain further information. (A graphic is a type of GeoElement).private val _tapLocation = MutableStateFlow<Point?>(null)val tapLocation: StateFlow<Point?> = _tapLocation.asStateFlow()// The geoelement closest to the location that the user tapped.private val _selectedGeoElement = MutableStateFlow<GeoElement?>(null)val selectedGeoElement: StateFlow<GeoElement?> = _selectedGeoElement.asStateFlow()private var currentIdentifyJob: Job? = nullval locator = LocatorTask(uri = "https://geocode-api.arcgis.com/arcgis/rest/services/World/GeocodeServer")enum class Category(val label: String, val color: Color) {// CoffeeShop color is brown.CoffeeShop(label = "Coffee shop", color = Color.fromRgba(r =150, g = 75, b= 0, a = 255)),// GasStation color is orange.GasStation(label = "Gas station", color = Color.fromRgba(r = 255, g = 165, b = 0, a =255)),// Food color is purple.Food(label = "Food", color = Color.fromRgba(r = 160, g = 32, b = 240, a = 255)),// Hotel color is blue.Hotel(label = "Hotel", color = Color.fromRgba(r = 0, g = 0, b = 255, a = 255)),ParksOutdoors(label = "Parks and Outdoors", Color.green)}suspend fun findPlaces(category: Category) {graphicsOverlay.graphics.clear()val geocodeParameters = GeocodeParameters().apply {searchArea = geoViewExtentresultAttributeNames.addAll(listOf("Place_addr", "PlaceName"))}val geocodeResultsList = locator.geocode(searchText = category.label,parameters = geocodeParameters).getOrElse { error ->return logError(error)}if (geocodeResultsList.isNotEmpty()) {val placeSymbol = SimpleMarkerSymbol(style = SimpleMarkerSymbolStyle.Circle,color = category.color,size = 10f).apply {outline = SimpleLineSymbol(style = SimpleLineSymbolStyle.Solid,color = Color.white,width = 2f)}val graphics = geocodeResultsList.map { geocodeResult ->Graphic(geometry = geocodeResult.displayLocation,attributes = geocodeResult.attributes,symbol = placeSymbol)}graphicsOverlay.graphics.addAll(graphics)}}/*** Identifies the tapped screen coordinate in the provided [singleTapConfirmedEvent]. The* identified geoelement is set to [_selectedGeoElement].** @since 200.5.0*/fun identify(singleTapConfirmedEvent: SingleTapConfirmedEvent) {currentIdentifyJob?.cancel()currentIdentifyJob = viewModelScope.launch {val result = mapViewProxy.identify(graphicsOverlay = graphicsOverlay,screenCoordinate = singleTapConfirmedEvent.screenCoordinate,tolerance = 2.dp)result.onSuccess { identifyGraphicsOverlayResult ->_selectedGeoElement.value = identifyGraphicsOverlayResult.geoElements.firstOrNull()}.onFailure { error ->logError(error)}}}fun clearSelectedGeoElement() {_selectedGeoElement.value = null}private fun logError(error: Throwable) {Log.e(this.javaClass.simpleName, error.message.toString(), error.cause)}}@Composablefun MainScreen() {var isDropdownExpanded by remember { mutableStateOf(false) }// Create a ViewModel to handle MapView interactions.val mapViewModel: MapViewModel = viewModel()val selectedGeoElement = mapViewModel.selectedGeoElement.collectAsState().valueScaffold(topBar = {TopAppBar(title = { Text(text = stringResource(id = R.string.app_name)) },actions = {IconButton(onClick = { isDropdownExpanded = !isDropdownExpanded }) {Icon(imageVector = Icons.Default.MoreVert,contentDescription = "More options")}DropdownMenu(expanded = isDropdownExpanded,onDismissRequest = { isDropdownExpanded = false }) {DropdownMenuItem(onClick = {mapViewModel.clearSelectedGeoElement()mapViewModel.viewModelScope.launch {mapViewModel.findPlaces(category = MapViewModel.Category.CoffeeShop)isDropdownExpanded = false}},text = { Text(MapViewModel.Category.CoffeeShop.label) })DropdownMenuItem(onClick = {mapViewModel.clearSelectedGeoElement()mapViewModel.viewModelScope.launch {mapViewModel.findPlaces(category = MapViewModel.Category.GasStation)isDropdownExpanded = false}},text = { Text(MapViewModel.Category.GasStation.label) })DropdownMenuItem(onClick = {mapViewModel.clearSelectedGeoElement()mapViewModel.viewModelScope.launch {mapViewModel.findPlaces(category = MapViewModel.Category.Food)isDropdownExpanded = false}},text = { Text(MapViewModel.Category.Food.label) })DropdownMenuItem(onClick = {mapViewModel.clearSelectedGeoElement()mapViewModel.viewModelScope.launch {mapViewModel.findPlaces(category = MapViewModel.Category.Hotel)isDropdownExpanded = false}},text = { Text(MapViewModel.Category.Hotel.label) })DropdownMenuItem(onClick = {mapViewModel.clearSelectedGeoElement()mapViewModel.viewModelScope.launch {mapViewModel.findPlaces(category = MapViewModel.Category.ParksOutdoors)isDropdownExpanded = false}},text = { Text(MapViewModel.Category.ParksOutdoors.label) })}}) }) {MapView(modifier = Modifier.fillMaxSize().padding(it),arcGISMap = mapViewModel.map,onVisibleAreaChanged = { newVisibleArea ->mapViewModel.geoViewExtent = newVisibleArea.extent},mapViewProxy = mapViewModel.mapViewProxy,graphicsOverlays = listOf(mapViewModel.graphicsOverlay),onSingleTapConfirmed = { singleTapConfirmedEvent ->mapViewModel.identify(singleTapConfirmedEvent)},)}}/*** Content for the Callout to display information on the tapped graphics overlay and its [selectedElementAttributes]*/@Composablefun CalloutContent(selectedElementAttributes: Map<String, Any?>) {LazyColumn(contentPadding = PaddingValues(8.dp)) {selectedElementAttributes.forEach { attribute ->item {val style = if (attribute.key == "PlaceName") {MaterialTheme.typography.titleLarge} else {MaterialTheme.typography.bodyMedium}Text(text = "${attribute.value}",fontStyle = FontStyle.Normal,style = style,textAlign = TextAlign.Start)}}}}
Display information for the found place
The MapView needs one more parameter so the callout content displays on top of the map view.
-
Go back to
MapViewin your code and add thecontentparameter, which is a lambda that calls theCalloutcomposable defined in the ArcGIS Maps SDK for Kotlin Toolkit. TheCalloutfunction has its owncontentlambda parameter, which in turn calls yourCalloutContentfunction with the attributes (Place_addr,PlaceName) you specified in the map view model .The
Modifierpassed toCalloutcalls size functions that restrict the display size of the callout:wrapContentSize(),height(),widthIn().MapView()264 collapsed lines@file:OptIn(ExperimentalMaterial3Api::class)package com.example.app.screensimport android.app.Applicationimport android.util.Logimport androidx.compose.foundation.layout.PaddingValuesimport androidx.compose.foundation.layout.fillMaxSizeimport androidx.compose.foundation.layout.heightimport androidx.compose.foundation.layout.paddingimport androidx.compose.foundation.layout.widthInimport androidx.compose.foundation.layout.wrapContentSizeimport androidx.compose.foundation.lazy.LazyColumnimport androidx.compose.material.icons.Iconsimport androidx.compose.material.icons.filled.MoreVertimport androidx.compose.material3.DropdownMenuimport androidx.compose.material3.DropdownMenuItemimport androidx.compose.material3.ExperimentalMaterial3Apiimport androidx.compose.material3.Iconimport androidx.compose.material3.IconButtonimport androidx.compose.material3.MaterialThemeimport androidx.compose.material3.Scaffoldimport androidx.compose.material3.Textimport androidx.compose.material3.TopAppBarimport androidx.compose.runtime.Composableimport androidx.compose.runtime.collectAsStateimport androidx.compose.runtime.getValueimport androidx.compose.runtime.mutableStateOfimport androidx.compose.runtime.rememberimport androidx.compose.runtime.setValueimport androidx.compose.ui.Modifierimport androidx.compose.ui.res.stringResourceimport androidx.compose.ui.text.font.FontStyleimport androidx.compose.ui.text.style.TextAlignimport androidx.compose.ui.unit.dpimport androidx.lifecycle.AndroidViewModelimport androidx.lifecycle.ViewModelimport androidx.lifecycle.viewModelScopeimport androidx.lifecycle.viewmodel.compose.viewModelimport com.arcgismaps.Colorimport com.arcgismaps.geometry.Envelopeimport com.arcgismaps.geometry.Pointimport com.arcgismaps.geometry.SpatialReferenceimport com.arcgismaps.mapping.ArcGISMapimport com.arcgismaps.mapping.BasemapStyleimport com.arcgismaps.mapping.GeoElementimport com.arcgismaps.mapping.Viewpointimport com.arcgismaps.mapping.symbology.SimpleLineSymbolimport com.arcgismaps.mapping.symbology.SimpleLineSymbolStyleimport com.arcgismaps.mapping.symbology.SimpleMarkerSymbolimport com.arcgismaps.mapping.symbology.SimpleMarkerSymbolStyleimport com.arcgismaps.mapping.view.Graphicimport com.arcgismaps.mapping.view.GraphicsOverlayimport com.arcgismaps.mapping.view.SingleTapConfirmedEventimport com.arcgismaps.tasks.geocode.GeocodeParametersimport com.arcgismaps.tasks.geocode.LocatorTaskimport com.arcgismaps.toolkit.geoviewcompose.MapViewimport com.arcgismaps.toolkit.geoviewcompose.MapViewProxyimport com.example.app.Rimport kotlinx.coroutines.Jobimport kotlinx.coroutines.flow.MutableStateFlowimport kotlinx.coroutines.flow.StateFlowimport kotlinx.coroutines.flow.asStateFlowimport kotlinx.coroutines.launchclass MapViewModel() : ViewModel() {// Create a map using the basemap style ArcGISTopographic.val map = ArcGISMap(BasemapStyle.ArcGISTopographic).apply {initialViewpoint = Viewpoint(center = Point(x = -118.477324,y = 33.999390,spatialReference = SpatialReference.wgs84()),scale = 72_000.0)}val mapViewProxy = MapViewProxy()val graphicsOverlay = GraphicsOverlay()// The current extent visible in the map view.lateinit var geoViewExtent: Envelope// The location on the map that the user tapped to obtain further information. (A graphic is a type of GeoElement).private val _tapLocation = MutableStateFlow<Point?>(null)val tapLocation: StateFlow<Point?> = _tapLocation.asStateFlow()// The geoelement closest to the location that the user tapped.private val _selectedGeoElement = MutableStateFlow<GeoElement?>(null)val selectedGeoElement: StateFlow<GeoElement?> = _selectedGeoElement.asStateFlow()private var currentIdentifyJob: Job? = nullval locator = LocatorTask(uri = "https://geocode-api.arcgis.com/arcgis/rest/services/World/GeocodeServer")enum class Category(val label: String, val color: Color) {// CoffeeShop color is brown.CoffeeShop(label = "Coffee shop", color = Color.fromRgba(r =150, g = 75, b= 0, a = 255)),// GasStation color is orange.GasStation(label = "Gas station", color = Color.fromRgba(r = 255, g = 165, b = 0, a =255)),// Food color is purple.Food(label = "Food", color = Color.fromRgba(r = 160, g = 32, b = 240, a = 255)),// Hotel color is blue.Hotel(label = "Hotel", color = Color.fromRgba(r = 0, g = 0, b = 255, a = 255)),ParksOutdoors(label = "Parks and Outdoors", Color.green)}suspend fun findPlaces(category: Category) {graphicsOverlay.graphics.clear()val geocodeParameters = GeocodeParameters().apply {searchArea = geoViewExtentresultAttributeNames.addAll(listOf("Place_addr", "PlaceName"))}val geocodeResultsList = locator.geocode(searchText = category.label,parameters = geocodeParameters).getOrElse { error ->return logError(error)}if (geocodeResultsList.isNotEmpty()) {val placeSymbol = SimpleMarkerSymbol(style = SimpleMarkerSymbolStyle.Circle,color = category.color,size = 10f).apply {outline = SimpleLineSymbol(style = SimpleLineSymbolStyle.Solid,color = Color.white,width = 2f)}val graphics = geocodeResultsList.map { geocodeResult ->Graphic(geometry = geocodeResult.displayLocation,attributes = geocodeResult.attributes,symbol = placeSymbol)}graphicsOverlay.graphics.addAll(graphics)}}/*** Identifies the tapped screen coordinate in the provided [singleTapConfirmedEvent]. The* identified geoelement is set to [_selectedGeoElement].** @since 200.5.0*/fun identify(singleTapConfirmedEvent: SingleTapConfirmedEvent) {currentIdentifyJob?.cancel()currentIdentifyJob = viewModelScope.launch {val result = mapViewProxy.identify(graphicsOverlay = graphicsOverlay,screenCoordinate = singleTapConfirmedEvent.screenCoordinate,tolerance = 2.dp)result.onSuccess { identifyGraphicsOverlayResult ->_selectedGeoElement.value = identifyGraphicsOverlayResult.geoElements.firstOrNull()}.onFailure { error ->logError(error)}}}fun clearSelectedGeoElement() {_selectedGeoElement.value = null}private fun logError(error: Throwable) {Log.e(this.javaClass.simpleName, error.message.toString(), error.cause)}}@Composablefun MainScreen() {var isDropdownExpanded by remember { mutableStateOf(false) }// Create a ViewModel to handle MapView interactions.val mapViewModel: MapViewModel = viewModel()val selectedGeoElement = mapViewModel.selectedGeoElement.collectAsState().valueScaffold(topBar = {TopAppBar(title = { Text(text = stringResource(id = R.string.app_name)) },actions = {IconButton(onClick = { isDropdownExpanded = !isDropdownExpanded }) {Icon(imageVector = Icons.Default.MoreVert,contentDescription = "More options")}DropdownMenu(expanded = isDropdownExpanded,onDismissRequest = { isDropdownExpanded = false }) {DropdownMenuItem(onClick = {mapViewModel.clearSelectedGeoElement()mapViewModel.viewModelScope.launch {mapViewModel.findPlaces(category = MapViewModel.Category.CoffeeShop)isDropdownExpanded = false}},text = { Text(MapViewModel.Category.CoffeeShop.label) })DropdownMenuItem(onClick = {mapViewModel.clearSelectedGeoElement()mapViewModel.viewModelScope.launch {mapViewModel.findPlaces(category = MapViewModel.Category.GasStation)isDropdownExpanded = false}},text = { Text(MapViewModel.Category.GasStation.label) })DropdownMenuItem(onClick = {mapViewModel.clearSelectedGeoElement()mapViewModel.viewModelScope.launch {mapViewModel.findPlaces(category = MapViewModel.Category.Food)isDropdownExpanded = false}},text = { Text(MapViewModel.Category.Food.label) })DropdownMenuItem(onClick = {mapViewModel.clearSelectedGeoElement()mapViewModel.viewModelScope.launch {mapViewModel.findPlaces(category = MapViewModel.Category.Hotel)isDropdownExpanded = false}},text = { Text(MapViewModel.Category.Hotel.label) })DropdownMenuItem(onClick = {mapViewModel.clearSelectedGeoElement()mapViewModel.viewModelScope.launch {mapViewModel.findPlaces(category = MapViewModel.Category.ParksOutdoors)isDropdownExpanded = false}},text = { Text(MapViewModel.Category.ParksOutdoors.label) })}}) }) {MapView(modifier = Modifier.fillMaxSize().padding(it),arcGISMap = mapViewModel.map,onVisibleAreaChanged = { newVisibleArea ->mapViewModel.geoViewExtent = newVisibleArea.extent},mapViewProxy = mapViewModel.mapViewProxy,graphicsOverlays = listOf(mapViewModel.graphicsOverlay),onSingleTapConfirmed = { singleTapConfirmedEvent ->mapViewModel.identify(singleTapConfirmedEvent)},content = if (selectedGeoElement != null) {{Callout(modifier = Modifier.wrapContentSize().height(120.dp).widthIn(max = 300.dp),geoElement = selectedGeoElement,tapLocation = mapViewModel.tapLocation.value) {CalloutContent(selectedElementAttributes = selectedGeoElement.attributes)}}} else {null})32 collapsed lines}}/*** Content for the Callout to display information on the tapped graphics overlay and its [selectedElementAttributes]*/@Composablefun CalloutContent(selectedElementAttributes: Map<String, Any?>) {LazyColumn(contentPadding = PaddingValues(8.dp)) {selectedElementAttributes.forEach { attribute ->item {val style = if (attribute.key == "PlaceName") {MaterialTheme.typography.titleLarge} else {MaterialTheme.typography.bodyMedium}Text(text = "${attribute.value}",fontStyle = FontStyle.Normal,style = style,textAlign = TextAlign.Start)}}}} -
Click Run > Run > app to run the app.
When the app opens, tap the More options icon in the upper right and select a place category. Then tap one of the places and see its name and address. If you zoom or pan to another area, tap the More options icon again and select a category to display places in the new extent.
Alternatively, you can download the tutorial solution, as follows.
Option 2: Download the solution
-
Click the Download solution link in the right-hand side of this page.
-
Unzip the file to a location on your machine.
-
Run Android Studio.
-
Go to File > Open…. Navigate to the solution folder and click Open.
On Windows: If you are in the Welcome to Android Studio dialog, click Open and navigate to the solution folder. Then click Open.
Since the downloaded solution does not contain authentication credentials, you must add the developer credentials that you created in the Set up authentication section.
Set developer credentials in the solution
To allow your app users to access ArcGIS location services
-
In the Android view of Android Studio, open app > kotlin+java > com.example.app > MainActivity. Set the
AuthenticationModeto.API_KEY.MainActivity.kt14 collapsed linespackage com.example.appimport android.os.Bundleimport androidx.activity.ComponentActivityimport androidx.activity.compose.setContentimport androidx.activity.enableEdgeToEdgeimport com.arcgismaps.ApiKeyimport com.arcgismaps.ArcGISEnvironmentimport com.arcgismaps.httpcore.authentication.OAuthUserConfigurationimport com.arcgismaps.toolkit.authentication.AuthenticatorStateimport com.arcgismaps.toolkit.authentication.DialogAuthenticatorimport com.example.app.screens.MainScreenimport com.example.app.ui.theme.TutorialThemeclass MainActivity : ComponentActivity() {private enum class AuthenticationMode { API_KEY, USER_AUTH }private val authenticationMode = AuthenticationMode.API_KEY42 collapsed linesprivate val authenticatorState = AuthenticatorState()override fun onCreate(savedInstanceState: Bundle?) {super.onCreate(savedInstanceState)when (authenticationMode) {AuthenticationMode.API_KEY -> {ArcGISEnvironment.apiKey = ApiKey.create("YOUR_ACCESS_TOKEN")}AuthenticationMode.USER_AUTH -> {authenticatorState.oAuthUserConfigurations = listOf(OAuthUserConfiguration(portalUrl = "https://www.arcgis.com",clientId = "YOUR_CLIENT_ID",redirectUrl = "YOUR_REDIRECT_URL"))}}enableEdgeToEdge()setContent {TutorialTheme {MainScreen()if (authenticationMode == AuthenticationMode.USER_AUTH) {DialogAuthenticator(authenticatorState)}}}}} -
Set the
apiKeyproperty with your API key access token.MainActivity.kt22 collapsed linespackage com.example.appimport android.os.Bundleimport androidx.activity.ComponentActivityimport androidx.activity.compose.setContentimport androidx.activity.enableEdgeToEdgeimport com.arcgismaps.ApiKeyimport com.arcgismaps.ArcGISEnvironmentimport com.arcgismaps.httpcore.authentication.OAuthUserConfigurationimport com.arcgismaps.toolkit.authentication.AuthenticatorStateimport com.arcgismaps.toolkit.authentication.DialogAuthenticatorimport com.example.app.screens.MainScreenimport com.example.app.ui.theme.TutorialThemeclass MainActivity : ComponentActivity() {private enum class AuthenticationMode { API_KEY, USER_AUTH }private val authenticationMode = AuthenticationMode.API_KEYprivate val authenticatorState = AuthenticatorState()override fun onCreate(savedInstanceState: Bundle?) {super.onCreate(savedInstanceState)when (authenticationMode) {AuthenticationMode.API_KEY -> {ArcGISEnvironment.apiKey = ApiKey.create("YOUR_ACCESS_TOKEN")}30 collapsed linesAuthenticationMode.USER_AUTH -> {authenticatorState.oAuthUserConfigurations = listOf(OAuthUserConfiguration(portalUrl = "https://www.arcgis.com",clientId = "YOUR_CLIENT_ID",redirectUrl = "YOUR_REDIRECT_URL"))}}enableEdgeToEdge()setContent {TutorialTheme {MainScreen()if (authenticationMode == AuthenticationMode.USER_AUTH) {DialogAuthenticator(authenticatorState)}}}}}
Best Practice: The access token is stored directly in the code as a convenience for this tutorial. Do not store credentials directly in source code in a production environment.
-
In the Android view of Android Studio, open app > kotlin+java > com.example.app > MainActivity. Set the
AuthenticationModeto.USER_AUTH.MainActivity.ktclass MainActivity : ComponentActivity() {private enum class AuthenticationMode { API_KEY, USER_AUTH }private val authenticationMode = AuthenticationMode.USER_AUTH -
Set your
clientIDandredirectURLvalues. You must use the RedirectURL that you supplied for your app in theuser authenticationpart of the Set up authentication step.MainActivity.ktAuthenticationMode.USER_AUTH -> {authenticatorState.oAuthUserConfigurations = listOf(OAuthUserConfiguration(portalUrl = "https://www.arcgis.com",clientId = "YOUR_CLIENT_ID",redirectUrl = "YOUR_REDIRECT_URL")) -
Open app > manifests > AndroidManifest.xml.
-
Set the
android:schemeandandroid:hostusing the scheme and host from your RedirectURL.A redirectURL is composed of a scheme and a host component. The format for the redirect url is
scheme://host. For example, if the redirect url ismyscheme://myhostthen the scheme ismyschemeand the host ismyhost.AndroidManifest.xml41 collapsed lines<?xml version="1.0" encoding="utf-8"?><manifest xmlns:android="http://schemas.android.com/apk/res/android"xmlns:tools="http://schemas.android.com/tools"><uses-permission android:name="android.permission.INTERNET" /><applicationandroid:allowBackup="true"android:dataExtractionRules="@xml/data_extraction_rules"android:fullBackupContent="@xml/backup_rules"android:icon="@mipmap/ic_launcher"android:label="@string/app_name"android:roundIcon="@mipmap/ic_launcher_round"android:supportsRtl="true"android:theme="@style/Theme.Tutorial"tools:targetApi="31"><activityandroid:name=".MainActivity"android:exported="true"android:label="@string/app_name"android:theme="@style/Theme.Tutorial"><intent-filter><action android:name="android.intent.action.MAIN" /><category android:name="android.intent.category.LAUNCHER" /></intent-filter></activity><activityandroid:name="com.arcgismaps.toolkit.authentication.AuthenticationActivity"android:configChanges="keyboard|keyboardHidden|orientation|screenSize"android:exported="true"android:launchMode="singleTop" ><intent-filter><action android:name="android.intent.action.VIEW" /><category android:name="android.intent.category.DEFAULT" /><category android:name="android.intent.category.BROWSABLE" /><dataandroid:scheme="your_redirect_url_scheme"android:host="your_redirect_url_host" />6 collapsed lines</intent-filter></activity></application></manifest>
Best Practice: The OAuth credentials are stored directly in the code as a convenience for this tutorial. Do not store credentials directly in source code in a production environment.
Run the app
Click Run > Run > app to run the app.
When the app opens, tap the More options icon in the upper right and select a place category. Then tap one of the places and see its name and address. If you zoom or pan to another area, tap the More options icon again and select a category to display places in the new extent.
What’s next?
Learn how to use additional API features, ArcGIS location services, and ArcGIS tools in these tutorials: