Scenes (3D)

Maps and scenes provide interactive displays of geographic data that enable you to visualize and explore patterns, answer questions, and share insight. They can be opened, edited, and shared across the ArcGIS system and beyond. While the programming patterns are similar and many of the classes you work with are the same, maps are designed for working with geographic data in two dimensions (2D) and scenes in three dimensions (3D). Most applications contain a basemap layer to display geographic data with streets or satellite imagery, but you can also use data layers and graphics to display additional data. See Maps (2D) in this guide for more information about working with maps.

You can use a scene and a scene view to:

  • Display a basemap layer such as streets or satellite imagery.
  • Access and display data layers based on files or services, including data you have authored.
  • Display terrain with an elevation layer.
  • Display real-world objects such as buildings, cars, and trees.
  • Display 3D visualizations of 2D objects.
  • Perform 3D analysis, such as line-of-sight, visibility, and 3D measurements.
  • Provide context for temporary points, lines, polygons, or text displayed as graphics.
  • Measure distance and explore spatial relationships between geometries.
  • Inspect data layers and display information from attributes.

How a scene works

A scene works together with a scene view to display geographic content in three dimensions. A scene contains a collection of layers including multiple data layers from online or local sources, a basemap layer that gives geographic context, and a base surface containing elevation data. A scene can also contain datasets that enable searches for addresses or place names, networks for solving routes, and non-spatial tables.

For offline workflows (when you don't have network connectivity), you can open a scene stored in a mobile scene package. You can create mobile scene packages using ArcGIS Pro, share them using your ArcGIS organization, or distribute directly by copying to a device. See Offline maps, scenes, and data for more information about implementing offline workflows in your app.

Scene

A scene contains a collection of layers. Two dimensional layers are displayed in the order in which they are added, while three dimensional layers are displayed using the layer's elevation information. You can use the scene to change the display order of two dimensional layers as well as to control which layers are visible, and expose this functionality with user interface controls such as lists, check boxes, or switches. Scenes extend the concept of a basemap by introducing a base surface that contains a collection of elevation sources. Layers can be draped on top of the surface, positioned relative to the surface or displayed based on their absolute values.

You can instantiate a new Scene object by creating a new scene and building it entirely with code. With this approach, you typically first add a basemap layer and then one or more data layers.

Use dark colors for code blocksCopy
1
2
3
4
5
6
7
8
9
10
11
12
13
14
15
16
17
18
19
20
21
22
23
24
25
26
27
28
29
30
31
32
33
34
35
36
37
38
39
40
41
42
43
44
45
46
47
48
49
50
51
52
53
54
55
56
57
58
59
60
61
62
63
64
65
66
67
68
69
70
71
72
73
74
75
76
77
78
79
80
81
82
83
84
85
86
87
88
89
90
91
// Provide an API key for your app (usually when the app starts).
// Esri.ArcGISRuntime.ArcGISRuntimeEnvironment.ApiKey = "YOUR_API_KEY";

var scene = new Scene(BasemapStyle.ArcGISTopographic);

const string elevationUrl = "https://elevation3d.arcgis.com/arcgis/rest/services/WorldElevation3D/Terrain3D/ImageServer";
var source = new ArcGISTiledElevationSource(new Uri(elevationUrl));
var surface = new Surface();
surface.ElevationSources.Add(source);
scene.BaseSurface = surface;

You can also instantiate a Scene that's stored in a portal (such as ArcGIS Online) using its item ID or URL.

Use dark colors for code blocksCopy
1
2
3
4
5
6
7
8
9
10
11
12
13
14
15
16
17
18
19
20
21
22
23
24
25
26
27
28
29
30
31
32
33
34
35
36
37
38
39
40
41
42
43
44
45
46
47
48
49
50
51
52
53
54
55
56
57
58
59
60
61
62
63
64
65
66
67
68
69
70
71
72
73
74
75
76
77
78
79
80
81
82
83
84
85
86
87
88
89
90
91
Scene scene = new Scene(new Uri("https://www.arcgis.com/home/item.html?id=31874da8a16d45bfbc1273422f772270"));

When the Scene first appears in the SceneView, you can focus the initial display at a specified view point by setting the Scene.InitialViewpoint property. If an initial view point is not defined, the scene will initially display at a global scale.

Layer

Each layer in a scene references geographic data, either from an online service or from a local dataset. There are a variety of layers that can be added to a scene, each designed to display a particular type of data. Some layers display images, such as satellite photos or aerial photography, others are composed of a collection of features to represent real-world entities using point, line, or polygon geometries. In addition to geometry, features have attributes that provide details about the entity it represents.

Scenes can also contain scene layers enabling you to create advanced 3D visualizations. Scene layers can contain one of four data types: points, point cloud, 3D objects, or an integrated mesh. To learn more about scene layers, visit What is a scene layer? in the ArcGIS Pro documentation.

The Layer class is the base class for all types of layers used in ArcGIS Maps SDK for .NET. The type of layer you create depends on the type of data you want to display. For example, to display feature data you can create a FeatureLayer that references an online service (such as a feature service) or a supported local dataset. Some layers cannot be displayed in a scene, such as ArcGISVectorTiledLayer and AnnotationLayer. Similarly, 3D layers cannot be displayed in a map, such as ArcGISSceneLayer.

Use dark colors for code blocksCopy
1
2
3
4
5
6
7
8
9
10
11
12
13
14
15
16
17
18
19
20
21
22
23
24
25
26
27
28
29
30
31
32
33
34
35
36
37
38
39
40
41
42
43
44
45
46
47
48
49
50
51
52
53
54
55
56
57
58
59
60
61
62
63
64
65
66
67
68
69
70
71
72
73
74
75
76
77
78
79
80
81
82
83
84
85
86
87
88
89
90
91
// Provide an API key for your app (usually when the app starts).
// Esri.ArcGISRuntime.ArcGISRuntimeEnvironment.ApiKey = "YOUR_API_KEY";

var scene = new Scene(BasemapStyle.ArcGISTopographic);

const string elevationUrl = "https://elevation3d.arcgis.com/arcgis/rest/services/WorldElevation3D/Terrain3D/ImageServer";
var source = new ArcGISTiledElevationSource(new Uri(elevationUrl));
var surface = new Surface();
surface.ElevationSources.Add(source);
scene.BaseSurface = surface;

Camera

Scenes and scene views extend the concept of two dimensional viewpoints with a camera that represents the observer's position and perspective within three dimensions.

The following properties define the camera position:

  • Geographic location on the surface (longitude and latitude)
  • Altitude (height, in meters, above sea level)
  • Heading (angle about the z axis the camera is rotated, in degrees)
  • Pitch (angle the camera is rotated up or down, in degrees)
  • Roll (angle the camera is rotated side-to-side, in degrees)
Use dark colors for code blocksCopy
1
2
3
4
5
6
7
8
9
10
11
12
13
14
15
16
17
18
19
20
21
22
23
24
25
26
27
28
29
30
31
32
33
34
35
36
37
38
39
40
41
42
43
44
45
46
47
48
49
50
51
52
53
54
55
56
57
58
59
60
61
62
63
64
65
66
67
68
69
70
71
72
73
74
75
76
77
78
79
80
81
82
83
84
85
86
87
88
89
90
91
// Define a longitude, latitude, and altitude for the camera location.
MapPoint cameraLocation = new MapPoint(-118.804, 33.909, 5330.0, SpatialReferences.Wgs84);

Camera sceneCamera = new Camera(locationPoint: cameraLocation,
                    heading: 355.0,
                    pitch: 72.0,
                    roll: 0.0);

A scene view has an associated controller that manages the camera for the scene. Each type of camera controller is designed to provide a specific user experience for interacting with the scene display. The camera controller and its properties can be changed at run time, enabling you to provide the scene view interaction experience best suited for the current context.

When a camera controller other than the default GlobeCameraController is active, the scene view's viewpoint cannot be assigned. Attempts to do so do not raise an exception, but they are ignored.

The following camera controllers are available:

  • GlobeCameraController (default)—Provides the default scene view camera behavior. Allows the user to freely move and focus the camera anywhere in the scene.
  • OrbitGeoElementCameraController—Locks the scene view's camera to maintain focus relative to a (possibly moving) graphic. The camera can only move relative to the target graphic.
  • OrbitLocationCameraController—Locks the scene view's camera to orbit a fixed location (map point). The camera can only move relative to the target map point.
  • TransformationMatrixCameraController—Provides navigation by using a TransformationMatrix to control the camera's location and rotation. You need to pass this object to all TransformationMatrixCameraController functions. This can be used with transformation matrices produced by Augmented Reality APIs like ARKit (iOS) and ARCore (Android).
Use dark colors for code blocksCopy
1
2
3
4
5
6
7
8
9
10
11
12
13
14
15
16
17
18
19
20
21
22
23
24
25
26
27
28
29
30
31
32
33
34
35
36
37
38
39
40
41
42
43
44
45
46
47
48
49
50
51
52
53
54
55
56
57
58
59
60
61
62
63
64
65
66
67
68
69
70
71
72
73
74
75
76
77
78
79
80
81
82
83
84
85
86
87
88
89
90
91
// Create a camera controller to follow a geoelement in the scene view.
// Pass a geoelement (graphic) and a distance (meters).
_orbitCameraController = new OrbitGeoElementCameraController(_plane3D, 20.0)
{
    CameraPitchOffset = 75.0
};
MainSceneView.CameraController = _orbitCameraController;

SceneView

A scene view is a user interface control that displays a single scene in your application. It contains built-in functionality that allows the user to explore the scene by zooming in and out, panning and rotating, or getting additional information about elements in the scene. Scene views may also contain graphics in one or more graphics overlays.

After creating a scene view, you typically set the scene and the camera position. Unlike a map, a scene uses a camera to define the viewer's perspective and to determine the visible area. The perspective is defined by setting the camera's position, location, altitude (height), heading, and tilt.

Add a Scene to a SceneView control to display it. Changes you make to the scene, such as adding, removing, or reording layers, will immediately be reflected in the display. The Scene.InitialViewpoint property will determine the area shown when the scene loads.

Use dark colors for code blocksCopy
1
2
3
4
5
6
7
8
9
10
11
12
13
14
15
16
17
18
19
20
21
22
23
24
25
26
27
28
29
30
31
32
33
34
35
36
37
38
39
40
41
42
43
44
45
46
47
48
49
50
51
52
53
54
55
56
57
58
59
60
61
62
63
64
65
66
67
68
69
70
71
72
73
74
75
76
77
78
79
80
81
82
83
84
85
86
87
88
89
90
91
MainSceneView.Scene = scene;

MainSceneView.SetViewpointCamera(new Camera(
    latitude: 33.961,
    longitude: -118.808,
    altitude: 2000,
    heading: 0,
    pitch: 75,
    roll: 0
    ));

A scene view control also allows you to:

  • Adjust light, atmosphere, and space effects.
  • Display image overlays on the scene surface.
  • Lock the camera to a location or geoelement.
  • Add analysis overlays to visualize analysis results.
  • Identify and select features using a mouse or tap location.
  • Export an image of the current display.
  • Apply a time extent to filter the display of features.

Examples

Display a scene with elevation

This example uses a Scene and SceneView to display the topographic basemap layer. The basemap layer is draped on an elevation layer to create a 3D perspective. A Camera is created to define the initial view of the scene.

Steps

  1. Create a Scene and add a basemap layer.
  2. Use an elevation service to define the Scene.BaseSurface.
  3. Create a SceneView and set the camera position.
Expand
Use dark colors for code blocksCopy
1
2
3
4
5
6
7
8
9
10
11
12
13
14
15
16
17
18
19
20
21
22
23
24
25
26
27
28
29
30
31
32
33
34
35
36
37
38
39
40
41
42
43
44
45
46
47
48
// Provide an API key for your app (usually when the app starts).
// Esri.ArcGISRuntime.ArcGISRuntimeEnvironment.ApiKey = "YOUR_API_KEY";

var scene = new Scene(BasemapStyle.ArcGISTopographic);

var elevationUrl = new Uri("https://elevation3d.arcgis.com/arcgis/rest/services/WorldElevation3D/Terrain3D/ImageServer");
var elevationSource = new ArcGISTiledElevationSource(elevationUrl);
var surface = new Surface();
surface.ElevationSources.Add(elevationSource);
scene.BaseSurface = surface;

MainSceneView.Scene = scene;

MainSceneView.SetViewpointCamera(new Camera(
    latitude: 33.961,
    longitude: -118.808,
    altitude: 2000,
    heading: 0,
    pitch: 75,
    roll: 0
));
Expand

Display a scene from a mobile scene package

This example displays a scene from a mobile scene package. You can create your own mobile scene packages using ArcGIS Pro or download existing ones from ArcGIS Online. The Philadelphia scene package, for example, shows an area of downtown Philadelphia with textured buildings.

Steps

  1. Create a MobileScenePackage using the path to a local .mspk file.
  2. Call MobileScenePackage.LoadAsync() to load the package.
  3. When the package loads, get the first scene from the package using the MobileScenePackage.Scenes property.
  4. Display the scene in a SceneView.
Expand
Use dark colors for code blocksCopy
1
2
3
4
5
6
7
8
9
10
11
12
13
14
15
16
17
18
19
20
21
22
23
24
25
26
27
28
29
30
31
32
33
34
35
36
37
38
39
40
41
        MobileScenePackage package = await MobileScenePackage.OpenAsync(filePath);

        await package.LoadAsync();

        MainView.Scene = package.Scenes.First();
Expand

Tutorials

Samples

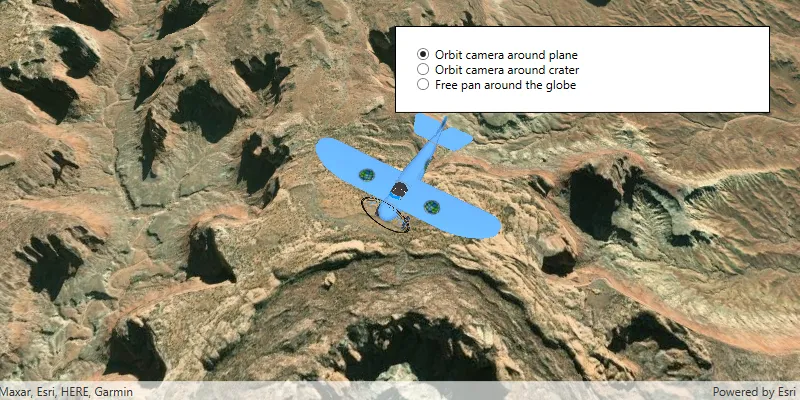
Choose camera controller

Change atmosphere effect

Animate images with image overlay

Open mobile scene package

Open scene (portal item)

Sync map and scene views

Services

Your browser is no longer supported. Please upgrade your browser for the best experience. See our browser deprecation post for more details.