Learn how to create and display a scene
Like a map
In this tutorial, you create and display a scene
The scene and code will be used as the starting point for other 3D tutorials.
Prerequisites
Before starting this tutorial:
-
You need an ArcGIS Location Platform or ArcGIS Online account.
-
Ensure your development environment meets the system requirements.
Optionally, you may want to install the ArcGIS Maps SDK for .NET to get access to project templates in Visual Studio (Windows only) and offline copies of the NuGet packages.
Set up authentication
To access the secure ArcGIS location services
You can implement API key authentication or user authentication in this tutorial. Compare the differences below:
API key authentication
- Users are not required to sign in.
- Requires creating an API key credential
API key credentials are an item that contains the parameters used to create and manage long-lived access tokens for API key authentication. They are a type of developer credential. with the correct privileges. - API keys
An API key is a long-lived access token created using API key credentials. They are valid for up to one year and are typically embedded directly into client applications. are long-lived access tokens. - Service usage is billed to the API key owner/developer.
- Simplest authentication method to implement.
- Recommended approach for new ArcGIS developers.
Learn more in API key authentication.
User authentication
- Users are required to sign in with an ArcGIS account
An ArcGIS account is an identity with a user type and set of privileges that can access specific ArcGIS products, tools, APIs, services, and resources. The main account types that can be used for development are an ArcGIS Location Platform account, ArcGIS Online account, and ArcGIS Enterprise account. ArcGIS Location Platform and ArcGIS Online accounts are also associated with a subscription. . - User accounts must have privilege
Privileges are a set of permissions assigned to ArcGIS accounts, developer credentials, and applications that grant access to secure resources and functionality in ArcGIS. to access the ArcGIS servicesA service, also known as an ArcGIS service, is software that supports an ArcGIS REST API and provides geospatial functionality or data. A service can be hosted by Esri or in ArcGIS Enterprise. used in application. - Requires creating OAuth credentials
OAuth credentials are an item that contains parameters required to implement user authentication or app authentication, including a .client_id,client_secret, and redirect URIs. They are a type of developer credential. - Application uses a redirect URL and client ID.
- Service usage is billed to the organization of the user signed into the application.
Learn more in User authentication.
To complete this tutorial, click on the tab in the switcher below for your authentication type of choice, either API key authentication or User authentication.
Create a new API key access token
-
Complete the Create an API key tutorial and create an API key with the following privilege(s)
Privileges are a set of permissions assigned to ArcGIS accounts, developer credentials, and applications that grant access to secure resources and functionality in ArcGIS. :- Privileges
- Location services > Basemaps
- Privileges
-
Copy and paste the API key access token into a safe location. It will be used in a later step.
Create new OAuth credentials to access the secure resources used in this tutorial.
-
Complete the Create OAuth credentials for user authentication tutorial to obtain a Client ID and Redirect URL.
A
Client IDuniquely identifies your app on the authenticating server. If the server cannot find an app with the provided Client ID, it will not proceed with authentication.The
Redirect URL(also referred to as a callback url) is used to identify a response from the authenticating server when the system returns control back to your app after an OAuth login. Since it does not necessarily represent a valid endpoint that a user could navigate to, the redirect URL can use a custom scheme, such asmy-app://auth. It is important to make sure the redirect URL used in your app’s code matches a redirect URL configured on the authenticating server. -
Copy and paste the Client ID and Redirect URL into a safe location. They will be used in a later step.
All users that access this application need account privileges
Develop or download
You have two options for completing this tutorial:
Option 1: Develop the code
Create a new Visual Studio Project
ArcGIS Maps SDK for .NET supports apps for Windows Presentation Framework (WPF), Windows UI Library (WinUI), and .NET MAUI. The instructions for this tutorial are specific to creating a WPF .NET project using Visual Studio for Windows.
-
Start Visual Studio and create a new project.
- In the Visual Studio start screen, click Create a new project.
- Choose the WPF App (.NET) template for C#, then click Next.
- Provide required values in the Configure your new project panel:
- Project name:
DisplayAScene - Location:
choose a folder
- Project name:
- Click Create to create the project.
If you are developing with Visual Studio for Windows, ArcGIS Maps SDK for .NET provides a set of project templates for each supported .NET platform. These templates follow the Model-View-ViewModel (MVVM) design pattern. Install the ArcGIS Maps SDK for .NET Visual Studio Extension to add the templates to Visual Studio (Windows only). See Install and set up for details.
Add a reference to the API
-
Add a reference to the API by installing a NuGet package.
- In Solution Explorer, right-click Dependencies and choose Manage NuGet Packages.
- In the NuGet Package Manager window, ensure the selected Package source is
nuget.org(upper-right). - Select the Browse tab and search for ArcGIS Maps SDK.
- In the search results, select the appropriate package for your platform. For this tutorial project, choose the Esri.ArcGISRuntime.WPF NuGet package.
- Confirm the Latest stable version of the package is selected in the Version dropdown.
- Click Install.
- The Preview Changes dialog confirms any package(s) dependencies or conflicts. Review the changes and click Apply to continue installing the packages.
- Review the license information on the License Acceptance dialog and click I Accept to add the package(s) to your project.
- In the Visual Studio Output window, ensure the packages were successfully installed. If you see an error about the target Windows version, you will fix that in the next step.
- Close the NuGet Package Manager window.
-
You may see an error like this in the Visual Studio Error List:
The 'Esri.ArcGISRuntime.WPF' nuget package cannot be used to target 'net8.0-windows'. Target 'net8.0-windows10.0.19041.0' or later instead.. If so, follow these steps to address it.- In Solution Explorer, right-click the project entry in the tree view and choose Edit Project File.
- Update the
<TargetFramework>element withnet8.0-windows10.0.19041.0(or higher).
<PropertyGroup><OutputType>WinExe</OutputType><TargetFramework>net8.0-windows10.0.19041.0</TargetFramework><UseWPF>true</UseWPF></PropertyGroup>- Save the project file and close it.
Create a view model to store app logic
Since this app builds the foundation to be used in several following tutorials, it’s good to build it with a solid design.
The Model-View-ViewModel (MVVM) design pattern provides an architecture that separates user interface elements, and related code, from the underlying app logic. In this pattern,model represents the data consumed in an app, view represents the user interface, and view model contains the logic that binds model and view together. The framework required for such a pattern might initially seem like a lot of work for a small project, but as your project’s complexity increases, a solid design foundation will make your code more flexible and easier to maintain.
In an ArcGIS app designed with MVVM, the map viewview component. Many of the classes fill the role of model (representing data as maps, scenes, layers, graphics, features, and others). Much of the code you write will be for the view model component, where you will add logic to work with ArcGIS objects and provide data for display in the view.
-
Add a new class that defines a
view modelfor the project.- Click Project > Add Class ….
- Name the new class
SceneViewModel.cs. - Click Add to create the new class and add it to the project.
- The new class will open in Visual Studio.
-
Add required
usingstatements to the view model.SceneViewModel.csusing System;using System.Collections.Generic;using System.Text;using Esri.ArcGISRuntime.Geometry;using Esri.ArcGISRuntime.Mapping;using System.ComponentModel;using System.Runtime.CompilerServices; -
Implement the
INotifyPropertyChangedinterface in theSceneViewModelclass.This interface defines a
PropertyChangedevent that is used to notify clients (views) that a property of the view model has changed.SceneViewModel.csnamespace DisplayAScene{class SceneViewModel : INotifyPropertyChanged{ -
Inside the
SceneViewModelclass, add code to implement thePropertyChangedevent.When a property of the view model changes, a call to
OnPropertyChangedwill raise this event.SceneViewModel.cs25 collapsed lines// Copyright 2021 Esri// Licensed under the Apache License, Version 2.0 (the "License");// you may not use this file except in compliance with the License.// You may obtain a copy of the License at//// https://www.apache.org/licenses/LICENSE-2.0//// Unless required by applicable law or agreed to in writing, software// distributed under the License is distributed on an "AS IS" BASIS,// WITHOUT WARRANTIES OR CONDITIONS OF ANY KIND, either express or implied.// See the License for the specific language governing permissions and// limitations under the License.using System;using System.Collections.Generic;using System.Text;using Esri.ArcGISRuntime.Geometry;using Esri.ArcGISRuntime.Mapping;using System.ComponentModel;using System.Runtime.CompilerServices;namespace DisplayAScene{class SceneViewModel : INotifyPropertyChanged{public event PropertyChangedEventHandler? PropertyChanged;protected void OnPropertyChanged([CallerMemberName] string propertyName = ""){PropertyChanged?.Invoke(this, new PropertyChangedEventArgs(propertyName));}}2 collapsed lines} -
Define a new property on the view model called
Scenethat exposes anSceneobject. When the property is set, callOnPropertyChanged.SceneViewModel.cs25 collapsed lines// Copyright 2021 Esri// Licensed under the Apache License, Version 2.0 (the "License");// you may not use this file except in compliance with the License.// You may obtain a copy of the License at//// https://www.apache.org/licenses/LICENSE-2.0//// Unless required by applicable law or agreed to in writing, software// distributed under the License is distributed on an "AS IS" BASIS,// WITHOUT WARRANTIES OR CONDITIONS OF ANY KIND, either express or implied.// See the License for the specific language governing permissions and// limitations under the License.using System;using System.Collections.Generic;using System.Text;using Esri.ArcGISRuntime.Geometry;using Esri.ArcGISRuntime.Mapping;using System.ComponentModel;using System.Runtime.CompilerServices;namespace DisplayAScene{class SceneViewModel : INotifyPropertyChanged{public event PropertyChangedEventHandler? PropertyChanged;protected void OnPropertyChanged([CallerMemberName] string propertyName = ""){PropertyChanged?.Invoke(this, new PropertyChangedEventArgs(propertyName));}private Scene? _scene;public Scene? Scene{get { return _scene; }set{_scene = value;OnPropertyChanged();}}}2 collapsed lines} -
Add a function to the
SceneViewModelclass calledSetupScene. Start the function by creating a newSceneusing theArcGISImageryStandardfield of theBasemapStyleenum.SceneViewModel.cs45 collapsed lines// Copyright 2021 Esri// Licensed under the Apache License, Version 2.0 (the "License");// you may not use this file except in compliance with the License.// You may obtain a copy of the License at//// https://www.apache.org/licenses/LICENSE-2.0//// Unless required by applicable law or agreed to in writing, software// distributed under the License is distributed on an "AS IS" BASIS,// WITHOUT WARRANTIES OR CONDITIONS OF ANY KIND, either express or implied.// See the License for the specific language governing permissions and// limitations under the License.using System;using System.Collections.Generic;using System.Text;using Esri.ArcGISRuntime.Geometry;using Esri.ArcGISRuntime.Mapping;using System.ComponentModel;using System.Runtime.CompilerServices;namespace DisplayAScene{class SceneViewModel : INotifyPropertyChanged{public event PropertyChangedEventHandler? PropertyChanged;protected void OnPropertyChanged([CallerMemberName] string propertyName = ""){PropertyChanged?.Invoke(this, new PropertyChangedEventArgs(propertyName));}private Scene? _scene;public Scene? Scene{get { return _scene; }set{_scene = value;OnPropertyChanged();}}private void SetupScene(){// Create a new scene with an imagery basemap.Scene scene = new Scene(BasemapStyle.ArcGISImageryStandard);}4 collapsed lines}} -
Create an
ElevationSourceto define the base surface for the scene.One or more elevation sources can be used to define a base surface in a scene. The base surface represents the ground height and all other layers in a scene are aligned relative to its height. Without a base surface, the default globe surface is used to display data in the scene.
SceneViewModel.cs48 collapsed lines// Copyright 2021 Esri// Licensed under the Apache License, Version 2.0 (the "License");// you may not use this file except in compliance with the License.// You may obtain a copy of the License at//// https://www.apache.org/licenses/LICENSE-2.0//// Unless required by applicable law or agreed to in writing, software// distributed under the License is distributed on an "AS IS" BASIS,// WITHOUT WARRANTIES OR CONDITIONS OF ANY KIND, either express or implied.// See the License for the specific language governing permissions and// limitations under the License.using System;using System.Collections.Generic;using System.Text;using Esri.ArcGISRuntime.Geometry;using Esri.ArcGISRuntime.Mapping;using System.ComponentModel;using System.Runtime.CompilerServices;namespace DisplayAScene{class SceneViewModel : INotifyPropertyChanged{public event PropertyChangedEventHandler? PropertyChanged;protected void OnPropertyChanged([CallerMemberName] string propertyName = ""){PropertyChanged?.Invoke(this, new PropertyChangedEventArgs(propertyName));}private Scene? _scene;public Scene? Scene{get { return _scene; }set{_scene = value;OnPropertyChanged();}}private void SetupScene(){// Create a new scene with an imagery basemap.Scene scene = new Scene(BasemapStyle.ArcGISImageryStandard);// Create an elevation source to show relief in the scene.string elevationServiceUrl = "http://elevation3d.arcgis.com/arcgis/rest/services/WorldElevation3D/Terrain3D/ImageServer";ArcGISTiledElevationSource elevationSource = new ArcGISTiledElevationSource(new Uri(elevationServiceUrl));// Create a Surface with the elevation data.Surface elevationSurface = new Surface();elevationSurface.ElevationSources.Add(elevationSource);// Add an exaggeration factor to increase the 3D effect of the elevation.elevationSurface.ElevationExaggeration = 2.5;// Apply the surface to the scene.scene.BaseSurface = elevationSurface;6 collapsed lines}}} -
Define the initial viewpoint for the scene using a
Cameraand a point in the scene.The position you view the scene from is defined by a
Camera. The following properties of the camera are used to define an observation point in the scene:- 3D location: Latitude, longitude, and altitude
- Heading: Azimuth of the camera’s direction
- Pitch: Up and down angle
- Roll: Side-to-side angle
SceneViewModel.cs62 collapsed lines// Copyright 2021 Esri// Licensed under the Apache License, Version 2.0 (the "License");// you may not use this file except in compliance with the License.// You may obtain a copy of the License at//// https://www.apache.org/licenses/LICENSE-2.0//// Unless required by applicable law or agreed to in writing, software// distributed under the License is distributed on an "AS IS" BASIS,// WITHOUT WARRANTIES OR CONDITIONS OF ANY KIND, either express or implied.// See the License for the specific language governing permissions and// limitations under the License.using System;using System.Collections.Generic;using System.Text;using Esri.ArcGISRuntime.Geometry;using Esri.ArcGISRuntime.Mapping;using System.ComponentModel;using System.Runtime.CompilerServices;namespace DisplayAScene{class SceneViewModel : INotifyPropertyChanged{public event PropertyChangedEventHandler? PropertyChanged;protected void OnPropertyChanged([CallerMemberName] string propertyName = ""){PropertyChanged?.Invoke(this, new PropertyChangedEventArgs(propertyName));}private Scene? _scene;public Scene? Scene{get { return _scene; }set{_scene = value;OnPropertyChanged();}}private void SetupScene(){// Create a new scene with an imagery basemap.Scene scene = new Scene(BasemapStyle.ArcGISImageryStandard);// Create an elevation source to show relief in the scene.string elevationServiceUrl = "http://elevation3d.arcgis.com/arcgis/rest/services/WorldElevation3D/Terrain3D/ImageServer";ArcGISTiledElevationSource elevationSource = new ArcGISTiledElevationSource(new Uri(elevationServiceUrl));// Create a Surface with the elevation data.Surface elevationSurface = new Surface();elevationSurface.ElevationSources.Add(elevationSource);// Add an exaggeration factor to increase the 3D effect of the elevation.elevationSurface.ElevationExaggeration = 2.5;// Apply the surface to the scene.scene.BaseSurface = elevationSurface;// Create a point that defines the observer's (camera) initial location in the scene.// The point defines a longitude, latitude, and altitude of the initial camera location.MapPoint cameraLocation = new MapPoint(-118.804, 33.909, 5330.0, SpatialReferences.Wgs84);// Create a Camera using the point, the direction the camera should face (heading), and its pitch and roll (rotation and tilt).Camera sceneCamera = new Camera(locationPoint: cameraLocation,heading: 355.0,pitch: 72.0,roll: 0.0);// Create the initial point to center the camera on (the Santa Monica mountains in Southern California).// Longitude=118.805 degrees West, Latitude=34.027 degrees NorthMapPoint sceneCenterPoint = new MapPoint(-118.805, 34.027, SpatialReferences.Wgs84);// Set an initial viewpoint for the scene using the camera and observation point.Viewpoint initialViewpoint = new Viewpoint(sceneCenterPoint, sceneCamera);scene.InitialViewpoint = initialViewpoint;6 collapsed lines}}} -
Set the
SceneViewModel.Sceneproperty with thesceneyou’ve created.SceneViewModel.cs79 collapsed lines// Copyright 2021 Esri// Licensed under the Apache License, Version 2.0 (the "License");// you may not use this file except in compliance with the License.// You may obtain a copy of the License at//// https://www.apache.org/licenses/LICENSE-2.0//// Unless required by applicable law or agreed to in writing, software// distributed under the License is distributed on an "AS IS" BASIS,// WITHOUT WARRANTIES OR CONDITIONS OF ANY KIND, either express or implied.// See the License for the specific language governing permissions and// limitations under the License.using System;using System.Collections.Generic;using System.Text;using Esri.ArcGISRuntime.Geometry;using Esri.ArcGISRuntime.Mapping;using System.ComponentModel;using System.Runtime.CompilerServices;namespace DisplayAScene{class SceneViewModel : INotifyPropertyChanged{public event PropertyChangedEventHandler? PropertyChanged;protected void OnPropertyChanged([CallerMemberName] string propertyName = ""){PropertyChanged?.Invoke(this, new PropertyChangedEventArgs(propertyName));}private Scene? _scene;public Scene? Scene{get { return _scene; }set{_scene = value;OnPropertyChanged();}}private void SetupScene(){// Create a new scene with an imagery basemap.Scene scene = new Scene(BasemapStyle.ArcGISImageryStandard);// Create an elevation source to show relief in the scene.string elevationServiceUrl = "http://elevation3d.arcgis.com/arcgis/rest/services/WorldElevation3D/Terrain3D/ImageServer";ArcGISTiledElevationSource elevationSource = new ArcGISTiledElevationSource(new Uri(elevationServiceUrl));// Create a Surface with the elevation data.Surface elevationSurface = new Surface();elevationSurface.ElevationSources.Add(elevationSource);// Add an exaggeration factor to increase the 3D effect of the elevation.elevationSurface.ElevationExaggeration = 2.5;// Apply the surface to the scene.scene.BaseSurface = elevationSurface;// Create a point that defines the observer's (camera) initial location in the scene.// The point defines a longitude, latitude, and altitude of the initial camera location.MapPoint cameraLocation = new MapPoint(-118.804, 33.909, 5330.0, SpatialReferences.Wgs84);// Create a Camera using the point, the direction the camera should face (heading), and its pitch and roll (rotation and tilt).Camera sceneCamera = new Camera(locationPoint: cameraLocation,heading: 355.0,pitch: 72.0,roll: 0.0);// Create the initial point to center the camera on (the Santa Monica mountains in Southern California).// Longitude=118.805 degrees West, Latitude=34.027 degrees NorthMapPoint sceneCenterPoint = new MapPoint(-118.805, 34.027, SpatialReferences.Wgs84);// Set an initial viewpoint for the scene using the camera and observation point.Viewpoint initialViewpoint = new Viewpoint(sceneCenterPoint, sceneCamera);scene.InitialViewpoint = initialViewpoint;// Set the view model "Scene" property.this.Scene = scene;6 collapsed lines}}} -
Add a constructor to the class that calls
SetupScenewhen a newSceneViewModelis created.When code like
SceneViewModel newSceneVM = new SceneViewModel();runs, the class constructor also runs. This is a good place to add code that needs to run whenever the class is initialized.SceneViewModel.cs22 collapsed lines// Copyright 2021 Esri// Licensed under the Apache License, Version 2.0 (the "License");// you may not use this file except in compliance with the License.// You may obtain a copy of the License at//// https://www.apache.org/licenses/LICENSE-2.0//// Unless required by applicable law or agreed to in writing, software// distributed under the License is distributed on an "AS IS" BASIS,// WITHOUT WARRANTIES OR CONDITIONS OF ANY KIND, either express or implied.// See the License for the specific language governing permissions and// limitations under the License.using System;using System.Collections.Generic;using System.Text;using Esri.ArcGISRuntime.Geometry;using Esri.ArcGISRuntime.Mapping;using System.ComponentModel;using System.Runtime.CompilerServices;namespace DisplayAScene{class SceneViewModel : INotifyPropertyChanged{public SceneViewModel(){SetupScene();}64 collapsed linespublic event PropertyChangedEventHandler? PropertyChanged;protected void OnPropertyChanged([CallerMemberName] string propertyName = ""){PropertyChanged?.Invoke(this, new PropertyChangedEventArgs(propertyName));}private Scene? _scene;public Scene? Scene{get { return _scene; }set{_scene = value;OnPropertyChanged();}}private void SetupScene(){// Create a new scene with an imagery basemap.Scene scene = new Scene(BasemapStyle.ArcGISImageryStandard);// Create an elevation source to show relief in the scene.string elevationServiceUrl = "http://elevation3d.arcgis.com/arcgis/rest/services/WorldElevation3D/Terrain3D/ImageServer";ArcGISTiledElevationSource elevationSource = new ArcGISTiledElevationSource(new Uri(elevationServiceUrl));// Create a Surface with the elevation data.Surface elevationSurface = new Surface();elevationSurface.ElevationSources.Add(elevationSource);// Add an exaggeration factor to increase the 3D effect of the elevation.elevationSurface.ElevationExaggeration = 2.5;// Apply the surface to the scene.scene.BaseSurface = elevationSurface;// Create a point that defines the observer's (camera) initial location in the scene.// The point defines a longitude, latitude, and altitude of the initial camera location.MapPoint cameraLocation = new MapPoint(-118.804, 33.909, 5330.0, SpatialReferences.Wgs84);// Create a Camera using the point, the direction the camera should face (heading), and its pitch and roll (rotation and tilt).Camera sceneCamera = new Camera(locationPoint: cameraLocation,heading: 355.0,pitch: 72.0,roll: 0.0);// Create the initial point to center the camera on (the Santa Monica mountains in Southern California).// Longitude=118.805 degrees West, Latitude=34.027 degrees NorthMapPoint sceneCenterPoint = new MapPoint(-118.805, 34.027, SpatialReferences.Wgs84);// Set an initial viewpoint for the scene using the camera and observation point.Viewpoint initialViewpoint = new Viewpoint(sceneCenterPoint, sceneCamera);scene.InitialViewpoint = initialViewpoint;// Set the view model "Scene" property.this.Scene = scene;}}}
Your SceneViewModel is complete!
An advantage to using the MVVM design pattern is that you can reuse code from a view model. Because this API has a nearly-standard API surface across platforms, a view model written for one app typically works on all supported .NET platforms.
Set developer credentials
To allow your app users to access ArcGIS Location Services
-
In the Solution Explorer, expand the node for App.xaml, and double-click App.xaml.cs to open it.
-
In the App class, add an override for the
OnStartup()function to set theApiKeyproperty onArcGISRuntimeEnvironment.App.xaml.cspublic partial class App : Application{protected override void OnStartup(StartupEventArgs e){base.OnStartup(e);// Set the access token for ArcGIS Maps SDK for .NET.Esri.ArcGISRuntime.ArcGISRuntimeEnvironment.ApiKey = "YOUR_ACCESS_TOKEN";}}} -
Replace “YOUR_ACCESS_TOKEN” with the API key access token you created earlier.
-
Save and close the
App.xaml.csfile.
Best Practice: The access token is stored directly in the code as a convenience for this tutorial. Do not store credentials directly in source code in a production environment.
-
Add the
Microsoft.Web.WebView2NuGet package. This package provides the Microsoft Edge WebView2 control, which allows you to embed web technologies (HTML, CSS, and JavaScript) in your native apps. Your app will use the WebView2 control to display a login user interface for user authentication.- In the Solution Explorer, right-click Dependencies and choose Manage NuGet Packages.
- In the NuGet Package Manager window, ensure the selected Package source is
nuget.org(upper-right). - Select the Browse tab and search for Microsoft.Web.WebView2.
- In the search results, select the Microsoft.Web.WebView2 NuGet package.
- Confirm the Latest stable version of the package is selected in the Version dropdown.
- Click Install.
- The Preview Changes dialog confirms any package(s) dependencies or conflicts. Review the changes and click Apply to continue installing the packages.
- Review the license information on the License Acceptance dialog and click I Accept to add the package(s) to your project.
- In the Visual Studio Output window, ensure the packages were successfully installed.
- Close the NuGet Package Manager window.
-
From the Visual Studio Project menu, choose Add class …. Name the class
ArcGISLoginPrompt.csthen click Add. The new class is added to your project and opens in Visual Studio. -
Select all the code in the new class and delete it.
-
Copy all of the code below and paste it into the
ArcGISLoginPrompt.csclass in your project.ArcGISLoginPrompt.cs// Copyright 2021 Esri.//// Licensed under the Apache License, Version 2.0 (the "License"); you may not use this file except in compliance with the License.// You may obtain a copy of the License at: http://www.apache.org/licenses/LICENSE-2.0//// Unless required by applicable law or agreed to in writing, software distributed under the License is distributed on an// "AS IS" BASIS, WITHOUT WARRANTIES OR CONDITIONS OF ANY KIND, either express or implied. See the License for the specific// language governing permissions and limitations under the License.using Esri.ArcGISRuntime.Portal;using Esri.ArcGISRuntime.Security;using Microsoft.Web.WebView2.Core;using Microsoft.Web.WebView2.Wpf;using System;using System.Collections.Generic;using System.Threading.Tasks;using System.Windows;using System.Windows.Threading;namespace UserAuth{internal static class ArcGISLoginPrompt{private const string ArcGISOnlineUrl = "https://www.arcgis.com/sharing/rest";// Specify the Client ID and Redirect URL to use with OAuth authentication.// See the instructions here for creating OAuth app settings:// https://developers.arcgis.com/documentation/security-and-authentication/user-authentication/tutorials/create-oauth-credentials-user-auth/private const string AppClientId = "YOUR_CLIENT_ID";private const string OAuthRedirectUrl = "YOUR_REDIRECT_URL";public static async Task<bool> EnsureAGOLCredentialAsync(){bool loggedIn = false;try{// Create the portal, prompting the user to log in if they haven't already.var portal = await ArcGISPortal.CreateAsync(new Uri(ArcGISOnlineUrl), loginRequired: true);// If the user logged in successfully, the portal's User property will be non-null.loggedIn = portal.User != null;}catch (OperationCanceledException){// OAuth login was canceled, no need to display error to user.}catch (Exception ex){// Login failureMessageBox.Show("Login failed: " + ex.Message);}return loggedIn;}public static void RegisterOAuthConfig(){var userConfig = new OAuthUserConfiguration(new Uri(ArcGISOnlineUrl), AppClientId, new Uri(OAuthRedirectUrl));AuthenticationManager.Current.OAuthUserConfigurations.Add(userConfig);AuthenticationManager.Current.OAuthHandler = new OAuthAuthorize();}#region OAuth handler// In a desktop (WPF) app, an IOAuthHandler component is used to handle some of the OAuth details. Specifically, it// implements AuthorizeAsync to show the login UI (generated by the server that hosts secure content) in a web control.// When the user logs in successfully, cancels the login, or closes the window without continuing, the IOAuthAuthorizeHandler// is responsible for obtaining the authorization from the server or raising an OperationCanceledException.public class OAuthAuthorize : IOAuthHandler{// Window to contain the OAuth UI.private Window? _authWindow;// Use a TaskCompletionSource to track the completion of the authorization.private TaskCompletionSource<IDictionary<string, string>> _tcs;// URL for the authorization callback result (the redirect URI configured for your application).private string _callbackUrl = "";// URL that handles the OAuth request.private string? _authorizeUrl;// Function to handle authorization requests, takes the URIs for the secured service, the authorization endpoint, and the redirect URI.public Task<IDictionary<string, string>> LoginAsync(OAuthLoginParameters parameters){if (_tcs != null && !_tcs.Task.IsCompleted)throw new Exception("Task in progress");_tcs = new TaskCompletionSource<IDictionary<string, string>>();// Store the authorization and redirect URLs._authorizeUrl = parameters.AuthorizeUri.AbsoluteUri;_callbackUrl = parameters.RedirectUri.AbsoluteUri;// Call a function to show the login controls, make sure it runs on the UI thread for this app.Dispatcher dispatcher = Application.Current.Dispatcher;if (dispatcher == null || dispatcher.CheckAccess()){AuthorizeOnUIThread(_authorizeUrl);}else{Action authorizeOnUIAction = () => AuthorizeOnUIThread(_authorizeUrl);dispatcher.BeginInvoke(authorizeOnUIAction);}// Return the task associated with the TaskCompletionSource.return _tcs.Task;}// Challenge for OAuth credentials on the UI thread.private void AuthorizeOnUIThread(string authorizeUri){// Initialize a WebView2 control to display the authorize page.WebView2 webBrowser = new WebView2() { MinWidth = 500, MinHeight = 500 };// Handle the navigation event for the browser to check for a response to the redirect URL.webBrowser.NavigationStarting += WebBrowserOnNavigationStarting;// Display the web browser in a new window._authWindow = new Window{Content = webBrowser,SizeToContent = SizeToContent.WidthAndHeight,WindowStartupLocation = WindowStartupLocation.CenterOwner};// Set the app's window as the owner of the browser window (if main window closes, so will the browser).if (Application.Current != null && Application.Current.MainWindow != null){_authWindow.Owner = Application.Current.MainWindow;}// Handle window loaded event as the WebView2 control can only be initialized after it is visible in the UI_authWindow.Loaded += async (s, e) =>{await webBrowser.EnsureCoreWebView2Async();webBrowser.CoreWebView2.Navigate(authorizeUri);};// Handle the window closed event_authWindow.Closed += OnWindowClosed;// Display the window._authWindow.ShowDialog();}// Handle the browser window closing.private void OnWindowClosed(object? sender, EventArgs e){// If the browser window closes, return the focus to the main window.if (_authWindow != null && _authWindow.Owner != null){_authWindow.Owner.Focus();}// If the task wasn't completed, the user must have closed the window without logging in.if (!_tcs.Task.IsCompleted){// Set the task completion source exception to indicate a canceled operation._tcs.SetCanceled();}_authWindow = null;}// Handle browser navigationprivate void WebBrowserOnNavigationStarting(object? sender, CoreWebView2NavigationStartingEventArgs e){// Check for a response to the callback url.const string portalApprovalMarker = "/oauth2/approval";Uri uri = new Uri(e.Uri);// If no browser, uri, or an empty url, return.if (sender == null || uri == null || string.IsNullOrEmpty(uri.AbsoluteUri))return;// Check for redirect.bool isRedirected = uri.AbsoluteUri.StartsWith(_callbackUrl) ||_callbackUrl.Contains(portalApprovalMarker) && uri.AbsoluteUri.Contains(portalApprovalMarker);// Check if browser was redirected to the callback URL. (This indicates succesful authentication.)if (isRedirected){e.Cancel = true;// Call a helper function to decode the response parameters.IDictionary<string, string> authResponse = DecodeParameters(uri);// Set the result for the task completion source._tcs.SetResult(authResponse);// Close the window.if (_authWindow != null){_authWindow.Close();}}}private static IDictionary<string, string> DecodeParameters(Uri uri){// Create a dictionary of key value pairs returned in an OAuth authorization response URI query string.string answer = "";// Get the values from the URI fragment or query string.if (!string.IsNullOrEmpty(uri.Fragment)){answer = uri.Fragment.Substring(1);}else{if (!string.IsNullOrEmpty(uri.Query)){answer = uri.Query.Substring(1);}}// Parse parameters into key / value pairs.Dictionary<string, string> keyValueDictionary = new Dictionary<string, string>();string[] keysAndValues = answer.Split(new[] { '&' }, StringSplitOptions.RemoveEmptyEntries);foreach (string kvString in keysAndValues){string[] pair = kvString.Split('=');string key = pair[0];string value = string.Empty;if (key.Length > 1){value = Uri.UnescapeDataString(pair[1]);}keyValueDictionary.Add(key, value);}// Return the dictionary of string keys/values.return keyValueDictionary;}}#endregion OAuth handler}} -
Add your values for the client ID (
AppClientId) and for the redirect URL (OAuthRedirectUrl). These are the user authentication settings you created in the Set up authentication step.ArcGISLoginPrompt.csinternal static class ArcGISLoginPrompt{private const string ArcGISOnlineUrl = "https://www.arcgis.com/sharing/rest";// Specify the Client ID and Redirect URL to use with OAuth authentication.// See the instructions here for creating OAuth app settings:// https://developers.arcgis.com/documentation/security-and-authentication/user-authentication/tutorials/create-oauth-credentials-user-auth/private const string AppClientId = "YOUR_CLIENT_ID";private const string OAuthRedirectUrl = "YOUR_REDIRECT_URL"; -
In the Solution Explorer, expand the node for App.xaml, and double-click App.xaml.cs to open it.
-
In the App class, add an override for the
OnStartup()function to call theSetChallengeHandler()method on your staticArcGISLoginPromptclass.App.xaml.cspublic partial class App : Application{protected override void OnStartup(StartupEventArgs e){base.OnStartup(e);// Call a function to set up the AuthenticationManager for OAuth.UserAuth.ArcGISLoginPrompt.RegisterOAuthConfig();}}} -
Save and close the
App.xaml.csfile.
Best Practice: The OAuth credentials are stored directly in the code as a convenience for this tutorial. Do not store credentials directly in source code in a production environment.
Next, set up a view in your project to consume the view model.
Add a scene view
A SceneView control is used to display a Scene. You will add a scene view to your project UI and wire it up to consume the scene that is defined on SceneViewModel.
-
Add required XML namespace and resource declarations.
- Open
MainWindow.xamland switch to the XAML view - Inside the existing namespace declarations, add an
esriXML namespace for the ArcGIS controls - Add XAML that defines a
SceneViewModelinstance as a static resource
MainWindow.xaml<Window x:Class="DisplayAScene.MainWindow"xmlns="http://schemas.microsoft.com/winfx/2006/xaml/presentation"xmlns:x="http://schemas.microsoft.com/winfx/2006/xaml"xmlns:d="http://schemas.microsoft.com/expression/blend/2008"xmlns:mc="http://schemas.openxmlformats.org/markup-compatibility/2006"xmlns:local="clr-namespace:DisplayAScene"xmlns:esri="http://schemas.esri.com/arcgis/runtime/2013"mc:Ignorable="d"Title="MainWindow" Height="450" Width="800"><Window.Resources><local:SceneViewModel x:Key="SceneViewModel" /></Window.Resources>6 collapsed lines<Grid></Grid></Window> - Open
-
Add a
SceneViewcontrol toMainWindow.xamland bind it to theSceneViewModel.- Add XAML that defines a
SceneViewcontrol namedMainSceneView - Use data binding to set the
Sceneproperty of the control using theSceneViewModelresource
MainWindow.xaml14 collapsed lines<Window x:Class="DisplayAScene.MainWindow"xmlns="http://schemas.microsoft.com/winfx/2006/xaml/presentation"xmlns:x="http://schemas.microsoft.com/winfx/2006/xaml"xmlns:d="http://schemas.microsoft.com/expression/blend/2008"xmlns:mc="http://schemas.openxmlformats.org/markup-compatibility/2006"xmlns:local="clr-namespace:DisplayAScene"xmlns:esri="http://schemas.esri.com/arcgis/runtime/2013"mc:Ignorable="d"Title="MainWindow" Height="450" Width="800"><Window.Resources><local:SceneViewModel x:Key="SceneViewModel" /></Window.Resources><Grid><esri:SceneView x:Name="MainSceneView"Scene="{Binding Scene, Source={StaticResource SceneViewModel}}" /></Grid>2 collapsed lines</Window> - Add XAML that defines a
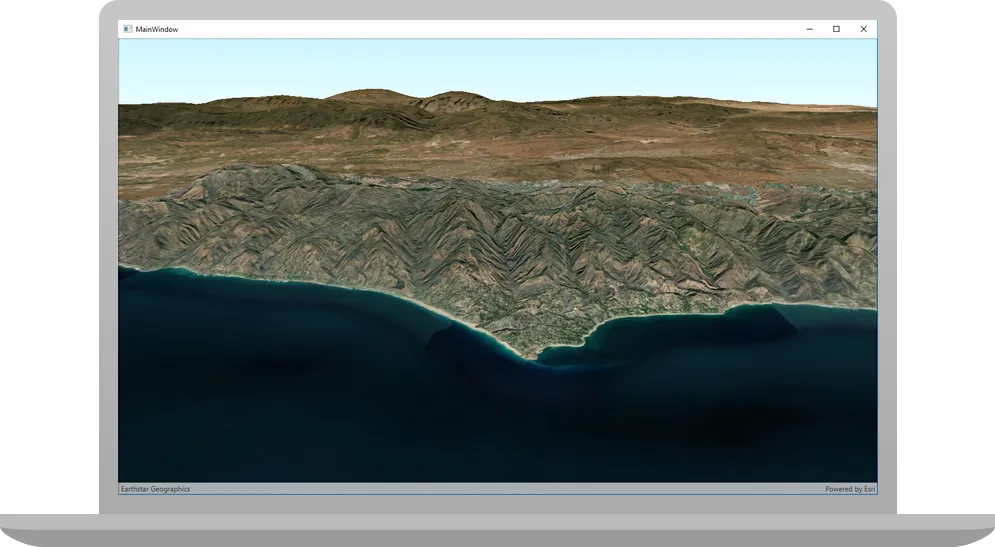
Run the app
Click Debug > Start Debugging (or press <F5> on the keyboard) to run the app. If your app uses user authentication, enter your ArcGIS Online credentials when prompted.
You should see a scene
Alternatively, you can download the tutorial solution, as follows.
Option 2: Download the solution
-
Click the Download solution link in the right-hand panel of the page.
-
Unzip the file to a location on your machine.
-
Open the
.slnfile in Visual Studio.
Since the downloaded solution does not contain authentication credentials, you must add the developer credentials that you created in the Set up authentication section.
Set developer credentials in the solution
To allow your app users to access ArcGIS location services
-
In Visual Studio, in the Solution Explorer, click App.xaml.cs to open the file.
-
Set the
ArcGISEnvironment.ApiKeyproperty with your API key access token.App.xaml.csprotected override void OnStartup(StartupEventArgs e){base.OnStartup(e);// Set the access token for ArcGIS Maps SDK for .NET.Esri.ArcGISRuntime.ArcGISRuntimeEnvironment.ApiKey = "YOUR_ACCESS_TOKEN";// Call a function to set up the AuthenticationManager for OAuth.UserAuth.ArcGISLoginPrompt.RegisterOAuthConfig();} -
Remove the code that sets up user authentication.
App.xaml.csprotected override void OnStartup(StartupEventArgs e){base.OnStartup(e);// Set the access token for ArcGIS Maps SDK for .NET.Esri.ArcGISRuntime.ArcGISRuntimeEnvironment.ApiKey = "YOUR_ACCESS_TOKEN";// Call a function to set up the AuthenticationManager for OAuth.UserAuth.ArcGISLoginPrompt.RegisterOAuthConfig();}
Best Practice: The access token is stored directly in the code as a convenience for this tutorial. Do not store credentials directly in source code in a production environment.
-
From the Visual Studio Solution explorer window, open the
ArcGISLoginPrompt.csfile. -
Set your values for the client ID (
OAuthClientID) and the redirect URL (OAuthRedirectUrl). These are the user authentication settings you created in the Set up authentication step.ArcGISLoginPrompt.csinternal static class ArcGISLoginPrompt{private const string ArcGISOnlineUrl = "https://www.arcgis.com/sharing/rest";// Specify the Client ID and Redirect URL to use with OAuth authentication.// See the instructions here for creating OAuth app settings:// https://developers.arcgis.com/documentation/security-and-authentication/user-authentication/tutorials/create-oauth-credentials-user-auth/private const string AppClientId = "YOUR_CLIENT_ID";private const string OAuthRedirectUrl = "YOUR_REDIRECT_URL"; -
In Visual Studio, in the Solution Explorer, click App.xaml.cs to open the file.
-
Remove the line of code that sets an API key access token.
App.xaml.csprotected override void OnStartup(StartupEventArgs e){base.OnStartup(e);// Set the access token for ArcGIS Maps SDK for .NET.Esri.ArcGISRuntime.ArcGISRuntimeEnvironment.ApiKey = "YOUR_ACCESS_TOKEN";// Call a function to set up the AuthenticationManager for OAuth.UserAuth.ArcGISLoginPrompt.RegisterOAuthConfig();}
Best Practice: The OAuth credentials are stored directly in the code as a convenience for this tutorial. Do not store credentials directly in source code in a production environment.
Run the app
Click Debug > Start Debugging (or press <F5> on the keyboard) to run the app. If your app uses user authentication, enter your ArcGIS Online credentials when prompted.
You should see a map
What’s next?
Learn how to use additional API features, ArcGIS location services, and ArcGIS tools in these tutorials: