Learn how to use a URL to access and
display a feature layer
A map
A feature layerx,y coordinates and a spatial reference.
In this tutorial, you use URLs to access and display three different feature layers
Prerequisites
Before starting this tutorial:
-
You need an ArcGIS Location Platform or ArcGIS Online account.
-
Your system meets the system requirements.
-
You need an IDE for Flutter - we recommend VS Code.
Develop or Download
You have two options for completing this tutorial:
Option 1: Develop the code
To start the tutorial, complete the Display a map tutorial. This creates a map to display the Santa Monica Mountains in California using the topographic basemap from the ArcGIS Basemap Styles service
Open a Flutter project
-
Open the project you created by completing the Display a map tutorial.
-
Continue with the following instructions to use a URL to access and display a feature layer in a map.
Create feature layers to display the hosted data
To display three new data layersFeatureLayers using URIs to reference datasets hosted in ArcGIS Online
-
Open lib\main.dart.
-
In
onMapViewReady(), defineStringvariables to hold the URLs of each hosted feature layer. You will add: Trailheads (points), Trails (lines), and Parks and Open Spaces (polygons).main.dartvoid onMapViewReady() {final map = ArcGISMap.withBasemapStyle(BasemapStyle.arcGISTopographic);// Trailheads feature service.const trailheadsUri ='https://services3.arcgis.com/GVgbJbqm8hXASVYi/arcgis/rest/services/Trailheads_Styled/FeatureServer/0';// Trails feature service.const trailsUri ='https://services3.arcgis.com/GVgbJbqm8hXASVYi/arcgis/rest/services/Trails_Styled/FeatureServer/0';// Parks feature service.const parksUri ='https://services3.arcgis.com/GVgbJbqm8hXASVYi/arcgis/rest/services/Parks_and_Open_Space_Styled/FeatureServer/0';} -
Create feature layers by creating
ServiceFeatureTables for each URI.main.dart// Trailheads feature service.const trailheadsUri ='https://services3.arcgis.com/GVgbJbqm8hXASVYi/arcgis/rest/services/Trailheads_Styled/FeatureServer/0';// Trails feature service.const trailsUri ='https://services3.arcgis.com/GVgbJbqm8hXASVYi/arcgis/rest/services/Trails_Styled/FeatureServer/0';// Parks feature service.const parksUri ='https://services3.arcgis.com/GVgbJbqm8hXASVYi/arcgis/rest/services/Parks_and_Open_Space_Styled/FeatureServer/0';// Trailheads feature layer using service feature table.final trailheadsLayer = FeatureLayer.withFeatureTable(ServiceFeatureTable.withUri(Uri.parse(trailheadsUri)),);// Trails feature layer using service feature table.final trailsLayer = FeatureLayer.withFeatureTable(ServiceFeatureTable.withUri(Uri.parse(trailsUri)),);// Parks feature layer using service feature table.final parksLayer = FeatureLayer.withFeatureTable(ServiceFeatureTable.withUri(Uri.parse(parksUri)),); -
Add the new feature layers to the map.
main.dart// Trailheads feature layer using service feature table.final trailheadsLayer = FeatureLayer.withFeatureTable(ServiceFeatureTable.withUri(Uri.parse(trailheadsUri)),);// Trails feature layer using service feature table.final trailsLayer = FeatureLayer.withFeatureTable(ServiceFeatureTable.withUri(Uri.parse(trailsUri)),);// Parks feature layer using service feature table.final parksLayer = FeatureLayer.withFeatureTable(ServiceFeatureTable.withUri(Uri.parse(parksUri)),);// Add all the feature layers to the map.map.operationalLayers.addAll([trailheadsLayer, trailsLayer, parksLayer]);// Code from `Display a map` tutorial and remains unchanged._mapViewController.arcGISMap = map;_mapViewController.setViewpoint(Viewpoint.withLatLongScale(latitude: 34.02700,longitude: -118.80500,scale: 72000,),);
Run the app
-
Make sure you have an Android emulator, iOS simulator or physical device configured and running.
-
In VS Code, select Run > Run Without Debugging.
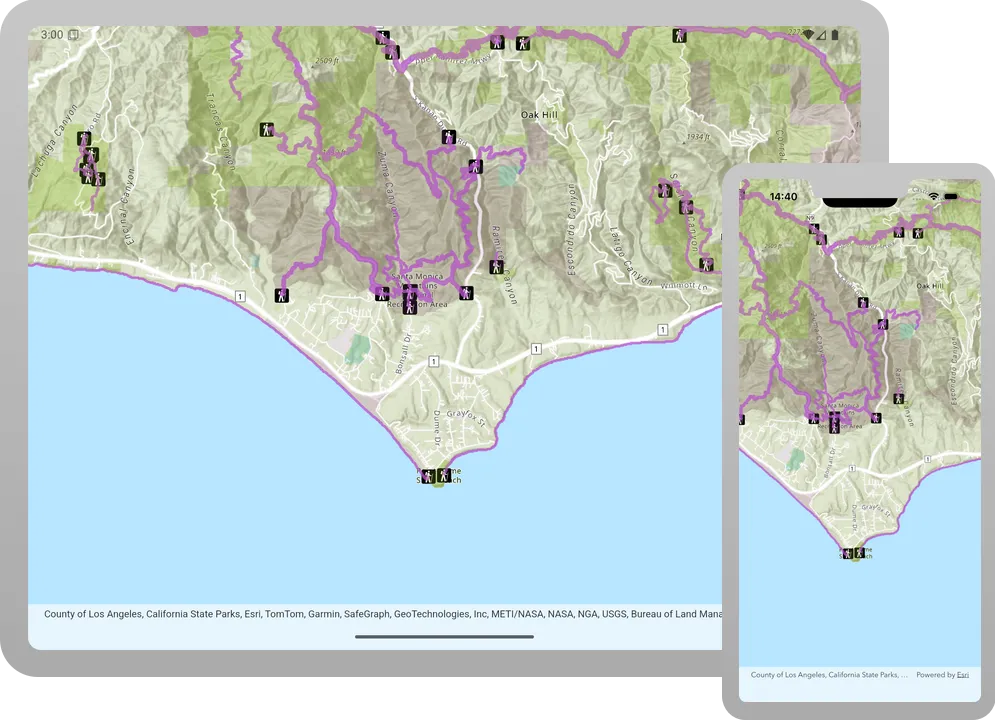
You should see point, line, and polygon features (representing trailheads, trails, and parks) draw on the map for an area in the Santa Monica Mountains.
Alternatively, you can download the tutorial solution, as follows.
Option 2: Download the solution
-
Click the
Download solutionlink underSolutionand unzip the file to a location on your machine. -
Open the project in VS code.
Since the downloaded solution does not contain authentication code, you must first set up authentication to create credentials, then add authentication code and set the developer credentials to the solution.
Set up authentication
To access the secure ArcGIS location services
You can implement API key authentication or user authentication in this tutorial. Compare the differences below:
API key authentication
- Users are not required to sign in.
- Requires creating an API key credential
API key credentials are an item that contains the parameters used to create and manage long-lived access tokens for API key authentication. They are a type of developer credential. with the correct privileges. - API keys
An API key is a long-lived access token created using API key credentials. They are valid for up to one year and are typically embedded directly into client applications. are long-lived access tokens. - Service usage is billed to the API key owner/developer.
- Simplest authentication method to implement.
- Recommended approach for new ArcGIS developers.
Learn more in API key authentication.
User authentication
- Users are required to sign in with an ArcGIS account
An ArcGIS account is an identity with a user type and set of privileges that can access specific ArcGIS products, tools, APIs, services, and resources. The main account types that can be used for development are an ArcGIS Location Platform account, ArcGIS Online account, and ArcGIS Enterprise account. ArcGIS Location Platform and ArcGIS Online accounts are also associated with a subscription. . - User accounts must have privilege
Privileges are a set of permissions assigned to ArcGIS accounts, developer credentials, and applications that grant access to secure resources and functionality in ArcGIS. to access the ArcGIS servicesA service, also known as an ArcGIS service, is software that supports an ArcGIS REST API and provides geospatial functionality or data. A service can be hosted by Esri or in ArcGIS Enterprise. used in application. - Requires creating OAuth credentials
OAuth credentials are an item that contains parameters required to implement user authentication or app authentication, including a .client_id,client_secret, and redirect URIs. They are a type of developer credential. - Application uses a redirect URL and client ID.
- Service usage is billed to the organization of the user signed into the application.
Learn more in User authentication.
To complete this tutorial, click on the tab in the switcher below for your authentication type of choice, either API key authentication or User authentication.
Create a new API key access token
-
Complete the Create an API key tutorial and create an API key with the following privilege(s)
Privileges are a set of permissions assigned to ArcGIS accounts, developer credentials, and applications that grant access to secure resources and functionality in ArcGIS. :- Privileges
- Location services > Basemaps
- Privileges
-
Copy and paste the API key access token into a safe location. It will be used in a later step.
Create new OAuth credentials to access the secure resources used in this tutorial.
-
Complete the Create OAuth credentials for user authentication tutorial to obtain a Client ID and Redirect URL.
A
Client IDuniquely identifies your app on the authenticating server. If the server cannot find an app with the provided Client ID, it will not proceed with authentication.The
Redirect URL(also referred to as a callback url) is used to identify a response from the authenticating server when the system returns control back to your app after an OAuth login. Since it does not necessarily represent a valid endpoint that a user could navigate to, the redirect URL can use a custom scheme, such asmy-app://auth. It is important to make sure the redirect URL used in your app’s code matches a redirect URL configured on the authenticating server. -
Copy and paste the Client ID and Redirect URL into a safe location. They will be used in a later step.
All users that access this application need account privileges
Add authentication code and set developer credentials
To allow your app users to access ArcGIS location services
-
Open lib/main.dart.
-
In the
main()function, set theArcGISEnvironment.apiKeyvalue to your access tokenAn access token is an authorization string that provides access to secure ArcGIS content, data, and services. Its capabilities are determined by the privileges it supports. It is obtained by implementing API key authentication, User authentication, or App authentication. .main.dartvoid main () {ArcGISEnvironment.apiKey = 'YOUR_ACCESS_TOKEN';runApp(const MaterialApp(home: MainApp()));}
Best Practice: The access token is stored directly in the code as a convenience for this tutorial. Do not store credentials directly in source code in a production environment.
Add the Authenticator toolkit component to manage your OAuth credentials.
-
Add the ArcGIS Maps SDK for Flutter Toolkit package to your app by following these instructions
-
Add the following code to main.dart:
- Define a final class member inside
_MainAppStateclass,_oAuthUserConfiguration, and initialize it withOAuthUserConfigurationpassing in theportalUri,clientId, andredirectUrivalues. - Add code to revoke all tokens,
Authenticator.revokeOAuthTokens(), and clear all credentials,Authenticator.clearCredentials(), from the authenticator’s credential store during application sign-out. - Add the
Authenticatorwidget as a parent of theArcGISMapViewwidget in the existing widget tree found in thebuild(). Set the value of the named parameter,oAuthUserConfigurationsto a list containing the new member variable_oAuthUserConfiguration.
main.dartclass _MainAppState extends State<MainApp> {final _mapViewController = ArcGISMapView.createController();final _oAuthUserConfiguration = OAuthUserConfiguration(portalUri: Uri.parse('https://www.arcgis.com'),clientId: 'YOUR_CLIENT_ID',redirectUri: Uri.parse('YOUR_REDIRECT_URL'),);@overridevoid dispose() {Authenticator.revokeOAuthTokens().whenComplete(Authenticator.clearCredentials,);super.dispose();}@overrideWidget build(BuildContext context) {return Scaffold(body: Column(children: [Expanded(child: Authenticator(oAuthUserConfigurations: [_oAuthUserConfiguration],child: ArcGISMapView(controllerProvider: () => _mapViewController,onMapViewReady: onMapViewReady,),),),],),);}}Best Practice: The OAuth credentials are stored directly in the code as a convenience for this tutorial. Do not store credentials directly in source code in a production environment.
- Define a final class member inside
-
For Android only, a system browser is required for user authentication
User authentication is a type of authentication that allows users with an ArcGIS account to sign into an application and allow it to access ArcGIS content, services, and resources on their behalf. The typical authorization protocol used is OAuth2.0. . Add the following activity to the Android manifest in your project:android/app/src/main/AndroidManifest.xml<!-- ... --><activityandroid:name="com.linusu.flutter_web_auth_2.CallbackActivity"android:exported="true"><intent-filter android:label="flutter_web_auth_2"><action android:name="android.intent.action.VIEW" /><category android:name="android.intent.category.DEFAULT" /><category android:name="android.intent.category.BROWSABLE" /><data android:scheme="YOUR_CALLBACK_URL_SCHEME_HERE" /></intent-filter></activity><!-- ... -->Replace
YOUR_CALLBACK_URL_SCHEME_HEREwith the scheme of the redirect URL used when you set up authentication earlier. This is necessary so that the browser can communicate back to your app after the login workflow completes.For example, if you have a redirect URL, such as: my-app://auth, the value of the scheme would be: my-app. This value would replace
YOUR_CALLBACK_URL_SCHEME_HEREin the activity.
Run the application
Follow these steps to run the application.
-
In VS Code’s terminal, run:
flutter pub upgrade -
Run:
dart run arcgis_maps install -
Make sure you have an Android emulator, iOS simulator or physical device configured and running.
-
In VS Code, select Run > Run Without Debugging.
You should see point, line, and polygon features (representing trailheads, trails, and parks) draw on the map for an area in the Santa Monica Mountains.