ArcGIS Maps SDK for Unity is a plugin designed for Unity. To use this SDK to create 3D interactive experiences that incorporate real-world geospatial data and 3D content, it's essential to properly prepare your Unity project.
1. Download Unity
The plugin supports Unity 2022.3 LTS, 6.0 LTS, 6.3 LTS, and 6.4. If you do not have Unity installed, install Unity.
The following steps describe how to install the plugin into a new project. If you have an existing project, you can install the plugin into an existing project.
2. Create a new project
-
To create a new project, open Unity Hub and select the Projects tab, then click the New project button.
-
In the pop-up window, define the following:
- Editor Version: ArcGIS Maps SDK for Unity supports Unity 2022.3 LTS, 6.0 LTS, 6.3 LTS, and 6.4. If you have multiple Unity editor versions installed, select the supported editor version at the top of the pop-up window.
- Templates: The plugin supports both the High Definition Render Pipeline (12.x) and the Universal Render Pipeline (12.x). You can download the High Definition 3D Core or Universal 3D Core templates. If you select templates other than these templates, install the render pipeline package manually. (The Legacy built-in render pipeline is not supported.)
- Project Name: Sets the name of the main project folder, which contains the assets, scenes, and other files related to your project
- Location: Sets where your project is stored in your computer's file system. The default project location is set to the home folder on your computer.

3. Download and install the plugin
You can download the plugin either from the Unity Asset Store or from the downloads page.
Download from the Unity Asset Store
-
Download the plugin from the Unity Asset Store.
-
After downloading, in the top menu, expand Window > Package Manager > My Assets to open the downloaded asset.

-
Follow the steps in the topic Importing an Asset Store package in the Unity Documentation.
Once the plugin has been imported to the project, you will find the ArcGIS Maps SDK for Unity folder in the Packages section of the Project window when In Project is selected from the Package menu.
Download from the downloads page
-
Download the plugin from the downloads page.
-
After downloading, in the top menu, click Window > Package Manager to open the Package Manager window.

-
Click the + icon in the Package Manager window.
-
Select Add package from tarball from the list and open a file browser.

-
Navigate to the folder where you saved your tarball file.
Once the plugin has been imported to the project, you will find the ArcGIS Maps SDK for Unity folder in the Packages section of the Project window when In Project is selected from the Package menu.
4. Import sample assets
ArcGIS Maps SDK for Unity comes with additional samples and tools that can be used to add functionality and visual continuity to your scene.
To import sample assets that come with the plugin:
Downloaded from the Unity Asset Store
-
In the top menu, click Window > Package Manager to open the Package Manager window.
-
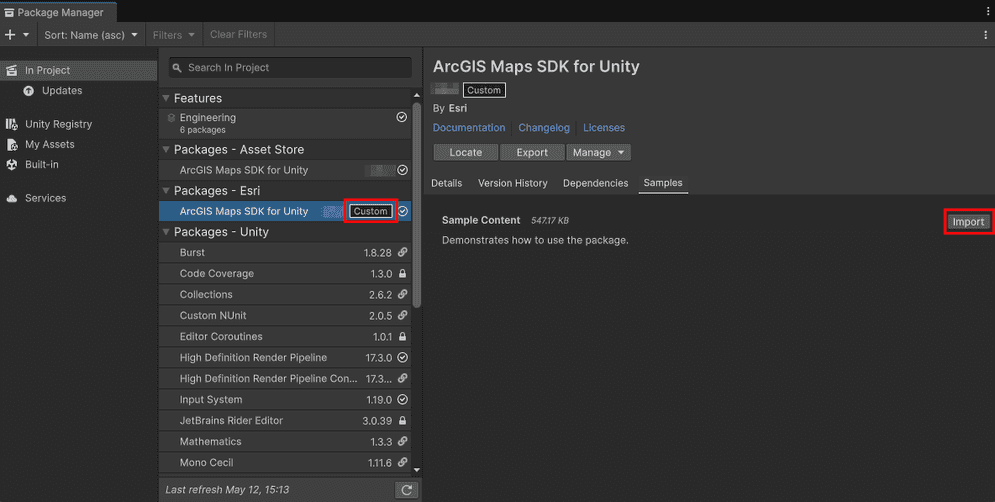
Select ArcGIS Maps SDK for Unity with the
Customlabel from the list on the left side. -
Click the Samples tab on the right-side panel.
-
Click the Import button next to Sample Content.
Downloaded from the downloads page
-
In the top menu, click Window > Package Manager to open the Package Manager window.
-
Select ArcGIS Maps SDK for Unity with the
Tarballlabel from the list on the left side. -
Click the Samples tab on the right-side panel.
-
Click the Import button next to Sample Content.

When the sample assets are imported to the project, you can find the folder and its content under Assets > Samples in the Project window.

5. Choose your scene-setting option
The plugin provides three options to use ArcGIS data and other geospatial content within a scene:
- The Map Creator UI provides the option to create a scene without writing any code.
- The Components can be attached to game objects in your scene.
- The C# API provides customization options by modifying the plugin source code.