ArcGIS Maps SDK for Unity can be added to an existing project with the supported Unity version. Make sure that you download the plugin before starting this page.
Open existing projects
In the Unity Hub, click your Project and open it with Unity 6 or 2022.3.x LTS version of Unity. If the Unity Hub can't find a matching Editor version for your project, it displays a warning message asking you to download that version.
Install the plugin
Install the plugin using the Unity Package Manager. For more information about the Unity Package Manager see topic Unity's Package Manager in the Unity Documentation.
Install the plugin from My Assets
-
Download the plugin from the Unity Asset Store.
-
After downloading, in the top menu, expand Window > Package Manager > My Assets to open the downloaded asset.

-
Follow the steps in the topic Importing an Asset Store package in the Unity Documentation.
Once the plugin has been imported to the project, you will find the ArcGIS Maps SDK for Unity folder in the Packages section of the Project window when In Project is selected from the Package menu.
Install the plugin from tarball
-
Download the plugin from the downloads page.
-
After downloading, in the top menu, click Window > Package Manager to open the Package Manager window.

-
Click the + icon in the Package Manager window.
-
Select Add package from tarball from the list and open a file browser.

-
Navigate to the folder where you saved your tarball file.
Once the plugin has been imported to the project, you will find the ArcGIS Maps SDK for Unity folder in the Packages section of the Project window when In Project is selected from the Package menu.
Convert the project to URP or HDRP
The ArcGIS Maps SDK for Unity requires a minimum of the Universal Render Pipeline (URP) 12.x package or the High Definition Render Pipeline (HDRP) 12.x package. (The Legacy built-in render pipeline is not supported.) If your project is currently configured to use the Legacy render pipeline, you will need to convert the project to use either URP or HDRP.
To convert:
-
Open the Package Manager by clicking on Window > Package Manager from the top menu and select Unity Registry from the package drop-down menu.

-
Find Universal RP or High Definition RP to install.
-
Click the Install button.


For more information on upgrading a project to HDRP see Converting a Project from the Built-in Renderer to the High Definition Render Pipeline.
For more information on upgrading a project to URP see Upgrading your Shaders.
Manage locations of existing contents
To allow your project's existing game objects to track within an ArcGIS Map with geographic coordinates, you can add an ArcGIS Location component.
To position your project's existing game objects in real world locations, you can add an ArcGIS Location component. You can search for it in the project folder.
If you are going to develop an app with the C# API, make sure game objects with the ArcGIS Location component are children of the game object that contains the ArcGIS MapView component.
If you select the Map Creator UI or components development option in order to use an ArcGIS Location component:
-
Click the game object in the Hierarchy window and click Add Component to select the ArcGIS Location component to add the script. For more information about components, see Unity's documentation: Use components.
-
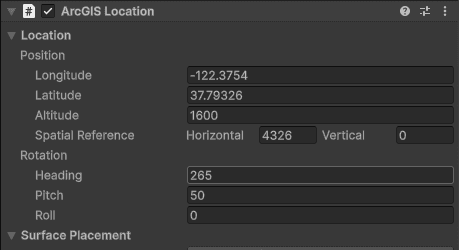
Select the game object and set the initial position and rotation of the game object in the Inspector.
- X (Longitude) : Specifies the east–west position of the game object on the Earth's surface. A projected position value for projected coordinate systems or a longitude value for geographic coordinate systems.
- Y (Latitude) : Specifies the north–south position of the game object on the Earth's surface. A projected position value for projected coordinate systems or a latitude value for geographic coordinate systems.
- Z (Altitude): Sets the vertical distance of the game object above the Earth. The units depend on the spatial reference.
- Spatial Reference: The spatial reference Well-Known ID (WKID) for the horizontal (geographic or projected) and optional vertical (gravity-related or ellipsoidal) coordinate systems. (Specifying a spatial reference with Well-Known Text (WKT) is not supported for the ArcGIS Location Component).
- Heading: Sets the heading or up axis of the game object. This is also known as yaw or azimuth. It represents the number of degrees by which the game object will be rotated, measured counterclockwise from north. To rotate clockwise, use a negative value.
- Pitch: Sets the pitch or right axis of the game object. Pitch is the equivalent of moving a plane's nose up or down (rotating along the axis that passes through the plane's wings). Positive values, looking forward, are above the horizon (pointing upward) and negative values are below the horizon (pointing downward).
- Roll: Sets the roll or forward axis of the game object. Roll is the equivalent of tilting a plane's wings up or down (rotating along the axis that passes through the center of the plane from front to back). A zero value is perfectly horizontal. Positive values will tilt the left side upward (or right side downward). Negative values do the opposite.
-
Select a surface placement mode to determine the positioning of the game object in relation to the ground in the Surface Placement section.
Import sample assets
ArcGIS Maps SDK for Unity comes with additional samples and tools that can be used to add functionality and visual continuity to your scene.
To import sample assets that come with the plugin:
Downloaded from the Unity Asset Store
-
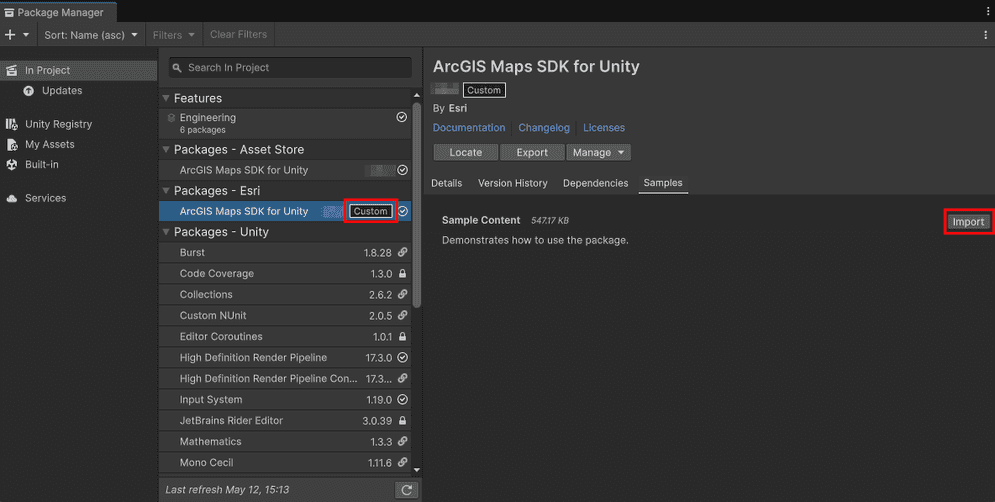
In the top menu, click Window > Package Manager to open the Package Manager window.
-
Select ArcGIS Maps SDK for Unity with the
Customlabel from the list on the left side. -
Click the Samples tab on the right-side panel.
-
Click the Import button next to Sample Content.
Downloaded from the downloads page
-
In the top menu, click Window > Package Manager to open the Package Manager window.
-
Select ArcGIS Maps SDK for Unity with the
Tarballlabel from the list on the left side. -
Click the Samples tab on the right-side panel.
-
Click the Import button next to Sample Content.

When the sample assets are imported to the project, you can find the folder and its content under Assets > Samples in the Project window.
