ArcGIS Maps SDK for Unity integrates 2D and 3D ArcGIS
The plugin provides three options to use ArcGIS data and other geospatial content within a scene:
- The Map Creator UI provides the option to create a scene without writing a single line of code.
- The components provide useful functionalities that can be attached to game objects in your scene. The tutorials are coming soon.
- The C# API grants access to the plugin source code.
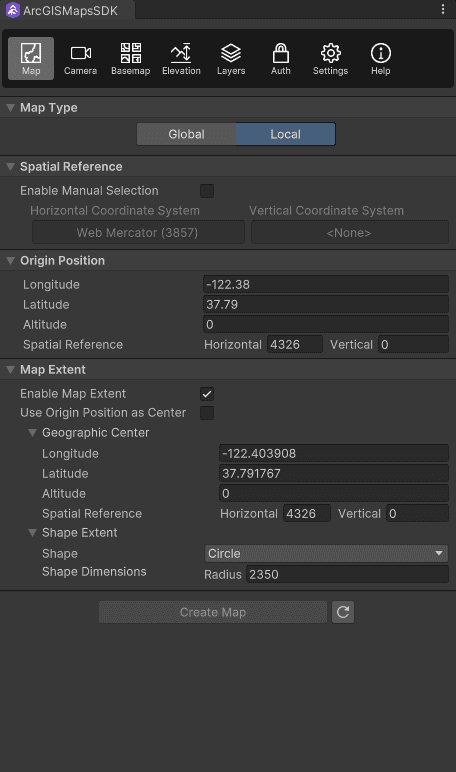
Map Creator UI
The Map Creator UI is the central place to set up your scene without writing a single line of code. It initiates the necessary components and sample code that add functionalities to set up a scene.
You can use the Map Creator UI to change between a global or local scene, set the initial position and rotation of the camera and origin, adjust the extent for a local scene, manage layers, as well as change a layer's property during the setup. You have a list of default basemaps that you can choose from or can use a custom basemap or a raster tile layer. You can enable and disable elevation, and you have the option to use the default elevation layer or to set a custom elevation layer.
To use the Map Creator UI, launch the Unity Editor. From the main menu bar, open Tools -> ArcGIS Maps SDK -> Map Creator.
The Map Creator UI has the OAuth challenge handler that works for the editor mode only. For using OAuth 2.0 in play mode, you can attach the OAuth Challenge Handlers Initializer which uses the sample scripts to the game object with the ArcGIS Map Component. If you want to write and use your own OAuth challenge handler initializer, you can replace the script.
Components
ArcGIS Maps SDK for Unity also provides the development option of using components. It provides useful behaviors that can be attached to game objects in your scene.
A component is a script that can be attached to a game object. It will update the state of the object at the start of the game object's lifecycle and/or every frame while the game object is still active. Components can be used for a variety of things, including moving and rotating objects, updating lighting effects, showing/hiding objects, among others. For more information about components, see Unity's documentation: Use components.
Essential components
The essential components to set up a GIS scene are:
- ArcGIS Map: This component is the container of the content. It communicates with the High Precision Framework to convert from double precision to single precision to work in the Unity space.
- ArcGIS Camera: This component controls the data that is loaded into your scene. To learn more information about the ArcGIS Camera component, see use the camera.
- ArcGIS Location: This component places GameObjects at specific geographic coordinates and defines their relation to the terrain. To learn more information, see ArcGIS Location component.
Other components
Depending on the app you are developing, you may need the following components:
- ArcGIS Rebase: Periodically updates the origin position as the camera moves around to maintain the 32-bit floating point precision. To learn more information, see use the camera.
- ArcGIS Camera Controller: This is a sample component that is used in the sample scenes to move the camera around. You can find the sample code in Assets/Samples/ArcGIS Maps SDK for Unity/[version]/Sample Content/Components. You can find more information on use the camera.
- ArcGIS Tabletop Controller: This sample component is used for Tabletop workflows. It wraps the ArcGIS Map and an ArcGIS Camera component in a scalable GameObject. You can set the map extent size and the map center position with this component to zoom and pan the map.
- ArcGIS Tabletop Input Controller: This is a sample input controller that is used for the Tabletop sample. This component handles mouse or two-finger inputs for controlling the tabletop map.
- ArcGIS Attribution Display: This is a sample component that includes the information and details about the data within the layer. Attribution is required for all applications that contain a map or do not contain a map. While this component is provided, using the Attribution Display prefabs is strongly recommended, as it contains a UI canvas for a more streamlined setup.
Set up a scene with components
To set up a scene with components:
-
Create an empty object in the scene by right-clicking on an empty space in the Hierarchy window and selecting Create Empty.
-
Click Add Component in the Inspector window and attach the ArcGIS Map component.
-
Add a camera under the game object with the ArcGIS Map component or move the existing camera in the Hierarchy window and make it the child of the game object with the ArcGIS Map.
-
Attach the ArcGIS Camera component and ArcGIS Location component to the camera in the Inspector window.
Additionally, you can attach the ArcGIS Camera Controller component and the ArcGIS Rebase component to the camera.
C# API
The C# API provides classes and components that you can use to set up your scene in the API reference. Use the C# API enable the user to perform actions such as changing layer visibility at runtime.
If you have not set up the scripting environment, see topic Setting Up Your Scripting Environment in the Unity Documentation.
To set up a scene with the C# API:
-
Create a new script by selecting Assets > Create > C# Script from the main menu bar, or by using the + (plus sign) to open the Create menu located in the Project window. This script will be used to create our scene.
-
Create an empty object in the scene by right-clicking on an empty space in the Hierarchy window and selecting Create Empty.
-
Attach the newly created C# script by dragging it into the empty object. You can see the new component in the Inspector.