Learn how to set a basemap, elevation source, and data layers by using the C++ API.
In this tutorial, you will create a C++ class to set up an ArcGIS Map with a circular extent in the Local scene. Using the C++ class, you can easily switch between the Global and Local scenes by modifying one line of code.

Prerequisites
Before starting this tutorial, review the following guidelines:
- You need an ArcGIS Location Platform account or ArcGIS Online account and an API key
An API key is a long-lived access token created using API key credentials. They are valid for up to one year and are typically embedded directly into client applications. to access ArcGIS servicesA service, also known as an ArcGIS service, is software that supports an ArcGIS REST API and provides geospatial functionality or data. A service can be hosted by Esri or in ArcGIS Enterprise. . If you don't have an account, sign up for free. - Ensure your development environment meets the system requirements.
- Follow the install and setup steps and install the plugin. Make sure to import the sample assets.
- Review the scene setting options page.
Steps
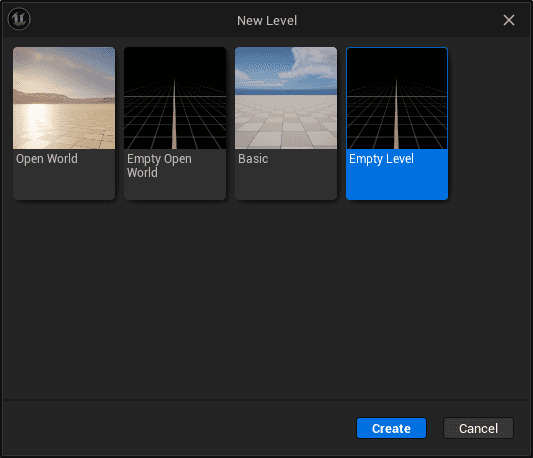
Create a new level
-
Click File on the Menu Bar and select New Level.
-
If using a blank template from the games category for your project, select Empty Level in the popup window.
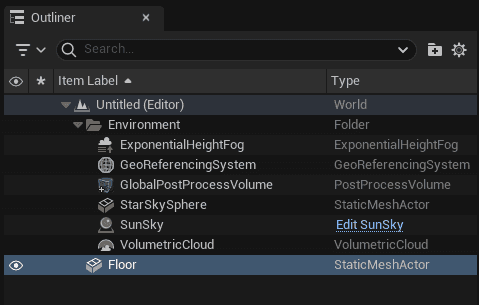
If using a simulation blank template from the simulation category for your project, select Simulation Blank in the popup window,
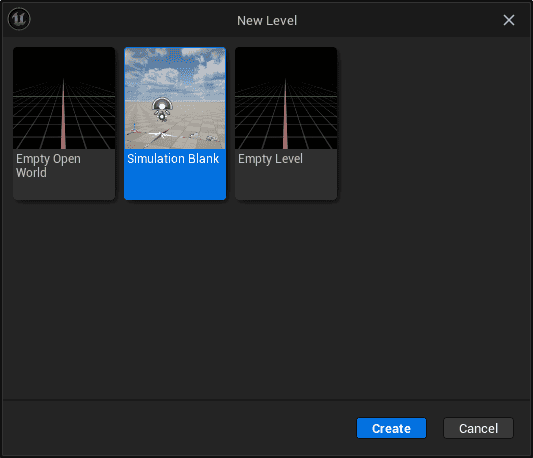
and remove the included Floor static mesh actor from the Outliner window.
-
Click File on the Menu Bar and select Save Level As. Name your level and click Save.
Initialize the C++ API
-
To create these scripts in your project, you need to go to the content folder. Click Tools > New C++ Class.
-
This will show the Choose Parent Class wizard. You want your script to attach to an Actor. Select All Classes and click ArcGIS Actor under Actor, then click Next. ArcGIS Actor includes the ArcGIS Maps SDK Subsystem Listener that allows you to use the editor mode.

-
Give a name to the Actor and set where you like to place the Actor script. It can be set in the host project or in a different module. The Public/Private button will define whether this class will be public or private. Also, you can define the path where the file will be. After you fill out the parameters click Create Class.

-
After Unreal Engine compiles the project, Visual Studio will automatically open the .h and the .cpp files.
Add Actors and set Origin Position
ArcGIS Map Actor will place your GIS content in Unreal Engine space, and you can enable/disable the editor mode and Mesh Colliders. In this tutorial, you will configure where your GIS content is to be placed at 0, 0, 0 of the game engine space.
You can find the ArcGIS Map Actor here:
Plugins\ArcGIS Maps SDK for Unreal Engine C++ Classes\ArcGISMapsSDK\Public\ArcGISMapsSDK\Actors
-
Drag the ArcGIS Map Actor into the level.

-
Configure the Origin Position with a WKID. In this tutorial, set up the following Origin Position values for New York City:
- Longitude: -74
- Latitude: 41
- Spatial Reference WKID: 4326
- Altitude: 0
This is the result of the updated ArcGIS Map Actor:

-
Locate the Map Creator Actor in the Content Drawer. Drag and drop the Actor you created into the level.

Set up the project
Before working on the .h and the .cpp files, you need to first set up the project.
-
Navigate to your MapCreator.cpp file folder. Create a PCH file with the .h suffix as follows:
Use dark colors for code blocks Copy #pragma once #include <assert.h> #include <atomic> #include <functional> #include <memory> #include "CoreMinimal.h" #include "ArcGISMapsSDK/API/Unreal/ArcGISDictionary.h" -
Open
yourfile under the directory your_project > Source > your_project._project _file. Build.cs -
Add this line of code after
PCHthat points to your PCH file.Usage = PCH Usage Mode. Use Explicit Or Shared PC Hs; Use dark colors for code blocks Copy PrivatePCHHeaderFile = "Private/your_PCH_file.h"; -
In
Public, add two modules as follows:Dependency Module Names. Add Range Use dark colors for code blocks Copy PublicDependencyModuleNames.AddRange(new string[] { "Core", "CoreUObject", "Engine", "InputCore" , "EnhancedInput", "ArcGISMapsSDK","ArcGISSamples"});
Create header file
-
When you create an ArcGIS Actor, you already have the necessary content included in the header file. Make sure you have
ArcGIS.Maps SD K/ Actors/ ArcGIS Actor.h -
Set the default values for the Actor's properties and set it to public. In this tutorial, expose the API key field to the Details panel to allow setting the API key
An API key is a long-lived access token created using API key credentials. They are valid for up to one year and are typically embedded directly into client applications. from Unreal Editor. You can also set your API key directly without exposing a field. To obtain an API key, go to your portalArcGIS portal, also known as a portal, is a website with applications and tools that can be used to create, manage, access, and share geospatial content and data. It supports security and authentication, developer credentials, content and data service management, user and group management, and site administration. A portal can be hosted in Esri's infrastructure or your own infrastructure. .Use dark colors for code blocks Copy public: ASampleAPIMapCreator(); UPROPERTY(EditAnywhere, Category = "ArcGISSamples|SampleAPIMapCreator") FString APIKey; -
Create the method that will run your code. In this example, it is named as
Create.ArcGIS Map() Use dark colors for code blocks Copy void CreateArcGISMap(); -
For the editor mode, it's necessary to react to changes during the editor time. Add subsystem listener for the ArcGIS Map Component Actor which is connected to the subsystem.
Use dark colors for code blocks Copy // IArcGISMapsSDKSubsystemListener void OnArcGISMapComponentChanged(UArcGISMapComponent* InMapComponent) override;
This is the complete source code for our header file:
#pragma once
#include "CoreMinimal.h"
#include "ArcGISMapsSDK/Actors/ArcGISActor.h"
#include "SampleAPIMapCreator.generated.h"
// The declaration of our Actor class
UCLASS()
class ARCGISSAMPLES_API ASampleAPIMapCreator : public AArcGISActor
{
GENERATED_BODY()
public:
ASampleAPIMapCreator();
FString APIKey;
// IArcGISMapsSDKSubsystemListener
void OnArcGISMapComponentChanged(UArcGISMapComponent* InMapComponent) override;
void CreateArcGISMap();
};Include headers and create Renderer Component
-
First, in the .cpp file you previously created for the Actor, include all the required headers.
Use dark colors for code blocks Copy #include "SampleAPIMapCreator.h" #include "Engine/World.h" #include "Kismet/GameplayStatics.h" #include "ArcGISMapsSDK/API/GameEngine/Elevation/Base/ArcGISElevationSource.h" #include "ArcGISMapsSDK/API/GameEngine/Layers/Base/ArcGISLayer.h" #include "ArcGISMapsSDK/API/GameEngine/View/ArcGISView.h" #include "ArcGISMapsSDK/API/GameEngine/View/State/ArcGISElevationSourceViewState.h" #include "ArcGISMapsSDK/API/GameEngine/View/State/ArcGISLayerViewState.h" #include "ArcGISMapsSDK/API/GameEngine/View/State/ArcGISViewState.h" #include "ArcGISMapsSDK/API/GameEngine/View/State/ArcGISViewStateMessage.h" #include "ArcGISMapsSDK/BlueprintNodes/GameEngine/Elevation/ArcGISImageElevationSource.h" #include "ArcGISMapsSDK/BlueprintNodes/GameEngine/Extent/ArcGISExtentCircle.h" #include "ArcGISMapsSDK/BlueprintNodes/GameEngine/Geometry/ArcGISSpatialReference.h" #include "ArcGISMapsSDK/BlueprintNodes/GameEngine/Layers/ArcGIS3DObjectSceneLayer.h" #include "ArcGISMapsSDK/BlueprintNodes/GameEngine/Layers/ArcGISImageLayer.h" #include "ArcGISMapsSDK/BlueprintNodes/GameEngine/Layers/Base/ArcGISLayerCollection.h" #include "ArcGISMapsSDK/BlueprintNodes/GameEngine/Map/ArcGISBasemap.h" #include "ArcGISMapsSDK/BlueprintNodes/GameEngine/Map/ArcGISMap.h" #include "ArcGISMapsSDK/BlueprintNodes/GameEngine/Map/ArcGISMapElevation.h" #include "ArcGISMapsSDK/BlueprintNodes/GameEngine/Map/ArcGISMapType.h" #include "ArcGISMapsSDK/Components/ArcGISLocationComponent.h" #include "ArcGISMapsSDK/Components/ArcGISMapComponent.h" #include "ArcGISMapsSDK/Utils/ArcGISMapsSDKProjectSettings.h" #include "ArcGISSamples/Public/ArcGISPawn.h" -
In the constructor, change
PrimarytoActor Tick.b Can Ever Tick falseto improve performance.Use dark colors for code blocks Copy ASampleAPIMapCreator::ASampleAPIMapCreator() { PrimaryActorTick.bCanEverTick = false; } -
Call the method
Createfor the ArcGIS Subsystem Listener.ArcGIS Map() Use dark colors for code blocks Copy void ASampleAPIMapCreator::OnArcGISMapComponentChanged(UArcGISMapComponent* InMapComponent) { AArcGISActor::OnArcGISMapComponentChanged(InMapComponent); if (MapComponent) { CreateArcGISMap(); } }
Create ArcGIS Map and set layers
ArcGIS Map is a container of your GIS content. First, create this container as a function to begin adding your content.
-
Create your
Createfunction.ArcGIS Map() Use dark colors for code blocks Copy void ASampleAPIMapCreator::CreateArcGISMap() { } -
Set the view mode by using
ArcGISenum and createMap Type ArcGI. You will set up a map extent in the Set map extent section.S Map Use dark colors for code blocks Copy // Create the map document auto mapType = EArcGISMapType::Local; auto arcGISMap = UArcGISMap::CreateArcGISMapWithMapType(mapType); -
Create a basemap with an image tile layer using the
ArcGISofImagery ArcGISclass which requires the API key.Basemap Style Use dark colors for code blocks Copy // Add a basemap auto basemapType = EArcGISBasemapStyle::ArcGISImagery; auto arcGISBasemap = UArcGISBasemap::CreateArcGISBasemapWithBasemapStyle(basemapType, APIKey); // Set the basemap arcGISMap->SetBasemap(arcGISBasemap); -
Set and create your map elevation with
ArcGIS.Elevation Source Use dark colors for code blocks Copy // Set the elevation auto elevationSource = UArcGISImageElevationSource::CreateArcGISImageElevationSourceWithName( "https://elevation3d.arcgis.com/arcgis/rest/services/WorldElevation3D/Terrain3D/ImageServer", "Terrain 3D", ""); auto mapElevation = UArcGISMapElevation::CreateArcGISMapElevationWithElevationSource(elevationSource); arcGISMap->SetElevation(mapElevation);In this tutorial, you'll use Terrain3D as the elevation source. You can find more elevation layers in ArcGIS Online
ArcGIS Online is a GIS mapping, analytics, data hosting, and content management software as a service (SaaS) product. It includes applications, tools, APIs, and location services for users and developers. It is subscription-based and requires an ArcGIS Online account. . -
Add the following three image tile layers and one 3D object scene layer with their name.
-
Image tile layers
- Layer name:
layer_1 - ArcGIS Online item: UrbanObservatory_NYC_TransitFrequency.
- Layer name:
layer_2 - ArcGIS Online item: New_York_Industrial
- Layer name:
layer_3 - ArcGIS Online item: NewYorkCity_PopDensity
- Layer name:
-
3D object scene layer
- Layer name:
buildingLayer - ArcGIS Online item: New York, USA Buildings
- Layer name:
Add image tile layers and the 3D object scene layer to the ArcGIS Map by using
ArcGISandImage Layer ArcGI, respectively.S3 D Object Scene Layer Use dark colors for code blocks Copy // Create layers auto layer_1 = UArcGISImageLayer::CreateArcGISImageLayerWithProperties( "https://www.arcgis.com/home/item.html?id=b3a3743cda50473ba5df14eaf14e5d18", "NYTransitFrequencyTiles", 1.0f, true, ""); arcGISMap->GetLayers()->Add(layer_1); auto layer_2 = UArcGISImageLayer::CreateArcGISImageLayerWithProperties( "https://www.arcgis.com/home/item.html?id=1c28f1944276445a99f5b554c3c07771", "NYIndustrialTiles", 1.0f, true, ""); arcGISMap->GetLayers()->Add(layer_2); auto layer_3 = UArcGISImageLayer::CreateArcGISImageLayerWithProperties( "https://www.arcgis.com/home/item.html?id=7de726fabcc149f185b0bf8acde82878", "NYPopDensityTiles", 1.0f, true, ""); arcGISMap->GetLayers()->Add(layer_3); auto buildingLayer = UArcGIS3DObjectSceneLayer::CreateArcGIS3DObjectSceneLayerWithProperties( "https://www.arcgis.com/home/item.html?id=a457834a6cb449cd958502d6e98ba305", "NYScene", 1.0f, true, ""); arcGISMap->GetLayers()->Add(buildingLayer); -
Set map extent
To configure an extent, it is required to provide the center point position together with the shape and dimensions. ArcGIS class allows you to define a position of a map with GIS coordinates and its spatial reference. You can use ArcGIS to specify the extent center. Use ArcGIS to configure an extent with the following parameter values and set it for the map.
- Latitude: 40.691242
- Longitude: -74.054921
- Altitude: 3000 Meters
- Radius: 10000 Meters
- Spatial Reference: WGS 84 (WKID 4326)
The if statement will check the maptype and the extent can be set only for local. Refer step 2 in the Create ArcGIS Map and set layers section.
// Create extent
if (mapType == EArcGISMapType::Local)
{
// Set this to true to enable an extent on the map component
MapComponent->SetIsExtentEnabled(true);
auto sr = UArcGISSpatialReference::WGS84();
auto extentCenter = UArcGISPoint::CreateArcGISPointWithXYZSpatialReference(-74.054921, 40.691242, 3000, sr);
auto extent = UArcGISExtentCircle::CreateArcGISExtentCircle(extentCenter, 10000);
arcGISMap->SetClippingArea(extent);
}
For other extent options, refer to the map extent page.
Set initial camera position
The ArcGIS Camera Component controls the data that is loaded into your scene. The ArcGIS Location Component is responsible for the position and the angle of the camera. Unreal Engine's Default Pawn is a kind of Actors that can be controlled by players or AI with some additional Components and functionality. To explore ArcGIS Map with a camera, you can set your camera controller together with the ArcGIS Camera Component and the ArcGIS Location Component to a Default Pawn.
In this tutorial, you will set the initial camera position with C++ script by using ArcGIS Pawn, which is a sample Pawn that has a sample camera controller code, along with the ArcGIS Camera Component and the ArcGIS Location Component.
-
Locate the ArcGISPawn in the Content Drawer (Plugins > ArcGIS Maps SDK for Unreal Engine C++ Classes > ArcGISMapsSDK > Public). Drag and drop it into the level. The position of the ArcGIS Pawn is defined by the ArcGIS Location Component. To populate the position values of the ArcGIS Location Component, access the Component attached to the Actor.
Use dark colors for code blocks Copy // Set the initial Pawn location. This can be removed to set the AArcGISPawn`s location using the details panel AArcGISPawn* arcGISPawn = Cast<AArcGISPawn>(UGameplayStatics::GetActorOfClass(GetWorld(), AArcGISPawn::StaticClass())); auto PawnLocationComponent = Cast<UArcGISLocationComponent>(arcGISPawn->GetComponentByClass(UArcGISLocationComponent::StaticClass())); -
Specify the position values with
ArcGIS. In this tutorial, you set the following values for the camera position.Point - Longitude: -74.054921
- Latitude: 40.691242
- Altitude: 3000 Meters
- Spatial Reference: WGS 84 (WKID 4326)
Use dark colors for code blocks Copy auto Position = UArcGISPoint::CreateArcGISPointWithXYZSpatialReference(-74.054921, 40.691242, 3000, UArcGISSpatialReference::WGS84()); PawnLocationComponent->SetPosition(Position); -
Set the rotation of the camera with the following values.
- Heading: 65
- Pitch: 0
- Roll: 68
Use dark colors for code blocks Copy auto Rotation = UArcGISRotation::CreateArcGISRotation(65, 0, 68); PawnLocationComponent->SetRotation(Rotation);
Set ArcGIS Map
-
Set the value for the
ArcGIS. If it's set toView Options trueyou can change the layer's visibility during the runtime.Use dark colors for code blocks Copy // Create the view options config struct FArcGISViewOptions viewOptions{true}; -
ArcGIS Map Component communicates with
ArcGISto handle what and how the ArcGIS Map to be rendered. Set theView viewandOptions arcto theGIS Map Map.Component Use dark colors for code blocks Copy // Set the map and view options MapComponent->GetView()->SetViewOptions(viewOptions); MapComponent->SetMap(arcGISMap);
You have created the C++ source code for an API scene. Build and compile the project and Unreal Engine will be automatically opened.
Set up the sky and the light
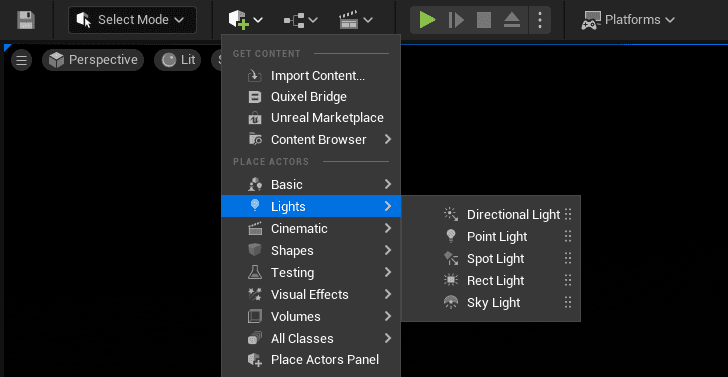
-
From the Create menu on the Main Toolbar, select Lights > Directional Light and drag it into the level to create a Directional Light. For more information about Directional Lights, see Lights.
-
Select the Directional Light in the Outliner, and open the Transform section in the Details panel.
-
Reset the Location and Set the Rotation to:
- X: 0
- Y: -28
- Z: -28
-
Set the Mobility to Movable.

-
In the Light section, change the Intensity Value to
3.1416. -
In the Cascaded Shadow Maps section, change the Dynamic Shadow Distance MovableLight to
2000000. -
In the Atmosphere and Cloud section, enable Atmosphere Sun Light.
-
In the Actor > Spawn Collision Handling Method section, select Always Spawn, Ignore Collisions.

-
From the quick add menu on the toolbar, select Lights > Sky Light and drag it into the level to create a Sky Light. For more information about Sky Light, see Lights.
-
In the Transform section, reset the Location and set the Mobility to Movable.
-
In the Light section, enable Real Time Capture.

-
From the quick add menu on the toolbar, select Visual Effects > Sky Atmosphere and drag it into the level to create a Sky. For more information about Sky Atmosphere, see Fog Effects.
-
In the Planet section, change the Ground Radius to
6378.137207.
When the light starts loading in the Viewport, you can see the render result in the editor Viewport. Double-click the ArcGIS Pawn in the Outliner panel to snap the editor camera to the camera position.
Use the WASD keys while holding the right mouse button mouse to move around, or hold the left mouse button to pan during the editor mode.
Click the Play icon on the Toolbar, and Use the WASD keys to move around, hold the right mouse button mouse to look around or hold the left mouse button to pan.