The general steps to use ArcGIS Experience Builder are:
1. Choose a template
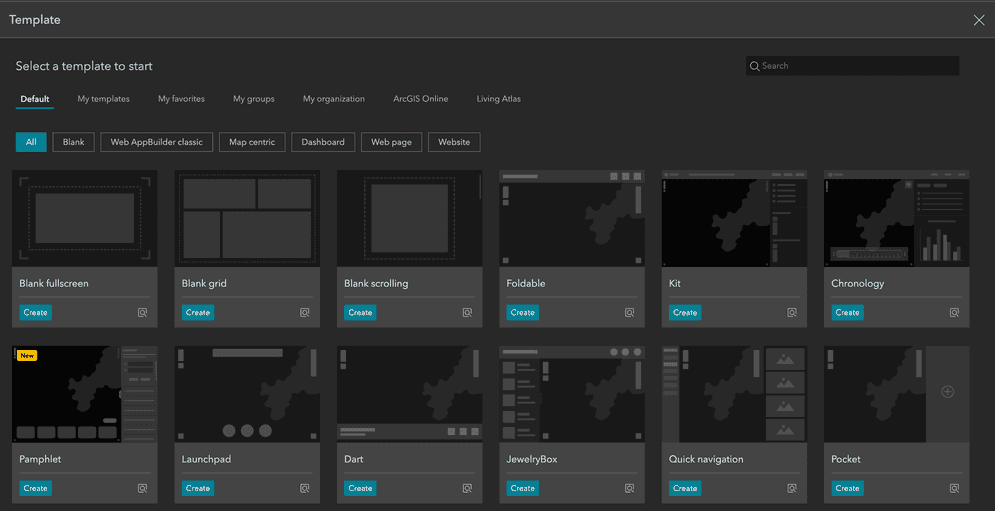
Start with selecting from a list of templates.
Experience Builder templates are predefined layouts and configurations that provide a starting point for creating web applications. These templates offer a way to quickly create web apps without starting from scratch. Templates include predefined widgets, styles, and layouts that can be customized to fit your specific need.
-
Click Create new.
-
Hover over each template for a short description
-
Click the Preview icon for a quick view of the template.
-
Click Create on the template card of the template you chose.
2. Add data
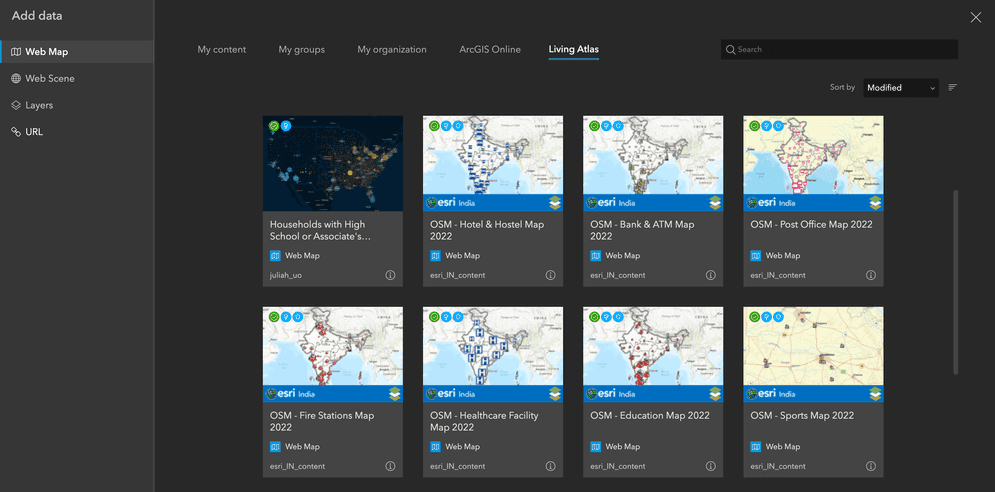
Add your data to the newly created experience.
ArcGIS Experience Builder allows you to connect various 2D and 3D data sources, including web maps, web scenes, hosted layers, services, and feature tables.
To add data to a web app, in builder more:
-
Click Data tab.
-
Click Add data.
-
Choose either a web map, web scene, feature service, or supply a URL to a data service.
-
Click Done.
3. Add widgets
There are a number ArcGIS Experience Builder widgets you can use to add functionality to your experience. For example, you can create menus, add map interactions, and add buttons. Widgets can be customized by adding or modifying them through the layout editor allowing you to align, duplicate, or remove widgets. You can configure the content, style, and actions for each widget, including linking them to data sources or other widgets. Widgets can also be copied and pasted to replicate widgets across pages.
The collection of widgets are categorized into the following categories:
-
Map-centric: Widgets that work with or are connected to a map, and perform tasks that make the map more useful.
-
Data-centric: Widgets that work with and interact with different sources of data.
-
Page element: Widgets that allow you to easily add images, text, and other media to a web app.
-
Menu and toolbar: Widgets that offer navigational options in a web app.
-
Layout: Containers that help with organizing the different elements on an app page.
-
Section: Widgets that display changing content in different views and let users switch between those views.
To add a widget in a web app, in builder mode:
-
Click Insert tab.
-
Click and drag a widget onto the layout.

- Configure the widget in the configuration panel (right side of the builder).
4. Configure layout for mobile devices
You can preview your web application at various screen resolutions and ensure the design is suitable for small devices. The default templates are designed to display optimally on smaller screens, but you have the option to use Custom layout mode for more precise control on how the web app will be displayed.
If a widget does not fit in the layout on a small screen, it can be manually added and reconfigured from the Pending tab, and the Live view feature allows you to experiment with interactive widgets and designs.

Add or remove widgets from the Pending list to accommodate for mobile views.
5. Publish the app
You can save and preview your web application to test before sharing it. Additionally, you have the option to generate a template for creating a collection of web applications with a consistent design. To create copies of the templates, you can duplicate items from the gallery or save copies from the builder.