import RenderNode from "@arcgis/core/views/3d/webgl/RenderNode.js";const RenderNode = await $arcgis.import("@arcgis/core/views/3d/webgl/RenderNode.js");- Inheritance:
- RenderNode→
Accessor
- Since
- ArcGIS Maps SDK for JavaScript 4.29
The RenderNode provides low level access to the render pipeline of the SceneView to create custom visualizations and effects. Render nodes inject custom WebGL code in different stages of the render pipeline to alter their outputs.
Important guidelines
This interface is experimental. Please read the following information carefully before using it in a product: It is not possible to shield users of this interface from SceneView internal implementation details. Therefore, this interface should be considered not stable and subject to changes in upcoming minor releases of the ArcGIS Maps SDK for JavaScript. Because of the complex nature of WebGL and hardware-accelerated 3D rendering, this interface is targeting expert developers that are experienced with WebGL or OpenGL.
- Improper use of WebGL might not only break the custom rendering, but also the rendering of SceneView itself.
- Esri does not provide any support for issues related to WebGL rendering in custom rendering code, or for issues that arise in SceneView rendering while using custom rendering code. Integration with third-party libraries is only possible under certain conditions. Specifically, the third-party library has to be capable of working on the same WebGL context as SceneView, and able to set the relevant parts of the WebGL state in every frame.
Usage
A RenderNode subclass is linked to a specific SceneView during construction:
new LuminanceRenderNode({ view });A RenderNode subclass is created using Accessor.createSubclass(). This example node modifies the "composite-color" output of the render pipeline:
const LuminanceRenderNode = RenderNode.createSubclass({ consumes: { required: ["composite-color"] } produces: ["composite-color"] render(inputs) { // custom render code } });
Modifying render graph outputs
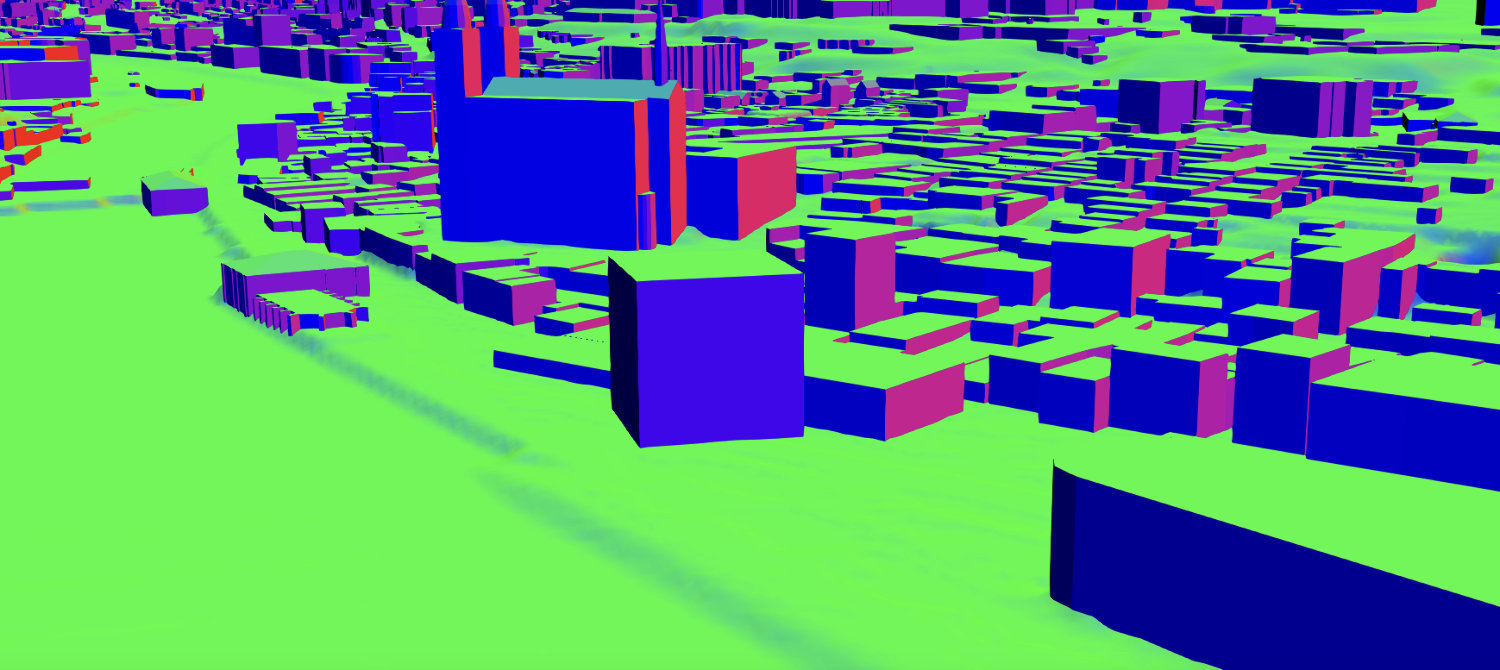
Rendering a single frame in SceneView traverses the individual nodes of the internal render graph of the SceneView. Every time a node is traversed, the render engine will modify or create framebuffers. For example, the render graph in the images shown below contains nodes which render buildings, one transparent cube, the terrain with textures, atmosphere effects, and post processing effects such as antialiasing.
Depending on the SceneView properties and layer configuration, the rendering engine modifies the render graph to traverse the nodes which are required to produce the configured rendering. The chronological render order of the render graph is given by the input-output dependencies between the nodes in the graph. For example, transparent geometry is rendered after all opaque geometry.
The RenderNode class offers a way to inject custom render code to this render pipeline. Currently the following outputs can be modified by custom render nodes:
| RenderNodeOutput | Description |
|---|---|
| opaque-color | Contains the rendered image after all opaque geometries have been drawn. |
| transparent-color | Contains the rendered image after all opaque and transparent geometries have been drawn |
| composite-color | Contains the rendered image without any post processes applied. |
| final-color | Contains the rendered image including post processes. |
Important to note is that the chronological order for traversing the render graph does not correspond to the object location in the frame. For example, all opaque objects are rendered first even if they are behind transparent objects. Depth testing and alpha blending will create the correct visibility.
Once the injection point is declared with produces, the render() function needs to return this output in a ManagedFBO for the RenderNode to be correctly traversed. The output is also provided as an input, and typically this input is read as a texture or bound as the framebuffer to create the output.
See produces and RenderNodeOutput for details.
RenderNode inputs
Every RenderNode requires some input framebuffer objects. Typically a node will modify the state of a framebuffer, using its output also as a required input. The RenderNode offers additional input targets to be used as inputs for a rendering code. These are used for advanced graphics effects. The following additional inputs are available:
 |  |  |  |  |
|---|---|---|---|---|
| composite-color | composite-color depth attachment | composite-color emissive attachment | highlights | normals |
If one of the required inputs is not available then this RenderNode will be skipped during the frame. For example, a custom RenderNode using highlights as required input will only render if highlights are present in the scene. Optional inputs do not cause the render node to be skipped while rendering. If optional inputs are not available they will not be present in the input parameter of the render function.
Note that there are restrictions in availability due to the implicit ordering of the render graph as well. For example, opaque-color cannot require composite-color. See details in RenderNodeInput.
Managed framebuffer objects and attachments
All render nodes have in common that they alter the state of a framebuffer object. This happens either by simply drawing additional geometry "on top" of the input framebuffer, or by using the input as a Texture, e.g. to apply a post processing effect. See WebGL tutorials or the WebGL documentation to get familiar with the concept of framebuffer objects.
The ManagedFBO is a wrapper interface to request and provide framebuffer content to the render engine of the SceneView.The ManagedFBO exposes the necessary interface to reference count these framebuffer and attached textures to render nodes. See ManagedFBO for details.
Coordinate systems
When working with custom render nodes, coordinates have to be specified in the internal rendering coordinate system of SceneView. This coordinate system depends on the SceneView.viewingMode of the view:
- In
localviewing mode, it is equal to the coordinate system defined by the spatial reference of the view. - In
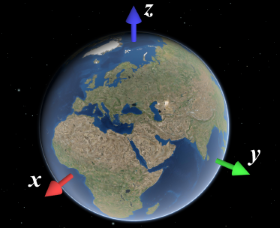
globalviewing mode, it is an ECEF coordinate system where the X-axis points to 0°N 0°E, the Y-axis points to 0°N 90°E, and the Z-axis points to the North Pole. The virtual globe is drawn as a perfect sphere with a radius of 6378137, so the unit of the coordinate system should be considered meters.
You can use toRenderCoordinates() and fromRenderCoordinates() to transform to and from the rendering coordinate system without having to worry about viewingMode and the exact coordinate system definition.
Precision and local origins
In global scenes, the precision of 32-bit floating point arithmetic is not sufficient for visualizations that go beyond global scale (i.e. country scale to city scale). When zooming the view beyond a certain scale, geometries will appear to wobble or jitter, and generally appear displaced. The same applies to local scenes where geometries are far away from the origin of the coordinate system.
In general, you should ensure that all arithmetic done in JavaScript is done in double precision. This is the case for normal JavaScript arithmetic, but you should specifically avoid using Float32Array unless you can rule out precision issues.
However, WebGL does not support 64 bit floating point arithmetic. A simple way to work around this limitation is to render scenes with a local origin:
- Pick a local origin position, approximately at the center of your data.
- Subtract the local origin position from all positional data (vertex data, uniforms, etc.) before passing it into WebGL.
- Translate the view transformation matrix by the origin (pre-multiply the view transformation matrix by the origin translation matrix)
This technique will cause the data to be rendered in a local coordinate frame, and thus avoid the large numbers which would otherwise be needed to place the data at the right location. Multiple local origins are needed if the data covers large extents with high detail. Note that the local origin has to be representable exactly in 32 bit floating point, which is best achieved by storing the local origin itself as a Float32Array.
Constructors
Constructor
Parameters
| Parameter | Type | Description | Required |
|---|---|---|---|
| properties | | |
Properties
camera
- Type
- RenderCamera
Get the render representation of the current camera of a view.
consumes
- Type
- ConsumedNodes
Declare which inputs are needed from the engine for rendering.
For example, to request composite-color and normals, the function consumes() is specified as follows:
consumes: { required: ["composite-color" , "normals"], optional: ["highlights"] } gl
Returns the current WebGL2RenderingContext instance. A context is available within the render() once the view is ready.
produces
- Type
- RenderNodeOutput
Define the output produced by the render function.
The output is always given as one of the inputs to the render function. A post-processing render function
would for example declare to produce the composite-color output:
produces: "composite-color"
Methods
| Method | Signature | Class |
|---|---|---|
acquireOutputFramebuffer(): ManagedFBO | | |
bindRenderTarget(): ManagedFBO | | |
render protected | render(inputs: ManagedFBO[]): ManagedFBO | null | undefined | |
requestRender(): void | | |
resetWebGLState(): void | |
acquireOutputFramebuffer
- Signature
-
acquireOutputFramebuffer (): ManagedFBO
Acquire and bind a managed framebuffer object to be written to and returned by the render function.
A custom RenderNode can render in two ways:
- First, bind an input framebuffer and render into this framebuffer
- Second, acquire a new output framebuffer to render into and bind inputs framebuffers as textures.
This function is a convenience function for acquiring a framebuffer to be returned by the render function. The framebuffer will have the same resolution as the input framebuffer. This function will automatically bind and initialize the acquired framebuffer.
The returned FBO has only a color0 attachment. The render function is however expected to return a ManagedFBO with the same attachments as the input framebuffer. Any additionally needed attachments can be allocated using ManagedFBO.acquireDepth() and ManagedFBO.acquireColor(), or reused from an input framebuffer using ManagedFBO.attachDepth() and ManagedFBO.attachColor().
- Returns
- ManagedFBO
The requested framebuffer object.
Example
// A grayscale RenderNode producing "composite-color" rendering into a color output// framebuffer, and then reuses the unmodified input depth texture:render(inputs) {   const input = inputs.find(({ name }) => name === "composite-color")!;   const output = this.acquireOutputFramebuffer();
   gl.activeTexture(gl.TEXTURE0);   gl.bindTexture(gl.TEXTURE_2D, input.getTexture().glName);   gl.uniform1i(this.textureUniformLocation, 0);
   // ...render grayscale using input texture
   output.attachDepth(input.getAttachment(gl.DEPTH_STENCIL_ATTACHMENT));   return output; }
bindRenderTarget
- Signature
-
bindRenderTarget (): ManagedFBO
Bind the color and depth buffers to render into and return the ManagedFBO.
The 'produces' output framebuffer is always provided as an input to the render function. Depending on the implementation, a custom render node implementation will read this input buffer to produce a new output, or bind it as the active framebuffer to update it. This function will create this framebuffer binding for the second use case.
- Returns
- ManagedFBO
The bound managed framebuffer object.
render
- Signature
-
render (inputs: ManagedFBO[]): ManagedFBO | null | undefined
The render function is called whenever a frame is rendered.
It has to return a framebuffer with the same attachments as the input "produces" framebuffer. A render node producing "composite-color" is expected to produce a "composite-color" framebuffer with one color and depth attachment. If the "composite-color" framebuffer contains an additional color attachment, e.g. for emissive rendering, the render node is expected to return a framebuffer with two attachments and a depth attachment.
Typically the render function either uses bindRenderTarget() to render into this framebuffer, or acquireOutputFramebuffer() to get a new output framebuffer.
The returned framebuffer will be released once by the render engine once it is no longer needed. If the same framebuffer is returned over multiple frames it needs to be retained once per frame.
Parameters
| Parameter | Type | Description | Required |
|---|---|---|---|
| inputs | An array of currently provided fbos. | |
- Returns
- ManagedFBO | null | undefined
The framebuffer containing the modified input.
requestRender
- Signature
-
requestRender (): void
Request the SceneView to be redrawn.
SceneView only renders a frame when there have been changes to the view, for example when the camera has moved or new data is available for display. Frames are always redrawn from the ground up, which means that external renderers will get called in each frame that is drawn.
If a render node requires the view to be redrawn, for example because data has changed, it must call this
function. This will trigger a single frame to be rendered. For continuous rendering, e.g. during animations,
requestRender can be called in every frame from within render. It is important to note that calling
requestRender() should be avoided if frame content stays the same for performance reasons.
Render requests are throttled to allow continuous background animations, and they do not affect SceneView.updating.
- Returns
- void
resetWebGLState
- Signature
-
resetWebGLState (): void
Reset WebGL to a well-defined state.
The ArcGIS Maps SDK for JavaScript offers no guarantee at the time of the call to render
that all WebGL state variables are set to their respective defaults according to the
WebGL 2.0 specification. Calling this function will
reset the state to these defaults.
Because this function conservatively sets all WebGL state, it might incur a performance overhead. Therefore we suggest users instead keep track of the specific WebGL state that is modified, and reset that part of the state manually before returning from 'render'.
- Returns
- void