Developer edition of ArcGIS Experience Builder
How to install developer edition
Here are the general steps to install developer edition of Experience Builder.
1. Create a Client ID
The developer edition of Experience Builder requires a Client ID to connect to ArcGIS Online or ArcGIS Enterprise. This is a unique identifier that allows the developer edition of Experience Builder to authenticate with your ArcGIS account and access the necessary resources.
- Log in to your ArcGIS Online or ArcGIS Enterprise portal and go to the
Contentpage. - In the Content page, click
New Item.
Option 1 - Application
-
In the
New Itemdialog box, selectApplication. -
Under the
Application typeselection, choose theOther applicationoption and clickNext. -
Enter the following parameters:
-
Title- Enter the application title, such asExperience Builder credentials. -
Folder- Select a folder where the item will be stored within your Content. -
Optionally fill
Categories,Tags, andSummaryif you prefer. -
Click
Saveto create the application.
-
-
In the item detail page, under the
Credentialssection, click theManagebutton.
-
In the
Redirect URsection, click theLs + Addbutton and enterhttps.://localhost :3001/ -
At the bottom of the page, click the
Savebutton. -
Copy the
Client IDto use it in the "Server Install" steps, see below.
Option 2 - Developer Credentials
-
In the
New Itemdialog box, selectDeveloper Credentials. -
Choose
O-Auth 2.0 credentials For user authentication.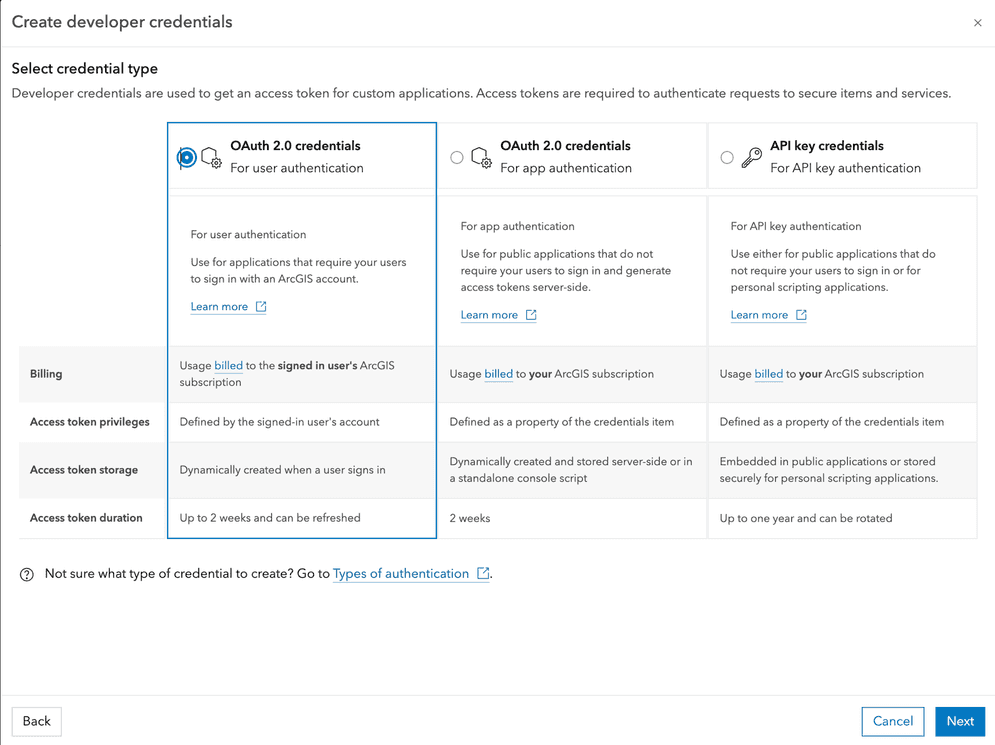
-
In the
Redirect URbox, inputLs httpsand click Next.://localhost :3001/ -
Enter the following parameters:
Title- Enter the application title, such asExperience Builder credentials.Folder- Select a folder where the item will be stored within your Content.- Optionally fill
Categories,Tags, andSummaryif you prefer. - Click
Nextto review the settings. - Click
Createto create the developer credential.
- In the item detail page, under the
Credentialssection copy theClient IDto use it in the "Server Install" steps, see below.
2. Install server service
The Server service is responsible for running the builder interface of developer edition of Experience Builder. The server service must be running in order to see your changes in the builder interface.
-
Experience Builder uses Node.js. Check the recommended Node version for the version of Experience Builder you are using, then download and install that version of Node.js for your operating system.
-
Download the developer edition of Experience Builder and unzip it on your local drive.
-
Open a command prompt or terminal window.
-
Within the terminal, browse to the
/serverdirectory of the Experience Builder files that you unzipped in step 2 using thecdcommand. -
Type
npm ciand then theEnterkey to install the necessary modules. -
Type
npm startand then theEnterkey to start the service. -
In a browser, open this URL:
https. You should see the builder interface.://localhost :3001/ -
Specify the URL to your ArcGIS Online or ArcGIS Enterprise organization, and paste in the
Client IDthat you created in the previous section. -
Install the client, see below.
3. Install client service
The Client service is responsible for running the webpack server, which is used to bundle and load your custom widgets and themes. The client service must be running in order to see your changes in the builder interface.
-
Open a command prompt or terminal window.
-
Within the terminal, browse to the
/clientdirectory of the Experience Builder files that you unzipped in the previous section using thecdcommand. -
Type
npm ciand then theEnterkey to install the necessary modules. -
Type
npm startand then theEnterkey to start the service.
You can have multiple versions of the developer edition of Experience Builder on the same machine. Please check that your machine meets the System requirements.
Installation options
The developer edition of Experience Builder can be installed in different ways depending on your needs. Here are the options:
Install offline
If you are in a disconnected environment, you can perform an offline install of developer edition. This is useful if you are in an environment that does not have access to the internet or if you want to run Experience Builder on a server that does not have internet access.
-
Install developer edition using the offline Node cache ZIP.
-
Install the offline libraries, ArcGIS Maps SDK for JavaScript and Calcite, for offline use and update Experience Builder to reference them.
Install the offline Node cache
-
Experience Builder uses Node.js. Check the recommended Node version for the version of Experience Builder you are using, then download and install that version of Node.js for your operating system.
-
Download the developer edition of Experience Builder and unzip it on your local drive.
-
Download the Node cache ZIP for the developer edition of Experience Builder and unzip it on your local drive.
-
Open your user folder in a command prompt or terminal. Type
npm config get cacheand press the Enter key. A folder path will be displayed. -
Copy the folder path that you got in the previous step and open that directory in Windows Explorer or Finder.
-
Copy the downloaded Node cache files (from step 3) into this directory.
-
Open a command prompt or terminal window.
-
Within the terminal, browse to the
/clientdirectory of the Experience Builder files that you unzipped at the beginning of this section using thecdcommand. -
Type
npm install --offlineand then theEnterkey to install the necessary modules. -
Open another command prompt or terminal window.
-
Within the terminal, browse to the
/serverdirectory of the Experience Builder files that you unzipped at the beginning of this section using thecdcommand. -
Type
npm install --offlineand then theEnterkey to install the necessary modules.
Install the offline libraries
In a disconnected environment you will not have access to the CDN libraries that are necessary for Experience Builder to run:
- ArcGIS Maps SDK for JavaScript CDN
- Calcite Components CDN
Because of this, you will need to download these libraries, host them locally, and point developer edition of Experience Builder to use those locally hosted versions.
-
Check the recommended ArcGIS Maps SDK for JavaScript version for the version of Experience Builder you are using, then download and install that version of the ArcGIS Maps SDK for JavaScript locally. Note the URL of the hosted files to use later.
-
Experience Builder uses the Web Components in the Maps SDK for JavaScript, you need to download the Components by following Components guide, host them under the Maps SDK folder, and make sure they are accessible under these URLs:
arcgis,Js Api Url/map-components/ arcgisandJs Api Url/charts-components/ arcgis.Js Api Url/coding-components/ -
In the Experience Builder files, browse to
client/nodeand copy these files to your web server. Note the URL of the hosted files to use later._modules/@esri/calcite-components/dist/calcite -
In the Experience Builder files, browse to
client/dist. -
There are four places you will need to update the variables
arcgisandJs Api Url calcitewith the local URLs you got in the steps above. For example:Components Url - Replace
"arcgiswithJs Api Url" : "https ://js.arcgis.com/5.0/" "arcgisJs Api Url" : "https :// YOUR _JS _API _UR L/5.0/" - Replace
"calcitewithComponents Url" : "https ://js.arcgis.com/calcite-components/5.0/" "calciteComponents Url" : "https :// YOUR _CALCITE _UR L/"
... in each of the files below:
<install folder>/client/dist/index.html <install folder>/client/dist/experience/index.html <install folder>/client/dist/template/index.html <install folder>/client/dist/builder/index.html
- Replace
Run developer edition offline
Now that you've installed the offline Node cache and updated Experience Builder to point to locally accessible versions of the libraries, you can run developer edition offline.
- Experience Builder requires a connection to ArcGIS Enterprise portal. Create a Client ID using the steps in the previous section.
- Within the terminal window opened to the
/clientfolder from the previous section, typenpm startto start the client service. - Within a separate terminal window opened to the
/serverfolder from the previous section, typenpm startto start the server service. - In a browser, open this URL:
https. You should see the builder interface.://localhost :3001/ - Specify the URL to your ArcGIS Enterprise organization, and paste in the
Client IDthat you created at the beginning of this section.
Install as a Windows Service
You can install developer edition of Experience Builder as a Windows service. This allows you to run the server service in the background and automatically start it when your computer starts. This is useful if you want to run developer edition of Experience Builder on a server or in a production environment.
- Download and install the latest Node.js LTS version for your operating system.
- Open Windows command prompt as administrator.
- Change the directory (
cd) to the/serverdirectory of Experience Builder. - Run the command
npm cito install the dependencies. - Run the command
npm run install-windows-service. - Open the Windows Services app and start the Experience Builder service (default name:
exb-server). - To remove the Experience Builder service, run the command
npm run uninstall-windows-service.