This tutorial shows you how to use the Scene Viewer
Prerequisites
You need an ArcGIS Location Platform or ArcGIS Online account for this tutorial.
Steps
Copy the web scene
Use the unstyled LA Parks and Trails Scene (unstyled) as a starting point for the tutorial. Or, if you prefer, use your own web scene from the Create a web scene tutorial.
-
Go to the LA Parks and Trails Scene (unstyled) web scene.
-
Click Sign In > Save > Save As to copy the map. At minimum, you need a title and tags to save the web map.
Style trailheads (points)
You can style pointx,y coordinates and a spatial reference.
-
In the left-side toolbar, click the Layer Manager.
-
Click the ellipsis to the right of the Trailheads layer, Then click Layer style.
-
In 2D Marker > Options.
-
In Style 2D Marker set the following:
- Marker: Basic shapes > Circle > Done.
- Color:
#1A1 A1 A - Size:
8pixels
-
Enable Callout:
city scale-small- Color:
dark
-
Enable Labels:
- Text:
TRL_NAME - Size:
medium - Color
light
- Text:
-
Enable Declutter.
-
Disable Improve perspective.
-
Click Done > Done.
-
Click the ellipsis to the right of the Trailheads layer, then click Layer properties.
-
Under Elevation click Relative to ground > Configure more.
-
Set Offset to 1.
-
Set Unit to m.
-
Click Done > Done.
Style trails (lines)
You set a line
-
Click Trails > 2D Line > Options.
-
In Style 2D Line, set the following:
- Color:
#B A55 D3 - Width:
7
- Color:
-
Click the ellipsis to the right of the Trails layer and click Layer properties.
-
Set the Transparency to
20. -
Under Elevation click Relative to ground > Configure more.
-
Set Offset to 1.
-
Set Unit to m.
-
Click Done > Done.
Style bike-only trails
You can show different visual patterns for a single layer by adding it twice, applying a filter, and then styling it with a different color. Use the filter to style bike-only trails.
-
In the left panel, click Add layers > Add layer from URL.
-
In Layer URL. Enter the following URL:
https://services3.arcgis.com/ G Vgb Jbqm8h XASV Yi/ ArcGI S/rest/services/ Trails/ Feature Server/0
-
In Layer name the layer to
Trails for Bikes> Add. -
Click the ellipses in the Trails for Bikes layer > Layer properties.
-
In Filter > USE_BIKE.
-
Check Yes and uncheck all and No.
-
Click Done.
-
Click Trails for Bikes > 2D Line > Options.
-
In Style 2D Line, set the following:
- Color:
#F F91 FF - Width:
1.5
- Color:
-
Set Elevation mode to
Relative to ground. -
Set Offset to
2. -
Click Done > Done.
Style parks (polygons)
You use a fill symbol or extrude the polygon
-
Click the Parks and Open Space layer > 2D Polygon > Options.
-
In Style 2D Polygon:
- Color:
#228B22 - Transparency:
80%. Click Done.
- Color:
-
Set Elevation mode to
On the ground. -
Click Done > Done.
Explore the web scene
-
In the left toolbar, click Save to save your scene. At minimum you need a title and tags. Your web scene
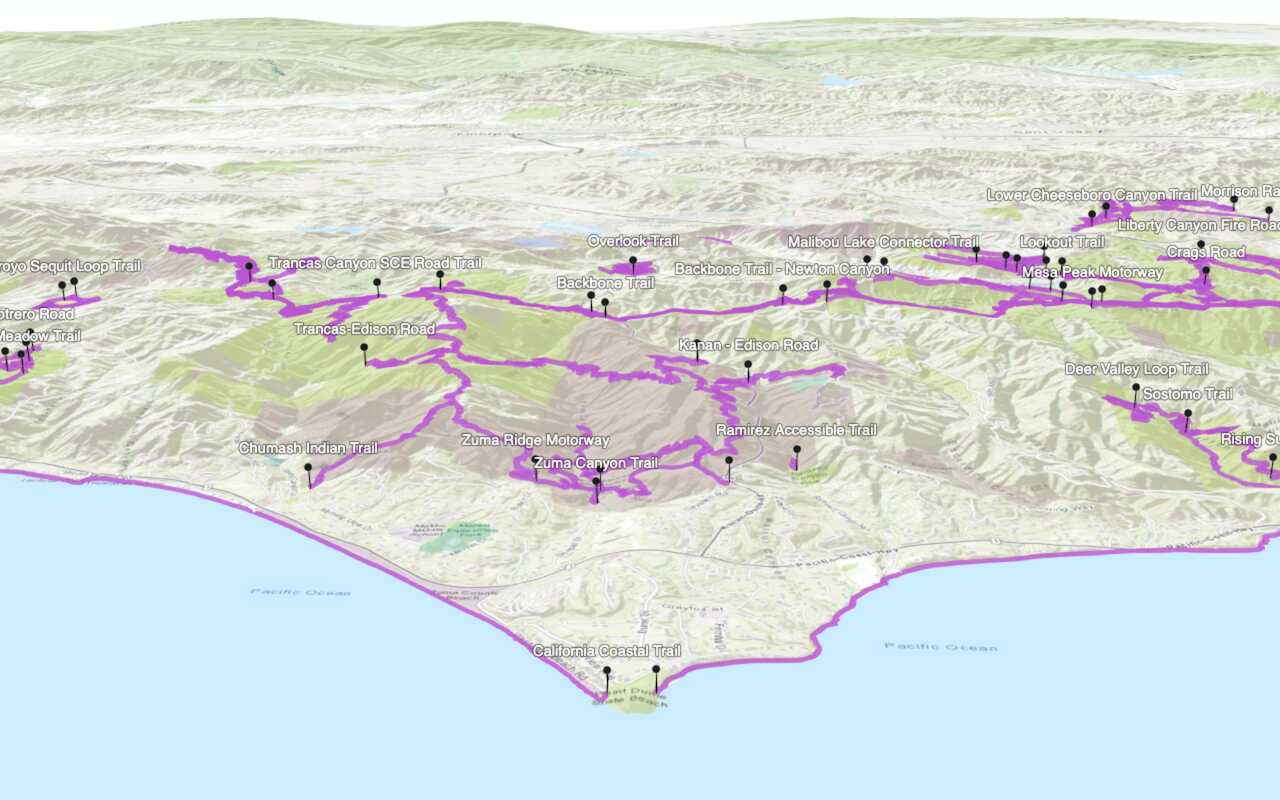
A web scene is a scene stored as a JSON object that defines properties such as the basemap layer, data layers, layer styles, and pop-up styles. Its JSON structure is defined by the web scene specification. should look something like this. -
Drag, zoom, and pan the styled web scene.
What's next?
Learn how to use additional tools, APIs, and location services in these tutorials:
Display a web scene
Create and display a scene from a web scene.
Display a custom basemap style
Add and display a styled vector tile basemap layer.