Learn how to implement user authenticationclient_id, client_secret, and redirect URIs. They are a type of developer credential.
You can use different types of authentication to access secured ArcGIS services
In this tutorial, you will build an app that implements user authentication using OAuth credentials so users can sign in and be authenticated through ArcGIS Online to access the ArcGIS World Traffic service.
Prerequisites
Before starting this tutorial:
-
You need an ArcGIS Location Platform or ArcGIS Online account.
-
Confirm that your system meets the minimum system requirements.
-
An IDE for Java.
Steps
Create OAuth credentials for user authentication
OAuth credentialsclient_id, client_secret, and redirect URIs. They are a type of developer credential.
-
Go to the Create OAuth credentials for user authentication tutorial and create OAuth credentials
OAuth credentials are an item that contains parameters required to implement user authentication or app authentication, including a using your ArcGIS Location Platformclient_id,client_secret, and redirect URIs. They are a type of developer credential.An ArcGIS Location Platform account, formerly known as an ArcGIS Developer account, is an identity associated with an ArcGIS Location Platform subscription. or ArcGIS OnlineAn ArcGIS Online account, also known as an ArcGIS Organization account, is an identity associated with an ArcGIS Online subscription. It can be used to access ArcGIS tools and develop applications with ArcGIS location services for an organization. account. -
Copy the
Client IDandRedirect URLas you will use them to implement user authenticationUser authentication is a type of authentication that allows users with an ArcGIS account to sign into an application and allow it to access ArcGIS content, services, and resources on their behalf. The typical authorization protocol used is OAuth2.0. later in this tutorial. TheClient IDis found on the Application itemAn item, also known as a content item, is a resource stored in a portal such as a web map, hosted layer, style, script tool, file, or notebook. ’s Overview page, while theRedirect URLis found on the Settings page.
The Client ID uniquely identifies your app on the authenticating server. If the server cannot find an app with the provided Client ID, it will not proceed with authentication.
The Redirect URL (also referred to as a callback url) is used to identify a response from the authenticating server when the system returns control back to your app after an OAuth login. Since it does not necessarily represent a valid endpoint that a user could navigate to, the redirect URL can use a custom scheme, such as my-app://. You can configure several redirect URLs in your application definition and can remove or edit them. It’s important to make sure the redirect URL used in your app’s code matches a redirect URL configured for the application.
Open a Java project with Gradle
-
To start this tutorial, complete the Display a map tutorial, or download and unzip the Display a map solution into a new folder.
-
Open the build.gradle file as a project in IntelliJ IDEA.
-
Delete the code that sets your API Key. Since your app will be using OAuth, you will not need an API Key.
App.javaArcGISRuntimeEnvironment.setApiKey("YOUR_ACCESS_TOKEN");
Prepare files before coding the app
Modify the files from the Display a map tutorial so they can be used in this tutorial: you will add imports, change the application title, and modify the view point’s scale.
-
In IntelliJ IDEA, locate the Project tool window, open src/main/java/com.example.app, and double-click App. Add the following imports, replacing those from the
Display a maptutorial.-
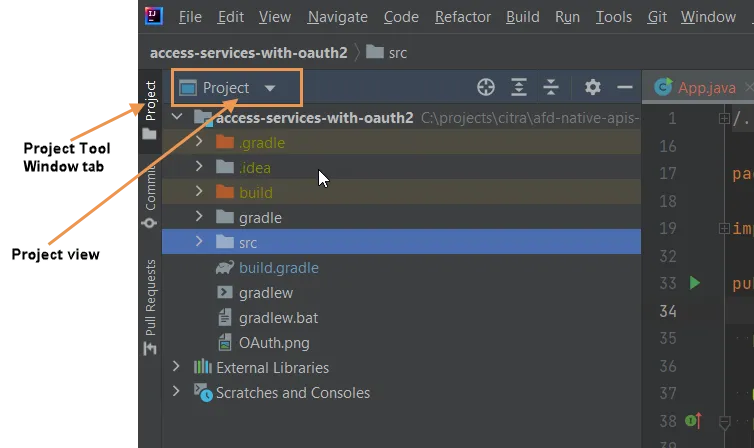
In the main menu of IntelliJ IDEA, click View > Tool Windows > Project. The Project Tool window displays, with a vertical tab on the left that says Project.
-
Inside the Project tool window, your view name should also be Project. If the view name is something else (such as Packages or Project Files), click on the leftmost control in the title bar of the Project tool window, and select Project from the drop-down list.
 App.javapackage com.example.app;import com.esri.arcgisruntime.ArcGISRuntimeEnvironment;import javafx.application.Application;import javafx.scene.Scene;import javafx.scene.layout.StackPane;import javafx.stage.Stage;import com.esri.arcgisruntime.layers.ArcGISMapImageLayer;import com.esri.arcgisruntime.mapping.ArcGISMap;import com.esri.arcgisruntime.mapping.BasemapStyle;import com.esri.arcgisruntime.mapping.Viewpoint;import com.esri.arcgisruntime.mapping.view.MapView;import com.esri.arcgisruntime.security.AuthenticationManager;import com.esri.arcgisruntime.security.DefaultAuthenticationChallengeHandler;import com.esri.arcgisruntime.security.OAuthConfiguration;public class App extends Application {
 -
-
In the
start()life cycle method, change the title that will appear on the application window toAccess services with OAuth 2.0. In addition, add thetrystatement, which will be closed later on in the tutorial.App.java@Overridepublic void start(Stage stage) {try {// set title, size, and add scene to stagestage.setTitle("Access services with OAuth 2.0");stage.setWidth(800);stage.setHeight(700);stage.show(); -
Change the scale of the map’s initial viewpoint to 72000. This scale will make the secured layer visible without zooming in.
App.java58 collapsed lines/** Copyright 2017 Esri.** Licensed under the Apache License, Version 2.0 (the "License"); you may not* use this file except in compliance with the License. You may obtain a copy of* the License at** http://www.apache.org/licenses/LICENSE-2.0** Unless required by applicable law or agreed to in writing, software* distributed under the License is distributed on an "AS IS" BASIS, WITHOUT* WARRANTIES OR CONDITIONS OF ANY KIND, either express or implied. See the* License for the specific language governing permissions and limitations under* the License.*/package com.example.app;import com.esri.arcgisruntime.ArcGISRuntimeEnvironment;import javafx.application.Application;import javafx.scene.Scene;import javafx.scene.layout.StackPane;import javafx.stage.Stage;import com.esri.arcgisruntime.layers.ArcGISMapImageLayer;import com.esri.arcgisruntime.mapping.ArcGISMap;import com.esri.arcgisruntime.mapping.BasemapStyle;import com.esri.arcgisruntime.mapping.Viewpoint;import com.esri.arcgisruntime.mapping.view.MapView;import com.esri.arcgisruntime.security.AuthenticationManager;import com.esri.arcgisruntime.security.DefaultAuthenticationChallengeHandler;import com.esri.arcgisruntime.security.OAuthConfiguration;public class App extends Application {private MapView mapView;@Overridepublic void start(Stage stage) {try {// set title, size, and add scene to stagestage.setTitle("Access services with OAuth 2.0");stage.setWidth(800);stage.setHeight(700);stage.show();// create stack pane and application sceneStackPane stackPane = new StackPane();Scene scene = new Scene(stackPane);stage.setScene(scene);// create a map view and it to the stack panemapView = new MapView();stackPane.getChildren().add(mapView);ArcGISMap map = new ArcGISMap(BasemapStyle.ARCGIS_TOPOGRAPHIC);// set the map on the map viewmapView.setMap(map);mapView.setViewpoint(new Viewpoint(34.02700, -118.80543, 72000.0 ));30 collapsed lines// set up the authentication manager to handle authentication challengesDefaultAuthenticationChallengeHandler defaultAuthenticationChallengeHandler = new DefaultAuthenticationChallengeHandler();AuthenticationManager.setAuthenticationChallengeHandler(defaultAuthenticationChallengeHandler);// add the OAuth configurationAuthenticationManager.addOAuthConfiguration(oAuthConfiguration);}/*** Stops and releases all resources used in application.*/@Overridepublic void stop() {if (mapView != null) {mapView.dispose();}}/*** Opens and runs application.** @param args arguments passed to this application*/public static void main(String[] args) {Application.launch(args);}}
Implement user authentication using OAuth 2.0
This API abstracts some of the details for user authenticationclient_id, client_secret, and redirect URIs. They are a type of developer credential. AuthenticationManager to request, store, and manage credentials for secure resources.
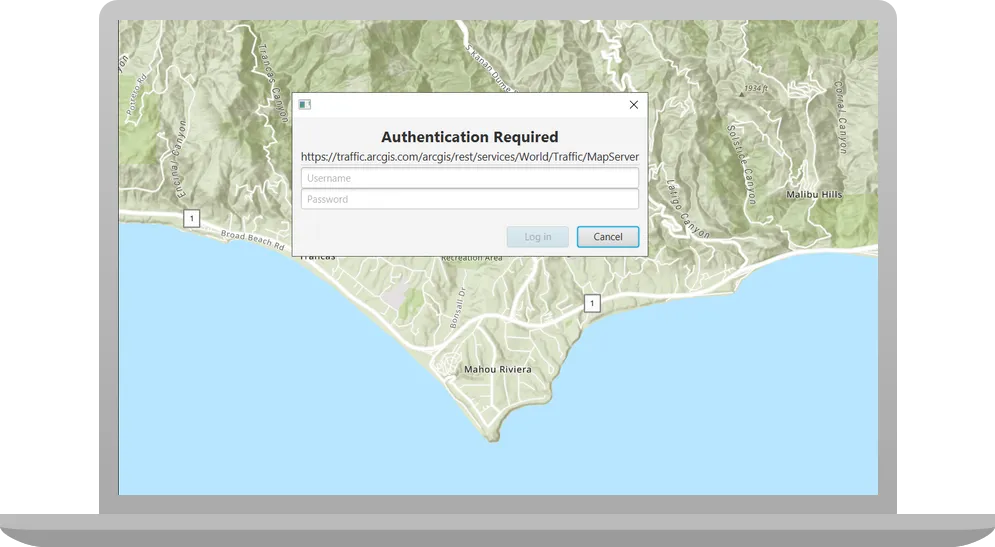
Add code to set up the AuthenticationManager, which launches a small browser window titled Authentication Required. The user must enter log-in credentials before proceeding.
-
In the
start()method, after the line that callsmapView.setViewpoint(), create anOAuthConfiguration.App.java63 collapsed lines/** Copyright 2017 Esri.** Licensed under the Apache License, Version 2.0 (the "License"); you may not* use this file except in compliance with the License. You may obtain a copy of* the License at** http://www.apache.org/licenses/LICENSE-2.0** Unless required by applicable law or agreed to in writing, software* distributed under the License is distributed on an "AS IS" BASIS, WITHOUT* WARRANTIES OR CONDITIONS OF ANY KIND, either express or implied. See the* License for the specific language governing permissions and limitations under* the License.*/package com.example.app;import com.esri.arcgisruntime.ArcGISRuntimeEnvironment;import javafx.application.Application;import javafx.scene.Scene;import javafx.scene.layout.StackPane;import javafx.stage.Stage;import com.esri.arcgisruntime.layers.ArcGISMapImageLayer;import com.esri.arcgisruntime.mapping.ArcGISMap;import com.esri.arcgisruntime.mapping.BasemapStyle;import com.esri.arcgisruntime.mapping.Viewpoint;import com.esri.arcgisruntime.mapping.view.MapView;import com.esri.arcgisruntime.security.AuthenticationManager;import com.esri.arcgisruntime.security.DefaultAuthenticationChallengeHandler;import com.esri.arcgisruntime.security.OAuthConfiguration;public class App extends Application {private MapView mapView;@Overridepublic void start(Stage stage) {try {// set title, size, and add scene to stagestage.setTitle("Access services with OAuth 2.0");stage.setWidth(800);stage.setHeight(700);stage.show();// create stack pane and application sceneStackPane stackPane = new StackPane();Scene scene = new Scene(stackPane);stage.setScene(scene);// create a map view and it to the stack panemapView = new MapView();stackPane.getChildren().add(mapView);ArcGISMap map = new ArcGISMap(BasemapStyle.ARCGIS_TOPOGRAPHIC);// set the map on the map viewmapView.setMap(map);mapView.setViewpoint(new Viewpoint(34.02700, -118.80543, 72000.0 ));// set up an OAuth config with URL to portal, a Client ID and a Redirect URLOAuthConfiguration oAuthConfiguration = new OAuthConfiguration("YOUR-ORGANIZATION-URL", "YOUR-APP-CLIENT-ID", "YOUR-APP-REDIRECT-URL");23 collapsed lines}/*** Stops and releases all resources used in application.*/@Overridepublic void stop() {if (mapView != null) {mapView.dispose();}}/*** Opens and runs application.** @param args arguments passed to this application*/public static void main(String[] args) {Application.launch(args);}}The
OAuthConfigurationconstructor takes three parameters:-
"YOUR-ORGANIZATION-URL": the URL for your organization’s portalArcGIS portal, also known as a portal, is a website with applications and tools that can be used to create, manage, access, and share geospatial content and data. It supports security and authentication, developer credentials, content and data service management, user and group management, and site administration. A portal can be hosted in Esri's infrastructure or your own infrastructure. associated with the ArcGIS Location PlatformAn ArcGIS Location Platform account, formerly known as an ArcGIS Developer account, is an identity associated with an ArcGIS Location Platform subscription. or ArcGIS OnlineAn ArcGIS Online account, also known as an ArcGIS Organization account, is an identity associated with an ArcGIS Online subscription. It can be used to access ArcGIS tools and develop applications with ArcGIS location services for an organization. account you signed in with during Create OAuth credentials for user authentication above. -
"YOUR-APP-CLIENT-ID": theClient IDfrom your Application itemAn item, also known as a content item, is a resource stored in a portal such as a web map, hosted layer, style, script tool, file, or notebook. ’s Overview tab in your portalArcGIS portal, also known as a portal, is a website with applications and tools that can be used to create, manage, access, and share geospatial content and data. It supports security and authentication, developer credentials, content and data service management, user and group management, and site administration. A portal can be hosted in Esri's infrastructure or your own infrastructure. . -
"YOUR-APP-REDIRECT-URL": theRedirect URLfrom your Application itemAn item, also known as a content item, is a resource stored in a portal such as a web map, hosted layer, style, script tool, file, or notebook. ’s Settings tab in your portalArcGIS portal, also known as a portal, is a website with applications and tools that can be used to create, manage, access, and share geospatial content and data. It supports security and authentication, developer credentials, content and data service management, user and group management, and site administration. A portal can be hosted in Esri's infrastructure or your own infrastructure. .
-
-
Create a
DefaultAuthenticationChallengeHandlerand set it on theAuthenticationManager. Then add theoAuthConfigurationto theAuthenticationManager.App.java63 collapsed lines/** Copyright 2017 Esri.** Licensed under the Apache License, Version 2.0 (the "License"); you may not* use this file except in compliance with the License. You may obtain a copy of* the License at** http://www.apache.org/licenses/LICENSE-2.0** Unless required by applicable law or agreed to in writing, software* distributed under the License is distributed on an "AS IS" BASIS, WITHOUT* WARRANTIES OR CONDITIONS OF ANY KIND, either express or implied. See the* License for the specific language governing permissions and limitations under* the License.*/package com.example.app;import com.esri.arcgisruntime.ArcGISRuntimeEnvironment;import javafx.application.Application;import javafx.scene.Scene;import javafx.scene.layout.StackPane;import javafx.stage.Stage;import com.esri.arcgisruntime.layers.ArcGISMapImageLayer;import com.esri.arcgisruntime.mapping.ArcGISMap;import com.esri.arcgisruntime.mapping.BasemapStyle;import com.esri.arcgisruntime.mapping.Viewpoint;import com.esri.arcgisruntime.mapping.view.MapView;import com.esri.arcgisruntime.security.AuthenticationManager;import com.esri.arcgisruntime.security.DefaultAuthenticationChallengeHandler;import com.esri.arcgisruntime.security.OAuthConfiguration;public class App extends Application {private MapView mapView;@Overridepublic void start(Stage stage) {try {// set title, size, and add scene to stagestage.setTitle("Access services with OAuth 2.0");stage.setWidth(800);stage.setHeight(700);stage.show();// create stack pane and application sceneStackPane stackPane = new StackPane();Scene scene = new Scene(stackPane);stage.setScene(scene);// create a map view and it to the stack panemapView = new MapView();stackPane.getChildren().add(mapView);ArcGISMap map = new ArcGISMap(BasemapStyle.ARCGIS_TOPOGRAPHIC);// set the map on the map viewmapView.setMap(map);mapView.setViewpoint(new Viewpoint(34.02700, -118.80543, 72000.0 ));// set up an OAuth config with URL to portal, a Client ID and a Redirect URLOAuthConfiguration oAuthConfiguration = new OAuthConfiguration("YOUR-ORGANIZATION-URL", "YOUR-APP-CLIENT-ID", "YOUR-APP-REDIRECT-URL");// set up the authentication manager to handle authentication challengesDefaultAuthenticationChallengeHandler defaultAuthenticationChallengeHandler = new DefaultAuthenticationChallengeHandler();AuthenticationManager.setAuthenticationChallengeHandler(defaultAuthenticationChallengeHandler);// add the OAuth configurationAuthenticationManager.addOAuthConfiguration(oAuthConfiguration);24 collapsed lines}/*** Stops and releases all resources used in application.*/@Overridepublic void stop() {if (mapView != null) {mapView.dispose();}}/*** Opens and runs application.** @param args arguments passed to this application*/public static void main(String[] args) {Application.launch(args);}} -
Create a file named
style.cssto specify the visual display of the Authentication Required browser window.-
In the Project tool window, open src > main and right-click the main folder. In the context menu, click New > Directory and click resources under Gradle Source Sets. Hit Enter to create the folder.
-
In the Project tool window, right-click the resources folder. In the context menu, click New > File and name the file style.css.
-
Copy the code displayed below and paste it into the
style.cssfile.style.css.panel-region .label {-fx-text-fill: white;}.label {-fx-text-fill: black;}.slider .axis {-fx-tick-label-fill: white;}.range-slider .axis {-fx-tick-label-fill: white;}.panel-region .check-box {-fx-text-fill: white;}.panel-region .radio-button {-fx-text-fill: white;}.color-picker .color-picker-label {-fx-text-fill: black;}
-
Add a traffic layer
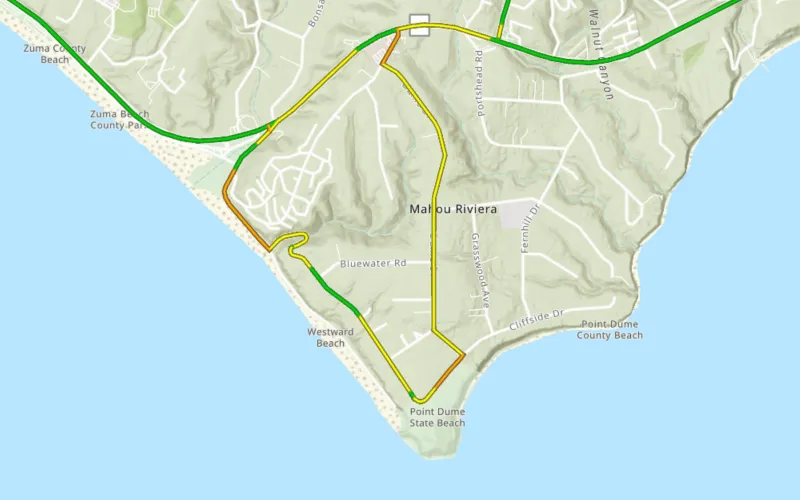
You will add a layer to display the ArcGIS World Traffic service, a dynamic map service that presents historical and near real-time traffic information for different regions in the world. This is a secure service and requires an ArcGIS Online organizational subscription.
ArcGIS World Traffic service data is updated every five minutes to provide traffic speed and traffic incident visualization and identification.
Traffic speeds are displayed as a percentage of free-flow speeds, which is frequently the speed limit or how fast cars tend to travel when unencumbered by other vehicles. The streets are color coded as follows:
- Green (fast): 85 - 100% of free flow speeds
- Yellow (moderate): 65 - 85%
- Orange (slow); 45 - 65%
- Red (stop and go): 0 - 45%
-
Create an
ArcGISMapImageLayerto display the traffic service. Then add the layer to the map’s collection of data layers (operational layers). In addition, you’ll add thecatchstatement that corresponds to thetrystatement added earlier in the tutorial.App.java65 collapsed lines/** Copyright 2017 Esri.** Licensed under the Apache License, Version 2.0 (the "License"); you may not* use this file except in compliance with the License. You may obtain a copy of* the License at** http://www.apache.org/licenses/LICENSE-2.0** Unless required by applicable law or agreed to in writing, software* distributed under the License is distributed on an "AS IS" BASIS, WITHOUT* WARRANTIES OR CONDITIONS OF ANY KIND, either express or implied. See the* License for the specific language governing permissions and limitations under* the License.*/package com.example.app;import com.esri.arcgisruntime.ArcGISRuntimeEnvironment;import javafx.application.Application;import javafx.scene.Scene;import javafx.scene.layout.StackPane;import javafx.stage.Stage;import com.esri.arcgisruntime.layers.ArcGISMapImageLayer;import com.esri.arcgisruntime.mapping.ArcGISMap;import com.esri.arcgisruntime.mapping.BasemapStyle;import com.esri.arcgisruntime.mapping.Viewpoint;import com.esri.arcgisruntime.mapping.view.MapView;import com.esri.arcgisruntime.security.AuthenticationManager;import com.esri.arcgisruntime.security.DefaultAuthenticationChallengeHandler;import com.esri.arcgisruntime.security.OAuthConfiguration;public class App extends Application {private MapView mapView;@Overridepublic void start(Stage stage) {try {// set title, size, and add scene to stagestage.setTitle("Access services with OAuth 2.0");stage.setWidth(800);stage.setHeight(700);stage.show();// create stack pane and application sceneStackPane stackPane = new StackPane();Scene scene = new Scene(stackPane);stage.setScene(scene);// create a map view and it to the stack panemapView = new MapView();stackPane.getChildren().add(mapView);ArcGISMap map = new ArcGISMap(BasemapStyle.ARCGIS_TOPOGRAPHIC);// set the map on the map viewmapView.setMap(map);mapView.setViewpoint(new Viewpoint(34.02700, -118.80543, 72000.0 ));// set up an OAuth config with URL to portal, a Client ID and a Redirect URLOAuthConfiguration oAuthConfiguration = new OAuthConfiguration("YOUR-ORGANIZATION-URL", "YOUR-APP-CLIENT-ID", "YOUR-APP-REDIRECT-URL");// set up the authentication manager to handle authentication challengesDefaultAuthenticationChallengeHandler defaultAuthenticationChallengeHandler = new DefaultAuthenticationChallengeHandler();AuthenticationManager.setAuthenticationChallengeHandler(defaultAuthenticationChallengeHandler);// add the OAuth configurationAuthenticationManager.addOAuthConfiguration(oAuthConfiguration);ArcGISMapImageLayer trafficLayer = new ArcGISMapImageLayer("https://traffic.arcgis.com/arcgis/rest/services/World/Traffic/MapServer");map.getOperationalLayers().add(trafficLayer);} catch (Exception e) {// on any error, display the stack trace.e.printStackTrace();}}22 collapsed lines/*** Stops and releases all resources used in application.*/@Overridepublic void stop() {if (mapView != null) {mapView.dispose();}}/*** Opens and runs application.** @param args arguments passed to this application*/public static void main(String[] args) {Application.launch(args);}} -
Run the app. Ensure to run the app as a Gradle task and not as an application in your IDE. In the Gradle tool window, under Tasks > application, double-click run.
You should initially see the map