Learn how to display the current device location on a map
You can display the device location on a map or scene. This is important for workflows that require the user’s current location, such as finding nearby businesses, navigating from the current location, or identifying and collecting geospatial information.
By default, location display uses the device’s location provider. Your app can also process input from other location providers, such as an external GPS receiver or a provider that returns a simulated location. For more information, see the Show device location topic.
Prerequisites
Before starting this tutorial:
-
You need an ArcGIS Location Platform or ArcGIS Online account.
-
Confirm that your system meets the minimum system requirements.
-
An IDE for Java.
Steps
Open a Java project with Gradle
-
To start this tutorial, complete the Display a map tutorial, or download and unzip the Display a map solution into a new folder.
-
Open the build.gradle file as a project in IntelliJ IDEA.
-
If you downloaded the solution, get an access token and set the API key.
An API key
An API key is a long-lived access token created using API key credentials. They are valid for up to one year and are typically embedded directly into client applications. gives your app access to secure resourcesA secure resource is any item or service in an ArcGIS that requires an ArcGIS account and authentication to access. Examples include ArcGIS Location Services, and items and data services in an ArcGIS portal. used in this tutorial.-
Go to the Create an API key tutorial to obtain a new API key access token
An access token is an authorization string that provides access to secure ArcGIS content, data, and services. Its capabilities are determined by the privileges it supports. It is obtained by implementing API key authentication, User authentication, or App authentication. using your ArcGIS Location PlatformAn ArcGIS Location Platform account, formerly known as an ArcGIS Developer account, is an identity associated with an ArcGIS Location Platform subscription. or ArcGIS OnlineAn ArcGIS Online account, also known as an ArcGIS Organization account, is an identity associated with an ArcGIS Online subscription. It can be used to access ArcGIS tools and develop applications with ArcGIS location services for an organization. account. Ensure that the following privilegePrivileges are a set of permissions assigned to ArcGIS accounts, developer credentials, and applications that grant access to secure resources and functionality in ArcGIS. is enabled: Location services > Basemaps > Basemap styles service. Copy the access token as it will be used in the next step. -
In IntelliJ IDEA’s Project tool window, open src/main/java/com.example.app and double-click App.
-
In the
start()method, set the API key property on theArcGISRuntimeEnvironmentwith your access tokenAn access token is an authorization string that provides access to secure ArcGIS content, data, and services. Its capabilities are determined by the privileges it supports. It is obtained by implementing API key authentication, User authentication, or App authentication. . Replace YOUR_ACCESS_TOKEN with your copied access token. Be sure to surround your access token with double quotes as it is a string.App.javaArcGISRuntimeEnvironment.setApiKey("YOUR_ACCESS_TOKEN");
-
Prepare files before coding the app
Modify the files from the Display a map tutorial so they can be used in this tutorial: you will add imports, change the application title, and remove unnecessary code; you will then add a requirement to the Java module definition and a dependency to the build configuration.
-
In IntelliJ IDEA’s Project tool window, open src/main/java/com.example.app and double-click App. Add the following imports, replacing those from the
Display a maptutorialApp.javapackage com.example.app;import java.nio.charset.StandardCharsets;import java.util.Calendar;import javafx.application.Application;import javafx.scene.Scene;import javafx.scene.control.Alert;import javafx.scene.layout.StackPane;import javafx.stage.Stage;import com.esri.arcgisruntime.ArcGISRuntimeEnvironment;import com.esri.arcgisruntime.geometry.Geometry;import com.esri.arcgisruntime.geometry.Polyline;import com.esri.arcgisruntime.geometry.SpatialReferences;import com.esri.arcgisruntime.loadable.LoadStatus;import com.esri.arcgisruntime.location.SimulatedLocationDataSource;import com.esri.arcgisruntime.location.SimulationParameters;import com.esri.arcgisruntime.mapping.ArcGISMap;import com.esri.arcgisruntime.mapping.BasemapStyle;import com.esri.arcgisruntime.mapping.view.LocationDisplay;import com.esri.arcgisruntime.mapping.view.MapView;import org.apache.commons.io.IOUtils;public class App extends Application { -
In the
start()life-cycle method, change the title that will appear on the application window toDisplay device location.App.java@Overridepublic void start(Stage stage) {try {// set the title and size of the stage and show itstage.setTitle("Display device location");stage.setWidth(800);stage.setHeight(700);stage.show(); -
Delete the map’s initial viewpoint
A viewpoint is a set of parameters used to define a geographic area visible in a map or scene. . The map will zoom to the extentAn extent is a bounding rectangle with points that delineate an area for a map or scene. of the current location, so this code is no longer needed.App.java// create a map view to display the map and add it to the stack panemapView = new MapView();stackPane.getChildren().add(mapView);ArcGISMap map = new ArcGISMap(BasemapStyle.ARCGIS_TOPOGRAPHIC);// set the map on the map viewmapView.setMap(map);mapView.setViewpoint(new Viewpoint(34.02700, -118.80543, 144447.638572)); -
In IntelliJ IDEA’s Project tool window, double-click module-info.java. Add one requires module directive.
module-info.java13 collapsed lines/*COPYRIGHT 1995-2022 ESRITRADE SECRETS: ESRI PROPRIETARY AND CONFIDENTIALUnpublished material - all rights reserved under theCopyright Laws of the United States.For additional information, contact:Environmental Systems Research Institute, Inc.Attn: Contracts Dept380 New York StreetRedlands, California, USA 92373email: contracts@esri.com*/module com.example.app {// require ArcGIS Runtime modulerequires com.esri.arcgisruntime;// requires JavaFX modules that the application usesrequires javafx.graphics;// requires SLF4j modulerequires org.slf4j.nop;requires org.apache.commons.io;exports com.example.app;} -
In IntelliJ IDEA’s Project tool window, double-click build.gradle. Add one dependency and load the gradle changes.
build.gradle27 collapsed linesplugins {id 'application'id 'org.openjfx.javafxplugin' version '0.1.0'id 'idea'}idea {module {downloadJavadoc = true}}ext {arcgisVersion = '200.6.0'}repositories {mavenCentral()maven {url 'https://esri.jfrog.io/artifactory/arcgis'}}configurations {natives}dependencies {implementation 'commons-io:commons-io:2.17.0'implementation "com.esri.arcgisruntime:arcgis-java:$arcgisVersion"natives "com.esri.arcgisruntime:arcgis-java-jnilibs:$arcgisVersion"natives "com.esri.arcgisruntime:arcgis-java-resources:$arcgisVersion"implementation "org.slf4j:slf4j-nop:2.0.16"}29 collapsed linesjavafx {version = "21.0.5"modules = [ 'javafx.controls', 'javafx.graphics', 'javafx.fxml', 'javafx.web', 'javafx.media' ]}application {mainModule = "com.example.app"mainClass = "com.example.app.App"}task copyNatives(type: Copy) {description = "Copies the arcgis native libraries into the .arcgis directory for development."group = "build"configurations.natives.asFileTree.each {from(zipTree(it))}into "${System.properties.getProperty("user.home")}/.arcgis/$arcgisVersion"}run {dependsOn copyNatives}wrapper {gradleVersion = '8.10.2'}
Create simulated location data
Simulation of location data allows this app to run on devices that do not have location services or do not have an actively updating GPS signal. Simulated data is also useful for testing your own location-enabled apps. For more information, see Simulated device location updates.
For this tutorial, you will use simulated location data: a set of location points defined in json. The location points are from a walk around a large parking lot. To display a user’s real position, you would use NmeaLocationDataSource instead.
-
On your file system, create a file named
polyline_data.jsonin thesrc/main/resources/directory of your project. Then paste the following json code into it.polyline_data.json{"paths": [[[-117.19810659418077, 34.057405229888325],[-117.19814377275544, 34.057211176001729],[-117.19775710911107, 34.057177293200773],[-117.1973868388223, 34.057255151357538],[-117.19724927620958, 34.057458446284997],[-117.1973853161779, 34.057553079922293],[-117.19752637683034, 34.057534135490592],[-117.19771293355865, 34.057471254533809],[-117.19794672280628, 34.057485315324428],[-117.19810659418077, 34.057405229888325]]],"spatialReference": {"wkid": 102100,"latestWkid": 3857}} -
From those location points, create a
Polylinethat traces the route through the parking lot.In App.java, get the data from the json file, using
IOUtils.string(), which you imported from thecommons-iodependency in the previous section. Then callGeometry.fromJson()and cast the returnedGeometryto aPolyline.App.java77 collapsed lines/** Copyright 2020 Esri.** Licensed under the Apache License, Version 2.0 (the "License"); you may not* use this file except in compliance with the License. You may obtain a copy of* the License at** http://www.apache.org/licenses/LICENSE-2.0** Unless required by applicable law or agreed to in writing, software* distributed under the License is distributed on an "AS IS" BASIS, WITHOUT* WARRANTIES OR CONDITIONS OF ANY KIND, either express or implied. See the* License for the specific language governing permissions and limitations under* the License.*/package com.example.app;import java.nio.charset.StandardCharsets;import java.util.Calendar;import javafx.application.Application;import javafx.scene.Scene;import javafx.scene.control.Alert;import javafx.scene.layout.StackPane;import javafx.stage.Stage;import com.esri.arcgisruntime.ArcGISRuntimeEnvironment;import com.esri.arcgisruntime.geometry.Geometry;import com.esri.arcgisruntime.geometry.Polyline;import com.esri.arcgisruntime.geometry.SpatialReferences;import com.esri.arcgisruntime.loadable.LoadStatus;import com.esri.arcgisruntime.location.SimulatedLocationDataSource;import com.esri.arcgisruntime.location.SimulationParameters;import com.esri.arcgisruntime.mapping.ArcGISMap;import com.esri.arcgisruntime.mapping.BasemapStyle;import com.esri.arcgisruntime.mapping.view.LocationDisplay;import com.esri.arcgisruntime.mapping.view.MapView;import org.apache.commons.io.IOUtils;public class App extends Application {private MapView mapView;public static void main(String[] args) {Application.launch(args);}@Overridepublic void start(Stage stage) {// set the title and size of the stage and show itstage.setTitle("Display device location");stage.setWidth(800);stage.setHeight(700);stage.show();// create a JavaFX scene with a stack pane as the root node, and add it to the sceneStackPane stackPane = new StackPane();Scene scene = new Scene(stackPane);stage.setScene(scene);ArcGISRuntimeEnvironment.setApiKey("YOUR_ACCESS_TOKEN");// create a map view to display the map and add it to the stack panemapView = new MapView();stackPane.getChildren().add(mapView);ArcGISMap map = new ArcGISMap(BasemapStyle.ARCGIS_TOPOGRAPHIC);// set the map on the map viewmapView.setMap(map);// access the json of the location pointsString polylineData = IOUtils.toString(getClass().getResourceAsStream("/polyline_data.json"), StandardCharsets.UTF_8);// create a polyline from the location pointsPolyline locations = (Polyline) Geometry.fromJson(polylineData, SpatialReferences.getWgs84());14 collapsed lines}/*** Stops and releases all resources used in application.*/@Overridepublic void stop() {if (mapView != null) {mapView.dispose();}}} -
Create a
SimulatedLocationDataSourceand set the location data points on it, and then pass the polyline describing the route and theSimulationParameterstoSimulateLocationDataSource.setLocations().App.java77 collapsed lines/** Copyright 2020 Esri.** Licensed under the Apache License, Version 2.0 (the "License"); you may not* use this file except in compliance with the License. You may obtain a copy of* the License at** http://www.apache.org/licenses/LICENSE-2.0** Unless required by applicable law or agreed to in writing, software* distributed under the License is distributed on an "AS IS" BASIS, WITHOUT* WARRANTIES OR CONDITIONS OF ANY KIND, either express or implied. See the* License for the specific language governing permissions and limitations under* the License.*/package com.example.app;import java.nio.charset.StandardCharsets;import java.util.Calendar;import javafx.application.Application;import javafx.scene.Scene;import javafx.scene.control.Alert;import javafx.scene.layout.StackPane;import javafx.stage.Stage;import com.esri.arcgisruntime.ArcGISRuntimeEnvironment;import com.esri.arcgisruntime.geometry.Geometry;import com.esri.arcgisruntime.geometry.Polyline;import com.esri.arcgisruntime.geometry.SpatialReferences;import com.esri.arcgisruntime.loadable.LoadStatus;import com.esri.arcgisruntime.location.SimulatedLocationDataSource;import com.esri.arcgisruntime.location.SimulationParameters;import com.esri.arcgisruntime.mapping.ArcGISMap;import com.esri.arcgisruntime.mapping.BasemapStyle;import com.esri.arcgisruntime.mapping.view.LocationDisplay;import com.esri.arcgisruntime.mapping.view.MapView;import org.apache.commons.io.IOUtils;public class App extends Application {private MapView mapView;public static void main(String[] args) {Application.launch(args);}@Overridepublic void start(Stage stage) {// set the title and size of the stage and show itstage.setTitle("Display device location");stage.setWidth(800);stage.setHeight(700);stage.show();// create a JavaFX scene with a stack pane as the root node, and add it to the sceneStackPane stackPane = new StackPane();Scene scene = new Scene(stackPane);stage.setScene(scene);ArcGISRuntimeEnvironment.setApiKey("YOUR_ACCESS_TOKEN");// create a map view to display the map and add it to the stack panemapView = new MapView();stackPane.getChildren().add(mapView);ArcGISMap map = new ArcGISMap(BasemapStyle.ARCGIS_TOPOGRAPHIC);// set the map on the map viewmapView.setMap(map);// access the json of the location pointsString polylineData = IOUtils.toString(getClass().getResourceAsStream("/polyline_data.json"), StandardCharsets.UTF_8);// create a polyline from the location pointsPolyline locations = (Polyline) Geometry.fromJson(polylineData, SpatialReferences.getWgs84());// create a simulated location data sourceSimulatedLocationDataSource simulatedLocationDataSource = new SimulatedLocationDataSource();// set the location of the simulated location data source with simulation parameters to set a consistent velocitysimulatedLocationDataSource.setLocations(locations, new SimulationParameters(Calendar.getInstance(), 5.0, 0.0, 0.0));14 collapsed lines}/*** Stops and releases all resources used in application.*/@Overridepublic void stop() {if (mapView != null) {mapView.dispose();}}}
Show the current location
Each map view has its own instance of a LocationDisplay that shows the current location (point) of the device
Instances of this class manage the display of device location on a map view: the symbols, animation, auto pan behavior, and so on. Location display is an overlay of the map view, and displays above everything else, including graphics overlays.
The location display does not retrieve location information, that is the job of the associated data source, which provides location updates on a regular basis. In addition to the default system location data source, you can use location providers based on external GPS devices or a simulated location source.
Each map view has its own instance of a location display and instances of location display and location data source are not shared by multiple map views. This allows you to start and stop location display independently on multiple map views without affecting each other.
-
In
start(), get the location display and set the simulated location data source on it.App.java77 collapsed lines/** Copyright 2020 Esri.** Licensed under the Apache License, Version 2.0 (the "License"); you may not* use this file except in compliance with the License. You may obtain a copy of* the License at** http://www.apache.org/licenses/LICENSE-2.0** Unless required by applicable law or agreed to in writing, software* distributed under the License is distributed on an "AS IS" BASIS, WITHOUT* WARRANTIES OR CONDITIONS OF ANY KIND, either express or implied. See the* License for the specific language governing permissions and limitations under* the License.*/package com.example.app;import java.nio.charset.StandardCharsets;import java.util.Calendar;import javafx.application.Application;import javafx.scene.Scene;import javafx.scene.control.Alert;import javafx.scene.layout.StackPane;import javafx.stage.Stage;import com.esri.arcgisruntime.ArcGISRuntimeEnvironment;import com.esri.arcgisruntime.geometry.Geometry;import com.esri.arcgisruntime.geometry.Polyline;import com.esri.arcgisruntime.geometry.SpatialReferences;import com.esri.arcgisruntime.loadable.LoadStatus;import com.esri.arcgisruntime.location.SimulatedLocationDataSource;import com.esri.arcgisruntime.location.SimulationParameters;import com.esri.arcgisruntime.mapping.ArcGISMap;import com.esri.arcgisruntime.mapping.BasemapStyle;import com.esri.arcgisruntime.mapping.view.LocationDisplay;import com.esri.arcgisruntime.mapping.view.MapView;import org.apache.commons.io.IOUtils;public class App extends Application {private MapView mapView;public static void main(String[] args) {Application.launch(args);}@Overridepublic void start(Stage stage) {// set the title and size of the stage and show itstage.setTitle("Display device location");stage.setWidth(800);stage.setHeight(700);stage.show();// create a JavaFX scene with a stack pane as the root node, and add it to the sceneStackPane stackPane = new StackPane();Scene scene = new Scene(stackPane);stage.setScene(scene);ArcGISRuntimeEnvironment.setApiKey("YOUR_ACCESS_TOKEN");// create a map view to display the map and add it to the stack panemapView = new MapView();stackPane.getChildren().add(mapView);ArcGISMap map = new ArcGISMap(BasemapStyle.ARCGIS_TOPOGRAPHIC);// set the map on the map viewmapView.setMap(map);// access the json of the location pointsString polylineData = IOUtils.toString(getClass().getResourceAsStream("/polyline_data.json"), StandardCharsets.UTF_8);// create a polyline from the location pointsPolyline locations = (Polyline) Geometry.fromJson(polylineData, SpatialReferences.getWgs84());// create a simulated location data sourceSimulatedLocationDataSource simulatedLocationDataSource = new SimulatedLocationDataSource();// set the location of the simulated location data source with simulation parameters to set a consistent velocitysimulatedLocationDataSource.setLocations(locations, new SimulationParameters(Calendar.getInstance(), 5.0, 0.0, 0.0));// configure the map view's location display to follow the simulated location data sourceLocationDisplay locationDisplay = mapView.getLocationDisplay();locationDisplay.setLocationDataSource(simulatedLocationDataSource);14 collapsed lines}/*** Stops and releases all resources used in application.*/@Overridepublic void stop() {if (mapView != null) {mapView.dispose();}}} -
Set the autopan mode to recenter. (For other autopan modes, see the
LocationDisplay.AutoPanModeenum.) Then set the initial zoom scale to 1000, usingLocationDisplay.setInitialZoomScale().App.java77 collapsed lines/** Copyright 2020 Esri.** Licensed under the Apache License, Version 2.0 (the "License"); you may not* use this file except in compliance with the License. You may obtain a copy of* the License at** http://www.apache.org/licenses/LICENSE-2.0** Unless required by applicable law or agreed to in writing, software* distributed under the License is distributed on an "AS IS" BASIS, WITHOUT* WARRANTIES OR CONDITIONS OF ANY KIND, either express or implied. See the* License for the specific language governing permissions and limitations under* the License.*/package com.example.app;import java.nio.charset.StandardCharsets;import java.util.Calendar;import javafx.application.Application;import javafx.scene.Scene;import javafx.scene.control.Alert;import javafx.scene.layout.StackPane;import javafx.stage.Stage;import com.esri.arcgisruntime.ArcGISRuntimeEnvironment;import com.esri.arcgisruntime.geometry.Geometry;import com.esri.arcgisruntime.geometry.Polyline;import com.esri.arcgisruntime.geometry.SpatialReferences;import com.esri.arcgisruntime.loadable.LoadStatus;import com.esri.arcgisruntime.location.SimulatedLocationDataSource;import com.esri.arcgisruntime.location.SimulationParameters;import com.esri.arcgisruntime.mapping.ArcGISMap;import com.esri.arcgisruntime.mapping.BasemapStyle;import com.esri.arcgisruntime.mapping.view.LocationDisplay;import com.esri.arcgisruntime.mapping.view.MapView;import org.apache.commons.io.IOUtils;public class App extends Application {private MapView mapView;public static void main(String[] args) {Application.launch(args);}@Overridepublic void start(Stage stage) {// set the title and size of the stage and show itstage.setTitle("Display device location");stage.setWidth(800);stage.setHeight(700);stage.show();// create a JavaFX scene with a stack pane as the root node, and add it to the sceneStackPane stackPane = new StackPane();Scene scene = new Scene(stackPane);stage.setScene(scene);ArcGISRuntimeEnvironment.setApiKey("YOUR_ACCESS_TOKEN");// create a map view to display the map and add it to the stack panemapView = new MapView();stackPane.getChildren().add(mapView);ArcGISMap map = new ArcGISMap(BasemapStyle.ARCGIS_TOPOGRAPHIC);// set the map on the map viewmapView.setMap(map);// access the json of the location pointsString polylineData = IOUtils.toString(getClass().getResourceAsStream("/polyline_data.json"), StandardCharsets.UTF_8);// create a polyline from the location pointsPolyline locations = (Polyline) Geometry.fromJson(polylineData, SpatialReferences.getWgs84());// create a simulated location data sourceSimulatedLocationDataSource simulatedLocationDataSource = new SimulatedLocationDataSource();// set the location of the simulated location data source with simulation parameters to set a consistent velocitysimulatedLocationDataSource.setLocations(locations, new SimulationParameters(Calendar.getInstance(), 5.0, 0.0, 0.0));// configure the map view's location display to follow the simulated location data sourceLocationDisplay locationDisplay = mapView.getLocationDisplay();locationDisplay.setLocationDataSource(simulatedLocationDataSource);locationDisplay.setAutoPanMode(LocationDisplay.AutoPanMode.RECENTER);locationDisplay.setInitialZoomScale(1000);14 collapsed lines}/*** Stops and releases all resources used in application.*/@Overridepublic void stop() {if (mapView != null) {mapView.dispose();}}} -
Once the map has loaded, start the location display.
App.java77 collapsed lines/** Copyright 2020 Esri.** Licensed under the Apache License, Version 2.0 (the "License"); you may not* use this file except in compliance with the License. You may obtain a copy of* the License at** http://www.apache.org/licenses/LICENSE-2.0** Unless required by applicable law or agreed to in writing, software* distributed under the License is distributed on an "AS IS" BASIS, WITHOUT* WARRANTIES OR CONDITIONS OF ANY KIND, either express or implied. See the* License for the specific language governing permissions and limitations under* the License.*/package com.example.app;import java.nio.charset.StandardCharsets;import java.util.Calendar;import javafx.application.Application;import javafx.scene.Scene;import javafx.scene.control.Alert;import javafx.scene.layout.StackPane;import javafx.stage.Stage;import com.esri.arcgisruntime.ArcGISRuntimeEnvironment;import com.esri.arcgisruntime.geometry.Geometry;import com.esri.arcgisruntime.geometry.Polyline;import com.esri.arcgisruntime.geometry.SpatialReferences;import com.esri.arcgisruntime.loadable.LoadStatus;import com.esri.arcgisruntime.location.SimulatedLocationDataSource;import com.esri.arcgisruntime.location.SimulationParameters;import com.esri.arcgisruntime.mapping.ArcGISMap;import com.esri.arcgisruntime.mapping.BasemapStyle;import com.esri.arcgisruntime.mapping.view.LocationDisplay;import com.esri.arcgisruntime.mapping.view.MapView;import org.apache.commons.io.IOUtils;public class App extends Application {private MapView mapView;public static void main(String[] args) {Application.launch(args);}@Overridepublic void start(Stage stage) {// set the title and size of the stage and show itstage.setTitle("Display device location");stage.setWidth(800);stage.setHeight(700);stage.show();// create a JavaFX scene with a stack pane as the root node, and add it to the sceneStackPane stackPane = new StackPane();Scene scene = new Scene(stackPane);stage.setScene(scene);ArcGISRuntimeEnvironment.setApiKey("YOUR_ACCESS_TOKEN");// create a map view to display the map and add it to the stack panemapView = new MapView();stackPane.getChildren().add(mapView);ArcGISMap map = new ArcGISMap(BasemapStyle.ARCGIS_TOPOGRAPHIC);// set the map on the map viewmapView.setMap(map);// access the json of the location pointsString polylineData = IOUtils.toString(getClass().getResourceAsStream("/polyline_data.json"), StandardCharsets.UTF_8);// create a polyline from the location pointsPolyline locations = (Polyline) Geometry.fromJson(polylineData, SpatialReferences.getWgs84());// create a simulated location data sourceSimulatedLocationDataSource simulatedLocationDataSource = new SimulatedLocationDataSource();// set the location of the simulated location data source with simulation parameters to set a consistent velocitysimulatedLocationDataSource.setLocations(locations, new SimulationParameters(Calendar.getInstance(), 5.0, 0.0, 0.0));// configure the map view's location display to follow the simulated location data sourceLocationDisplay locationDisplay = mapView.getLocationDisplay();locationDisplay.setLocationDataSource(simulatedLocationDataSource);locationDisplay.setAutoPanMode(LocationDisplay.AutoPanMode.RECENTER);locationDisplay.setInitialZoomScale(1000);map.addDoneLoadingListener(() -> {if (map.getLoadStatus() == LoadStatus.LOADED) {// start the location displaylocationDisplay.startAsync();} else {new Alert(Alert.AlertType.ERROR, "Map failed to load: " + map.getLoadError().getCause().getMessage()).show();}});15 collapsed lines}/*** Stops and releases all resources used in application.*/@Overridepublic void stop() {if (mapView != null) {mapView.dispose();}}} -
Wrap your code in
start()with try and catch blocks.App.java50 collapsed lines/** Copyright 2020 Esri.** Licensed under the Apache License, Version 2.0 (the "License"); you may not* use this file except in compliance with the License. You may obtain a copy of* the License at** http://www.apache.org/licenses/LICENSE-2.0** Unless required by applicable law or agreed to in writing, software* distributed under the License is distributed on an "AS IS" BASIS, WITHOUT* WARRANTIES OR CONDITIONS OF ANY KIND, either express or implied. See the* License for the specific language governing permissions and limitations under* the License.*/package com.example.app;import java.nio.charset.StandardCharsets;import java.util.Calendar;import javafx.application.Application;import javafx.scene.Scene;import javafx.scene.control.Alert;import javafx.scene.layout.StackPane;import javafx.stage.Stage;import com.esri.arcgisruntime.ArcGISRuntimeEnvironment;import com.esri.arcgisruntime.geometry.Geometry;import com.esri.arcgisruntime.geometry.Polyline;import com.esri.arcgisruntime.geometry.SpatialReferences;import com.esri.arcgisruntime.loadable.LoadStatus;import com.esri.arcgisruntime.location.SimulatedLocationDataSource;import com.esri.arcgisruntime.location.SimulationParameters;import com.esri.arcgisruntime.mapping.ArcGISMap;import com.esri.arcgisruntime.mapping.BasemapStyle;import com.esri.arcgisruntime.mapping.view.LocationDisplay;import com.esri.arcgisruntime.mapping.view.MapView;import org.apache.commons.io.IOUtils;public class App extends Application {private MapView mapView;public static void main(String[] args) {Application.launch(args);}@Overridepublic void start(Stage stage) {try {// set the title and size of the stage and show itstage.setTitle("Display device location");stage.setWidth(800);stage.setHeight(700);stage.show();68 collapsed lines// create a JavaFX scene with a stack pane as the root node, and add it to the sceneStackPane stackPane = new StackPane();Scene scene = new Scene(stackPane);stage.setScene(scene);ArcGISRuntimeEnvironment.setApiKey("YOUR_ACCESS_TOKEN");// create a map view to display the map and add it to the stack panemapView = new MapView();stackPane.getChildren().add(mapView);ArcGISMap map = new ArcGISMap(BasemapStyle.ARCGIS_TOPOGRAPHIC);// set the map on the map viewmapView.setMap(map);// access the json of the location pointsString polylineData = IOUtils.toString(getClass().getResourceAsStream("/polyline_data.json"), StandardCharsets.UTF_8);// create a polyline from the location pointsPolyline locations = (Polyline) Geometry.fromJson(polylineData, SpatialReferences.getWgs84());// create a simulated location data sourceSimulatedLocationDataSource simulatedLocationDataSource = new SimulatedLocationDataSource();// set the location of the simulated location data source with simulation parameters to set a consistent velocitysimulatedLocationDataSource.setLocations(locations, new SimulationParameters(Calendar.getInstance(), 5.0, 0.0, 0.0));// configure the map view's location display to follow the simulated location data sourceLocationDisplay locationDisplay = mapView.getLocationDisplay();locationDisplay.setLocationDataSource(simulatedLocationDataSource);locationDisplay.setAutoPanMode(LocationDisplay.AutoPanMode.RECENTER);locationDisplay.setInitialZoomScale(1000);map.addDoneLoadingListener(() -> {if (map.getLoadStatus() == LoadStatus.LOADED) {// start the location displaylocationDisplay.startAsync();} else {new Alert(Alert.AlertType.ERROR, "Map failed to load: " + map.getLoadError().getCause().getMessage()).show();}});} catch (Exception e) {// on any error, display the stack trace.e.printStackTrace();}}/*** Stops and releases all resources used in application.*/@Overridepublic void stop() {if (mapView != null) {mapView.dispose();}}} -
Run the app. Ensure to run the app as a Gradle task and not as an application in your IDE. In the Gradle tool window, under Tasks > application, double-click run.
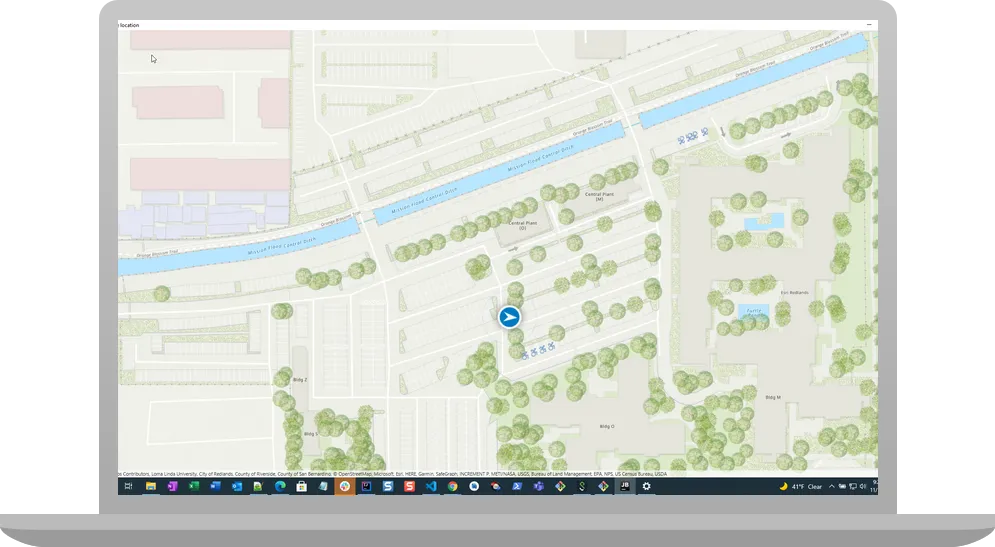
You will see the initial location displayed as a round blue symbol on the map. The location symbol then changes into a white arrowhead within a blue circle and begins walking around the parking lot as the location display consumes the simulated data. When the end of the data is reached, the route repeats.
Different location symbols are used in different autopan modes, and a location symbol’s appearance changes whenever a location is acquired. See LocationDisplay.AutoPanMode for details.
By default, a round blue symbol is used to display the device’s location. The location data source tries to get the most accurate location available but depending upon signal strength, satellite positions, and other factors, the location reported could be an approximation. A semi-transparent circle around the location symbol indicates the range of accuracy. As the device moves and location updates are received, the location symbol will be repositioned on the map.
What’s next?
Learn how to use additional API features, ArcGIS location services, and ArcGIS tools in these tutorials: