Learn how to use a URL to access and
display a feature layer
A feature layerx,y coordinates and a spatial reference.
In this tutorial, you use URLs to access and display three different feature layers
Prerequisites
Before starting this tutorial:
-
You need an ArcGIS Location Platform or ArcGIS Online account.
-
Confirm that your system meets the minimum system requirements.
-
An IDE for Java.
Steps
Open a Java project with Gradle
-
To start this tutorial, complete the Display a map tutorial, or download and unzip the Display a map solution into a new folder.
-
Open the build.gradle file as a project in IntelliJ IDEA.
-
If you downloaded the solution, get an access token and set the API key.
An API key
An API key is a long-lived access token created using API key credentials. They are valid for up to one year and are typically embedded directly into client applications. gives your app access to secure resourcesA secure resource is any item or service in an ArcGIS that requires an ArcGIS account and authentication to access. Examples include ArcGIS Location Services, and items and data services in an ArcGIS portal. used in this tutorial.-
Go to the Create an API key tutorial to obtain a new API key access token
An access token is an authorization string that provides access to secure ArcGIS content, data, and services. Its capabilities are determined by the privileges it supports. It is obtained by implementing API key authentication, User authentication, or App authentication. using your ArcGIS Location PlatformAn ArcGIS Location Platform account, formerly known as an ArcGIS Developer account, is an identity associated with an ArcGIS Location Platform subscription. or ArcGIS OnlineAn ArcGIS Online account, also known as an ArcGIS Organization account, is an identity associated with an ArcGIS Online subscription. It can be used to access ArcGIS tools and develop applications with ArcGIS location services for an organization. account. Ensure that the following privilegePrivileges are a set of permissions assigned to ArcGIS accounts, developer credentials, and applications that grant access to secure resources and functionality in ArcGIS. is enabled: Location services > Basemaps > Basemap styles service. Copy the access token as it will be used in the next step. -
In IntelliJ IDEA’s Project tool window, open src/main/java/com.example.app and double-click App.
-
In the
start()method, set the API key property on theArcGISRuntimeEnvironmentwith your access tokenAn access token is an authorization string that provides access to secure ArcGIS content, data, and services. Its capabilities are determined by the privileges it supports. It is obtained by implementing API key authentication, User authentication, or App authentication. . Replace YOUR_ACCESS_TOKEN with your copied access token. Be sure to surround your access token with double quotes as it is a string.App.javaArcGISRuntimeEnvironment.setApiKey("YOUR_ACCESS_TOKEN");
-
Add import statements
Add import statements to reference the API classes.
-
In the IntelliJ IDEA’s Project tool window, open src/main/java/com.example.app and double-click App.
-
Add the following imports above the existing imports.
App.javaimport com.esri.arcgisruntime.data.ServiceFeatureTable;import com.esri.arcgisruntime.layers.FeatureLayer;import com.esri.arcgisruntime.ArcGISRuntimeEnvironment;import com.esri.arcgisruntime.mapping.ArcGISMap;import com.esri.arcgisruntime.mapping.BasemapStyle;import com.esri.arcgisruntime.mapping.Viewpoint;import com.esri.arcgisruntime.mapping.view.MapView; -
In the
start()life-cycle method, change the title that will appear on the application window toAdd a feature layer.App.java@Overridepublic void start(Stage stage) {// set the title and size of the stage and show itstage.setTitle("Add a feature layer tutorial");stage.setWidth(800);stage.setHeight(700);stage.show();
Create service feature tables to reference feature service data
To display three new data layersServiceFeatureTable objects using URLs to reference datasets hosted in ArcGIS Online
-
Open a browser and navigate to the URL for Parks and Open Spaces to view metadata about the layer. To display the layer in your app, you only need the URL.
The service page provides information such as the geometry
A geometry is a geometric shape, such as a point, polyline, or polygon, that contains one or more coordinates and a spatial reference. type, the geographic extentAn extent is a bounding rectangle with points that delineate an area for a map or scene. , the minimum and maximum scaleZoom level is a value that sets the scale for a map view or a scene view. at which features are visible, and the attributesAttributes are fields and values for a single feature or non-spatial record. They are typically stored in a database or service such as a feature service. (fields) it contains. You can preview the layer by clicking on Map Viewer in the “View In:” list at the top of the page. -
In the
start()method, create threeServiceFeatureTableobjects, using a string URL in each to reference the datasets. You will add: Trailheads (points), Trails (lines), and Parks and Open Spaces (polygons).A
ServiceFeatureTableis effectively an in-memory database of the features from the service.App.java50 collapsed linespackage com.example.app;import com.esri.arcgisruntime.data.ServiceFeatureTable;import com.esri.arcgisruntime.layers.FeatureLayer;import com.esri.arcgisruntime.ArcGISRuntimeEnvironment;import com.esri.arcgisruntime.mapping.ArcGISMap;import com.esri.arcgisruntime.mapping.BasemapStyle;import com.esri.arcgisruntime.mapping.Viewpoint;import com.esri.arcgisruntime.mapping.view.MapView;import javafx.application.Application;import javafx.scene.Scene;import javafx.scene.layout.StackPane;import javafx.stage.Stage;public class App extends Application {private MapView mapView;public static void main(String[] args) {Application.launch(args);}@Overridepublic void start(Stage stage) {// set the title and size of the stage and show itstage.setTitle("Add a feature layer tutorial");stage.setWidth(800);stage.setHeight(700);stage.show();// create a JavaFX scene with a stack pane as the root node, and add it to the sceneStackPane stackPane = new StackPane();Scene scene = new Scene(stackPane);stage.setScene(scene);ArcGISRuntimeEnvironment.setApiKey("YOUR_ACCESS_TOKEN");// create a map view to display the map and add it to the stack panemapView = new MapView();stackPane.getChildren().add(mapView);ArcGISMap map = new ArcGISMap(BasemapStyle.ARCGIS_TOPOGRAPHIC);// set the map on the map viewmapView.setMap(map);mapView.setViewpoint(new Viewpoint(34.02700, -118.80543, 144447.638572));String parksUrl = "https://services3.arcgis.com/GVgbJbqm8hXASVYi/arcgis/rest/services/Parks_and_Open_Space_Styled/FeatureServer/0";String trailsUrl = "https://services3.arcgis.com/GVgbJbqm8hXASVYi/arcgis/rest/services/Trails_Styled/FeatureServer/0";String trailHeadsUrl = "https://services3.arcgis.com/GVgbJbqm8hXASVYi/arcgis/rest/services/Trailheads_Styled/FeatureServer/0";ServiceFeatureTable parksServiceFeatureTable = new ServiceFeatureTable(parksUrl);ServiceFeatureTable trailsServiceFeatureTable = new ServiceFeatureTable(trailsUrl);ServiceFeatureTable trailHeadsServiceFeatureTable = new ServiceFeatureTable(trailHeadsUrl);14 collapsed lines}/*** Stops and releases all resources used in application.*/@Overridepublic void stop() {if (mapView != null) {mapView.dispose();}}}
Create feature layers to display the hosted data
You will create three new FeatureLayer objects to display the hosted layers above the basemap.
-
Create three new
FeatureLayerobjects using the service feature tables and add them to the map as data (operational) layers.Data layers
A data layer is a layer that references geographic data from a file or a service and is used to visualize the data in a map or scene. are displayed in the order in which they are added. PolygonA polygon is a type of geometry containing an array of rings and a spatial reference. Each ring contains an array of point coordinates, where the first and last point are the same. layers should be added before layers with linesA polyline is a type of geometry containing ordered point coordinates and a spatial reference. or pointsA point is a type of geometry containing a single set of if there’s a chance the polygon symbols will obscure features beneath.x,ycoordinates and a spatial reference.A
FeatureLayeris simply a reference to a feature service and a fast and easy way to add data to a map. It is accessed via a URL that specifies the endpoint. By default, the API will try to load all of the features that fit into the current view.App.java58 collapsed linespackage com.example.app;import com.esri.arcgisruntime.data.ServiceFeatureTable;import com.esri.arcgisruntime.layers.FeatureLayer;import com.esri.arcgisruntime.ArcGISRuntimeEnvironment;import com.esri.arcgisruntime.mapping.ArcGISMap;import com.esri.arcgisruntime.mapping.BasemapStyle;import com.esri.arcgisruntime.mapping.Viewpoint;import com.esri.arcgisruntime.mapping.view.MapView;import javafx.application.Application;import javafx.scene.Scene;import javafx.scene.layout.StackPane;import javafx.stage.Stage;public class App extends Application {private MapView mapView;public static void main(String[] args) {Application.launch(args);}@Overridepublic void start(Stage stage) {// set the title and size of the stage and show itstage.setTitle("Add a feature layer tutorial");stage.setWidth(800);stage.setHeight(700);stage.show();// create a JavaFX scene with a stack pane as the root node, and add it to the sceneStackPane stackPane = new StackPane();Scene scene = new Scene(stackPane);stage.setScene(scene);ArcGISRuntimeEnvironment.setApiKey("YOUR_ACCESS_TOKEN");// create a map view to display the map and add it to the stack panemapView = new MapView();stackPane.getChildren().add(mapView);ArcGISMap map = new ArcGISMap(BasemapStyle.ARCGIS_TOPOGRAPHIC);// set the map on the map viewmapView.setMap(map);mapView.setViewpoint(new Viewpoint(34.02700, -118.80543, 144447.638572));String parksUrl = "https://services3.arcgis.com/GVgbJbqm8hXASVYi/arcgis/rest/services/Parks_and_Open_Space_Styled/FeatureServer/0";String trailsUrl = "https://services3.arcgis.com/GVgbJbqm8hXASVYi/arcgis/rest/services/Trails_Styled/FeatureServer/0";String trailHeadsUrl = "https://services3.arcgis.com/GVgbJbqm8hXASVYi/arcgis/rest/services/Trailheads_Styled/FeatureServer/0";ServiceFeatureTable parksServiceFeatureTable = new ServiceFeatureTable(parksUrl);ServiceFeatureTable trailsServiceFeatureTable = new ServiceFeatureTable(trailsUrl);ServiceFeatureTable trailHeadsServiceFeatureTable = new ServiceFeatureTable(trailHeadsUrl);map.getOperationalLayers().add(new FeatureLayer(parksServiceFeatureTable));map.getOperationalLayers().add(new FeatureLayer(trailsServiceFeatureTable));map.getOperationalLayers().add(new FeatureLayer(trailHeadsServiceFeatureTable));14 collapsed lines}/*** Stops and releases all resources used in application.*/@Overridepublic void stop() {if (mapView != null) {mapView.dispose();}}} -
Run the app. Ensure to run the app as a Gradle task and not as an application in your IDE. In the Gradle tool window, under Tasks > application, double-click run.
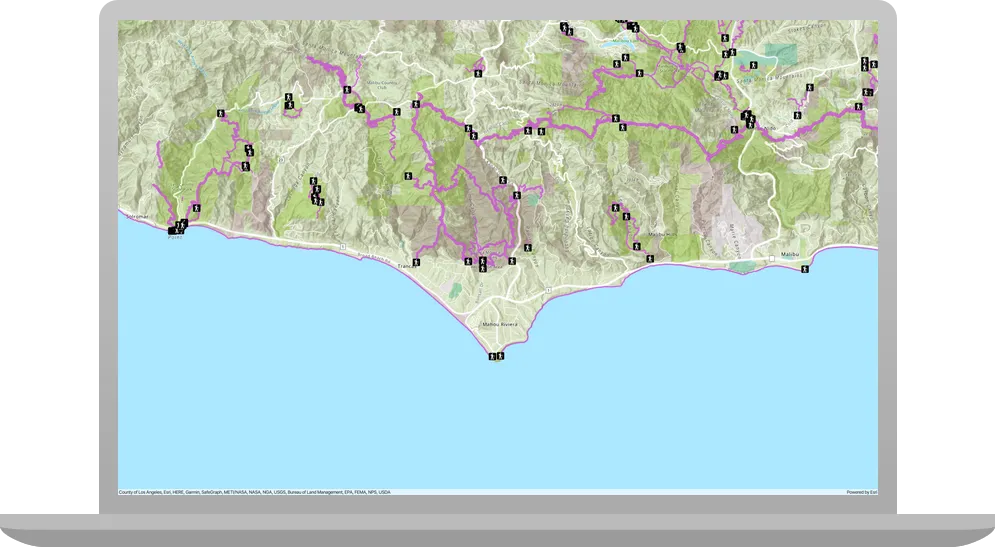
You should see point, line, and polygon features (representing trailheads, trails, and parks) draw on the map for an area in the Santa Monica Mountains in southern California.
What’s next?
Learn how to use additional API features, ArcGIS location services, and ArcGIS tools in these tutorials: