Learn how to implement user authentication to access a secure ArcGIS service with OAuth credentials.

You can use different types of authentication to access secured ArcGIS services
In this tutorial, you will build an app that implements user authentication using OAuth credentials so users can sign in and be authenticated through ArcGIS Online to access the ArcGIS World Traffic service.
Prerequisites
Before starting this tutorial, you need the following:
-
An ArcGIS Location Platform or ArcGIS Online account.
-
A development and deployment environment that meets the system requirements.
-
An IDE for Android development in Kotlin.
Steps
Create OAuth credentials for user authentication
OAuth credentialsclient_id, client_secret, and redirect URIs. They are a type of developer credential.
-
Go to the Create OAuth credentials for user authentication tutorial and create OAuth credentials
OAuth credentials are an item that contains parameters required to implement user authentication or app authentication, including a using your ArcGIS Location Platformclient_id,client_secret, and redirect URIs. They are a type of developer credential.An ArcGIS Location Platform account, formerly known as an ArcGIS Developer account, is an identity associated with an ArcGIS Location Platform subscription. or ArcGIS OnlineAn ArcGIS Online account, also known as an ArcGIS Organization account, is an identity associated with an ArcGIS Online subscription. It can be used to access ArcGIS tools and develop applications with ArcGIS location services for an organization. account. -
Copy the
Client IDandRedirect URLas you will use them to implement user authenticationUser authentication is a type of authentication that allows users with an ArcGIS account to sign into an application and allow it to access ArcGIS content, services, and resources on their behalf. The typical authorization protocol used is OAuth2.0. later in this tutorial. Both theClient IDand theRedirect URLare found on the Settings page.
The Client ID uniquely identifies your app on the authenticating server. If the server cannot find an app with the provided Client ID, it will not proceed with authentication.
The Redirect URL (also referred to as a callback url) is used to identify a response from the authenticating server when the system returns control back to your app after an OAuth login. Since it does not necessarily represent a valid endpoint that a user could navigate to, the redirect URL can use a custom scheme, such as my-app://. You can configure several redirect URLs in your application definition and can remove or edit them. It’s important to make sure the redirect URL used in your app’s code matches a redirect URL configured for the application.
- The redirect URL consists of three parts:
- the scheme
- the separator string ”://”
- the host
- Scheme: You are probably familiar with standard schemes used in internet URLs:
http,https,ftp, etc. In OAuth 2.0, you can create a private-use URI scheme (also known as custom URL scheme), which will only be used by the authorization server and your app. This is an arbitrary string whose allowed characters are declared in the Uniform Resource Locators (URL) Spec . Though not strictly required, making your scheme unique is a good practice. Some organization use the app ID or the reverse domain of their company (com.mycompany.appname) as the URL scheme. - Host: An arbitrary string occupying the host portion of the URL. It allows you to use the same URL scheme with different URL hosts.
Open an Android Studio project with Gradle
-
Open the project you created by completing the Display a map tutorial.
-
Continue with the following instructions to access the World Traffic Service using OAuth 2.0 and display it as a feature layer.
-
Modify the old project for use in this new tutorial.
-
On your file system, delete the .idea folder, if present, at the top level of your project.
-
In the Android view, open app > res > values > strings.xml.
In the
<string name="app_name">element, change the text content to Access services with OAuth 2.0.strings.xml<resources><string name="app_name">Access services with OAuth 2.0</string></resources> -
In the Android view, open Gradle Scripts > settings.gradle.kts.
Change the value of
rootProject.nameto “Access services with OAuth 2.0”.settings.gradle.kts14 collapsed linespluginManagement {repositories {google {content {includeGroupByRegex("com\\.android.*")includeGroupByRegex("com\\.google.*")includeGroupByRegex("androidx.*")}}mavenCentral()gradlePluginPortal()}}dependencyResolutionManagement {repositoriesMode.set(RepositoriesMode.FAIL_ON_PROJECT_REPOS)repositories {google()mavenCentral()maven { url = uri("https://esri.jfrog.io/artifactory/arcgis") }}}rootProject.name = "Access services with OAuth 2.0"include(":app") -
Click File > Sync Project with Gradle files. Android Studio will recognize your changes and create a new .idea folder.
-
-
Open the app > kotlin+java > com.example.app > MainActivity.kt. Delete the code in the
MainActivityclass, leaving only the class declaration.MainActivity.ktclass MainActivity : ComponentActivity() {
Add imports
-
Open app > kotlin+java > com.example.app > screens > MainScreen.kt. Modify import statements to reference the packages and classes required for this tutorial.
MainScreen.kt@file:OptIn(ExperimentalMaterial3Api::class)package com.example.app.screensimport androidx.compose.foundation.layout.fillMaxSizeimport androidx.compose.foundation.layout.paddingimport androidx.compose.material3.ExperimentalMaterial3Apiimport androidx.compose.material3.Scaffoldimport androidx.compose.material3.Textimport androidx.compose.material3.TopAppBarimport androidx.compose.runtime.Composableimport androidx.compose.runtime.rememberimport androidx.compose.ui.Modifierimport androidx.compose.ui.res.stringResourceimport com.arcgismaps.mapping.ArcGISMapimport com.arcgismaps.mapping.BasemapStyleimport com.arcgismaps.mapping.Viewpointimport com.arcgismaps.mapping.layers.ArcGISMapImageLayerimport com.arcgismaps.toolkit.geoviewcompose.MapViewimport com.example.app.R
Add a traffic layer to the map
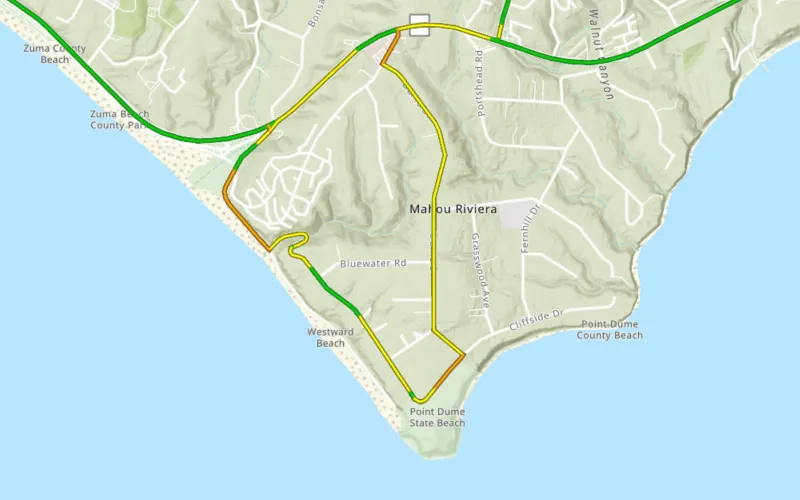
You will add a layer to display the ArcGIS World Traffic service, a dynamic map service that presents historical and near real-time traffic information for different regions in the world. This is a secure service and requires an ArcGIS Online organizational subscription.
ArcGIS World Traffic service data is updated every five minutes to provide traffic speed and traffic incident visualization and identification.
Traffic speeds are displayed as a percentage of free-flow speeds, which is frequently the speed limit or how fast cars tend to travel when unencumbered by other vehicles. The streets are color coded as follows:
- Green (fast): 85 - 100% of free flow speeds
- Yellow (moderate): 65 - 85%
- Orange (slow); 45 - 65%
- Red (stop and go): 0 - 45%
-
In MainScreen.kt, create an
ArcGISMapImageLayerto display the traffic service.MainScreen.kt37 collapsed lines@file:OptIn(ExperimentalMaterial3Api::class)package com.example.app.screensimport androidx.compose.foundation.layout.fillMaxSizeimport androidx.compose.foundation.layout.paddingimport androidx.compose.material3.ExperimentalMaterial3Apiimport androidx.compose.material3.Scaffoldimport androidx.compose.material3.Textimport androidx.compose.material3.TopAppBarimport androidx.compose.runtime.Composableimport androidx.compose.runtime.rememberimport androidx.compose.ui.Modifierimport androidx.compose.ui.res.stringResourceimport com.arcgismaps.mapping.ArcGISMapimport com.arcgismaps.mapping.BasemapStyleimport com.arcgismaps.mapping.Viewpointimport com.arcgismaps.mapping.layers.ArcGISMapImageLayerimport com.arcgismaps.toolkit.geoviewcompose.MapViewimport com.example.app.R@Composablefun MainScreen() {val map = remember {createMap()}Scaffold(topBar = { TopAppBar(title = { Text(text = stringResource(id = R.string.app_name)) }) }) {MapView(modifier = Modifier.fillMaxSize().padding(it),arcGISMap = map)}}fun createMap(): ArcGISMap {// Create a layer to display the ArcGIS World Traffic serviceval trafficLayer = ArcGISMapImageLayer("https://traffic.arcgis.com/arcgis/rest/services/World/Traffic/MapServer")return ArcGISMap(BasemapStyle.ArcGISTopographic).apply {initialViewpoint = Viewpoint(latitude = 34.02700,longitude = -118.80543,scale = 72000.0)}} -
Add the layer to the map’s collection of data layers (operational layers).
MainScreen.kt37 collapsed lines@file:OptIn(ExperimentalMaterial3Api::class)package com.example.app.screensimport androidx.compose.foundation.layout.fillMaxSizeimport androidx.compose.foundation.layout.paddingimport androidx.compose.material3.ExperimentalMaterial3Apiimport androidx.compose.material3.Scaffoldimport androidx.compose.material3.Textimport androidx.compose.material3.TopAppBarimport androidx.compose.runtime.Composableimport androidx.compose.runtime.rememberimport androidx.compose.ui.Modifierimport androidx.compose.ui.res.stringResourceimport com.arcgismaps.mapping.ArcGISMapimport com.arcgismaps.mapping.BasemapStyleimport com.arcgismaps.mapping.Viewpointimport com.arcgismaps.mapping.layers.ArcGISMapImageLayerimport com.arcgismaps.toolkit.geoviewcompose.MapViewimport com.example.app.R@Composablefun MainScreen() {val map = remember {createMap()}Scaffold(topBar = { TopAppBar(title = { Text(text = stringResource(id = R.string.app_name)) }) }) {MapView(modifier = Modifier.fillMaxSize().padding(it),arcGISMap = map)}}fun createMap(): ArcGISMap {// Create a layer to display the ArcGIS World Traffic serviceval trafficLayer = ArcGISMapImageLayer("https://traffic.arcgis.com/arcgis/rest/services/World/Traffic/MapServer")return ArcGISMap(BasemapStyle.ArcGISTopographic).apply {initialViewpoint = Viewpoint(latitude = 34.02700,longitude = -118.80543,scale = 72000.0)operationalLayers.add(trafficLayer)}}
Integrate OAuth credentials into your app
The ArcGIS Maps SDK for Kotlin toolkit contains classes and composable functions that abstract some of the detail of implementing OAuth 2.0 authentication in your app.
First you will create an AuthenticatorState. Then you will instantiate OAuthUserConfiguration, add the instance to a list, and assign the list to the AuthenticatorState.oAuthUserConfigurations property. You will need your OAuth Client ID and Redirect URL when you instantiate OAuthUserConfiguration.
Then you will call the DialogAuthenticator composable to display the a log-in screen.
The DialogAuthenticator composable displays an Authentication UI when an authentication challenge is issued. The AuthenticatorState interface handles authentication challenges and exposes the state for the DialogAuthenticator to display to the user. Both are defined in the authentication component of the ArcGIS Maps SDK for Kotlin Toolkit.
-
In
MainActivity.ktadd anauthenticatorproperty to the MainActivity class.MainActivity.kt13 collapsed linespackage com.example.appimport android.os.Bundleimport androidx.activity.ComponentActivityimport androidx.activity.compose.setContentimport androidx.activity.enableEdgeToEdgeimport com.arcgismaps.httpcore.authentication.OAuthUserConfigurationimport com.arcgismaps.toolkit.authentication.AuthenticatorStateimport com.arcgismaps.toolkit.authentication.DialogAuthenticatorimport com.example.app.screens.MainScreenimport com.example.app.ui.theme.TutorialThemeclass MainActivity : ComponentActivity() {private val authenticatorState = AuthenticatorState() -
Add the
onCreate()lifecycle method to the MainActivity class.MainActivity.kt13 collapsed linespackage com.example.appimport android.os.Bundleimport androidx.activity.ComponentActivityimport androidx.activity.compose.setContentimport androidx.activity.enableEdgeToEdgeimport com.arcgismaps.httpcore.authentication.OAuthUserConfigurationimport com.arcgismaps.toolkit.authentication.AuthenticatorStateimport com.arcgismaps.toolkit.authentication.DialogAuthenticatorimport com.example.app.screens.MainScreenimport com.example.app.ui.theme.TutorialThemeclass MainActivity : ComponentActivity() {private val authenticatorState = AuthenticatorState()override fun onCreate(savedInstanceState: Bundle?) {super.onCreate(savedInstanceState)enableEdgeToEdge()setContent {TutorialTheme {MainScreen()}}}} -
In
onCreate(), instantiateOAuthUserConfiguration, passing yourclientIdand yourredirectUrl.MainActivity.kt13 collapsed linespackage com.example.appimport android.os.Bundleimport androidx.activity.ComponentActivityimport androidx.activity.compose.setContentimport androidx.activity.enableEdgeToEdgeimport com.arcgismaps.httpcore.authentication.OAuthUserConfigurationimport com.arcgismaps.toolkit.authentication.AuthenticatorStateimport com.arcgismaps.toolkit.authentication.DialogAuthenticatorimport com.example.app.screens.MainScreenimport com.example.app.ui.theme.TutorialThemeclass MainActivity : ComponentActivity() {private val authenticatorState = AuthenticatorState()override fun onCreate(savedInstanceState: Bundle?) {super.onCreate(savedInstanceState)authenticatorState.oAuthUserConfigurations = listOf(OAuthUserConfiguration(portalUrl = "https://www.arcgis.com",clientId = "YOUR_CLIENT_ID",redirectUrl = "YOUR_REDIRECT_URL"))enableEdgeToEdge()setContent {TutorialTheme {MainScreen()}}}}The value of
portalUrlin the code block ishttps://www.arcgis.com. Alternatively, it could be the URL of your ArcGIS Online organization. In both cases, the Android Custom Tab will display a log-in for the user’s credentials.Note that if the OAuth configuration does not match the
portalUrl, a username/password prompt will be displayed instead; this will authenticate the user with ArcGIS token instead of OAuth. If you see the following screen in this tutorial, you are not being authenticated with OAuth. To troubleshoot your OAuth code, verify the parameters you’re passing to theOAuthUserConfigurationconstructor inMainActivityand verify as well theandroid:schemeandandroid:hostattributes of the data element in AndroidManifest.xml.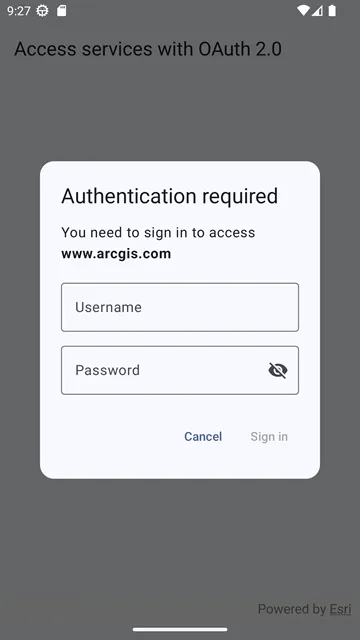
-
Inside the
TutorialThemeblock, call theDialogAuthenticatorcomposable, passing inauthenticatorState.MainActivity.kt13 collapsed linespackage com.example.appimport android.os.Bundleimport androidx.activity.ComponentActivityimport androidx.activity.compose.setContentimport androidx.activity.enableEdgeToEdgeimport com.arcgismaps.httpcore.authentication.OAuthUserConfigurationimport com.arcgismaps.toolkit.authentication.AuthenticatorStateimport com.arcgismaps.toolkit.authentication.DialogAuthenticatorimport com.example.app.screens.MainScreenimport com.example.app.ui.theme.TutorialThemeclass MainActivity : ComponentActivity() {private val authenticatorState = AuthenticatorState()override fun onCreate(savedInstanceState: Bundle?) {super.onCreate(savedInstanceState)authenticatorState.oAuthUserConfigurations = listOf(OAuthUserConfiguration(portalUrl = "https://www.arcgis.com",clientId = "YOUR_CLIENT_ID",redirectUrl = "YOUR_REDIRECT_URL"))enableEdgeToEdge()setContent {TutorialTheme {MainScreen()DialogAuthenticator(authenticatorState)}}}} -
Open app > manifests > AndroidManifest.xml and locate the
<activity>tag for the OAuth user sign-in activity. TheAuthenticationActivityis defined in the ArcGIS Maps SDK for Kotlin toolkit.The
AuthenticationActivityclass is an activity that launches an Android Custom Tab and receives the redirect intent that is sent when the user completes the CustomTabs prompt. For more information, see theREADMEfor theAuthenticatorcomponent in the ArcGIS Maps SDK for Kotlin Toolkit. -
The
<data>element ofAuthenticationActivityhas anandroid:schemeattribute and andandroid:hostwhere you must specify the scheme and the host of your OAuth redirect URL. See Create OAuth credentials for user authentication above for details on redirect URL, scheme, and host.AndroidManifest.xml30 collapsed lines<?xml version="1.0" encoding="utf-8"?><manifest xmlns:android="http://schemas.android.com/apk/res/android"xmlns:tools="http://schemas.android.com/tools"><uses-permission android:name="android.permission.INTERNET" /><applicationandroid:allowBackup="true"android:dataExtractionRules="@xml/data_extraction_rules"android:fullBackupContent="@xml/backup_rules"android:icon="@mipmap/ic_launcher"android:label="@string/app_name"android:roundIcon="@mipmap/ic_launcher_round"android:supportsRtl="true"android:theme="@style/Theme.Tutorial"tools:targetApi="31"><activityandroid:name=".MainActivity"android:exported="true"android:label="@string/app_name"android:theme="@style/Theme.Tutorial"><intent-filter><action android:name="android.intent.action.MAIN" /><category android:name="android.intent.category.LAUNCHER" /></intent-filter></activity><activityandroid:name="com.arcgismaps.toolkit.authentication.AuthenticationActivity"android:configChanges="keyboard|keyboardHidden|orientation|screenSize"android:exported="true"android:launchMode="singleTop" ><intent-filter><action android:name="android.intent.action.VIEW" /><category android:name="android.intent.category.DEFAULT" /><category android:name="android.intent.category.BROWSABLE" /><dataandroid:scheme="your_redirect_url_scheme"android:host="your_redirect_url_host" /></intent-filter></activity>4 collapsed lines</application></manifest> -
Click Run > Run > app to run the app.
When running your app, you will be prompted for username and password in an Android Custom Tab.

After successfully logging in with your ArcGIS Online credentials, you should see the map
What’s next?
Learn how to use additional API features, ArcGIS location services, and ArcGIS tools in these tutorials: