Maps
See Scenes (3D) in this guide for more information about working with scenes.
You can use a map to:
- Display a basemap layer
A basemap layer is the layer in a map or scene that displays basemap data. The data source for a basemap layer is typically a basemap service. such as streets or satellite imagery. - Access and display data layers
A data layer is a layer that references geographic data from a file or a service and is used to visualize the data in a map or scene. based on files or services, including data you have authored. - Provide context for temporary points, lines, polygons, or text displayed as graphics
A graphic is a visual element composed of a geometry, symbol, and attributes that is displayed on a map or scene. . - Inspect data layers and display information from attributes
Attributes are fields and values for a single feature or non-spatial record. They are typically stored in a database or service such as a feature service. . - Measure distance and explore spatial relationships between geometries
A geometry is a geometric shape, such as a point, polyline, or polygon, that contains one or more coordinates and a spatial reference. . - Save a collection of layers as a web map
A web map is a map stored as a JSON object that defines properties such as the basemap layer, data layers, layer styles, and pop-up styles. Its JSON structure is defined by the web map specification. to be shared across ArcGIS.
How a map works
A map
For offline
Map
A map contains a collection of layers
You can open an existing map or create one entirely with code. To create a map, you typically first add a basemap layer
// API key authentication or user authentication is required to access basemaps// and other location services.ArcGISEnvironment.apiKey = ApiKey.create(YOUR_ACCESS_TOKEN)
// Create a map with an ArcGIS basemap style.val map = ArcGISMap(BasemapStyle.ArcGISTopographic)
You can also open a map stored in a portal
// Create an ArcGIS Map instance from a web map URL.val webMap = ArcGISMap("https://www.arcgis.com/home/item.html?id=acc027394bc84c2fb04d1ed317aac674")You can define the initial extent at which the map will display by setting the ArcGISMap.initialViewpoint property.
Layer
Each layer
The Layer class is the base class for all types of layers. The type of layer you create depends on the type of data you want to display. For example, to display feature data you can create a FeatureLayer that references an online service (such as a feature service
ArcGISEnvironment.apiKey = ApiKey.create(YOUR_ACCESS_TOKEN)
val arcGISMap = ArcGISMap(BasemapStyle.ArcGISTopographic)
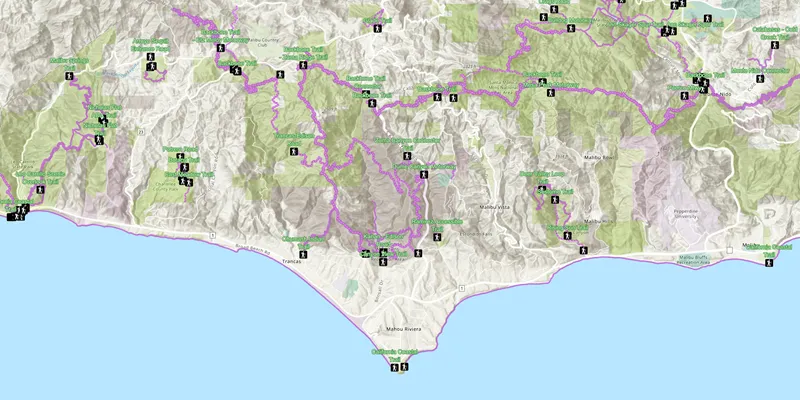
val trailheadsLayer = FeatureLayer.createWithFeatureTable( ServiceFeatureTable("https://services3.arcgis.com/GVgbJbqm8hXASVYi/arcgis/rest/services/Trailheads_Styled/FeatureServer/0"))
val trailsLayer = FeatureLayer.createWithFeatureTable( ServiceFeatureTable("https://services3.arcgis.com/GVgbJbqm8hXASVYi/arcgis/rest/services/Trails_Styled/FeatureServer/0"))
val openSpacesLayer = FeatureLayer.createWithFeatureTable( ServiceFeatureTable("https://services3.arcgis.com/GVgbJbqm8hXASVYi/arcgis/rest/services/Parks_and_Open_Space_Styled/FeatureServer/0"))
arcGISMap.operationalLayers.addAll(listOf(openSpacesLayer, trailsLayer, trailheadsLayer))
// Display the map by assigning it to the mutable map property used by the Composable MapView. map = arcGISMapMapView
A map view
A map view
- Access data for data layers and graphics.
- Display the current location as a point on the map.
- Identify and select features at a specified location.
- Export an image of the current display.
- Rotate the map display.
- Apply a time extent to filter the display of features.
- Filter layer data using attribute and spatial criteria.
- Display image overlays on the map view.
Add a mapMapView control to display it. Changes you make to the map, such as adding, removing, or reordering layers, will immediately be reflected in the map view display. The ArcGISMap.initialViewpoint property will determine the area of the map shown when the map loads. You can also use MapViewProxy.setViewpoint() and MapViewProxy.setViewpointRotation() to programmatically change the map area or orientation shown in the display.
After creating a map, you set an initial viewpoint and then add the map to the map view:
map.initialViewpoint = Viewpoint(34.0270, -118.8050, 72000.0)
MapView(    modifier = Modifier.fillMaxSize(),    // Pass the map to the Composable MapView.    arcGISMap = map)
Examples
Create and display a map
You can display a basic map by creating one with a basemap layer, setting its initial extent, and adding it to a map view. To learn how to add additional data, see the Layers topic.
Steps
- Create a new
ArcGISMap, passing aBasemapStyleinto the constructor. - Optionally, add one or more data layers to the map.
- Assign the map to a
MapViewcontrol in your app. - Set the map view
Viewpointto focus on a specified area of the map.
25 collapsed lines
package com.example.guide.maps2d.displaymap.example
import android.os.Bundleimport androidx.activity.ComponentActivityimport androidx.activity.compose.setContentimport androidx.compose.foundation.layout.fillMaxSizeimport androidx.compose.ui.Modifierimport com.arcgismaps.ApiKeyimport com.arcgismaps.ArcGISEnvironmentimport com.arcgismaps.mapping.ArcGISMapimport com.arcgismaps.mapping.BasemapStyleimport com.arcgismaps.mapping.Viewpointimport com.arcgismaps.toolkit.geoviewcompose.MapViewimport com.esri.arcgismaps.sample.sampleslib.theme.SampleAppThemeimport com.example.guide.maps2d.displaymap.example.BuildConfig.YOUR_ACCESS_TOKEN
class MainActivity : ComponentActivity() { override fun onCreate(savedInstanceState: Bundle?) { super.onCreate(savedInstanceState) // API key authentication or user authentication is required to access basemaps and other location services. ArcGISEnvironment.apiKey = ApiKey.create(YOUR_ACCESS_TOKEN)
setContent { SampleAppTheme {
val map = ArcGISMap(BasemapStyle.ArcGISTopographic) map.initialViewpoint = Viewpoint(34.0270, -118.8050, 72000.0)
MapView( modifier = Modifier.fillMaxSize(), arcGISMap = map )5 collapsed lines
} } }}You can also create and save a web map
Display a web map
You can open a web map
To learn how to access secured content, see Authentication.
Steps
- Create a
Portalobject to connect to the portal that hosts a web map you want to load. If you don’t provide a portal URL, the connection defaults to ArcGIS Online. - Create a
PortalItemobject using the item IDAn item ID is a unique identifier representing a single item stored, managed, and accessed in a portal, such as a web map, hosted layer, or file. for the item that stores the web map. - Create a new map, passing the portal item
An item, also known as a content item, is a resource stored in a portal such as a web map, hosted layer, style, script tool, file, or notebook. into the constructor. - Assign the map to a
MapViewcontrol in your app.
25 collapsed lines
package com.example.guide.maps2d.displaywebmap.example
import android.os.Bundleimport androidx.activity.ComponentActivityimport androidx.activity.compose.setContentimport androidx.compose.foundation.layout.fillMaxSizeimport androidx.compose.ui.Modifierimport com.arcgismaps.ApiKeyimport com.arcgismaps.ArcGISEnvironmentimport com.arcgismaps.mapping.ArcGISMapimport com.arcgismaps.portal.Portalimport com.arcgismaps.mapping.PortalItemimport com.arcgismaps.toolkit.geoviewcompose.MapViewimport com.esri.arcgismaps.sample.sampleslib.theme.SampleAppThemeimport com.example.guide.maps2d.displaywebmap.example.BuildConfig.YOUR_ACCESS_TOKEN
class MainActivity : ComponentActivity() { override fun onCreate(savedInstanceState: Bundle?) { super.onCreate(savedInstanceState) // API key authentication or user authentication is required to access basemaps and other location services. ArcGISEnvironment.apiKey = ApiKey.create(YOUR_ACCESS_TOKEN)
setContent { SampleAppTheme {
// Create a Portal instance for ArcGIS Online (https://www.arcgis.com) and then a PortalItem instance with an item Id. val portal = Portal("https://www.arcgis.com", Portal.Connection.Anonymous) val portalItem = PortalItem(portal, "41281c51f9de45edaf1c8ed44bb10e30") // Create a map using the portal item. val webMap = ArcGISMap(portalItem)
MapView( modifier = Modifier.fillMaxSize(), // Pass the web map to the Composable MapView. arcGISMap = webMap )5 collapsed lines
} } }}Display a mobile map
This example displays a map
Steps
- Create a
MobileMapPackageusing the path to a local .mmpk file. - Call
Loadable.load()to load the package. - When the package loads, get the first map from the package using the
MobileMapPackage.mapsproperty. - Display the map in a
MapView.
56 collapsed lines
package com.example.guide.maps2d.displaymobilemappackage.example
import android.os.Bundleimport android.util.Logimport androidx.activity.ComponentActivityimport androidx.activity.compose.setContentimport androidx.compose.foundation.layout.fillMaxSizeimport androidx.compose.runtime.getValueimport androidx.compose.runtime.mutableStateOfimport androidx.compose.runtime.setValueimport androidx.compose.ui.Modifierimport androidx.lifecycle.lifecycleScopeimport com.arcgismaps.ApiKeyimport com.arcgismaps.ArcGISEnvironmentimport com.arcgismaps.mapping.ArcGISMapimport com.arcgismaps.mapping.BasemapStyleimport com.arcgismaps.mapping.MobileMapPackageimport com.esri.arcgismaps.sample.sampleslib.theme.SampleAppThemeimport com.arcgismaps.toolkit.geoviewcompose.MapViewimport com.example.guide.maps2d.displaymobilemappackage.example.BuildConfig.YOUR_ACCESS_TOKENimport kotlinx.coroutines.launchimport java.io.File
class MainActivity : ComponentActivity() {
private val provisionPath: String by lazy { getExternalFilesDir(null)?.path.toString() + File.separator + getString(R.string.app_name) }
private var map by mutableStateOf(ArcGISMap(BasemapStyle.ArcGISNavigationNight))
override fun onCreate(savedInstanceState: Bundle?) { super.onCreate(savedInstanceState) // API key authentication or user authentication is required to access basemaps // and other location services. ArcGISEnvironment.apiKey = ApiKey.create(YOUR_ACCESS_TOKEN)
// Get the file path of the (.mmpk) file. val filePath = provisionPath + File.separator + getString(R.string.yellowstone_mmpk)
// Load and add the mobile map package. addMobileMapPackage(filePath)
setContent { SampleAppTheme { // Compose equivalent of the view-based MapView class. MapView( arcGISMap = map, modifier = Modifier.fillMaxSize() ) } } }
private fun addMobileMapPackage(filePath: String) {
// Create the mobile map package val mapPackage = MobileMapPackage(filePath) lifecycleScope.launch { // Load the mobile map package. mapPackage.load().getOrElse { // Mobile map package failed to load. showError("Map package failed to load: ${it.message.toString()}") } // Get the first map in the mobile map package. // Display the map by assigning it to the mutable map property used by the MapView composable. map = mapPackage.maps.first() }8 collapsed lines
}
private fun showError(message: String) { Log.e(this::javaClass.name, message) }
}Use API key access tokens
An API key access tokenApiKeyResource.
Tutorials

Samples

Style graphics with renderer

Show device location

Manage operational layers