Tracing entails identifying a subset of utility network elements that meet specified criteria. A trace begins at one or more starting points or at the subnetwork controller for the specified subnetwork, and spans outward in a radial fashion. It travels through the network along paths of connected features and objects until it reaches an end location. The end location can be a barrier or the end of a path. See Trace utility networks to learn more about tracing in utility networks.
Follow the steps below to work with traces:
-
Define how the trace will be executed, using the NamedTraceConfiguration, UNTraceConfiguration, TraceLocation and TraceParameters classes.
-
Execute the trace using trace objects.
-
Obtain and visualize the results from the trace, which are returned as a TraceResult object.
NamedTraceConfiguration
The NamedTraceConfiguration allows users to retrieve pre-configured traces that are defined and stored within a utility network and then shared across an organization through a webmap. See Named trace configurations to learn more about adding, sharing, and working with named trace configurations.
You can access the trace configurations in a utility network through the sharedNamedTraceConfigurations property. Make sure to first load the utility network from a WebMap, as demonstrated in Introduction to utility networks.
const viewElement = document.querySelector("arcgis-map");viewElement.addEventListener("arcgisViewReadyChange", () => {  // Check if webMap contains utility networks  if (webMap.utilityNetworks.length > 0) {    // Assigns the utility network at index 0 to utilityNetwork    utilityNetwork = webMap.utilityNetworks.getItemAt(0);
    // Triggers the loading of the UtilityNetwork instance    await utilityNetwork.load();
    // Loop through the shared named trace configurations    utilityNetwork.sharedNamedTraceConfigurations.forEach((namedTraceConfig) => {      // Print to the console the globalIds and their corresponding trace configuration name      console.log(namedTraceConfig.globalId + " - " + namedTraceConfig.title);    });  }});
UNTraceConfiguration
The UNTraceConfiguration describes an object that can be used to run custom traces in a utility network. Its properties include domain network name, tier name, subnetwork name, and other settings for traversability, functions, filters, and outputs (inherited from the TraceConfiguration).
UNTraceConfiguration is meant to work with custom traces that are only applicable to utility networks.
const unTraceConfiguration = new UNTraceConfiguration({ domainNetworkName: "Electric", tierName: "Electric Distribution", subnetworkName: "RMT003", includeContainers: true, validateConsistency: true, // Traversability conditionBarriers: [ { name: "E:Device Status", type: "networkAttribute", operator: "equal", value: 1, combineUsingOr: false, isSpecificValue: true, }, ], traversabilityScope: "junctionsAndEdges",});The UNTraceConfiguration can be used to override or modify existing trace configurations that are stored in the utility network. This includes filtering the features returned as trace results, controlling what is traced, setting up calculations to be performed, and more. See Configure a trace to learn more.
The following code snippet illustrates how to override the subnetwork name property from an existing shared named trace configuration.
const viewElement = document.querySelector("arcgis-map");viewElement.addEventListener("arcgisViewReadyChange", () => {  // Check if webMap contains utility networks  if (webMap.utilityNetworks.length > 0) {    // Assigns the utility network at index 0 to utilityNetwork    utilityNetwork = webMap.utilityNetworks.getItemAt(0);
    // Triggers the loading of the UtilityNetwork instance    await utilityNetwork.load();
    // Get shared named trace configurations from your Utility Network    const sharedNamedTraceConfigurations = utilityNetwork.sharedNamedTraceConfigurations;
    // Find a shared named trace configuration from the GlobalId and use it to create a new UNTraceConfiguration object    const traceConfiguration = sharedNamedTraceConfigurations.find(      (sharedNamedTraceConfig) =>        sharedNamedTraceConfig.globalId === "{537295F6-BFE2-4E0F-AD0D-DA7F7719F9DD}",    );    const unTraceConfiguration = new UNTraceConfiguration(      traceConfiguration.traceConfiguration.toJSON(),    );
    // Overwrite the subnetwork name property    unTraceConfiguration.subnetworkName = "myNewSubnetwork";  }});
TraceLocation
The TraceLocation can be used to define starting points (the starting locations of a trace) and barriers (locations in the network beyond which the trace cannot travel). See Add Trace Locations (Utility Network) to learn more.
The following code snippet shows how to add a trace location (starting point) on an existing line feature.
-
Click on the map to obtain the line feature’s globalId using a hitTest.
-
Filter the hitTest results for the line feature.
-
Define a percentage along the line to place the starting point. Set a percentAlong value of 0.5 for the purpose of this example. PercentAlong and globalId values are required to define a trace location. See the following Trace documentation to learn more about the percent along property from the ArcGIS REST API.
-
Create the
TraceLocationinstance, and pass in the values obtained in the previous steps. Also set the trace locationtype, which is"starting-point"in this example.
// Fires after a user clicks on the viewconst viewElement = document.querySelector("arcgis-map");viewElement.addEventListener("arcgisViewReadyChange", (mapEvent) => {  // Prevent the event bubbling up the event chain  mapEvent.stopPropagation();
  // Check to see if any graphics in the view intersect the given screen x, y coordinates  const hitTestResult = await view.hitTest(mapEvent);
  // Get Electric Distribution Line features only by using the GlobalId  const electricLines = hitTestResult.results.filter(    (result) => result.graphic.layer.globalId === "{537295F6-BFE2-4E0F-AD0D-DA7F7719F9DD}",  );
  // Get the GlobalID of the feature where the trace will start traversing the Utility Network  myGlobalId = electricLines[0].graphic.attributes.globalid;
  // Define percentage along line to place trace location  const myPercentageAlong = 0.5;
  // Create trace location (starting point)  const startingPoint = new TraceLocation({    globalId: myGlobalId,    percentAlong: myPercentageAlong,    type: "starting-point",  });});
TraceParameters
The TraceParameters object determines how a trace will be executed by defining the trace locations, trace types, trace configurations, result types, etc.
The following code snippet demonstrates how to create a TraceParameters object.
// Get named trace configurationsconst sharedNamedTraceConfigurations = utilityNetwork.sharedNamedTraceConfigurations;
// Find a specific named trace configuration from a GlobalIdconst namedTraceConfiguration = sharedNamedTraceConfigurations.find(  (traceConfig) => traceConfig.globalId === "{537295F6-BFE2-4E0F-AD0D-DA7F7719F9DD}",);
// Define an array with starting points, barriersconst myTraceLocations = [startingPoint, barrier];
// Define how the trace will be executedconst traceParameters = new TraceParameters({  namedTraceConfigurationGlobalId: namedTraceConfiguration.globalId,  traceLocations: myTraceLocations,});
TraceResult
The TraceResult contains the output from the execution of a trace. Depending on the TraceParameters configured, a set of aggregated geometries, an array of network elements, and an array of function aggregation results are returned.
The following example demonstrates how to obtain a TraceResult.
// Execute a trace to get a TraceResultconst traceResult = await trace.trace(utilityNetwork.networkServiceUrl, traceParameters);
if (traceResult.aggregatedGeometry) {  // Display results on the map  if (traceResult.aggregatedGeometry.multipoint) {    const multipointGraphic = new Graphic({      geometry: {        type: "multipoint",        points: traceResult.aggregatedGeometry.multipoint.points,        spatialReference: utilityNetwork.spatialReference,      },      symbol: myPointSymbol,    });
    traceResultsGraphicsLayer.graphics.add(multipointGraphic);  }}
UtilityNetworkTrace component
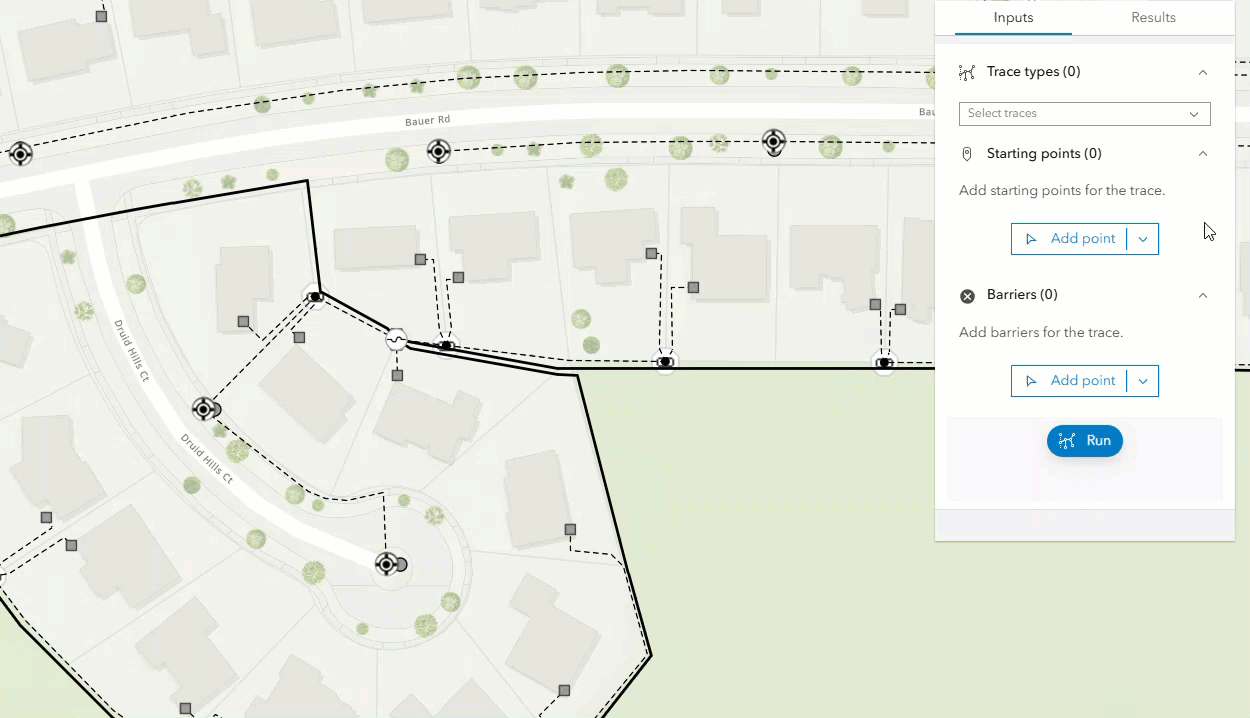
The UtilityNetworkTrace component is an out-of-the-box solution for running traces.
To use this component, load a arcgis-map published with a utility network and sharedNamedTraceConfigurations.
Take a look at the UtilityNetworkTrace component sample and learn how to run traces with this component.
Read the Trace a Utility Network with the ArcGIS Maps SDK for JavaScript blog to learn more about the UtilityNetworkTrace component, and how to incorporate it with real world solutions.
Steps to run a trace with the UtilityNetworkTrace component:
- Make sure to sign in as most utility network services are secured and require the ArcGIS Utility Network user type extension.
- Select one or more traces to run from the Trace types dropdown.
- Add starting points and barriers (optional) by clicking on the Starting points and Barriers buttons, then clicking on a feature on the map to place the points.
- Run the trace by clicking the Run button.