Construct a KML document and save it as a KMZ file.
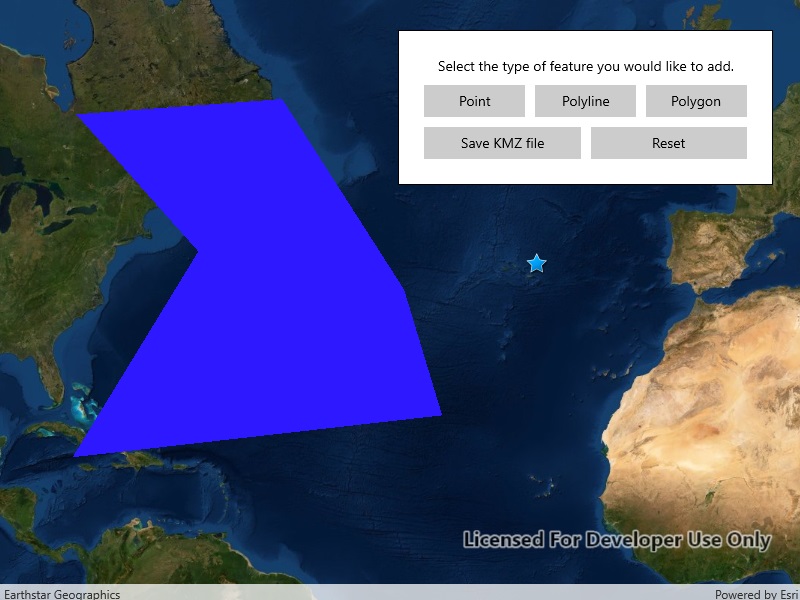
Use case
If you need to create and save data on the fly, you can use KML to create points, lines, and polygons by sketching on the map, customizing the style, and serializing them as KML nodes in a KML Document. Once complete, you can share the KML data with others that are using a KML reading application, such as ArcGIS Earth.
How to use the sample
Click on one of the buttons in the middle row to start adding a geometry. Click on the map view to place vertices. Click the “Complete Sketch” button to add the geometry to the KML document as a new KML placemark. Use the style interface to edit the style of the placemark. If you do not wish to set a style, click the “Don’t Apply Style” button. When you are finished adding KML nodes, click on the “Save KMZ file” button to save the active KML document as a .kmz file on your system. Use the “Reset” button to clear the current KML document and start a new one.
How it works
- Create a
- Create a using the .
- Create a using the and add it to .
- Create using .
- Project that to WGS84 using .
- Create a object using that projected .
- Create a using the .
- Add the to the .
- Set the for the .
- When finished with adding nodes to the , save the to a file using the method.
Relevant API
- GeometryEditor
- GeometryEngine.Project
- KmlDataset
- KmlDocument
- KmlGeometry
- KmlLayer
- KmlNode.SaveAsASync
- KmlPlacemark
- KmlStyle
Tags
geometry editor, Keyhole, KML, KMZ, OGC
Sample Code
<UserControl x:Class="ArcGIS.WinUI.Samples.CreateAndSaveKmlFile.CreateAndSaveKmlFile" xmlns="http://schemas.microsoft.com/winfx/2006/xaml/presentation" xmlns:x="http://schemas.microsoft.com/winfx/2006/xaml" xmlns:esriUI="using:Esri.ArcGISRuntime.UI.Controls"> <Grid> <esriUI:MapView x:Name="MyMapView" /> <Border Name="MainUI" Style="{StaticResource BorderStyle}"> <Grid> <Grid.RowDefinitions> <RowDefinition Height="auto" /> <RowDefinition Height="auto" /> <RowDefinition Height="auto" /> </Grid.RowDefinitions> <TextBlock Name="InstructionsText" Margin="5" HorizontalAlignment="Center" VerticalAlignment="Center" Text="Select the type of feature you would like to add." /> <Grid Grid.Row="1"> <Grid Name="ShapesPanel"> <Grid.ColumnDefinitions> <ColumnDefinition Width="*" /> <ColumnDefinition Width="*" /> <ColumnDefinition Width="*" /> </Grid.ColumnDefinitions> <Button x:Name="PointButton" Grid.Column="0" Margin="5" HorizontalAlignment="Stretch" Click="Edit_Click" Content="Point" /> <Button x:Name="PolylineButton" Grid.Column="1" Margin="5" HorizontalAlignment="Stretch" Click="Edit_Click" Content="Polyline" /> <Button x:Name="PolygonButton" Grid.Column="2" Margin="5" HorizontalAlignment="Stretch" Click="Edit_Click" Content="Polygon" /> </Grid> </Grid> <Grid x:Name="SaveResetGrid" Grid.Row="2"> <Grid.ColumnDefinitions> <ColumnDefinition Width="*" /> <ColumnDefinition Width="*" /> </Grid.ColumnDefinitions> <Button Grid.Column="0" Margin="5" HorizontalAlignment="Stretch" Click="Save_Click" Content="Save KMZ file" /> <Button Grid.Column="1" Margin="5" HorizontalAlignment="Stretch" Click="Reset_Click" Content="Reset" /> </Grid> <Button x:Name="CompleteButton" Grid.Row="1" Margin="5" HorizontalAlignment="Stretch" Click="Complete_Click" Content="Complete Sketch" Visibility="Collapsed" /> </Grid> </Border> <Border x:Name="StyleBorder" Width="auto" HorizontalAlignment="Right" VerticalAlignment="Center" Style="{StaticResource BorderStyle}" Visibility="Collapsed"> <Grid> <Grid.RowDefinitions> <RowDefinition /> <RowDefinition Height="auto" /> <RowDefinition /> </Grid.RowDefinitions> <Grid.ColumnDefinitions> <ColumnDefinition /> <ColumnDefinition /> </Grid.ColumnDefinitions> <TextBlock x:Name="StyleText" Grid.Row="0" Grid.ColumnSpan="2" Margin="5" Text="" /> <ComboBox x:Name="IconPicker" Grid.Row="1" Grid.ColumnSpan="2" Height="40" Margin="5" HorizontalAlignment="Center" ItemsSource="{Binding}"> <ComboBox.ItemTemplate> <DataTemplate> <BitmapIcon Width="30" Height="30" ShowAsMonochrome="False" UriSource="{Binding}" /> </DataTemplate> </ComboBox.ItemTemplate> </ComboBox> <ColorPicker x:Name="ColorSelector" Grid.Row="1" Grid.ColumnSpan="2" ColorSpectrumShape="Box" IsAlphaSliderVisible="False" IsColorChannelTextInputVisible="False" IsColorPreviewVisible="False" IsColorSliderVisible="False" IsHexInputVisible="False" /> <Button Grid.Row="2" Grid.Column="0" Margin="5" HorizontalAlignment="Stretch" Click="Apply_Style_Click" Content="Apply Style" /> <Button Grid.Row="2" Grid.Column="1" Margin="5" HorizontalAlignment="Stretch" Click="No_Style_Click" Content="Don't Apply Style" /> </Grid> </Border> </Grid></UserControl>// Copyright 2019 Esri.//// Licensed under the Apache License, Version 2.0 (the "License"); you may not use this file except in compliance with the License.// You may obtain a copy of the License at: http://www.apache.org/licenses/LICENSE-2.0//// Unless required by applicable law or agreed to in writing, software distributed under the License is distributed on an// "AS IS" BASIS, WITHOUT WARRANTIES OR CONDITIONS OF ANY KIND, either express or implied. See the License for the specific// language governing permissions and limitations under the License.
using ArcGIS.WinUI.Viewer;using Esri.ArcGISRuntime.Geometry;using Esri.ArcGISRuntime.Mapping;using Esri.ArcGISRuntime.Ogc;using Microsoft.UI.Xaml;using Microsoft.UI.Xaml.Controls;using System;using System.Collections.Generic;using System.Diagnostics;using System.Drawing;using System.IO;using System.Linq;using Windows.Storage.Pickers;using Geometry = Esri.ArcGISRuntime.Geometry.Geometry;
namespace ArcGIS.WinUI.Samples.CreateAndSaveKmlFile{ [ArcGIS.Samples.Shared.Attributes.Sample( name: "Create and save KML file", category: "Layers", description: "Construct a KML document and save it as a KMZ file.", instructions: "Click on one of the buttons in the middle row to start adding a geometry. Click on the map view to place vertices. Click the \"Complete Sketch\" button to add the geometry to the KML document as a new KML placemark. Use the style interface to edit the style of the placemark. If you do not wish to set a style, click the \"Don't Apply Style\" button. When you are finished adding KML nodes, click on the \"Save KMZ file\" button to save the active KML document as a .kmz file on your system. Use the \"Reset\" button to clear the current KML document and start a new one.", tags: new[] { "KML", "KMZ", "Keyhole", "OGC", "geometry editor" })] [ArcGIS.Samples.Shared.Attributes.OfflineData()] public partial class CreateAndSaveKmlFile { private KmlDocument _kmlDocument; private KmlDataset _kmlDataset; private KmlLayer _kmlLayer; private KmlPlacemark _currentPlacemark; private GeometryType _geometryType;
public CreateAndSaveKmlFile() { InitializeComponent(); Initialize(); }
private void Initialize() { // Create the map. MyMapView.Map = new Map(BasemapStyle.ArcGISImageryStandard);
// Set the images for the point icon picker. List<string> iconLinks = new List<string>() { "https://static.arcgis.com/images/Symbols/Shapes/BlueCircleLargeB.png", "https://static.arcgis.com/images/Symbols/Shapes/BlueDiamondLargeB.png", "https://static.arcgis.com/images/Symbols/Shapes/BluePin1LargeB.png", "https://static.arcgis.com/images/Symbols/Shapes/BluePin2LargeB.png", "https://static.arcgis.com/images/Symbols/Shapes/BlueSquareLargeB.png", "https://static.arcgis.com/images/Symbols/Shapes/BlueStarLargeB.png" }; List<Uri> _iconList = iconLinks.Select(x => new Uri(x)).ToList(); IconPicker.ItemsSource = _iconList; IconPicker.SelectedIndex = 0;
// Set up a new kml document and kml layer. ResetKml(); }
private void ResetKml() { // Clear any existing layers from the map. MyMapView.Map.OperationalLayers.Clear();
// Reset the most recently placed placemark. _currentPlacemark = null;
// Create a new KML document. _kmlDocument = new KmlDocument() { Name = "KML Sample Document" };
// Create a KML dataset using the KML document. _kmlDataset = new KmlDataset(_kmlDocument);
// Create the KML layer using the KML dataset. _kmlLayer = new KmlLayer(_kmlDataset);
// Add the KML layer to the map. MyMapView.Map.OperationalLayers.Add(_kmlLayer); }
private async void Edit_Click(object sender, RoutedEventArgs e) { try { // Hide the base UI and enable the complete button. ShapesPanel.Visibility = Visibility.Collapsed; CompleteButton.Visibility = Visibility.Visible; SaveResetGrid.Visibility = Visibility.Collapsed;
// Set the creation mode and UI based on which button called this method. switch (((Button)sender).Name) { case nameof(PointButton): _geometryType = GeometryType.Point; InstructionsText.Text = "Tap to add a point."; StyleText.Text = "Select an icon for the placemark."; break;
case nameof(PolylineButton): _geometryType = GeometryType.Polyline; InstructionsText.Text = "Tap to add a vertex."; StyleText.Text = "Select a color for the placemark."; break;
case nameof(PolygonButton): _geometryType = GeometryType.Polygon; InstructionsText.Text = "Tap to add a vertex."; StyleText.Text = "Select a color for the placemark."; break;
default: return; }
// Start the geometry editor. MyMapView.GeometryEditor.Start(_geometryType);
} catch (ArgumentException) { await new MessageDialog2("Unsupported Geometry", "Error").ShowAsync(); } }
private void Apply_Style_Click(object sender, RoutedEventArgs e) { // Create a new style for the placemark. _currentPlacemark.Style = new KmlStyle();
// Get the color from the ColorSelector var selected = ColorSelector.Color; Color color = Color.FromArgb(selected.A, selected.R, selected.G, selected.B);
// Set the style for that Placemark. switch (_currentPlacemark.GraphicType) { // Create a KmlIconStyle using the selected icon. case KmlGraphicType.Point: _currentPlacemark.Style.IconStyle = new KmlIconStyle(new KmlIcon((Uri)IconPicker.SelectedItem), 1.0); break;
// Create a KmlLineStyle using the selected color value. case KmlGraphicType.Polyline: _currentPlacemark.Style.LineStyle = new KmlLineStyle(color, 8); break;
// Create a KmlPolygonStyle using the selected color value. case KmlGraphicType.Polygon: _currentPlacemark.Style.PolygonStyle = new KmlPolygonStyle(color); _currentPlacemark.Style.PolygonStyle.IsFilled = true; _currentPlacemark.Style.PolygonStyle.IsOutlined = false; break; }
// Reset the UI. StyleBorder.Visibility = Visibility.Collapsed; MainUI.Visibility = Visibility.Visible; }
private void No_Style_Click(object sender, RoutedEventArgs e) { // Reset the UI. StyleBorder.Visibility = Visibility.Collapsed; MainUI.Visibility = Visibility.Visible; }
private void Complete_Click(object sender, RoutedEventArgs e) { try { // Get the user-drawn geometry. Geometry geometry = MyMapView.GeometryEditor.Stop();
// Hold a reference for the new placemark geometry. KmlGeometry kmlGeometry;
// Check to see if a geometry has been drawn. if (!geometry.IsEmpty) {
if (MyMapView.SpatialReference != null && geometry.SpatialReference != MyMapView.SpatialReference) { // Project the geometry to WGS84 (WGS84 is required by the KML standard). Geometry projectedGeometry = geometry.Project(SpatialReferences.Wgs84);
// Create a KmlGeometry using the projected geometry. kmlGeometry = new KmlGeometry(projectedGeometry, KmlAltitudeMode.ClampToGround); } else { // Create a KmlGeometry using the user-drawn geometry. kmlGeometry = new KmlGeometry(geometry, KmlAltitudeMode.ClampToGround); }
// Create a new placemark. _currentPlacemark = new KmlPlacemark(kmlGeometry);
// Add the placemark to the KmlDocument. _kmlDocument.ChildNodes.Add(_currentPlacemark);
// Enable the style editing UI. StyleBorder.Visibility = Visibility.Visible; MainUI.Visibility = Visibility.Collapsed;
// Display the Icon picker or the color picker based on the creation mode. IconPicker.Visibility = _geometryType == GeometryType.Point ? Visibility.Visible : Visibility.Collapsed; ColorSelector.Visibility = _geometryType != GeometryType.Point ? Visibility.Visible : Visibility.Collapsed; } } catch (Exception ex) { Debug.WriteLine(ex.Message); } finally { // Reset the UI. ShapesPanel.Visibility = Visibility.Visible; CompleteButton.Visibility = Visibility.Collapsed; InstructionsText.Text = "Select the type of feature you would like to add.";
// Enable the save and reset buttons. SaveResetGrid.Visibility = Visibility; } }
private async void Save_Click(object sender, RoutedEventArgs e) { try { // Open a save dialog for the user. FileSavePicker savePicker = new FileSavePicker(); WinRT.Interop.InitializeWithWindow.Initialize(savePicker, App.CurrentWindowHandle); savePicker.SuggestedStartLocation = PickerLocationId.DocumentsLibrary; savePicker.FileTypeChoices.Add("KMZ file", new List<string>() { ".kmz" }); Windows.Storage.StorageFile file = await savePicker.PickSaveFileAsync();
if (file != null) { using (Stream stream = await file.OpenStreamForWriteAsync()) { // Write the KML document to the stream of the file. await _kmlDocument.WriteToAsync(stream); } await new MessageDialog2("Item saved.").ShowAsync(); } } catch { await new MessageDialog2("File not saved.").ShowAsync(); } }
private void Reset_Click(object sender, RoutedEventArgs e) { ResetKml(); } }}