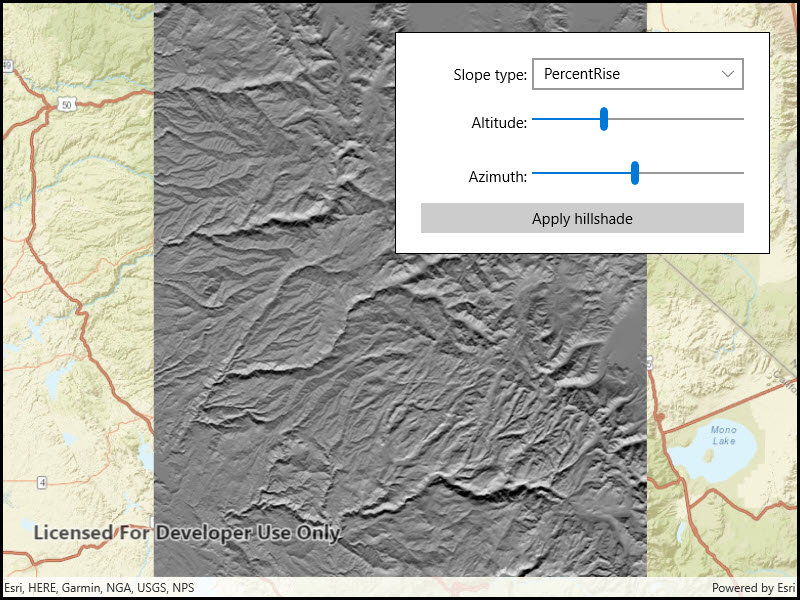
Apply a hillshade renderer to a raster.
Use case
An environmental agency may track coastal erosion by comparing images of an area taken over a a longer period of time with hillshade renderers applied.
How to use the sample
Choose and adjust the settings to update the hillshade renderer on the raster layer. The sample allows you to change the Altitude, Azimuth, and Slope Type.
How it works
- Create a from a grayscale raster file.
- Create a from the raster.
- Create a from the raster layer and set it to the map.
- Create a , specifying the slope type and other properties, .
- Set the hillshade renderer to be used on the raster layer with .
Relevant API
- Basemap
- HillshadeRenderer
- Raster
- RasterLayer
Offline data
This sample downloads the Hillshade raster portal item from ArcGIS Online automatically.
Tags
altitude, angle, azimuth, raster, slope, visualization
Sample Code
<UserControl x:Class="ArcGIS.WinUI.Samples.RasterHillshade.RasterHillshade" xmlns="http://schemas.microsoft.com/winfx/2006/xaml/presentation" xmlns:x="http://schemas.microsoft.com/winfx/2006/xaml" xmlns:esriUI="using:Esri.ArcGISRuntime.UI.Controls"> <Grid> <esriUI:MapView x:Name="MyMapView" /> <Border Style="{StaticResource BorderStyle}"> <Grid> <Grid.ColumnDefinitions> <ColumnDefinition /> <ColumnDefinition Width="2*" /> </Grid.ColumnDefinitions> <Grid.RowDefinitions> <RowDefinition /> <RowDefinition /> <RowDefinition /> <RowDefinition /> </Grid.RowDefinitions> <TextBlock Grid.Row="0" Grid.Column="0" VerticalAlignment="Center" Text="Slope type:" TextAlignment="Right" /> <ComboBox x:Name="SlopeTypeCombo" Grid.Row="0" Grid.Column="1" Margin="5" HorizontalAlignment="Stretch" /> <TextBlock Grid.Row="1" Grid.Column="0" VerticalAlignment="Center" Text="Altitude:" TextAlignment="Right" /> <Slider x:Name="AltitudeSlider" Grid.Row="1" Grid.Column="1" Margin="5" IsThumbToolTipEnabled="True" Maximum="90" Minimum="0" /> <TextBlock Grid.Row="2" Grid.Column="0" VerticalAlignment="Center" Text="Azimuth:" TextAlignment="Right" /> <Slider x:Name="AzimuthSlider" Grid.Row="2" Grid.Column="1" Margin="5" IsThumbToolTipEnabled="True" Maximum="360" Minimum="0" /> <Button x:Name="ApplyHillshadeButton" Grid.Row="3" Grid.ColumnSpan="2" Margin="5,0" Padding="3" HorizontalAlignment="Stretch" VerticalAlignment="Center" Click="ApplyHillshadeButton_Click" Content="Apply hillshade" /> </Grid> </Border> </Grid></UserControl>// Copyright 2018 Esri.//// Licensed under the Apache License, Version 2.0 (the "License"); you may not use this file except in compliance with the License.// You may obtain a copy of the License at: http://www.apache.org/licenses/LICENSE-2.0//// Unless required by applicable law or agreed to in writing, software distributed under the License is distributed on an// "AS IS" BASIS, WITHOUT WARRANTIES OR CONDITIONS OF ANY KIND, either express or implied. See the License for the specific// language governing permissions and limitations under the License.
using ArcGIS.Samples.Managers;using Esri.ArcGISRuntime.Mapping;using Esri.ArcGISRuntime.Rasters;using System;using System.Threading.Tasks;
namespace ArcGIS.WinUI.Samples.RasterHillshade{ [ArcGIS.Samples.Shared.Attributes.Sample( name: "Hillshade renderer", category: "Layers", description: "Apply a hillshade renderer to a raster.", instructions: "Choose and adjust the settings to update the hillshade renderer on the raster layer. The sample allows you to change the Altitude, Azimuth, and Slope Type.", tags: new[] { "altitude", "angle", "azimuth", "raster", "slope", "visualization" })] [ArcGIS.Samples.Shared.Attributes.OfflineData("ae9739163a76437ea02482e1a807b806")] public partial class RasterHillshade { // Constant to store a z-factor (conversion constant) applied to the hillshade. // If needed, this can be used to convert z-values to the same unit as the x/y coordinates or to apply a vertical exaggeration. private const double ZFactor = 1.0;
// Constants to store the Pixel Size Power and Pixel Size Factor values. // Use these to account for altitude changes (scale) as the viewer zooms in and out (recommended when using worldwide datasets). private const double PixelSizePower = 1.0;
private const double PixelSizeFactor = 1.0;
// Constant to store the bit depth (pixel depth), which determines the range of values that the hillshade raster can store. private const int PixelBitDepth = 8;
// Store a reference to the layer private RasterLayer _rasterLayer;
public RasterHillshade() { InitializeComponent();
// Set up the map and load the raster layer from a local file _ = Initialize(); }
private async Task Initialize() { // Create a map with a streets basemap Map map = new Map(BasemapStyle.ArcGISStreets);
// Get the file name for the local raster dataset string filepath = GetRasterPath();
// Load the raster file Raster rasterFile = new Raster(filepath);
try { // Create and load a new raster layer to show the image _rasterLayer = new RasterLayer(rasterFile); await _rasterLayer.LoadAsync();
// Enable the apply renderer button when the layer loads. ApplyHillshadeButton.IsEnabled = true;
// Create a viewpoint with the raster's full extent Viewpoint fullRasterExtent = new Viewpoint(_rasterLayer.FullExtent);
// Set the initial viewpoint for the map map.InitialViewpoint = fullRasterExtent;
// Add the layer to the map map.OperationalLayers.Add(_rasterLayer);
// Add the map to the map view MyMapView.Map = map;
// Add slope type values to the combo box foreach (object slope in Enum.GetValues(typeof(SlopeType))) { SlopeTypeCombo.Items.Add(slope.ToString()); }
// Select the "Scaled" slope type enum SlopeTypeCombo.SelectedIndex = 2; } catch (Exception e) { await new MessageDialog2(e.ToString(), "Error").ShowAsync(); } }
private void ApplyHillshadeButton_Click(object sender, Microsoft.UI.Xaml.RoutedEventArgs e) { // Get the current parameter values double altitude = AltitudeSlider.Value; double azimuth = AzimuthSlider.Value; SlopeType typeOfSlope = Enum.Parse<SlopeType>(SlopeTypeCombo.SelectedItem as string);
// Create a hillshade renderer that uses the values selected by the user HillshadeRenderer hillshadeRenderer = new HillshadeRenderer(altitude, azimuth, ZFactor, typeOfSlope, PixelSizeFactor, PixelSizePower, PixelBitDepth);
// Apply the new renderer to the raster layer _rasterLayer.Renderer = hillshadeRenderer; }
private static string GetRasterPath() { return DataManager.GetDataFolder("ae9739163a76437ea02482e1a807b806", "srtm.tiff"); } }}