Geotriggers let you monitor your GIS data in real-time and receive notifications when specified conditions are met. The most common type of notification is when a device (such as a cellphone) enters or leaves an area (sometimes called Geofencing). With geotriggers, you can monitor locations from whatever LocationDataSource you choose, while tapping into the full power of the GeometryEngine for evaluating spatial relationships.
With geotriggers your apps can do things like:
- Warn users when they enter a restricted or dangerous area.
- Provide notifications about nearby points of interest or attractions.
- Inform drivers when they enter or leave an area that has noise or speed restrictions.
- Notify a customer when their delivery is about to arrive.

Using geotriggers in your app involves the following main steps.
- Define a geotrigger condition to monitor.
- Set up a geotrigger monitor and listen for events.
- React to notification events.
Define a Geotrigger condition to monitor
A Geotrigger defines a condition that you want to monitor as the device location changes. Use the FenceGeotrigger class to monitor conditions based on a spatial relationship.
For example, you could use a fence geotrigger to represent a condition such as “Inform me when my device location comes within 50 meters of one of my target areas”.
The table below shows the meaningful parts of this condition and how they are represented in the Geotrigger API:
| Part | Example | API |
|---|---|---|
| Dynamic position | ”my device location” | GeotriggerFeed |
| Spatial operation | ”comes within” | FenceRuleType |
| Areas (fences) to check | ”my target areas” | FenceParameters |
Geotrigger feed
To monitor your device location, pass a LocationDataSource to a LocationGeotriggerFeed. The LocationDataSource is also what you use with the LocationDisplay to show your position on a map.
You can use the following types of LocationDataSource depending on your use case.
- Default (system) location data source (
DefaultLocationDataSource): uses the device’s built-in GPS and other sensors to provide a location. NmeaLocationDataSource: connects to an external high-accuracy GPS device.SimulatedLocationDataSource: simulates a location for testing or demonstration.- Custom
LocationDataSource: extend the location data source to provide locations according to your own logic.
The following example creates a simulated location data source that follows a provided route polyline. You can also configure a simulated location data source with a velocity (in meters per second) and the time of day (useful when considering traffic conditions, for example).
The location data source is used to configure a Geotrigger feed as well as the map view’s location display.
    // Create a new simulated location data source.    SimulatedLocationDataSource* simulatedDeviceLocation = new SimulatedLocationDataSource(this);
    // Create a new simulation parameters; set the start time and velocity.    SimulationParameters* simulatedLocationDataSource = new SimulationParameters(this);    simulatedLocationDataSource->setStartTime(QDateTime::currentDateTime());    simulatedLocationDataSource->setVelocity(100.0); // Meters/Second
    // The simulated location will move across the provided polyline.    simulatedDeviceLocation->setLocationsWithPolyline(routeLine, simulatedLocationDataSource);    // ...
    // Create a new Geotrigger feed with the simulated location source.    LocationGeotriggerFeed* locationGeotriggerFeed = new LocationGeotriggerFeed(simulatedDeviceLocation, this);    // ...
    // Get the location display from the map view.    LocationDisplay* locationDisplay = m_mapView->locationDisplay();
    // Enable location display on the map view using the same simulated location source.    locationDisplay->setDataSource(simulatedDeviceLocation);    locationDisplay->start();
Fence parameters
You supply a FenceParameters to monitor target areas, including an optional buffer distance. Depending on your workflow, you can make your fences visible or hidden in the map. Your user may not need to know exactly where the fences are, only when one has been entered or exited.
Your fences are based on either:
-
Graphics, which are light-weight, in-memory, and quick to create without needing a defined table schema. For example, graphics could represent a target area that the user sketches on the view. Graphic fences are dynamic, with new ones added, old ones removed, or geometry updates processed on-the-fly. For example, if your fences are polygons representing moving storm clouds, changes to these graphics will be evaluated in real-time. Use graphics when your condition uses temporary data created on the device. To represent fences using graphics, create a
GraphicFenceParametersor aGraphicsOverlayFenceParameters. -
Features from a
FeatureTablethat can be filtered by attributes and/or geometry. Features allow you to monitor online and offline data that can be shared across the Esri ecosystem. Use features when your condition makes use of authoritative data that you share with your map or scene. You create aFeatureFenceParametersto work with features.
The following example creates a fence geotrigger using the simulated location feed set up previously. The fence features come from a feature table of service areas defined by drive time with a buffer of 50 meters applied. Specifying a rule type of “enter” means notifications will be triggered when the fences are entered, but not when exited.
    // Create parameters that define the fence features and a buffer distance (meters).    FeatureFenceParameters* featureFenceParameters = new FeatureFenceParameters(driveTimeServiceAreas->featureTable(), 50, this);
    // Create a geotrigger with the location feed, "enter" rule type, and the fence parameters.    FenceGeotrigger* fenceGeotrigger = new FenceGeotrigger(locationFeed, FenceRuleType::Enter, featureFenceParameters, this);
Set up a Geotrigger monitor and listen for events
Once you have defined your geotrigger, you are ready to start monitoring it. The geotrigger itself just defines what you want to be notified about. To actually check for when things happen (conditions are met), you pass it to a geotrigger monitor.
The GeotriggerMonitor is the heart of the geotriggers workflow: it takes a single Geotrigger and monitors the condition it defines using real-time changes to the location feed. When a condition is met, it raises an event and provides the info your app needs in order to react appropriately.
Once you have created your GeotriggerMonitor, you need to:
- Subscribe to notification events so that you will be informed when the condition is met.
- Watch for warnings that indicate something isn’t working correctly.
- Start the geotrigger monitor to begin monitoring and wait for notifications to start coming in.
The following example creates a geotrigger monitor for the fence geotrigger. Event handlers are added for handling notifications from the monitor (when one of the fence areas is entered). Finally, the monitor is started.
    // Create a GeotriggerMonitor to monitor the FenceGeotrigger created previously.    m_geotriggerMonitor = new GeotriggerMonitor(fenceGeotrigger, this);
    // Handle notification events (when a fence is entered).    connect(m_geotriggerMonitor, &GeotriggerMonitor::geotriggerNotification, this, [this] (GeotriggerNotificationInfo* geotriggerNotificationInfo)    {
    });
    // Start monitoring.    QFuture<void> ignored = m_geotriggerMonitor->startAsync();    Q_UNUSED(ignored);
React to notification events
Whenever your geotrigger monitor is in a started state, you should be ready to handle notifications that provide details for the condition that was met. The GeotriggerNotificationInfo class provides information such as:
- The location where the condition was met. You can zoom to this position by updating the viewpoint for your map view or scene view.
- The geoelement for the fence, which includes all of its underlying attributes and attachments.
- The
GeotriggerMonitorthat sent the notification. You could use this to stop monitoring once a condition has been met.
When you receive a GeotriggerNotificationInfo you could display a message to the user to tell them what happened. You could take other action, such as selecting a feature on the map or routing to a location. Alternatively, you may not need to interact with the user at all, perhaps writing to a logfile or taking some internal action in your app.
The following example adds the code to handle the geotrigger monitor notifications. The fence attributes are used to determine if this is a suitable feature (charging station). If not, the geotrigger monitor will continue to run. If it is, a graphic will be added to the map view to show the station location and monitoring will stop.
    // Create a GeotriggerMonitor to monitor the FenceGeotrigger created previously.    m_geotriggerMonitor = new GeotriggerMonitor(fenceGeotrigger, this);
    // Handle notification events (when a fence is entered).    connect(m_geotriggerMonitor, &GeotriggerMonitor::geotriggerNotification, this, [this] (GeotriggerNotificationInfo* geotriggerNotificationInfo)    {
        // Use QScopedPointer to esnure the notification is cleaned up when we exit this scope.        QScopedPointer<GeotriggerNotificationInfo> scopedNotification{geotriggerNotificationInfo};
        if (geotriggerNotificationInfo->geotriggerNotificationInfoType() !=            GeotriggerNotificationInfoType::FenceGeotriggerNotificationInfo)        {            return;        }
        FenceGeotriggerNotificationInfo* fenceGeotriggerNotificationInfo = static_cast<FenceGeotriggerNotificationInfo*>(geotriggerNotificationInfo);
        // Get the Fence element that was entered (charging station service area).        auto fence = fenceGeotriggerNotificationInfo->fenceGeoElement();
        // Get info for this charging station: accessibility, longitude/latitude.        QString access = fence->attributes()->attributeValue("Accessible").toString().toLower();        const double stationLongitude = fence->attributes()->attributeValue("Longitude").toDouble();        const double stationLatitude = fence->attributes()->attributeValue("Latitude").toDouble();
        // If the station requires you to call ahead or is for hotel guests only, return.        if(access.contains("call ahead") || access.contains("guest use only"))        {            return;        }
        // Show the station for this service area on the map view.        const Point stationPoint = Point(stationLongitude, stationLatitude, SpatialReference::wgs84());        Graphic* stationGraphic = new Graphic(stationPoint, m_stationStopSymbol, this);
        m_mapView->graphicsOverlays()->at(0)->graphics()->append(stationGraphic);
        // Stop monitoring.        m_geotriggerMonitor->stop();
    });
    // Start monitoring.    QFuture<void> ignored = m_geotriggerMonitor->startAsync();    Q_UNUSED(ignored);
Customizing Notifications
Optionally, you can provide an expression that defines the message for your Geotrigger, using the Arcade language. This controls the message provided with GeotriggerNotificationInfo that is populated whenever the geotrigger condition is met. The expression uses the Geotrigger Notification Profile, which gives you access to:
- The
$feedfeature(the device location, for example) and its geometry and attributes. - Whether the area was “entered” or “exited”.
- The
$fencefeature(the target area) and its geometry and attributes.
You can also make use of other functions and objects available in Arcade, such as the Geometry() or Now() functions. For example, the following geotrigger message expression:
"Hello, you have entered " + $fencefeature.name + " with a heading of " + $feedfeature.heading + " degrees at " + Now()
Might result in a GeotriggerNotificationInfo.message of:
Hello, you have entered Area 1 with a heading of 45 degrees at 01 Jan 2021 12:00:00 pm.
Working with Geotriggers when your app is in the background
Many geotrigger workflows monitor and provide notifications while the user is interacting with and viewing the app. Sometimes, however, your app needs to provide notifications for a geotrigger condition while the user is engaged in other tasks, even when the app is not active. When working on mobile devices, it is particularly important to consider how geotriggers will behave when you navigate away from the app. In these scenarios, your app must contain logic that ensures its geotriggers are monitored when running in the background.
To work in the background on a mobile device, your app must enable appropriate settings and permissions for the native operating system.
On iOS devices, the following prerequisites must be satisfied before you are able to receive location events in the background:
- The app must request authorization from the user to access the device location while it is in the background. You can do this by adding the key
NSLocationAlwaysAndWhenInUseUsageDescriptionto your project’splistfile. To learn more about requesting user authorization, see the Note in the Location data sources section of the Device location guide topic. - Your project must have
Location Updatesenabled in theBackground Modes. First, addBackgroundModescapability by using the+ CapabilityunderSigning & Capabilitesof your project’s target. Next, checkLocation Updatesfrom the list of modes listed. - You need to set
CLLocationManagerwith theallowsBackgroundLocationUpdatesproperty enabled. Access to an iOSCLLocationManageris provided via theDefaultLocationDataSource.
You can then use the to create a LocationGeotriggerFeed. iOS will give your app execution time for monitoring geotriggers when a location update is received.
When you are finished monitoring geotriggers, you must stop monitoring locations with the iOS Core location services.
On Android devices, one approach is to move the geotriggers business logic to a long running foreground service that you interact with via a persistent notification.
You can continue to show UI such as the map view in your main activity but must ensure that the data required for geotriggers, such as the LocationDataSource and data used for fences, is managed by the foreground service. Your main activity starts the foreground service and then binds to it for sharing data and so on. To receive location updates from the device, you also need to request the ACCESS_BACKGROUND_LOCATION permission.
Once your foreground service is started it will be shown in the device’s notification bar irrespective of the state of your app. When a geotrigger condition is met, information can be displayed without relying on the main activity’s UI (using a Toast or Snackbar, for example). You can add UI controls to the notification that allow the user to stop geotrigger monitoring.
GPS accuracy considerations for feed updates
Inaccuracies in GPS data can affect the accuracy of geotrigger monitoring. To ensure that geotriggers more accurately report entering and exiting a fence, you can filter the feed updates to only monitor the most suitable locations by using an ArcadeExpression on LocationGeotriggerFeed.filter. For example, the expression return $locationupdate.horizontalaccuracy <= 10.0 only accepts those location updates with a horizontal accuracy less than or equal to 10 meters.
You can factor GPS accuracy into your geotriggers using FenceGeotriggerFeedAccuracyMode.UseGeometryWithAccuracy to buffer locations by their horizontal accuracy. This creates a polygon representing the area of uncertainty around the reported location, and this polygon is used to check if a geotrigger condition is met.
Fence enter and exit spatial relationships
The purpose of your application determines when you want to be notified of the geotriggers. For example, you may choose to receive notifications when you are near a fence or only when you are completely inside it. You can use FenceEnterExitSpatialRelationship to define enter and exit rules for the location with respect to the fence.
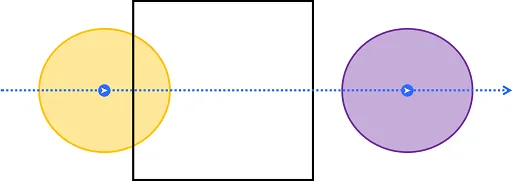
Some possible use cases for each FenceEnterExitSpatialRelationship value are described below. Each available value is followed by a diagram that illustrates a corresponding enter and exit scenario. In each diagram, the feed enters the fence from the left (shown in yellow) and exits to the right (shown in purple).
FenceEnterExitSpatialRelationship.EnterIntersectsAndExitDoesNotIntersect: You want to be notified when the location is near a fence, so you choose to receive enter notifications whenever the feed polygon intersects the fence. Exit notifications require that the location is completely outside the fence. For example, an industry worker needs to be notified whenever they are potentially approaching an area with hazardous gases and are also notified when they are clear of the danger.
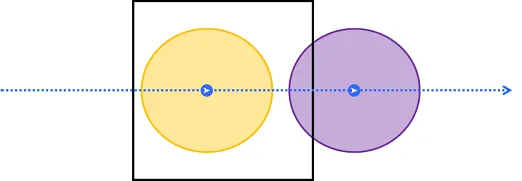
FenceEnterExitSpatialRelationship.EnterContainsAndExitDoesNotContain: You want to be notified only when you are completely inside a fence, so you choose to receive enter notifications when the feed polygon is contained within the fence. Exit notifications require that the location is not contained. For example, a field crew sent to cut down trees needs to avoid accidentally cutting down trees in neighboring plots. They only want on-site staff to be notified when there is high confidence.
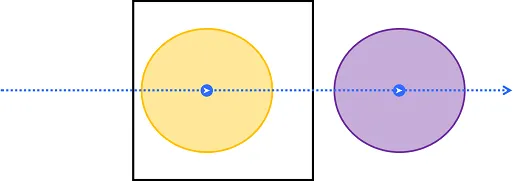
FenceEnterExitSpatialRelationship.EnterContainsAndExitDoesNotIntersect: You want to be notified only when you are completely inside or outside a fence. For example, a delivery driver driving along a highway past many addresses does not want to be notified of addresses they pass by, but only when they arrive at or leave their destination.
Performance considerations
Geotriggers may monitor conditions for long periods of time (maybe the entire time that your app is running). To minimize memory usage and to maximize your device’s battery life, consider some factors that can affect the performance of your geotrigger code.
Device specifications determine the limits of what you can successfully monitor. For example, mobile devices with reduced memory capacity can handle fewer fences than a powerful desktop computer. For typical workflows, you can expect mobile devices to effectively monitor tens of thousands of fences and perform well. By comparison, the same geotrigger code running on a desktop machine could handle hundreds of thousands of fences. As a guideline, you should try to monitor the minimum amount of fence data required for your application. Geotriggers use your device’s GPS and may continue to run in the background. To reduce your device’s battery consumption, turn GPS off when it is not required. Geotriggers are not monitored unless there are location or graphics updates.
You can use multiple geotriggers to monitor features from different feature tables within one application. When using online feature data, there is the possibility of losing network connectivity, which can affect your app’s availability. If you need to guarantee consistent performance without relying on network availability, consider taking the fence data offline.
Fence creation considerations
Geotrigger notifications can be affected by several factors including signal strength, accuracy of GPS data, and the frequency of position updates. To ensure accurate notifications, consider the intended speed of travel as well as your device’s accuracy when creating fences.
The speed of travel for an app designed for car users is higher than the one designed for pedestrians. For example, if you are traveling at 60 mph (around 100 kph) with location updates every second, the real world distance between two adjacent locations is approximately 30 meters. If the fence was just 10 meters wide, it might fall into the “gap” between positions, and the notification may be missed. Since the distance between position updates is greater when travelling at higher speeds, consider making your fences large enough.
As a general rule, favor larger fences. This helps avoid problems such as
- Receiving erroneous exit notifications when you’re inside a small fence due to GPS drift.
- Missing an enter notification when you’re traveling at high speeds and your locations fall on either side of a small fence.
Also, consider updating your app’s location data source to send position updates more frequently, if your performance considerations permit. This allows your app to get more accurate notifications.