Learn how to create and display a map
A map contains layers
In this tutorial, you create and display a map
The map and code will be used as the starting point for other 2D tutorials.
Prerequisites
Before starting this tutorial:
-
You need an ArcGIS Location Platform or ArcGIS Online account.
-
Your system meets the system requirements.
-
The ArcGIS Maps SDK for Qt, version 300.0.0 or later is installed.
-
The Qt 6.8.2 software development framework or later is installed.
Set up authentication
To access the secure ArcGIS location services
You can implement API key authentication or user authentication in this tutorial. Compare the differences below:
API key authentication
- Users are not required to sign in.
- Requires creating an API key credential
API key credentials are an item that contains the parameters used to create and manage long-lived access tokens for API key authentication. They are a type of developer credential. with the correct privileges. - API keys
An API key is a long-lived access token created using API key credentials. They are valid for up to one year and are typically embedded directly into client applications. are long-lived access tokens. - Service usage is billed to the API key owner/developer.
- Simplest authentication method to implement.
- Recommended approach for new ArcGIS developers.
Learn more in API key authentication.
User authentication
- Users are required to sign in with an ArcGIS account
An ArcGIS account is an identity with a user type and set of privileges that can access specific ArcGIS products, tools, APIs, services, and resources. The main account types that can be used for development are an ArcGIS Location Platform account, ArcGIS Online account, and ArcGIS Enterprise account. ArcGIS Location Platform and ArcGIS Online accounts are also associated with a subscription. . - User accounts must have privilege
Privileges are a set of permissions assigned to ArcGIS accounts, developer credentials, and applications that grant access to secure resources and functionality in ArcGIS. to access the ArcGIS servicesA service, also known as an ArcGIS service, is software that supports an ArcGIS REST API and provides geospatial functionality or data. A service can be hosted by Esri or in ArcGIS Enterprise. used in application. - Requires creating OAuth credentials
OAuth credentials are an item that contains parameters required to implement user authentication or app authentication, including a .client_id,client_secret, and redirect URIs. They are a type of developer credential. - Application uses a redirect URL and client ID.
- Service usage is billed to the organization of the user signed into the application.
Learn more in User authentication.
To complete this tutorial, click on the tab in the switcher below for your authentication type of choice, either API key authentication or User authentication.
Create a new API key access token
-
Complete the Create an API key tutorial and create an API key with the following privilege(s)
Privileges are a set of permissions assigned to ArcGIS accounts, developer credentials, and applications that grant access to secure resources and functionality in ArcGIS. :- Privileges
- Location services > Basemaps
- Privileges
-
Copy and paste the API key access token into a safe location. It will be used in a later step.
Create new OAuth credentials to access the secure resources used in this tutorial.
-
Complete the Create OAuth credentials for user authentication tutorial to obtain a Client ID and Redirect URL.
A
Client IDuniquely identifies your app on the authenticating server. If the server cannot find an app with the provided Client ID, it will not proceed with authentication.The
Redirect URL(also referred to as a callback url) is used to identify a response from the authenticating server when the system returns control back to your app after an OAuth login. Since it does not necessarily represent a valid endpoint that a user could navigate to, the redirect URL can use a custom scheme, such asmy-app://auth. It is important to make sure the redirect URL used in your app’s code matches a redirect URL configured on the authenticating server. -
Copy and paste the Client ID and Redirect URL into a safe location. They will be used in a later step.
All users that access this application need account privileges
Because this tutorial is the foundation (or starting point) for several other tutorials, you will want to follow one path for authentication (either API Key authentication or User authentication (via OAuth)) and use that same pattern for the other tutorials. If you wish to change authentication patterns as you move through the other tutorials, then complete this tutorial again, Display a map, using the other authentication pattern.
Develop or Download
You have two options for completing this tutorial:
Option 1: Develop the code
Create a new ArcGIS Maps Qt Creator Project
-
Start Qt Creator.
-
In the top menu bar, click File > New Project.
-
In the New Project dialog, in the left frame, under Projects, select ArcGIS. Then select the ArcGIS Maps 300.0.0 Qt Quick C++ app project template (or a later version) and click Choose. This step launches the template wizard.
-
In the Project Location template, name your project Display_a_map. You can specify your own “create in” location for where the project will be created or leave the default. Click Next.
-
In the Define Build System template, select qmake for your build system. Click Next.
-
In the Define Project Details template, give this app a description or leave as is. For the GeoView type dropdown menu, select 2D Map. For the ArcGIS Online Basemap dropdown menu, select Topographic. Do not supply an API Key (also called an access token) at this time; leave it blank. You will do this in another step when you set your developer credentials. Click Next.
-
In the Kit Selection template, check on the kit you previously set up when you installed Qt (Desktop Qt 6.8.2 MSVC2022 64bit or higher required). Click Next.
-
In the Project Management template, the option to Add as a subproject to root project is only available if you have already created a root project. If you have a version control system set up, you can select it in the dropdown but it is not needed to complete this tutorial. Click Finish to complete the template wizard.
Add a map
Use the map viewArcGISTopographic BasemapStyle.
-
In the project Headers folder of Qt Creator, double-click the Display_a_map.h file to open it.
-
Add the declaration
void setupViewpoint();underprivate:section. Then save the file.Display_a_map.hprivate:Esri::ArcGISRuntime::MapQuickView* mapView() const;void setMapView(Esri::ArcGISRuntime::MapQuickView* mapView);void setupViewpoint();Esri::ArcGISRuntime::Map* m_map = nullptr;Esri::ArcGISRuntime::MapQuickView* m_mapView = nullptr; -
In the project Sources folder of Qt Creator, open the Display_a_map.cpp file.
-
Add the following
#includestatements.Display_a_map.cpp#include "Display_a_map.h"#include "Map.h"#include "MapTypes.h"#include "MapQuickView.h"#include "Point.h"#include "Viewpoint.h"#include "SpatialReference.h"#include <QFuture>
Create the view point
-
Add code to implement the
setupViewpointmethod. This method creates acenterPointbased on aSpatialReferencealong with longitude and latitude. It also creates aViewpointbased oncenterand sets scale. Lastly, it asynchronously sets the initialMapviewpoint.The center
Pointand scale value keep the initialViewpointcentered and focused on the Santa Monica Mountains. The scale value sets the level of detail to focus on the area of interest.The spatial reference
A spatial reference is a set of parameters, typically defined by a WKID, that define the coordinate system and spatial properties for geographic data. Applications use a spatial reference to correctly display the position of geographic data in a map or scene. created above is set to use World Geodetic System 1984 (WGS84), the spatial reference commonly used for GPS, and it has the well known id4326. To learn more, seeSpatial Referencesin the ArcGIS Maps SDK for Qt Guide.Scale is an integral part of creating a viewpoint. It determines how closely you view your map. Scale is a ratio between measurements on a map view and measurements in the real-world. Use this conversion tool to see how scale works relative to zoom level and learn more about their relationship.
Display_a_map.cppMapQuickView* Display_a_map::mapView() const{return m_mapView;}void Display_a_map::setupViewpoint(){const Point center(-118.80543, 34.02700, SpatialReference::wgs84());const Viewpoint viewpoint(center, 100000.0);m_mapView->setViewpointAsync(viewpoint);}The
setMapViewmethod appearing later in this file gets a handle to theMapViewobject that was declared in QML code and sets theMapon theMapViewfor display. This code is installed by the templates that ArcGIS provides when creating a new project in Qt. -
Add the following line of code to call
setupViewpoint. Then save the file.Display_a_map.cpp// Set the view (created in QML)void Display_a_map::setMapView(MapQuickView* mapView){if (!mapView || mapView == m_mapView){return;}m_mapView = mapView;m_mapView->setMap(m_map);setupViewpoint();emit mapViewChanged();}
Set developer credentials
To allow your app users to access ArcGIS location services
For the final steps of this tutorial, click the tab below for either API key authentication or User authentication to use the correct authentication pattern to run the application.
Set the API Key
-
In the project Sources folder of Qt Creator, open the main.cpp file.
-
Modify the code to set the
accessTokenusing your API key access token (highlighted in yellow).main.cpp// The following methods grant an access token:// 1. User authentication: Grants a temporary access token associated with a user's ArcGIS account.// To generate a token, a user logs in to the app with an ArcGIS account that is part of an// organization in ArcGIS Online or ArcGIS Enterprise.// 2. API key authentication: Get a long-lived access token that gives your application access to// ArcGIS location services. Go to the tutorial at https://links.esri.com/create-an-api-key.// Copy the API Key access token.const QString accessToken = QString("");if (accessToken.isEmpty()){qWarning() << "Use of ArcGIS location services, such as the basemap styles service, requires" <<"you to authenticate with an ArcGIS account or set the API Key property.";}else{ArcGISRuntimeEnvironment::setApiKey(accessToken);} -
Save the main.cpp file.
Best Practice: The access token is stored directly in the code as a convenience for this tutorial. Do not store credentials directly in source code in a production environment.
Download the ArcGIS Maps SDK for Qt Toolkit
The open-source ArcGIS Maps SDK for Qt Toolkit contains UI components and utilities to help simplify your Qt app development. The Qt toolkit provides the Authenticator class, which has a dialog that automatically displays the proper authentication for any of the supported authentication types (OAuth, Token, HTTP Basic, HTTP Digest, SAML, PKI, IWA, etc).
To configure the ArcGIS Maps SDK for Qt Toolkit, copy the ArcGIS Maps SDK for Qt Toolkit repository in GitHub onto your development machine.
Do this by cloning the ArcGIS Maps SDK for Qt Toolkit repo (using the the URL: https://github.com/Esri/arcgis-maps-sdk-toolkit-qt.git) or downloading the .zip version of the repo and unzipping it to your preferred location on your development machine.
IMPORTANT: Make a particular note for the path to the toolkitcpp.pri file that is in the directory structure of the toolkit on your development machine. You will need to reference the path to this file later in the tutorial (for example: C:/arcgis-maps-sdk-toolkit-qt/uitools/toolkitcpp/toolkitcpp.pri).
Configure the .pro file
The Qt Creator .pro files contain information required by qmake to build an application, a library, or a plugin.
To utilize Authenticator, you will need to set the path to where the toolkitcpp.pri file is located on your development system. You will also add the code for the Qt WebEngine Quick module to your project. The Qt WebEngine is used to display an OAuth sign in webpage in your app. Then save the Display_a_map.pro file.
See the Install and setup for details on installing the Qt WebEngine on your system.
- In the Projects window of Qt Creator, open Display_a_map.pro file. Add the following code and set the correct path for the PATH_TO_TOOLKIT variable or the OAuth dialog will not appear to enter your user credentials. Then save the file.
ARCGIS_RUNTIME_VERSION = 300.0.0include($$PWD/arcgisruntime.pri)
# TODO: You need to replace the <path_to_toolkit_repo> with a valid location where the Qt Toolkit# resides on your system, example: C:/arcgis-maps-sdk-toolkit-qt/uitools/toolkitcpp/toolkitcpp.pri# This block determines whether you've cloned your toolkitPATH_TO_TOOLKIT = "<path_to_toolkit_repo>/uitools/toolkitcpp/toolkitcpp.pri"
exists($${PATH_TO_TOOLKIT}) { message("Toolkit found") DEFINES += TOOLKIT_FOUND
# include the toolkitcpp.pri, which contains all the toolkit resources include($${PATH_TO_TOOLKIT})
qtHaveModule(webenginequick) { QT += webenginequick }} else { message("Toolkit not found in provided path. Either set PATH_TO_TOOLKIT or use an API Key")}Add the user authentication code
The OAuth sign in web page is implemented using the Authenticator class and the Qt WebEngine, which is part of the ArcGIS Maps SDK for Qt Toolkit.
In the project Sources folder of Qt Creator, open main.cpp file. Add code for the #include statements for the QtWebEngineQuick, QQmlCOntext, and register.h for the ArcGIS Maps SDK for Qt Toolkit.
#include "Display_a_map.h"#include "ArcGISRuntimeEnvironment.h"#include "MapQuickView.h"
#ifdef TOOLKIT_FOUND #include <QtWebEngineQuick/QtWebEngineQuick> #include "Esri/ArcGISRuntime/Toolkit/register.h"#endif // TOOLKIT_FOUNDAdd the code to initialize the QtWebEngineQuick.
using namespace Esri::ArcGISRuntime;
int main(int argc, char *argv[]){
#ifdef TOOLKIT_FOUND // Initialize the QtWebEngineQuick to use the web based login dialog. QtWebEngineQuick::initialize(); #endif //TOOLKIT_FOUNDFinally in the main.cpp file, add the code to register the ArcGIS Maps SDK for Qt Toolkit. Then save the file.
// Register the Display_a_map (QQuickItem) for QML qmlRegisterType<Display_a_map>("Esri.Display_a_map", 1, 0, "Display_a_map");
// Initialize application view QQmlApplicationEngine engine;
#ifdef TOOLKIT_FOUND // Register the toolkit Esri::ArcGISRuntime::Toolkit::registerComponents(engine); #endif //TOOLKIT_FOUNDAt this point you need to add the visual component of the ArcGIS Maps SDK for Qt Toolkit control to the QML file of the Qt Creator project. The Authenticator component simplifies the authentication workflow to automatically display the correct login user interface for each security method (OAuth, Token, HTTP Basic, HTTP Digest, SAML, PKI, IWA, etc).
In Qt Creator, navigate to Resources > qml\qml.qrc > qml and open the Display_a_mapForm.qml file. Add code to create the Authenticator component. Then save the file.
// Declare the C++ instance which creates the map etc. and supply the view Display_a_map {
id: model
mapView: view
}
// Create an Authenticator as a Component, so it can be created dynamically. QtObject { id: authenticator property Component component: null
function applyComponentStatus() { if (!component) return;
if (component.status === Component.Ready) { loader.sourceComponent = component; } else if (component.status === Component.Error) { console.log("Toolkit not found in provided path. Either set PATH_TO_TOOLKIT in the .pro or use an API Key."); } }
Component.onCompleted: { component = Qt.createComponent("Esri.ArcGISRuntime.Toolkit", "Authenticator", Component.Asynchronous, authenticator); component.statusChanged.connect(applyComponentStatus); applyComponentStatus(); } }
// loader to load the Authenticator component Loader { id: loader anchors.centerIn: parent }Add the user authentication header files and namespace
Several additional classes and a namespace are required to support the functionality your app needs. Code need to be added for managing OAuth authentication, creating an image layer, and accessing the secured traffic layer portal item.
- In the project Sources folder of Qt Creator, open the Display_a_map.cpp file. Add
#includestatements for the required header files and anothernamespaceas shown. Then save the file.
#include "Display_a_map.h"#include "Map.h"
#include "MapTypes.h"
#include "MapQuickView.h"
#include "Point.h"#include "Viewpoint.h"#include "SpatialReference.h"#include <QFuture>
#ifdef TOOLKIT_FOUND #include "OAuthUserConfigurationManager.h"
#include "Authentication/OAuthUserConfiguration.h"
using namespace Esri::ArcGISRuntime::Authentication;#endif //TOOLKIT_FOUNDAdd the code for OAuth
You will create a new OAuthUserConfiguration object. This object is used as the input for the ArcGIS Maps SDK for Qt Toolkit OAuthUserConfigurationManager to make use of the Qt WebEngine based login dialog.
- In the
Display_a_mapconstructor, add the following code to create aOAuthUserConfigurationobject. Then save the file.
IMPORTANT You must set the values for the REDIRECT_URL and the CLIENT_ID strings or the OAuth dialog will not appear to enter your user credentials.
Display_a_map::Display_a_map(QObject* parent /* = nullptr */):
QObject(parent),
m_map(new Map(BasemapStyle::ArcGISTopographic, this))
{
#ifdef TOOLKIT_FOUND
// Define the Redirect URL string obtained when creating the OAuth credentials. // TODO: You need to replace the "REDIRECT_URL" with your own valid string, // ex: "urn:ietf:wg:oauth:2.0:oob" const auto qStringRedirectUrl = QString{"REDIRECT_URL"};
// Define the URL of the portal to authenticate with. const QUrl qUrlPortal = QUrl{"https://www.arcgis.com/"};
// Define a unique identifier associated with an application registered with the // portal that assists with client/server OAuth authentication. // TODO: You need to replace the "CLIENT_ID" with your own valid string. const QString qStringClientId = QString{"CLIENT_ID"};
// Create a new OAuth user configuration using: the Url to mapping web service, the Client ID // string, and the Redirect Url string. auto* oAuthUserConfiguration = new OAuthUserConfiguration(qUrlPortal, qStringClientId, qStringRedirectUrl, this);
// Call the Toolkit's OAuthUserConfigurationManager static `addConfiguration` // method to use the OAuth dialog. This will tell the Authenticator to use OAuth for the provided configuration. Toolkit::OAuthUserConfigurationManager::addConfiguration(oAuthUserConfiguration);#endif // TOOLKIT_FOUND
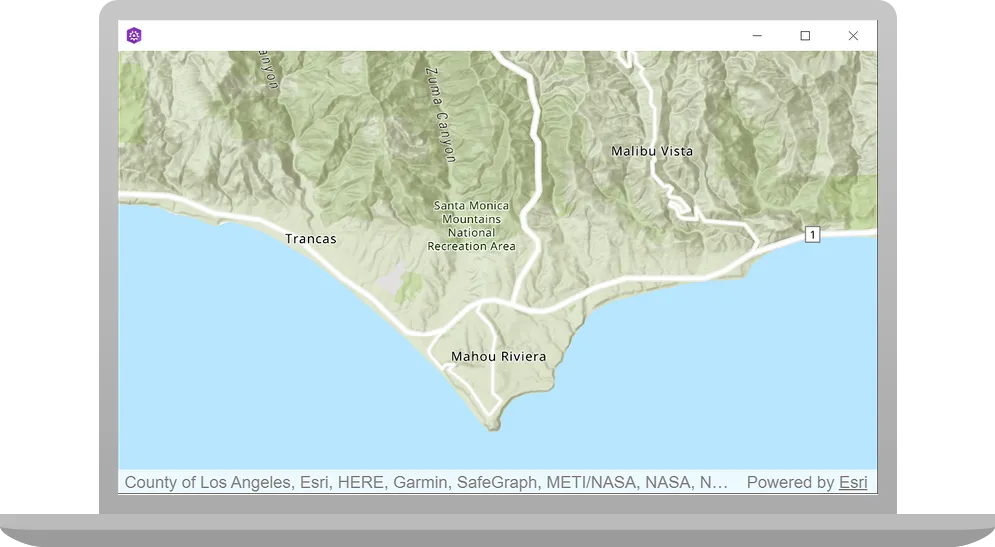
}Press Ctrl + R to run the app.
You should see a map
Alternatively, you can download the tutorial solution, as follows.
Option 2: Download the solution
-
Click the
Download solutionlink underSolutionand unzip the file to a location on your machine. -
Open the .pro project file in Qt Creator.
Since the downloaded solution does not contain authentication credentials, you must add the developer credentials that you created in the Set up authentication section.
Set developer credentials in the solution
Set the API Key
To allow your app users to access ArcGIS location services
-
In the project Sources folder of Qt Creator, open the main.cpp file.
-
Modify the code to set the
accessTokenusing your API key access token (highlighted in yellow).main.cpp// The following methods grant an access token:// 1. User authentication: Grants a temporary access token associated with a user's ArcGIS account.// To generate a token, a user logs in to the app with an ArcGIS account that is part of an// organization in ArcGIS Online or ArcGIS Enterprise.// 2. API key authentication: Get a long-lived access token that gives your application access to// ArcGIS location services. Go to the tutorial at https://links.esri.com/create-an-api-key.// Copy the API Key access token.const QString accessToken = QString("");if (accessToken.isEmpty()){qWarning() << "Use of ArcGIS location services, such as the basemap styles service, requires" <<"you to authenticate with an ArcGIS account or set the API Key property.";}else{ArcGISRuntimeEnvironment::setApiKey(accessToken);} -
Save main.cpp file.
Best Practice: The access token is stored directly in the code as a convenience for this tutorial. Do not store credentials directly in source code in a production environment.
Set path to the Qt Toolkit in the project
Ensure you have completed the prerequisites listed at the beginning of this tutorial. In particular, ensure you have done the step Download the ArcGIS Maps SDK for Qt Toolkit and have noted the path to the toolkitcpp.pri file that is in the directory structure of the Qt Toolkit on your development machine.
To utilize Authenticator, you will need to set the path to where the toolkitcpp.pri file is located on your development system. You will also add the code for the Qt WebEngine Quick module to your project. The Qt WebEngine is used to display an OAuth sign in webpage in your app. Then save the Display_a_map.pro file.
See the Install and setup for details on installing the Qt WebEngine on your system.
In the project Sources folder of Qt Creator, open the Display_a_map.pro file and locate the following lines and update PATH_TO_TOOLKIT variable with the path of the toolkitcpp.pri file (highlighted in yellow) or the OAuth dialog will not appear to enter your user credentials. Then save the file.
ARCGIS_RUNTIME_VERSION = 300.0.0include($$PWD/arcgisruntime.pri)
# TODO: You need to replace the <path_to_toolkit_repo> with a valid location where the Qt Toolkit# resides on your system, example: C:/arcgis-maps-sdk-toolkit-qt/uitools/toolkitcpp/toolkitcpp.pri# This block determines whether you've cloned your toolkitPATH_TO_TOOLKIT = "<path_to_toolkit_repo>/uitools/toolkitcpp/toolkitcpp.pri"
exists($${PATH_TO_TOOLKIT}) {  message("Toolkit found")  DEFINES += TOOLKIT_FOUND
  # include the toolkitcpp.pri, which contains all the toolkit resources  include($${PATH_TO_TOOLKIT})
qtHaveModule(webenginequick) { QT += webenginequick }} else { message("Toolkit not found in provided path. Either set PATH_TO_TOOLKIT or use an API Key")}Set developer credentials in the solution
To allow your app users to access ArcGIS location services
-
In the project Sources folder of Qt Creator, open the Display_a_map.cpp file.
-
Set your values for the REDIRECT_URL and the CLIENT_ID strings (highlighted in yellow). Then save the file.
{
#ifdef TOOLKIT_FOUND
    // Define the Redirect URL string obtained when creating the OAuth credentials.    // TODO: You need to replace the "REDIRECT_URL" with your own valid string,    // ex: "urn:ietf:wg:oauth:2.0:oob"    const auto qStringRedirectUrl = QString{"REDIRECT_URL"};
    // Define the URL of the portal to authenticate with.    const QUrl qUrlPortal = QUrl{"https://www.arcgis.com/"};
    // Define a unique identifier associated with an application registered with the    // portal that assists with client/server OAuth authentication.    // TODO: You need to replace the "CLIENT_ID" with your own valid string.    const QString qStringClientId = QString{"CLIENT_ID"};
    // Create a new OAuth user configuration using: the Url to mapping web service, the Client ID    // string, and the Redirect Url string.    auto* oAuthUserConfiguration = new OAuthUserConfiguration(qUrlPortal, qStringClientId,                                                              qStringRedirectUrl, this);
    // Call the Toolkit's OAuthUserConfigurationManager static `addConfiguration`    // method to use the OAuth dialog. This will tell the Authenticator to use OAuth for the provided configuration.    Toolkit::OAuthUserConfigurationManager::addConfiguration(oAuthUserConfiguration);#endif // TOOLKIT_FOUND
Run the app
Press Ctrl + R to run the app.
You should see a map
What’s next?
Learn how to use additional API features, ArcGIS location services, and ArcGIS tools in these tutorials: