Learn how to apply renderers
Applications can display feature layer data with different styles to enhance the visualization. The type of Renderer you choose depends on your application. A SimpleRenderer applies the same symbol to all features, a UniqueValueRenderer applies a different symbol to each unique attribute value, and a ClassBreaksRenderer applies a symbol to a range of numeric values. Renderers are responsible for accessing the data and applying the appropriate symbol to each feature when the layer draws. You can also use a LabelDefinition to show attribute information for features. Visit the Styles and data visualization documentation to learn more about styling layers.
You can also author, style and save web maps, web scenes, and layers as portal items and then add them to the map in your application. Visit the following tutorials to learn more about adding portal items.
In this tutorial, you will apply different renderers
Prerequisites
Before starting this tutorial:
-
You need an ArcGIS Location Platform or ArcGIS Online account.
-
Your system meets the system requirements.
-
The ArcGIS Maps SDK for Qt, version 300.0.0 or later is installed.
-
The Qt 6.8.2 software development framework or later is installed.
Develop or Download
You have two options for completing this tutorial:
Option 1: Develop the code
To start the tutorial, complete the Display a map tutorial. This creates a map to display the Santa Monica Mountains in California using the topographic basemap from the ArcGIS Basemap Styles service
Open a Qt Creator project
-
Open the project you created by completing the Display a map tutorial.
-
Continue with the following instructions to apply renderers and label definitions to a feature layer based on attribute values.
Add needed classes and declarations
-
In the Projects window, open the Headers folder. Open the Display_a_map.h file.
-
Add the
LabelDefinitionandFeatureLayerclasses to the namespace.Display_a_map.hnamespace Esri::ArcGISRuntime {class Map;class MapQuickView;class LabelDefinition;class FeatureLayer; -
Add the declarations for methods you will create.
Display_a_map.hprivate:Esri::ArcGISRuntime::MapQuickView* mapView() const;void setMapView(Esri::ArcGISRuntime::MapQuickView* mapView);void setupViewpoint();void addOpenSpaceLayer();void addTrailsLayer();void addNoBikeTrailsLayer();void addBikeOnlyTrailsLayer();void addTrailheadsLayer();Esri::ArcGISRuntime::FeatureLayer* addFeatureLayer(const QUrl& url);Esri::ArcGISRuntime::LabelDefinition* makeLabelDefinition(); -
Save the file.
Create a function to add a feature layer
A feature layer can be added from a feature servicex,y coordinates and a spatial reference.
Next, you will create a helper method to add a layer to the map’s collection of operational layers
-
In the project Headers folder of Qt Creator, double-click the Display_a_map.cpp file to open it. Add include statements to access the classes that will be used.
Display_a_map.cpp#include "Display_a_map.h"#include "Map.h"#include "MapTypes.h"#include "MapQuickView.h"#include "Point.h"#include "Viewpoint.h"#include "SpatialReference.h"#include <QFuture>#include "FeatureLayer.h"#include "ServiceFeatureTable.h"#include "LayerListModel.h" -
Add a helper method named
addFeatureLayer(const QUrl& url)that takes a feature service URL as an argument.Display_a_map.cppvoid Display_a_map::setupViewpoint(){const Point center(-118.80543, 34.02700, SpatialReference::wgs84());const Viewpoint viewpoint(center, 100000.0);m_mapView->setViewpointAsync(viewpoint);}// Create a new function that creates a feature layer and appends it to the operational layers and the m_map.FeatureLayer* Display_a_map::addFeatureLayer(const QUrl& url){ServiceFeatureTable* serviceFeatureTable = new ServiceFeatureTable(url, this);FeatureLayer* featureLayer = new FeatureLayer(serviceFeatureTable, this);m_map->operationalLayers()->append(featureLayer);return featureLayer;}
Add a layer with a unique value renderer
Create a method that creates a variable to store a feature service URL. Create a Parks and Open Spaces feature layer using that variable and then apply a different symbol for each type of park area displayed.
-
Staying within the Display_a_map.cpp file, add include statements to access the classes that will be used.
Display_a_map.cpp#include "FeatureLayer.h"#include "ServiceFeatureTable.h"#include "LayerListModel.h"#include "SymbolTypes.h"#include "UniqueValue.h"#include <QUrl>#include "SimpleFillSymbol.h"#include "UniqueValueRenderer.h" -
Add a new method named
addOpenSpaceLayer().Display_a_map.cppvoid Display_a_map::addOpenSpaceLayer(){// Create a parks and open spaces feature layer.QUrl parksAndOpenSpacesQUrl("https://services3.arcgis.com/GVgbJbqm8hXASVYi/ArcGIS/rest/services/Parks_and_Open_Space/FeatureServer/0");FeatureLayer* featureLayer = addFeatureLayer(parksAndOpenSpacesQUrl);// Create fill symbols.SimpleFillSymbol* purpleFillSymbol = new SimpleFillSymbol(SimpleFillSymbolStyle::Solid, QColor("purple"), this);SimpleFillSymbol* greenFillSymbol = new SimpleFillSymbol(SimpleFillSymbolStyle::Solid, QColor("green"), this);SimpleFillSymbol* blueFillSymbol = new SimpleFillSymbol(SimpleFillSymbolStyle::Solid, QColor("blue"), this);SimpleFillSymbol* redFillSymbol = new SimpleFillSymbol(SimpleFillSymbolStyle::Solid, QColor("red"), this);// Create a unique value for natural areas, regional open spaces, local parks & regional recreation parks.UniqueValue* naturalAreas = new UniqueValue("Natural Areas", "Natural Areas", {"Natural Areas"}, purpleFillSymbol, this);UniqueValue* regionalOpenSpace = new UniqueValue("Regional Open Space", "Regional Open Space", {"Regional Open Space"}, greenFillSymbol, this);UniqueValue* localPark = new UniqueValue("Local Park", "Local Park", {"Local Park"}, blueFillSymbol, this);UniqueValue* regionalRecreationPark = new UniqueValue("Regional Recreation Park", "Regional Recreation Park",{"Regional Recreation Park"}, redFillSymbol, this);// Create and assign a unique value renderer to the feature layer.UniqueValueRenderer* openSpacesUniqueValueRenderer = new UniqueValueRenderer("Open Spaces", nullptr, {"TYPE"},{naturalAreas, regionalOpenSpace, localPark, regionalRecreationPark }, this);featureLayer->setRenderer(openSpacesUniqueValueRenderer);// Set the layer opacity to semi-transparent.featureLayer->setOpacity(0.25f);} -
Update
setupViewpoint()method to call the newly addedaddOpenSpaceLayer()method.Display_a_map.cppvoid Display_a_map::setupViewpoint(){const Point center(-118.80543, 34.02700, SpatialReference::wgs84());const Viewpoint viewpoint(center, 100000.0);m_mapView->setViewpointAsync(viewpoint);addOpenSpaceLayer();
Add a layer with a class breaks renderer
Create a method to apply a different symbol for each of the five ranges of elevation gain to the Trails feature layer.
-
Staying within the Display_a_map.cpp file, add include statements to access the classes that will be used.
Display_a_map.cpp#include "SymbolTypes.h"#include "UniqueValue.h"#include <QUrl>#include "SimpleFillSymbol.h"#include "UniqueValueRenderer.h"#include "SimpleLineSymbol.h"#include <QList>#include "ClassBreaksRenderer.h" -
Add a global QUrl variable for the trails feature service.
Display_a_map.cppMapQuickView* Display_a_map::mapView() const{return m_mapView;}QUrl trailsQUrl("https://services3.arcgis.com/GVgbJbqm8hXASVYi/arcgis/rest/services/Trails/FeatureServer/0"); -
Add a new method named
addTrailsLayer().A
ClassBreakassigns a symbol to a range of values.For this example, the renderer uses each feature’s
ELEV_GAINattribute value to classify it into a defined range (class break) and apply the corresponding symbol.Display_a_map.cppvoid Display_a_map::addTrailsLayer(){FeatureLayer* featureLayer = addFeatureLayer(trailsQUrl);// Create five line symbols to display class breaks.SimpleLineSymbol* firstClassSymbol = new SimpleLineSymbol(SimpleLineSymbolStyle::Solid, QColor("purple"), 3, this);SimpleLineSymbol* secondClassSymbol = new SimpleLineSymbol(SimpleLineSymbolStyle::Solid, QColor("purple"), 4, this);SimpleLineSymbol* thirdClassSymbol = new SimpleLineSymbol(SimpleLineSymbolStyle::Solid, QColor("purple"), 5, this);SimpleLineSymbol* fourthClassSymbol = new SimpleLineSymbol(SimpleLineSymbolStyle::Solid, QColor("purple"), 6, this);SimpleLineSymbol* fifthClassSymbol = new SimpleLineSymbol(SimpleLineSymbolStyle::Solid, QColor("purple"), 7, this);// Create five class breaks.ClassBreak* firstClassBreak = new ClassBreak("Under 500", "0 - 500", 0.0, 500.0, firstClassSymbol, this);ClassBreak* secondClassBreak = new ClassBreak("501 to 1000", "501 - 1000", 501.0, 1000.0, secondClassSymbol, this);ClassBreak* thirdClassBreak = new ClassBreak("1001 to 1500", "1001 - 1500", 1001.0, 1500.0, thirdClassSymbol, this);ClassBreak* fourthClassBreak = new ClassBreak("1501 to 2000", "1501 - 2000", 1501.0, 2000.0, fourthClassSymbol, this);ClassBreak* fifthClassBreak = new ClassBreak("2001 to 2300", "2001 to 2300", 2001.0, 2300.0, fifthClassSymbol, this);QList<ClassBreak*> elevationBreaks = {firstClassBreak, secondClassBreak, thirdClassBreak, fourthClassBreak, fifthClassBreak};// Create and assign a class breaks renderer to the feature layer.ClassBreaksRenderer* elevationClassBreaksRenderer = new ClassBreaksRenderer("ELEV_GAIN", elevationBreaks, this);featureLayer->setRenderer(elevationClassBreaksRenderer);// Set the layer opacity to semi-transparent.featureLayer->setOpacity(0.75);} -
Again update the
setupViewpoint()method to call the newly addedaddTrailsLayer()method.Display_a_map.cppvoid Display_a_map::setupViewpoint(){const Point center(-118.80543, 34.02700, SpatialReference::wgs84());const Viewpoint viewpoint(center, 100000.0);m_mapView->setViewpointAsync(viewpoint);addOpenSpaceLayer();addTrailsLayer();
Add layers that leverage definition expressions
You can use a definition expression to define a subset of features to display. Features that do not meet the expression criteria are not displayed by the layer. In the following steps, you will create two methods that use a definition expression to apply a symbol to a subset of features in the Trails feature layer.
FeatureLayer::definitionExpression() uses a SQL expression to limit the features available for query and display. Your code will create two layers that each display a different subset of trails based on the value for the USE_BIKE field. Trails that allow bikes will be symbolized with a blue symbol ("USE_BIKE = 'Yes'") and those that don’t will be red ("USE_BIKE = 'No'"). Another way to symbolize these features would be to create a UniqueValueRenderer that applies a different symbol for these values.
-
Staying within the Display_a_map.cpp file, add the include statement to access the additional class that will be used.
Display_a_map.cpp#include "SymbolTypes.h"#include "UniqueValue.h"#include <QUrl>#include "SimpleFillSymbol.h"#include "UniqueValueRenderer.h"#include "SimpleLineSymbol.h"#include <QList>#include "ClassBreaksRenderer.h"#include "SimpleRenderer.h" -
Add a method named
addBikeOnlyTrailsLayer()that contains a definition expression to filter for trails that permit bikes.Display_a_map.cppvoid Display_a_map::addBikeOnlyTrailsLayer(){// Create a trails feature layer and add it to the map view.FeatureLayer* featureLayer = addFeatureLayer(trailsQUrl);// Write a definition expression to filter for trails that permit the use of bikes.featureLayer->setDefinitionExpression("USE_BIKE = 'Yes'");// Create and assign a simple renderer to the feature layer.SimpleLineSymbol* bikeTrailSymbol = new SimpleLineSymbol(SimpleLineSymbolStyle::Dot, QColor("blue"), 2, this);SimpleRenderer* bikeTrailRenderer = new SimpleRenderer(bikeTrailSymbol, this);featureLayer->setRenderer(bikeTrailRenderer);} -
Add another method named
addNoBikeTrailsLayer()with a definition expression to filter for trails that don’t allow bikes.Display_a_map.cppvoid Display_a_map::addNoBikeTrailsLayer(){// Create a trails feature layer and add it to the map view.FeatureLayer* featureLayer = addFeatureLayer(trailsQUrl);// Write a definition expression to filter for trails that don't permit the use of bikes.featureLayer->setDefinitionExpression("USE_BIKE = 'No'");// Create and assign a simple renderer to the feature layer.SimpleLineSymbol* noBikeTrailSymbol = new SimpleLineSymbol(SimpleLineSymbolStyle::Dot, QColor("red"), 2, this);SimpleRenderer* noBikeTrailRenderer = new SimpleRenderer(noBikeTrailSymbol, this);featureLayer->setRenderer(noBikeTrailRenderer);} -
Again update the
setupViewpoint()method to call the newly addedaddBikeOnlyTrailsLayer()andaddNoBikeTrailsLayer()methods.Display_a_map.cppvoid Display_a_map::setupViewpoint(){const Point center(-118.80543, 34.02700, SpatialReference::wgs84());const Viewpoint viewpoint(center, 100000.0);m_mapView->setViewpointAsync(viewpoint);addOpenSpaceLayer();addTrailsLayer();addBikeOnlyTrailsLayer();addNoBikeTrailsLayer();
Symbolize a layer with a picture symbol and label features with an attribute
Create a method to style trailheads with hiker images and labels for the Trailheads feature layer.
-
Staying within the Display_a_map.cpp file, add the include statement to access the additional classes that will be used.
Display_a_map.cpp#include "SimpleLineSymbol.h"#include <QList>#include "ClassBreaksRenderer.h"#include "SimpleRenderer.h"#include "LabelDefinition.h"#include "TextSymbol.h"#include "ArcadeLabelExpression.h"#include "LabelDefinitionListModel.h"#include "PictureMarkerSymbol.h" -
Create a helper method named
makeLabelDefinition()to define a label definition based on the trail name attribute (TRL_NAME). Also define the label placement and symbol.Display_a_map.cppLabelDefinition* Display_a_map::makeLabelDefinition(){// Create a new text symbol.TextSymbol* labelTextSymbol = new TextSymbol(this);labelTextSymbol->setColor(QColor("white"));labelTextSymbol->setSize(12.0);labelTextSymbol->setHaloColor (QColor("black"));labelTextSymbol->setHaloWidth(2.0);labelTextSymbol->setFontFamily("Arial");labelTextSymbol->setFontStyle(FontStyle::Italic);labelTextSymbol->setFontWeight(FontWeight::Normal);// Create a new Arcade label expression based on the field name: 'TRL_NAME'.ArcadeLabelExpression* labelExpression = new ArcadeLabelExpression("$feature.TRL_NAME", this);// Create and return the label definition.return new LabelDefinition(labelExpression, labelTextSymbol, this);} -
Add another method named
addTrailheadsLayer()that will define a variable to store a feature service URL accessing trailheads. Then use aPictureMarkerSymbolto draw trailhead hiker images, and use theLabelDefinitioncreated above to label each trailhead by its name.Display_a_map.cppvoid Display_a_map::addTrailheadsLayer(){// Create a ServiceFeatureTable from the URL, create a FeatureLayer, and add that to the map's operational layers.QUrl trailheadsQUrl("https://services3.arcgis.com/GVgbJbqm8hXASVYi/arcgis/rest/services/Trailheads/FeatureServer/0");FeatureLayer* featureLayer = addFeatureLayer(trailheadsQUrl);// Create a new picture marker symbol that uses the trailhead image.QUrl trailheadImageQUrl("https://static.arcgis.com/images/Symbols/NPS/npsPictograph_0231b.png");PictureMarkerSymbol* pictureMarkerSymbol = new PictureMarkerSymbol(trailheadImageQUrl, this);pictureMarkerSymbol->setHeight(18.0);pictureMarkerSymbol->setWidth(18.0);// Create a new simple renderer based on the picture marker symbol.SimpleRenderer* simpleRenderer = new SimpleRenderer(pictureMarkerSymbol, this);// Set the feature layer's renderer and enable labels.featureLayer->setRenderer(simpleRenderer);featureLayer->setLabelsEnabled(true);// Create the label definition.LabelDefinition* trailHeadsDefinition = makeLabelDefinition();// Add the label definition to the layer's label definition collection.featureLayer->labelDefinitions()->append(trailHeadsDefinition);} -
Finally, update the
setupViewpoint()method once more to call the newly addedaddTrailheadsLayer()method.Display_a_map.cppvoid Display_a_map::setupViewpoint(){const Point center(-118.80543, 34.02700, SpatialReference::wgs84());const Viewpoint viewpoint(center, 100000.0);m_mapView->setViewpointAsync(viewpoint);addOpenSpaceLayer();addTrailsLayer();addBikeOnlyTrailsLayer();addNoBikeTrailsLayer();addTrailheadsLayer();
Set developer credentials
For the final steps of this tutorial, click the tab below that corresponds to the authentication type (API key authentication or User authentication) that you chose when you completed the Display a map tutorial.
Be sure to also provide the same authentication (API key or user authentication Client ID/Redirect URL) that you used for the Display a map tutorial.
Set the API Key
-
In the project Sources folder of Qt Creator, open the main.cpp file.
-
Modify the code to set the
accessTokenusing your API key access token (highlighted in yellow).main.cpp// The following methods grant an access token:// 1. User authentication: Grants a temporary access token associated with a user's ArcGIS account.// To generate a token, a user logs in to the app with an ArcGIS account that is part of an// organization in ArcGIS Online or ArcGIS Enterprise.// 2. API key authentication: Get a long-lived access token that gives your application access to// ArcGIS location services. Go to the tutorial at https://links.esri.com/create-an-api-key.// Copy the API Key access token.const QString accessToken = QString("");if (accessToken.isEmpty()){qWarning() << "Use of ArcGIS location services, such as the basemap styles service, requires" <<"you to authenticate with an ArcGIS account or set the API Key property.";}else{ArcGISRuntimeEnvironment::setApiKey(accessToken);} -
Save the main.cpp file.
Best Practice: The access token is stored directly in the code as a convenience for this tutorial. Do not store credentials directly in source code in a production environment.
Set path to the Qt Toolkit in the project
In the project Sources folder of Qt Creator, open the Display_a_map.pro file and locate the following lines and update PATH_TO_TOOLKIT variable with the path of the toolkitcpp.pri file (highlighted in yellow) or the OAuth dialog will not appear to enter your user credentials. Then save the file.
ARCGIS_RUNTIME_VERSION = 300.0.0include($$PWD/arcgisruntime.pri)
# TODO: You need to replace the <path_to_toolkit_repo> with a valid location where the Qt Toolkit# resides on your system, example: C:/arcgis-maps-sdk-toolkit-qt/uitools/toolkitcpp/toolkitcpp.pri# This block determines whether you've cloned your toolkitPATH_TO_TOOLKIT = "<path_to_toolkit_repo>/uitools/toolkitcpp/toolkitcpp.pri"
exists($${PATH_TO_TOOLKIT}) {  message("Toolkit found")  DEFINES += TOOLKIT_FOUND
  # include the toolkitcpp.pri, which contains all the toolkit resources  include($${PATH_TO_TOOLKIT})
  qtHaveModule(webenginequick) {    QT += webenginequick  }} else {  message("Toolkit not found in provided path. Either set PATH_TO_TOOLKIT or use an API Key")}
Set developer credentials in the solution
In the project Sources folder of Qt Creator, open the Display_a_map.cpp file.
Set your values for the REDIRECT_URL and the CLIENT_ID strings (highlighted in yellow). Then save the file.
{
#ifdef TOOLKIT_FOUND
    // Define the Redirect URL string obtained when creating the OAuth credentials.    // TODO: You need to replace the "REDIRECT_URL" with your own valid string,    // ex: "urn:ietf:wg:oauth:2.0:oob"    const auto qStringRedirectUrl = QString{"REDIRECT_URL"};
    // Define the URL of the portal to authenticate with.    const QUrl qUrlPortal = QUrl{"https://www.arcgis.com/"};
    // Define a unique identifier associated with an application registered with the    // portal that assists with client/server OAuth authentication.    // TODO: You need to replace the "CLIENT_ID" with your own valid string.    const QString qStringClientId = QString{"CLIENT_ID"};
    // Create a new OAuth user configuration using: the Url to mapping web service, the Client ID    // string, and the Redirect Url string.    auto* oAuthUserConfiguration = new OAuthUserConfiguration(qUrlPortal, qStringClientId,                                                              qStringRedirectUrl, this);
    // Call the Toolkit's OAuthUserConfigurationManager static `addConfiguration`    // method to use the OAuth dialog. This will tell the Authenticator to use OAuth for the provided configuration.    Toolkit::OAuthUserConfigurationManager::addConfiguration(oAuthUserConfiguration);#endif // TOOLKIT_FOUND
Press Ctrl + R to run the app.
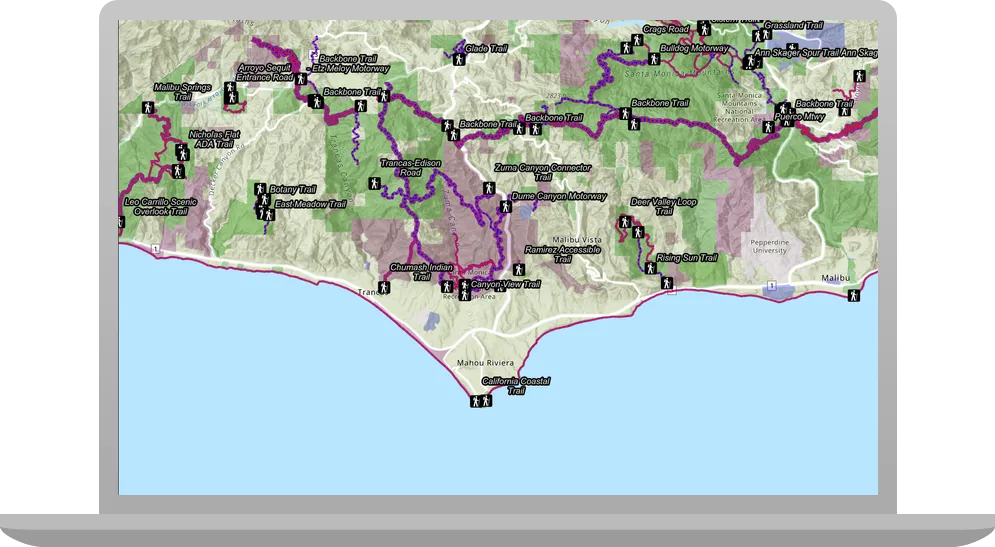
When the app opens, Trails feature layer is added to the map. The map draws a hiker icon for trails and displays the trail’s name.
Alternatively, you can download the tutorial solution, as follows.
Option 2: Download the solution
-
Click the
Download solutionlink underSolutionand unzip the file to a location on your machine. -
Open the .pro project file in Qt Creator.
Since the downloaded solution does not contain authentication credentials, you must set up authentication to create the developer credentials and add them to the project.
For the final steps of this tutorial, click the tab below that corresponds to the authentication type (API key authentication or User authentication) that you chose when you completed the Display a map tutorial.
Be sure to also provide the same authentication (API key or user authentication Client ID/Redirect URL) that you used for the Display a map tutorial.
Set developer credentials in the solution
Set the API Key
-
In the project Sources folder of Qt Creator, open the main.cpp file.
-
Modify the code to set the
accessTokenusing your API key access token (highlighted in yellow).main.cpp// The following methods grant an access token:// 1. User authentication: Grants a temporary access token associated with a user's ArcGIS account.// To generate a token, a user logs in to the app with an ArcGIS account that is part of an// organization in ArcGIS Online or ArcGIS Enterprise.// 2. API key authentication: Get a long-lived access token that gives your application access to// ArcGIS location services. Go to the tutorial at https://links.esri.com/create-an-api-key.// Copy the API Key access token.const QString accessToken = QString("");if (accessToken.isEmpty()){qWarning() << "Use of ArcGIS location services, such as the basemap styles service, requires" <<"you to authenticate with an ArcGIS account or set the API Key property.";}else{ArcGISRuntimeEnvironment::setApiKey(accessToken);} -
Save main.cpp file.
Best Practice: The access token is stored directly in the code as a convenience for this tutorial. Do not store credentials directly in source code in a production environment.
Set path to the Qt Toolkit in the project
In the project Sources folder of Qt Creator, open the Display_a_map.pro file and locate the following lines and update PATH_TO_TOOLKIT variable with the path of the toolkitcpp.pri file (highlighted in yellow) or the OAuth dialog will not appear to enter your user credentials. Then save the file.
ARCGIS_RUNTIME_VERSION = 300.0.0include($$PWD/arcgisruntime.pri)
# TODO: You need to replace the <path_to_toolkit_repo> with a valid location where the Qt Toolkit# resides on your system, example: C:/arcgis-maps-sdk-toolkit-qt/uitools/toolkitcpp/toolkitcpp.pri# This block determines whether you've cloned your toolkitPATH_TO_TOOLKIT = "<path_to_toolkit_repo>/uitools/toolkitcpp/toolkitcpp.pri"
exists($${PATH_TO_TOOLKIT}) {  message("Toolkit found")  DEFINES += TOOLKIT_FOUND
  # include the toolkitcpp.pri, which contains all the toolkit resources  include($${PATH_TO_TOOLKIT})
  qtHaveModule(webenginequick) {    QT += webenginequick  }} else {  message("Toolkit not found in provided path. Either set PATH_TO_TOOLKIT or use an API Key")}
Set developer credentials in the solution
-
In the project Sources folder of Qt Creator, open the Display_a_map.cpp file.
-
Set your values for the REDIRECT_URL and the CLIENT_ID strings (highlighted in yellow). Then save the file.
{
#ifdef TOOLKIT_FOUND
    // Define the Redirect URL string obtained when creating the OAuth credentials.    // TODO: You need to replace the "REDIRECT_URL" with your own valid string,    // ex: "urn:ietf:wg:oauth:2.0:oob"    const auto qStringRedirectUrl = QString{"REDIRECT_URL"};
    // Define the URL of the portal to authenticate with.    const QUrl qUrlPortal = QUrl{"https://www.arcgis.com/"};
    // Define a unique identifier associated with an application registered with the    // portal that assists with client/server OAuth authentication.    // TODO: You need to replace the "CLIENT_ID" with your own valid string.    const QString qStringClientId = QString{"CLIENT_ID"};
    // Create a new OAuth user configuration using: the Url to mapping web service, the Client ID    // string, and the Redirect Url string.    auto* oAuthUserConfiguration = new OAuthUserConfiguration(qUrlPortal, qStringClientId,                                                              qStringRedirectUrl, this);
    // Call the Toolkit's OAuthUserConfigurationManager static `addConfiguration`    // method to use the OAuth dialog. This will tell the Authenticator to use OAuth for the provided configuration.    Toolkit::OAuthUserConfigurationManager::addConfiguration(oAuthUserConfiguration);#endif // TOOLKIT_FOUND
Run the solution
Press Ctrl + R to run the app.
When the app opens, Trails feature layer is added to the map. The map draws a hiker icon for trails and displays the trail’s name.
Learn how to use additional API features, ArcGIS location services, and ArcGIS tools in these tutorials: