Learn how to create and display a map
A web map
In this tutorial, you use a web map
Prerequisites
Before starting this tutorial:
-
You need an ArcGIS Location Platform or ArcGIS Online account.
-
Your system meets the system requirements.
-
The ArcGIS Maps SDK for Qt, version 300.0.0 or later is installed.
-
The Qt 6.8.2 software development framework or later is installed.
Develop or Download
You have two options for completing this tutorial:
Option 1: Develop the code
To start the tutorial, complete the Display a map tutorial. This creates a map to display the Santa Monica Mountains in California using the topographic basemap from the ArcGIS Basemap Styles service
Open a Qt Creator project
- Open the project you created by completing the Display a map tutorial.
- Continue with the following instructions to display a map from a web map stored in ArcGIS.
Get the web map item ID
You can use ArcGIS tools
- Go to the LA Trails and Parks web map
in the Map Viewer in ArcGIS Online
ArcGIS Online is a GIS mapping, analytics, data hosting, and content management software as a service (SaaS) product. It includes applications, tools, APIs, and location services for users and developers. It is subscription-based and requires an ArcGIS Online account. . This web map displays trails, trailheads and parks in the Santa Monica Mountains. - Make a note of the item ID at the end of the browser's URL. The item ID should be
41281c51f9de45edaf1c8ed44bb10e30
Initialize the map using a web map
-
In the project Sources folder of Qt Creator, open the Display_a_map.cpp file.
-
Remove the five classes shown. These are not needed when displaying a web map.
Display_a_map.cppUse dark colors for code blocks #include "Display_a_map.h" #include "Map.h" #include "MapTypes.h" #include "MapQuickView.h" #include "Point.h" #include "Viewpoint.h" #include "SpatialReference.h" #include <QFuture> -
Remove the comma after
Qand then modify the constructor to remove initialization withObject(parent) Basemapand theStyle Map.Display_a_map.cppUse dark colors for code blocks Display_a_map::Display_a_map(QObject* parent /* = nullptr */): QObject(parent), m_map(new Map(BasemapStyle::ArcGISTopographic, this)) -
In the
setupmethod, replace the all of the existing code withing the curly brackets with the following. This code creates aViewpoint() QnamedString itemand sets it to the item ID_id An item ID is a unique identifier representing a single item stored, managed, and accessed in a portal, such as a web map, hosted layer, or file. for the LA Trails and Parks web map. It appends the item ID to the ArcGIS Online base URL and stores it in aQ. The new code creates aUrl Mapfrom the web map configuration specified by the item ID.Display_a_map.cppUse dark colors for code blocks MapQuickView* Display_a_map::mapView() const { return m_mapView; } void Display_a_map::setupViewpoint() { const QString item_id("41281c51f9de45edaf1c8ed44bb10e30"); const QUrl portal_url(QString("https://arcgis.com/sharing/rest/content/items/" + item_id)); m_map = new Map(portal_url, this); m_mapView->setMap(m_map); }
Set developer credentials
For the final steps of this tutorial, click the tab below that corresponds to the authentication type (API key authentication or User authentication) that you chose when you completed the Display a map tutorial.
Be sure to also provide the same authentication (API key or user authentication Client ID/Redirect URL) that you used for the Display a map tutorial.
Set the API Key
-
In the project Sources folder of Qt Creator, open the main.cpp file.
-
Modify the code to set the
accessusing your API key access token (highlighted in yellow).Token main.cppUse dark colors for code blocks // The following methods grant an access token: // 1. User authentication: Grants a temporary access token associated with a user's ArcGIS account. // To generate a token, a user logs in to the app with an ArcGIS account that is part of an // organization in ArcGIS Online or ArcGIS Enterprise. // 2. API key authentication: Get a long-lived access token that gives your application access to // ArcGIS location services. Go to the tutorial at https://links.esri.com/create-an-api-key. // Copy the API Key access token. const QString accessToken = QString(""); if (accessToken.isEmpty()) { qWarning() << "Use of ArcGIS location services, such as the basemap styles service, requires" << "you to authenticate with an ArcGIS account or set the API Key property."; } else { ArcGISRuntimeEnvironment::setApiKey(accessToken); } -
Save the main.cpp file.
Best Practice: The access token is stored directly in the code as a convenience for this tutorial. Do not store credentials directly in source code in a production environment.
Press Ctrl + R to run the app.
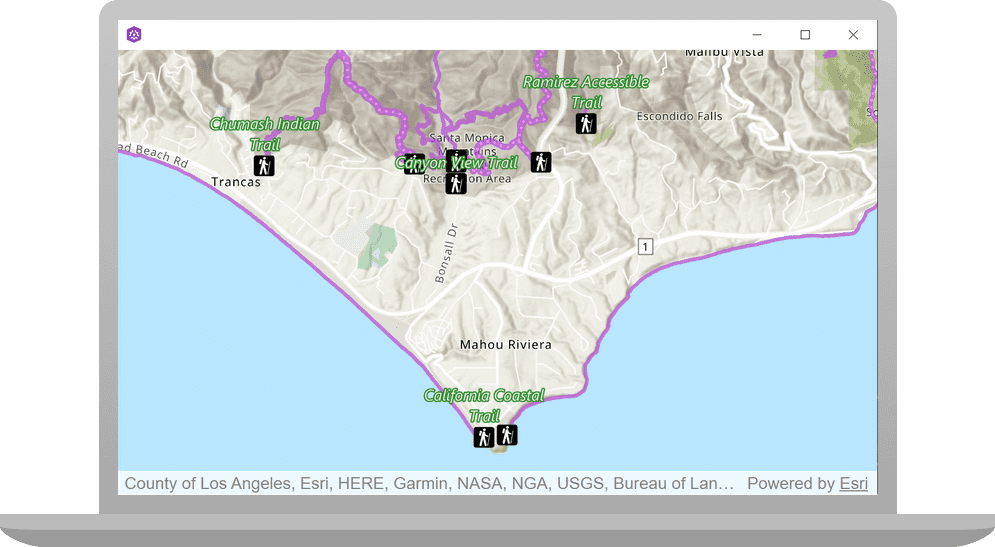
You will see a map of trails, trailheads and parks in the Santa Monica Mountains. Click, drag, and scroll the mouse wheel on the map view to explore the map.
Alternatively, you can download the tutorial solution, as follows.
Option 2: Download the solution
-
Click the
Download solutionlink underSolutionand unzip the file to a location on your machine. -
Open the .pro project file in Qt Creator.
Since the downloaded solution does not contain authentication credentials, you must set up authentication to create the developer credentials and add them to the project.
For the final steps of this tutorial, click the tab below that corresponds to the authentication type (API key authentication or User authentication) that you chose when you completed the Display a map tutorial.
Be sure to also provide the same authentication (API key or user authentication Client ID/Redirect URL) that you used for the Display a map tutorial.
Set developer credentials in the solution
Set the API Key
-
In the project Sources folder of Qt Creator, open the main.cpp file.
-
Modify the code to set the
accessusing your API key access token (highlighted in yellow).Token main.cppUse dark colors for code blocks // The following methods grant an access token: // 1. User authentication: Grants a temporary access token associated with a user's ArcGIS account. // To generate a token, a user logs in to the app with an ArcGIS account that is part of an // organization in ArcGIS Online or ArcGIS Enterprise. // 2. API key authentication: Get a long-lived access token that gives your application access to // ArcGIS location services. Go to the tutorial at https://links.esri.com/create-an-api-key. // Copy the API Key access token. const QString accessToken = QString(""); if (accessToken.isEmpty()) { qWarning() << "Use of ArcGIS location services, such as the basemap styles service, requires" << "you to authenticate with an ArcGIS account or set the API Key property."; } else { ArcGISRuntimeEnvironment::setApiKey(accessToken); } -
Save main.cpp file.
Best Practice: The access token is stored directly in the code as a convenience for this tutorial. Do not store credentials directly in source code in a production environment.
Run the solution
Press Ctrl + R to run the app.
You will see a map of trails, trailheads and parks in the Santa Monica Mountains. Click, drag, and scroll the mouse wheel on the map view to explore the map.
What's next?
Learn how to use additional API features, ArcGIS location services, and ArcGIS tools in these tutorials: